
Popular categories
Looking for a yarn?


|
|
Summer Berries |
|
 |
 |
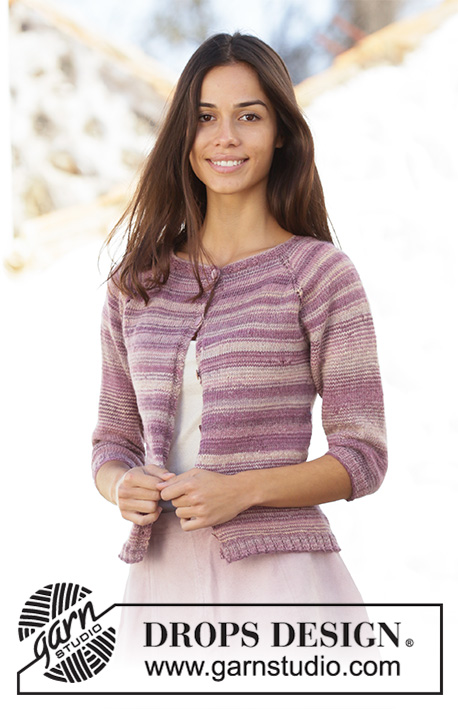
Knitted jumper in DROPS Delight. Piece is knitted top down with raglan, ¾ sleeves and A-shape. Size: S - XXXL
DROPS 201-13 |
|
|
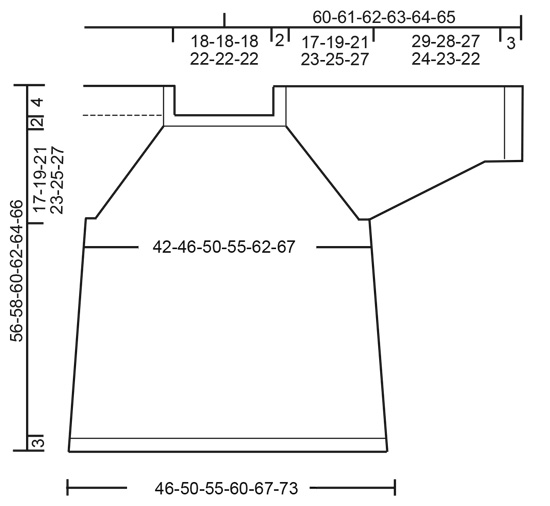
---------------------------------------------------------- EXPLANATION FOR THE PATTERN: ---------------------------------------------------------- STRIPES: To make more stripes on garment work alternately 1 strand from 2 different balls, adjust so that balls start with different colours. * Work 2 rounds with the first ball, work 2 rounds with the other ball (do not tighten yarn when pulling it upwards) *, work from *-*. This way the colour are mixed more and will produce more narrow stripes. INCREASE TIP-1 (evenly): To calculate how to increase evenly, use the total number of stitches on round (e.g. 116 stitches) and divide stitches by number of increases to be done (e.g. 8) = 14.5. In this example increase after alternately approx. every 14th and 15th stitch. Increase 1 stitch by making 1 yarn over, on next round work yarn over twisted to avoid holes. INCREASE TIP-2 (applies to sides of body): Begin 1 stitch before marker, make 1 yarn over, knit 1, 1 yarn over (= 2 stitches increased). Repeat at both markers. On next round knit yarn overs twisted to avoid holes. RAGLAN: Increase for raglan in every transition between sleeves and body. Work the increased stitches in stocking stitch. INCREASE AS FOLLOWS WHEN INCREASING 2 STITCHES ON EACH SIDE OF STITCH WITH MARKER THREAD: Begin before stitch with marker thread, pick up loop before stitch and knit loop twisted, make 1 yarn over, knit 1 (= stitch with marker thread), make 1 yarn over, pick up loop before next stitch and knit loop twisted (= 4 stitches increased). On next round knit the yarn overs to make holes. INCREASE AS FOLLOWS WHEN INCREASING 1 STITCH ON EACH SIDE OF STITCH WITH MARKER THREAD: Begin before stitch with marker thread, make 1 yarn over, knit 1 (= stitch with marker thread), make 1 yarn over (= 2 stitches increased). On next round purl yarn overs to make holes. KNITTING TIP: When increasing for raglan on every 4th round, the holes in raglan line will be further apart than when increasing on every other round. To avoid this work holes on the rounds without increase as follows: Begin 2 stitches before stitch with marker thread, knit 2 together, make 1 yarn over, knit 1 (= stitch with marker thread), make 1 yarn over, slip 1 stitch knitwise, knit 1, pass slipped stitch over stitch worked. On next round knit the yarn overs to make holes. DECREASE TIP (applies to mid under sleeves): Begin 2 stitches before stitch with marker, knit 2 twisted together, knit 1 (stitch with marker), knit 2 together (= 2 stitches decreased). ---------------------------------------------------------- START THE PIECE HERE: ---------------------------------------------------------- JUMPER - SHORT OVERVIEW OF THE PIECE: Worked in the round on circular needle from top down. Work sleeves in the round on double pointed needles. Work entire piece in STRIPES - see explanation above. YOKE: Cast on 116-116-116-136-136-136 stitches on circular needle size 2.5 mm with Delight. Work rib with knit 2/purl 2 - read STRIPES. When piece measures 1.5 cm, work 1 round from right side while increasing 8 stitches evenly in all sizes – read INCREASE TIP! = 124-124-124-144-144-144 stitches. Knit 1 round. Switch to circular needle size 3 mm. Insert 4 marker threads in piece (without working the stitches): Insert first marker thread in 21st-21st-21st-26th-26th-26th stitch, insert second marker thread in 42nd-42nd-42nd-47th-47th-47th stitch, insert third marker thread in 83rd-83rd-83rd-98th-98th-98th stitch and insert fourth marker thread in 104th-104th-104th-119th-119th-119th stitch. There are now 40-40-40-50-50-50 stitches between stitches with marker thread on front piece and back piece and 20 stitches in all sizes on each sleeve. REMEMBER THE KNITTING TENSION! Work stocking stitch over the first 20-20-20-25-25-25 stitches (= half back piece), increase 2 stitches on each side of stitch with marker thread for RAGLAN – see explanation above, work stocking stitch over the next 20 stitches (= sleeve), increase 2 stitches on each side of stitch with marker thread, work stocking stitch over the 40-40-40-50-50-50 stitches (= front piece), increase 2 stitches on each side of stitch with marker thread, work stocking stitch over the 20 stitches (= sleeve), increase 2 stitches on each side of stitch with marker thread, work stocking stitch over the next 20-20-20-25-25-25 stitches (= half back piece). Continue in stocking stitch and increase for raglan in every transition between body and sleeves as follows: Increase 2 stitches on each side of stitch with marker on every other round 6-6-6-8-8-10 times in total (first increase is already done). Then increase 1 stitch on each side of stitch with marker on every other round 8-8-8-9-9-10 times in total. When increases have been done 14-14-14-17-17-20 times in total there are 284-284-284-344-344-384 stitches on round. Continue increase for raglan and increase 1 stitch on each side of stitches with marker threads every other round 0-7-12-4-13-12 times in total and then every 4th round 6-4-3-7-4-5 times in total – READ KNITTING TIP. After last increase for raglan there are 332-372-404-432-480-520 stitches on round and piece measures approx. 19-21-23-25-27-29 cm from cast-on edge. Work next round as follows: Work the first 47-52-56-62-68-73 stitches (= half back piece), slip the next 72-82-90-92-104-114 stitches on 1 stitch holder for sleeve, cast on 7-7-9-9-13-15 new stitches on round (= in the side under sleeve), work the next 94-104-112-124-136-146 stitches as before (= back piece), slip the next 72-82-90-92-104-114 stitches on 1 stitch holder for sleeve, cast on 7-7-9-9-13-15 new stitches on round (= in the side under sleeve) and work the last 47-52-56-62-68-73 stitches. Finish body and sleeves separately. Remove the marker threads in piece. NOW MEASURE PIECE FROM HERE! BODY: = 202-222-242-266-298-322 stitches. Insert 1 marker thread in the middle of the 7-7-9-9-13-15 stitches cast on under each sleeve and move the marker threads upwards when working. Continue in the round in stocking stitch. When piece measures 3 cm, increase 2 stitches in each side - READ INCREASE TIP-2 (= 4 stitches increased). Increase like this every 6-6-6-5-5-4 cm 5-5-5-6-6-7 times in total = 222-242-262-290-322-350 stitches. When piece measures 34 cm, increase 6 stitches evenly on round = 228-248-268-296-328-356 stitches. Switch to circular needle size 2.5 mm and work rib knit 2 and purl 2 until rib measures 3 cm. Switch back to circular needle size 3 mm and cast off by knitting. Jumper measures approx. 56-58-60-62-64-66 cm from shoulder and down. SLEEVE: Slip the 72-82-90-92-104-114 stitches from stitch holder in one side of piece on double pointed needles size 3 mm and pick in addition up 1 new stitch in each of the 7-7-9-9-13-15 stitches cast on under sleeve = 79-89-99-101-117-129 stitches on round. Work in stocking stitch in the round. Insert a marker in the middle stitch under sleeve. When piece measures 3 cm in all sizes, decrease 1 stitch on each side of marker - read DECREASE TIP. Decrease 9-13-17-17-23-28 times in total in S: On every 10th round, in M: On every 6th round, in L and XL: On every 4th round, in XXL: On every round 4 times in total and then every 3rd round 19 times in total and in XXXL: On every round 8 times in total and then every other round 20 times in total = 61-63-65-67-71-73 stitches. Work until sleeve measures 29-28-27-24-23-22 cm from division. Knit 1 round while decreasing 5-3-1-3-3-1 stitch evenly = 56-60-64-64-68-72 stitches. Switch to double pointed needles size 2.5 mm and work rib with knit 2/purl 2 for 3 cm. Switch back to double pointed needles size 3 mm and cast off by knitting. Work the other sleeve the same way. |
|
|
|
|
Have you made this or any other of our designs? Tag your pictures in social media with #dropsdesign so we can see them! Do you need help with this pattern?You'll find tutorial videos, a Comments/Questions area and more by visiting the pattern on garnstudio.com. © 1982-2024 DROPS Design A/S. We reserve all rights. This document, including all its sub-sections, has copyrights. Read more about what you can do with our patterns at the bottom of each pattern on our site. |
|


With over 40 years in knitting and crochet design, DROPS Design offers one of the most extensive collections of free patterns on the internet - translated to 17 languages. As of today we count 304 catalogues and 11422 patterns - 11422 of which are translated into English (UK/cm).
We work hard to bring you the best knitting and crochet have to offer, inspiration and advice as well as great quality yarns at incredible prices! Would you like to use our patterns for other than personal use? You can read what you are allowed to do in the Copyright text at the bottom of all our patterns. Happy crafting!
Comments / Questions (24)
Body: “ “Increase like this every 6 stitches 5 times in total.” Is this supposed to read increase like this every six rows?
28.11.2022 - 23:58DROPS Design answered:
Dear Mrs Reid, on body you increase 4 sts (2 sts on each side), a total of 5 times (size S + M) on every 6th cm, ie when piece measures 3 cm + 9 cm + 15 cm + 21 cm + 27 cm + 33 cm. Happy knitting!
29.11.2022 - 10:11After the 7th repeat, 340 stitches are on the needle. Next are four rounds repeated four times. Refer to Knitting Tip: Can you please clarify this? “To avoid this work holes on the rounds without increase as follows:” I need to know which of the three rounds rounds without increase the paragraph applies to. Round 1 - Round 2 Round 3 Round 4
25.11.2022 - 01:39DROPS Design answered:
Dear Mrs Reid, this apply when you are increasing on every 4th round, ie after the last increase round, work 1 round as before then work this round (= making holes without increasing), work 1 round without increasing and increase on next round (as before, making holes). Happy knitting!
25.11.2022 - 08:44Instructions for placement of markers at 124 stitches at yoke say place at 21st st,. 42nd st,. 83rd st., and 104 st. This means there are 21 sts between each sleeve, and 41 sts. between back and front. Yet the pattern says there should be 20 sts between sleeves and 40 sts. back and front., which adds up to 120, not 124. Can you clarify? 21 21 41 41 124
11.11.2022 - 00:39DROPS Design answered:
Hi Carol, You count 20 stitches and insert the marker in the next stitch (stitch-21), count 20 stitches and insert the marker in the next stitch (stitch-42), count 40 stitches and insert the marker in the next stitch (stitch-83) etc. There will be 20 stitches between each marker stitch on the sleeves and 40 stitches on the back and front pieces, plus 4 marker stitches which is a total of 124 stitches. Happy knitting!
11.11.2022 - 06:47Raglan increases for size M, starting with 116 sts., are given as 8 sts 6 times, 4 sts 8 times for a total of 284 sts. but my math for this produces 196 sts not 284. What am I missing? 1. 116+8=124 2. 124+8=132 3. 132+8=140 4. 140+8=148 5. 148+8=156 6. 156+8=164 7. 164+4=168 8. 168+4=172 9. 172+4=176 10. 176+4=180 11. 180+4=184 12. 184+4=188 13. 188+4=192 14. 192+4=196
09.11.2022 - 23:57DROPS Design answered:
Hi Carol, You cast on 116 stitches, then increase 8 stitches evenly spaced after 1.5 cm = 124 stitches. Then you start to increase for raglan: first increase 2 stitches on each side of each marker (16, not 8 stitches increased each time) x 6 = 96 increases, then 1 stitch on each side of each marker (8 stitches not 4 on each increase round) = 64 stitches. This gives you a total of 284 stitches when all the increases are finished. Happy knitting!
10.11.2022 - 07:13After the yoke cast on, instructions say “ When piece measures 1.5 cm, work 1 round from right side while increasing 8 stitches evenly in all sizes – read INCREASE TIP! = 124 stitches.” What is not clear is if this is still done in K2P2 ribbing. If no, then the initial neck ribbing seems very shallow at 1.5 cm
09.11.2022 - 20:59DROPS Design answered:
Hi Carol, The ribbing around the neck is quite narrow in this pattern, but can be adjusted if you wish. The increases are worked on a knitted round when the ribbing is finished. Happy knitting!
10.11.2022 - 07:16Byłoby świetnie gdyby Forum miał opcję tłumaczenia klikam tłumacz pod każdym zapytaniem lub odpowiedzią bo naprawdę byłoby bardzo, pomocny, bo ja się dopiero uczę i inni też pytają i to byłoby mi pomocne szkoda że nie ma tej opcji, gdyby informatyk mógł to zrobić to byłoby wspaniałe klikam sobie w jakiś wzór, jakiś sweterek, mam trudności, patrzę na forum też, a to stop nic nie rozumię.
18.12.2021 - 00:33DROPS Design answered:
Witaj Danusiu, na chwilę obecną nie ma takiej opcji, ponieważ automatyczny tłumacz niestety nie jest opcją idealną, dla kogoś kto zna się na temacie może stanowić podpowiedź, dla początkujących raczej nie. Jeśli masz jakiekolwiek pytanie to śmiało pisz, na każde pytanie odpowiemy. Jeśli chcesz przetłumaczyć jakieś pytanie z forum, po prostu skopiuj to do google tranalator. Serdecznie pozdrawiamy!
20.12.2021 - 08:46Wo wird die Passe gemessen. Gerade runter oder am Raglan, also schräge?
23.08.2021 - 22:15DROPS Design answered:
Liebe Frau Reich, Raglan messen Sie von der anschlagskante in der Mitte vorne/Vorderteil oder in der Mitte hinten/Rückenteil - es wird 4 cm länger sein, wenn man es flach misst (siehe Skizze) wegen Schulter. Viel Spaß beim stricken!
24.08.2021 - 08:13Hoi, ik ben bezig met de eerste meerderingen van 2 voor en 2 na de markeersteek. Ik snap alleen de beschrijving én het instructiefilmpje van de meerdering niet (komt dat wel overeen? Als ik de andere bijbehorende patronen van de meerdering lees, staat er een heel andere beschrijving..). Is het niet gewoon "make 1 right" en "make 1 left" waarbij je de draad tussen de 2 steken ophaalt om een nieuwe steek te creëren?
31.07.2021 - 10:29DROPS Design answered:
Dag ABott,
Om twee steken te meerderen maak je zowel een meerdering door de draad tussen twee steken op te halen en deze gedraaid te breien en door direct daarna een omslag te maken die je op de volgende naald gedraaid breit. Je meerdert twee steken voor de markeerdraad en twee steken na de markeerdraad. Na de markeerdraad doe je het precies andersom, dus maak je eerst de omslag en daarna de draad tussen 2 steken gedraaid breien.
18.08.2021 - 19:52I am knitting the yolk I am at the point where I have done the two round increases and I have my total of 344 stitches for the extra large size. Now I am to increase for the raglan increase one stitch on each side of stitches with marker threads every other round four times for my size in total and then every fourth round seven times for my size if I do that I will not have enough stitches after the last increase for the raglan it's telling me that I need 432 and I will only have 366 stitches.
29.03.2021 - 22:51DROPS Design answered:
Hi Sherry, Your 344 stitches will increase by (8 x 4 = 32) + (8 x 7 = 56) which gives you a total of 432 stitches after all the increases. Happy knitting!
30.03.2021 - 07:48Salve, non mi torna il numero degli aumenti per la taglia M. Dopo i primi 14 ferri per il raglan si hanno 284 maglie. I successivi aumenti raglan di 1 maglia a ferri alterni mi da un totale di 328 maglie e non di 372 maglie come riportato. Non riesco a capire. Grazie. Noellie.
16.02.2021 - 20:32DROPS Design answered:
Buonasera Noellie, per la taglia M deve aumentare prima 7 volte in totale e poi 4 volte in totale, quindi (7x8) + (4x8) = 56+32= 88 aumenti. Di conseguenza 284 + 88 = 372 maglie. Buon lavoro!
16.02.2021 - 22:40