
Popular categories
Looking for a yarn?


|
|
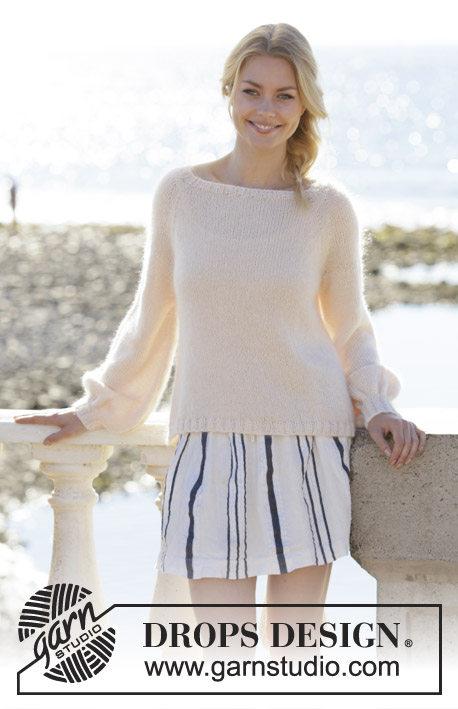
Soft Moonlight |
|
 |
 |
Knitted jumper with raglan and balloon sleeves. The piece is worked top down in DROPS BabyAlpaca Silk and DROPS Kid-Silk. Sizes S - XXXL.
DROPS 200-18 |
|
|
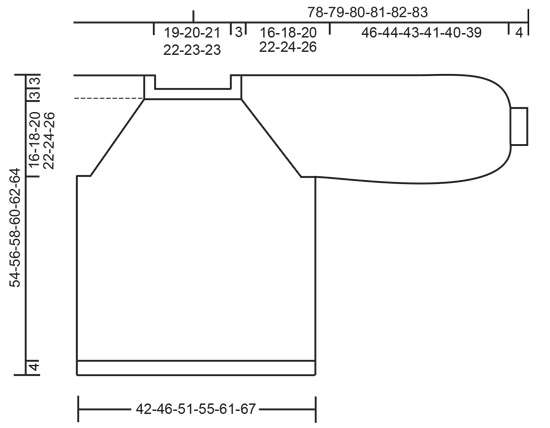
------------------------------------------------------- EXPLANATIONS FOR THE PATTERN: ------------------------------------------------------- INCREASE TIP-1 (evenly spaced): To work out how to increase evenly, count the total number of stitches on needle (e.g. 84 stitches) and divide by the number of increases to be made (e.g. 16) = 5.25. In this example, increase by making 1 yarn over after approx. each 5th stitch. On the next round work the yarn overs twisted to avoid holes. INCREASE TIP-2 (for mid under sleeve): Start 2 stitches before the marker, 1 yarn over, knit 4 (marker sits in middle of these 4 stitches), 1 yarn over = 2 stitches increased. On the next round knit the yarn overs twisted to avoid holes. RAGLAN: Increase to raglan in each transition between body and sleeves as follows: Work until there are 2 stitches left before the marker, 1 yarn over, knit 4 (marker sits in middle of these 4 stitches), 1 yarn over = 2 stitches increased and a total of 8 stitches in creased on round. On the next round knit the yarn overs twisted to avoid holes, then work the new stitches in stocking stitch. ------------------------------------------------------- START THE PIECE HERE: ------------------------------------------------------- JUMPER - SHORT OVERVIEW OF THE PIECE: Neck and yoke are worked in the round with circular needle, top down. The yoke is divided for body and sleeves and then the body is continued in the round with circular needle, top down. The sleeves are worked in the round with short circular needle/double pointed needles, top down. NECK: Cast on 84-88-92-96-100-100 stitches with short circular needle size 4 mm and 1 strand BabyAlpaca Silk and 1 strand Kid-Silk (= 2 strands). Knit 1 round. Then work rib in the round (= knit 2 / purl 2) for 3 cm. Knit 1 round where you increase 16-16-16-20-20-20 stitches evenly spaced – read INCREASE TIP-1 = 100-104-108-116-120-120 stitches. Then work yoke as described below. YOKE: Change to circular needle size 5 mm. Insert 4 markers in the piece as described below (without working the stitches). The markers are used when increasing to raglan. Count 18-19-20-22-23-23 stitches (= ½ back piece), insert first marker before next stitch, count 14 stitches (= sleeve), insert second marker before next stitch, count 36-38-40-44-46-46 stitches (= front piece), insert third marker before next stitch, count 14 stitches (= sleeve), insert fourth marker before next stitch. There are 18-19-20-22-23-23 stitches left on round after the last marker (= ½ back piece). Work stocking stitch in the round. REMEMBER THE KNITTING TENSION! AT THE SAME TIME on round 2 of the stocking stitch increase to RAGLAN – read description above. Increase to raglan every 2nd round a total of 15-18-21-22-25-27 times. After the last increase there are 220-248-276-292-320-336 stitches on the needle. Continue working stocking stitch without further increases until the piece measures 19-21-23-25-27-29 cm from the cast-on edge mid front. The next round is worked as follows: Work 33-36-40-43-48-52 stitches in stocking stitch (= ½ back piece), place the next 44-52-58-60-64-64 stitches on 1 thread for sleeve, cast on 6-6-6-8-8-10 new stitches on needle (= in side under sleeve), work 66-72-80-86-96-104 stitches in stocking stitch (= front piece), place the next 44-52-58-60-64-64 stitches on 1 thread for sleeve, cast on 6-6-6-8-8-10 new stitches on needle (= in side under sleeve) and work the remaining 33-36-40-43-48-52 stitches in stocking stitch (= ½ back piece). Cut the strand. The body and sleeves are finished separately. THE PIECE IS NOW MEASURED FROM HERE! BODY: = 144-156-172-188-208-228 stitches. Start the round on the one side of the piece in the middle of the 6-6-6-8-8-10 stitches cast on under the sleeve. Work stocking stitch in the round. When the piece measures 28 cm from the division in all sizes, knit 1 round where you increase 16-16-20-20-20-20 stitches evenly spaced = 160-172-192-208-228-248 stitches. Change to circular needle size 4 mm. Work rib in the round (= knit 2 / purl 2) for 4 cm. Change back to needle size 5 mm and loosely cast off with knit over knit and purl over purl. The jumper measures approx. 54-56-58-60-62-64 cm from the shoulder down. SLEEVE: Place the 44-52-58-60-64-64 stitches from the thread on the one side of the body on short circular needle/double pointed needles size 5 mm and knit up 1 stitch in each of the 6-6-6-8-8-10 stitches cast on under the sleeve = 50-58-64-68-72-74 stitches. Insert 1 marker in the middle of the 6-6-6-8-8-10 stitches under the sleeve. It will be used when increasing mid under sleeve. Work stocking stitch in the round. When the piece measures 3 cm from the division increase 2 stitches mid under sleeve – read INCREASE TIP-2. Increase like this every 2½-3½-3-3½-2½-3 cm a total of 15-11-12-10-12-11 times = 80-80-88-88-96-96 stitches. Continue working until the sleeve measures 46-44-43-41-40-39 cm from the division (short measurements in larger sizes due to wider neck and longer yoke). Work 1 round where all stitches are knitted together 2 and 2 = 40-40-44-44-48-48 stitches. Change to double pointed needles size 4 mm. Work rib in the round (= knit 2 / purl 2) for 4 cm (or to desired length) – make sure the rib is not work too loosely. Change to double pointed needles size 5 mm and loosely cast off with knit over knit and purl over purl. The sleeve measures approx. 50-48-47-45-44-43 cm from the division. Work the other sleeve in the same way. |
|
|
|
|
Have you made this or any other of our designs? Tag your pictures in social media with #dropsdesign so we can see them! Do you need help with this pattern?You'll find tutorial videos, a Comments/Questions area and more by visiting the pattern on garnstudio.com. © 1982-2024 DROPS Design A/S. We reserve all rights. This document, including all its sub-sections, has copyrights. Read more about what you can do with our patterns at the bottom of each pattern on our site. |
|


With over 40 years in knitting and crochet design, DROPS Design offers one of the most extensive collections of free patterns on the internet - translated to 17 languages. As of today we count 304 catalogues and 11422 patterns - 11422 of which are translated into English (UK/cm).
We work hard to bring you the best knitting and crochet have to offer, inspiration and advice as well as great quality yarns at incredible prices! Would you like to use our patterns for other than personal use? You can read what you are allowed to do in the Copyright text at the bottom of all our patterns. Happy crafting!
Comments / Questions (20)
Dag volgens patroon ben ik de raglan aan het breien, met 1 enkele omslag voor de markeringsdraad dan 4 steken waarbij de markeringsdraad tussen die 4 steken valt. alleen op de foto zoals de trui uiteindelijk zou moeten worden. Zie je de raglan met een dubbele omslag, dus een omslag, een aantal steken en dan weer een omslag. Klopt dit of lees ik het patroon niet goed ? Mvg
02.01.2024 - 21:38DROPS Design answered:
Dag Hannah,
Je meert voor de raglan in elke overgang door 1 omslag voor en 1 omslag na de 4 steken te maken. Zie uitleg bovenaan het patroon onder het kopje 'RAGLAN'.
07.01.2024 - 13:34Bonjour, Ce modèle est très beau mais je rencontre un problème pour le commencer. Il est indiqué qu’il faut monter 84 mailles à tricoter en circulaire. Sauf que si je monte juste 84 mailles, à tricoter en circulaire, cela me fait juste 5 cm pour passer la tête. Cela fait trop juste. .. Cela ne fait en tout cas pas les 19 cm indiqués sur le diagramme. Pouvez-vous me dire comment commencer le col ? J’ai dû rater quelque chose. Merci
27.11.2022 - 01:00DROPS Design answered:
Bonjour Émilie, les 19 cm sont mesurés lorsque le pull est à plat, c'est la largeur de l'encolure; dans les 84 mailles montées pour commencer, une partie de ces mailles sera "affectée" au dos, une autre au devant (pour l'encolure donc), mais une autre également pour les épaules de chaque côté, vous avez donc la circonférence totale du col et non la largeur de l'encolure. Pensez à bien vérifier votre tension: vous devez avoir 17 m x 22 rangs jersey = 10 x10 cm; si vous conservez bien cette tension, vous aurez alors les mesures indiquées dans le schéma. Bon tricot!
28.11.2022 - 09:38Ich möchte den Pullunder DROPS 76-9 by DROPS Design stricken in der gleichen Farbe, die Wolle ist nicht mehr vorhanden, hätten Sie eine Farbempfehlung und eine flauschige aber nicht zu flauschige Wollalternative für mich, die gestrickt so aussieht wie auf dem Foto, auch die gleiche Farbe in dem Grauton? Liebe Grüße Claudia Rocksien
09.02.2022 - 01:21DROPS Design answered:
Liebe Frau Rocksien, benutzen Sie unseren Garnumrechner für beide Garne um die unterschiedlichen Möglichkeiten zu finden. Gerne wird Ihnen Ihr DROPS Laden auch mit den passenden Farben - auch telefonisch oder per E-Mail - weiterhelfen. Viel Spaß beim stricken!
09.02.2022 - 08:56Dzień dobry, proszę o wyjaśnienie ,jak zacząć tył & przód . Robótkę zakończyłam na środku tyłu zostało 40 oczek ( połowa tyłu) . Teraz mam zacząć od boku na środku 6 nabranych oczek. Czy to znaczy, że te 40 plus 3 oczka nabrane mam przełożyć na nitkę? Tak jak rękawy ?
20.01.2022 - 15:42DROPS Design answered:
Witaj Kasiu, teraz jesteś na środku tyłu, po prostu przerób oczka do boku swetra (do środka 6 oczek nabranych pod rękawem) i tam umieść marker, który będzie wyznaczał nowy początek okrążenia. Pozdrawiamy!
20.01.2022 - 16:39Jag stickar i storlek L och har efter mina raglan-ökningar 276 maskor totalt, men de är fördelade mellan mina markörer 41-56-82-56-41, ska jag flytta markörerna eller fortsätta följa mönstret och bara sticka 40 maskor innan jag trär på 58 för ärmen? Oket ser helt rätt ut i övrigt.
29.08.2021 - 21:12DROPS Design answered:
Hei Sara. Du har alle økningene riktig og du trenger ikke å flytte markørene. Når du skal dele bærestykket, strikker du bare 40 masker før du setter 58 masker på 1 tråd til 1 erme og så følge oppskriften. mvh DROPS design
06.09.2021 - 11:14I believe this pattern calls for the knitter to hold and knit with 2 strands of sport weight yarn. If I wanted to knit with just one strand would I use worsted weight?
10.03.2020 - 22:44DROPS Design answered:
Dear Dina, you will read more about alternatives and calculate new amount here - 2 strands yarn group A can be replaced by 1 strand yarn group C. Your DROPS store will help you to find the best matching yarn, do not hesitate to contact them - even per mail or telephone. Happy knitting!
11.03.2020 - 08:32Beste lezer, Ik heb een vraag over de trui Soft Moonlight: de hals heb ik op de korte rondbreinaald nr. 4 gebreid en voor de pas ga ik verder met rondbreinaald nr. 5, doe ik dit op de korte van 40 cm. of op de lange van 80 cm.? Ik weet niet wanneer ik dit moet wisselen en zie het niet in de beschrijving staan. Ik hoor het graag. M.vr.gr. Annemieke Blom
05.03.2020 - 17:23DROPS Design answered:
Dag Annemieke,
Als de steken niet meer op de naald passen dan kun je wisselen en een naald met een langere draad nemen. Wat je ook kunt doen is, als de draad nog te lang is, dat je halverwege een stukje van de breidraad eruit laat steken.
10.03.2020 - 19:40Ich habe die Größe M gestrickt mit dem Originalgarn. Er fällt viel kleiner aus. Wie kann das sein? Ich habe ihn vorher mit der Air gestrickt, da hat alles gestimmt. Das originalgarn sieht sehr löcherig aus. Sehr ärgerlich
15.01.2020 - 16:53DROPS Design answered:
Liebe Frau Schmidt, stimmt Ihre Maschenprobe? Haben Sie die 17 Maschen x 22 Reihen glatt rechts mit 1 Faden BabyAlpaca Silk + 1 Faden Kid-Silk zusammengestrickt = 10 x 10 cm? Hier lesen Sie mehr über die Maschenprobe. Viel Spaß beim stricken!
16.01.2020 - 08:57Kan jeg strikke denne i brushed alpaca silk , vil det bli rett i forhold til strikkefasthet?
17.12.2019 - 11:56DROPS Design answered:
Hej Malinn, ja du kan strikke denne bluse i DROPS Brushed Alpaca Silk, men lav gerne en strikkeprøve så du er sikker på at du har samme strikkefasthed som der står i opskriften. God fornøjelse!
17.12.2019 - 12:29Hej Drops kan i hjælpe mig der jeg er gået helt i stå, der jeg ikke lige forstå hvor jeg skal tælle fra . Skal til at dele det i ærme og ryg og forstikke. Jeg strikker i størrelse L . Der står strik 40 masker og sæt 58 masker på en tråd . Jeg ved ikke rigtig hvor jeg skal tælle de 40 masker fra ? Venlig hilsen Anne Marie
22.09.2019 - 22:22DROPS Design answered:
Hej Anne Marie, du er midt på bagstykket, strikker de sidste 40 masker på bagstykket, sætter 58 m på en tråd til højre ærme, slår masker op under ærmet, strikker maskerne over forstykket, og sætter 58 masker på en tråd i den anden side til ærme, slår nye masker op under det andet ærme og strikker de sidste masker på bagstykket. Her klipper du tråden, så omgangen nu starter midt under det ene ærme. Se også gerne vores video :) God fornøjelse!
25.09.2019 - 12:13