
Popular categories
Looking for a yarn?


|
|
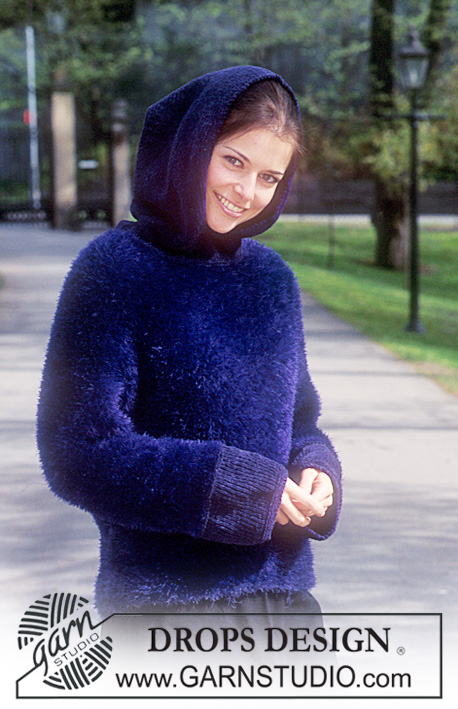
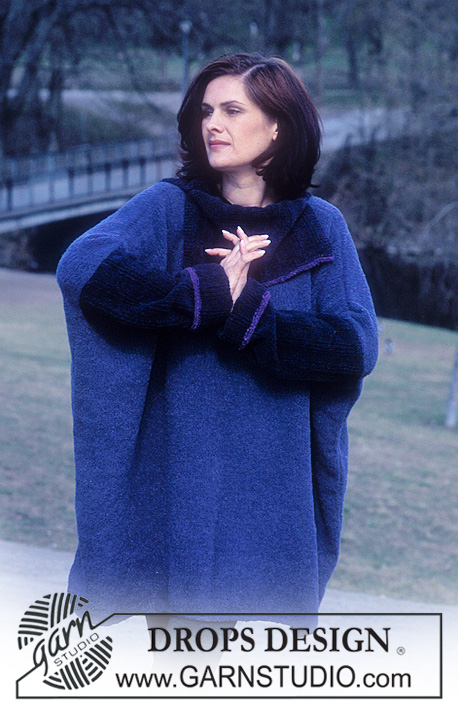
DROPS 63-11 |
|
|
|
|
DROPS jacket with hood and pockets in Tynn Chenille and Pelliza.
DROPS 63-11 |
|
|
Knitting tension: Remember needle size is only a guide. 10 x 10 cm stocking stitch = Tynn Cotton Chenille: 18 stitches x 28 rows with needle size 3.5 mm and Cotton Chenille: 13 stitches x 24 rows with needle size 4.5 mm Pelliza Soft: 23 stitches x 30 rows with needle size 3.5 mm. Ridge/Garter stitch: 1 ridge = Knit 2 rows. Loops: Work with crochet hook size 3 mm (3.5 mm) with fur print (grey tweed): start outermost in the garter stitch edge on right front piece, work 6 (5) chain stitches, fasten to the row 2 cm below starting point with 1 double crochet. Work double crochets back over chain stitches. --------------------------------------------------------------- Pocket: Measurements in cm are the same for both qualities. Cast on 50-53 (37-39) stitches with needle size 3.5 mm (4.5 mm) and fur print (grey tweed). Work 1 ridge. Then work upwards as follows: 5-5 (4-4) stitches garter stitch (= mid front), 43-46 (31-33) stitches stocking stitch, 2-2 (2-2) stitches garter stitch (= side). When piece measures 5-5 cm decrease in the side inside the 2-2 (2-2) stitches in garter stitch: 1 stitch x 3-5 (3-4) every 3-3 (3-4) cm = 47-48 (34-35) stitches. When piece measures 14-19 cm cast off 7-8 (5-6) stitches in side = 40-40 (29-29) stitches. Continue with 5-5 (4-4) stitches garter stitch towards mid front and stocking stitch over the remaining stitches - at the same time continue to decrease in the side every 2nd row: 1 stitch x 16-13 (8-6) and then every 4th row: 1 stitch x 3-4 (5-6) = 21-23 (16-17) stitches. When piece measures 30-35 cm place stitches on thread and set the piece to one side. Work another pocket but in reverse. Left front piece: Cast on 60-64 (43-46) stitches (incl. 1 edge stitch in side for seam) with needle size 3.5 mm (4.5 mm) with fur print (grey tweed), work 2 ridges. Continue with stocking stitch. Remember the knitting tension. When piece measures 5-5 cm decrease in side: 1 stitch x 17-17 (11-11) every 3-3 (5-5) cm = 48-52 (36-39) stitches (incl. pocket) - at the same time when piece measures 31-36 cm work the outermost 16-18 (12-13) stitches together with pocket as follows: Work the first 5-5 (4-4) garter stitch stitches from pocket, then work together the first stitch from front piece and first stitch from pocket, continue like this until all stitches from pocket are worked together with front piece. Continue with stocking stitch but the 5-5 (4-4) stitches towards mid front are worked in garter stitch upwards. When piece measures 57-61 cm cast off for armhole every 2nd row: 3 stitches x 1-1 (1-1), 2 stitches x 2-3 (1-2), 1 stitch x 4-4 (3-3) = 37-39 (28-29) stitches. When piece measures 73-78 cm cast off for neck every 2nd row: 9-10 (7-8) stitches x 1 (1), 2 stitches x 2 (2), 1 stitch x 4 (2). Cast off when piece measures 80-85 cm. Right front piece: Cast on and work as for left but in reverse. Back piece: Cast on 124-133 (90-97) stitches (incl. 1 stitch in each side for seam) with needle size 3.5 mm (4.5 mm) and fur print (grey tweed), work 2 ridges. Continue with stocking stitch. Remember the knitting tension. When piece measures 5-5 cm decrease in each side: 1 stitch x 17-17 (12-12) every 3-3 (4-4.5) cm = 90-99 (66-73) stitches. When piece measures 57-61 cm cast off for armholes as for front piece = 68-73 (50-53) stitches. Do not cast off for neck but when piece measures 80-85 cm place the middle 28-31 (20-23) stitches on a thread. The remaining stitches are cast off. Sleeve: Cast on 82-85 stitches (incl. 1 edge stitch in each side for seam) with needle size 3.5 mm and dark grey Pelliza Soft. Work stocking stitch. After 7-7 cm insert a marker thread in piece; the piece is now measured from here! When piece measures 1-1 cm change to fur print (grey tweed) and needle size 3.5 mm (4.5 mm) at the same time as you decrease 17-18 (34-36) stitches evenly on row = 65-67 (48-49) stitches. Work stocking stitch upwards. When piece measures 8-8 cm increase in each side: 1 stitch x 9-11 (7-8) every 4.5-3.5 (6-5) cm = 83-89 (62-65) stitches. When piece measures 51-50 cm cast off for sleeve cap in each side every 2nd row: 3 stitches x 3-3 (1-1), 2 stitches x 3-3 (1-2), 1 stitch x 3-6 (7-9), 2 stitches x 3-3 (2-1), then 3 (2) stitches in each side until piece measures 62-63 cm. Cast off. Assembly: Sew shoulder seams. Fold the 5 garter stitch stitches on front piece double towards wrong side and sew down. Hood: Knit up 40-44 (30-32) stitches around neck with needle size 3.5 mm (45 mm) and fur print (grey tweed) but start to knit up 7-7 cm from mid front and stop 7-7 cm from mid front. Work stocking stitch. After 1-1 cm increase 28-28 (20-20) stitches evenly on next row. When hood measures 39-40 cm cast off. Sew hood together mid top of head. Knit up approx. 180-184 stitches with needle size 3.5 mm and Pelliza around hood’s front edge. Work 14-14 cm stocking stitch, cast off and fold edge double towards wrong side and sew down so that the pick-up edge is hidden. Sew Pelliza-edge to neck. Fold the bottom 7-7 cm of sleeve double towards wrong side and sew down - there is now only 1 cm of Pelliza that shows. Sew sleeves to body. Sew sleeve and side seams in one go inside the 1 edge stitch. Sew on pockets in the sides and the bottom edge so that the 2 ridges at bottom of body still show. You can crochet 2 or 3 loops on edge of right front piece, start 5 cm from neck edge. Sew on buttons. |
|

|
|
|
Have you made this or any other of our designs? Tag your pictures in social media with #dropsdesign so we can see them! Do you need help with this pattern?You'll find tutorial videos, a Comments/Questions area and more by visiting the pattern on garnstudio.com. © 1982-2024 DROPS Design A/S. We reserve all rights. This document, including all its sub-sections, has copyrights. Read more about what you can do with our patterns at the bottom of each pattern on our site. |


With over 40 years in knitting and crochet design, DROPS Design offers one of the most extensive collections of free patterns on the internet - translated to 17 languages. As of today we count 304 catalogues and 11422 patterns - 11422 of which are translated into English (UK/cm).
We work hard to bring you the best knitting and crochet have to offer, inspiration and advice as well as great quality yarns at incredible prices! Would you like to use our patterns for other than personal use? You can read what you are allowed to do in the Copyright text at the bottom of all our patterns. Happy crafting!
Comments / Questions (4)
Anstelle von Tynn Cotton Chenille können Sie Karisma benutzen.
04.01.2010 - 10:42Hallo, wenn ich dieses Modell mit Karisma stricke , stimmen dann die Maschenprobe und die Angaben in der Strickanleitung noch ? Und wenn nicht , wie rechne ich das dann um ?? Vielen Dank Katrin Fey
04.01.2010 - 10:22Allison The 48 sts includes the 5 sts frontband you get when you, at the same time as you dec, ad the pocket when the work measures 31-36 cm [12.25" - 14-1/8"].
21.04.2008 - 07:40The instructions for front decrease says 17 times this would leave 43 stitches but pattern says 48 stitches. I have done 12 decreases, should I reduce the decreases on the back to match?
20.04.2008 - 09:31