
Popular categories
Looking for a yarn?


|
||||
Baby Talk |
||||
 |
 |
|||
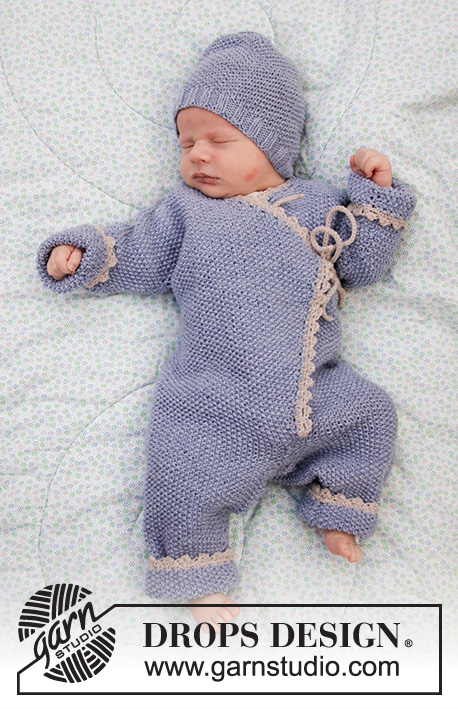
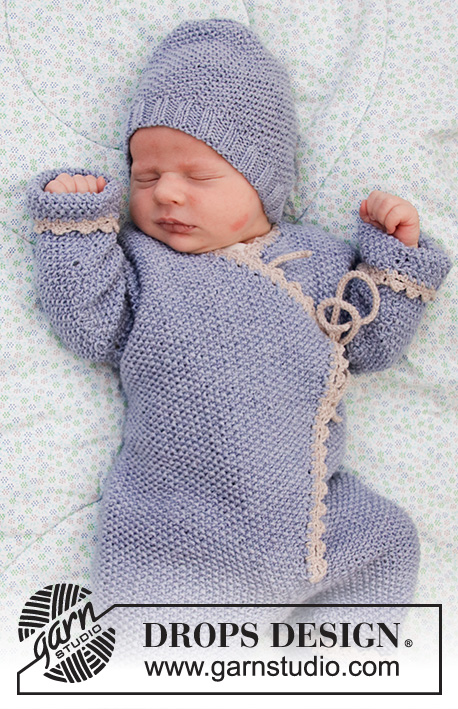
Knitted overall and hat for baby with moss stitch, garter stitch and crochet edge. The set is knitted in DROPS BabyMerino. Size overall: 1 month to 2 years Size hat: Premature to 4 years
DROPS Baby 33-30 |
||||
|
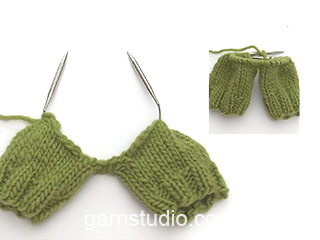
---------------------------------------------------------- EXPLANATION FOR THE PATTERN: ---------------------------------------------------------- GARTER STITCH (in the round - applies to hat): 1 ridge vertically = 2 rounds. Knit 1 round and purl 1 round. MOSS STITCH: Row 1: * Knit 1, purl 1 *, repeat from *-*. Row 2: Knit over purl and purl over knit. Repeat 2nd row upwards. INCREASE TIP (applies to overall): Increase inside 1 edge stitch. All increases are done from the right side. Increase by making 1 yarn over. Knit yarn over twisted on next row, it should not make holes. DECREASE TIP (applies to overall): Decrease inside 1 edge stitch. All decreases are done from the right side. Decrease as follows after 1 edge stitch: Slip 1 stitch knitwise, knit 1, pass slipped stitch over. Decrease as follows before 1 edge stitch: Knit 2 together. ---------------------------------------------------------- BEGIN PIECE FOR OVERALL HERE: ---------------------------------------------------------- OVERALL - SHORT OVERVIEW OF THE PIECE: Work from bottom up. First work 2 legs, then work the legs together and knit back and forth up to sleeve. Cast on stitches for sleeve in each side of piece, and work front and back piece separately until finished. Sew shoulder and sleeve seams and crochet an edge around the opening on overall at the end. Work entire overall in moss stitch. LEG: Worked back and forth on circular needle to make room for all the stitches. Cast on 46-50-54-58 (66-70) stitches (including 1 edge stitch in each side) on circular needle size 3 mm = US 2,5 with light lavender. Work in MOSS STITCH over all stitches - see explanation above. REMEMBER THE KNITTING GAUGE! When piece measures 6 cm = 2⅜", increase 1 stitch in each side of piece inside 1 edge stitch (= 2 stitches increased). Increase like this every 3rd-4th-5th-5th (8th-8th) row 11-11-12-14 (13-16) times in total = 68-72-78-86 (92-102) stitches. When piece measures 15-18-21-24 (29-34) cm = 6"-7"-8¼"-9½" (11⅜"-13⅜"), bind off 5 stitches at the beginning of the 2 next rows for gusset (i.e. bind off stitches in each side of piece) = 58-62-68-76 (82-92) stitches. Put piece aside and knit another leg the same way. OVERALL: Slip both legs on to same circular needle size 3 mm = US 2,5, with bind off stitches towards each other = 116-124-136-152 (164-184) stitches. Insert 1 marker thread in the piece. NOW MEASURE PIECE FROM HERE! Work 6 rows moss stitch back and forth, begin mid front. Then work as follows: Cast on 3 stitches at the end of the next 2 rows (for front bands) = 122-130-142-158 (170-190) stitches. Insert 1 marker after 32-34-37-41 (44-49) stitches in from each side. Move the markers upwards when working, they mark front pieces and back piece. Now increase stitches mid front (i.e. in each side of piece) so that the front pieces overlap. Increase 1 stitch inside 1 edge stitch in each side of piece (= 2 stitches increased) - read INCREASE TIP! Increase on every 4th row 3-2-0-3 (2-13) more times, then on every 6th row 8-11-16-17 (21-15) times (= 12-14-17-21 (24-29) stitches increased in total in each side of piece) = 44-48-54-62 (68-78) stitches on each front piece = 146-158-176-200-218-248 stitches in total. READ ALL OF THE FOLLOWING SECTION BEFORE CONTINUING! DECREASE MID FRONT FOR NECK INSIDE 1 EDGE STITCH WHILE AT THE SAME TIME DIVIDING THE PIECE AND CASTING ON STITCHES FOR SLEEVE. DECREASE MID FRONT FOR NECK AS FOLLOWS: Work over all stitches until piece measures 17-20-25-28 (32-34) cm = 6¾"-8"-9¾"-11" (12½"-13⅜") from marker thread. Then decrease 1 stitch inside 1 edge stitch for neck in each side of piece (= 2 stitches decreased) - read DECREASE TIP! Decrease like this on every other row 20-24-27-31 (35-41) more times, then on every 4th row 2 times (= 23-27-30-34 (38-44) stitches decreased in total in each side of piece). DIVIDE THE PIECE AND CAST ON STITCHES FOR SLEEVE AS FOLLOWS: RIGHT FRONT PIECE: When piece measures 21-26-30-35 (40-43) cm = 8¼"-10¼"-11¾"-13¾" (15¾"-17") from marker thread, divide piece at the 2 markers and finish front and back piece separately. Adjust so that next row is from right side. Now work over stitches until first marker (= right front piece). Slip the remaining stitches on a stitch holder. Now cast on stitches for sleeve at the end of every row from right side as follows (NOTE: Continue to decrease inside 1 edge stitch at the beginning of row as before): Cast on 4-6-6-6 (6-6) stitches in 4-4-5-6 (7-8) times in total, then 17-17-16-16 (18-20) stitches 1 time in total (= 33-41-46-52 (60-68) stitches cast on in total for sleeve). When all stitches are cast on and all decreases are done, there are 54-62-70-80 (90-102) stitches on needle. Work until piece measures 45-53-62-70 (81-90) cm = 17¾"-21"-24⅜"-27½" (32"-35½") in total, measured from leg to shoulder. Bind off. LEFT FRONT PIECE: Work over the last stitches slipped on a stitch holder, until marker. Work as right front piece but reversed - i.e. cast on stitches for sleeve at the end of row from wrong side. Continue to decrease inside 1 edge stitch at the end of row as before for neck. BACK PIECE: = 58-62-68-76 (82-92) stitches. Cast on new stitches at the end of every row in each side for sleeves as follows: Cast on 4-6-6-6 (6-6) stitches in 4-4-5-6 (7-8) times in total, then 17-17-16-16 (18-20) stitches 1 time in total (= 33-41-46-52 (60-68) stitches cast on in total for sleeve in each side of piece) = 124-144-160-180 (202-228) stitches. When piece measures 44-52-61-69 (80-89) cm = 17¼"-20½"-24"-27⅛" (31½"-35") in total, bind off the middle 16-20-20-20 (22-24) stitches for neck and finish each shoulder/sleeve separately (= 54-62-70-80 (90-102) stitches remain on each shoulder). Work like this until piece measures 45-53-62-70 (81-90) cm = 17¾"-21"-24⅜"-27½" (32"-35½") in total, measured from leg to shoulder, adjust according to front pieces. Bind off. Work the other shoulder the same way. ASSEMBLY: Sew overarm/shoulder seams with grafting/kitchener stitches from right side. Sew underarm seams together edge to edge in front loop of outermost stitches. Sew legs together inside 1 edge stitch, and sew the 5 stitches bind off between legs together. Sew vent up to where the 3 new stitches were cast on in each side for band stitches and sew the 3 band stitches in each side of piece to overall. CROCHET EDGE: Crochet on hook size 2.5 mm = US C/2 with light beige around the entire opening mid front on overall as follows: ROW 1 (= from wrong side): Begin mid front at the bottom of left front piece, work 1 single crochet in first stitch where 3 band stitches were cast on, * 1 chain stitch, skip approx. 1 cm = ⅜", 1 single crochet in next stitch *, repeat from *-* (make sure to avoid a tight edge), continue crochet edge around overall until corner where decrease for neck began on left front piece, work tie as follows: 1 single crochet in tip, then work chain stitches for approx. 20-25 cm = 8"-9¾", turn and work 1 slip stitch in every chain stitch, then work 1 single crochet in tip on front piece again, work in the round until next tip (i.e. on right front piece), work tie, continue as before around the rest of overall down to where 3 band stitches were cast on, adjust to finish with 1 single crochet. ROW 2 (= from right side): Work 1 chain stitch, 1 single crochet around first chain stitch, * 4 chain stitches, 1 double crochet in 4th chain stitch from hook, skip 1 single crochet + 1 chain stitch + 1 single crochet, work 1 single crochet around next chain stitch *, repeat from *-* (make sure to work over ties so that the ties are under the edge, i.e. do not work in stitch in tie), finish with 1 slip stitch in first single crochet on previous row. Cut and fasten the yarn. Crochet on hook size 2.5 mm = US C/2 with light beige mix at the bottom around both legs as follows: ROUND 1: Begin at the seam. Work 1 single crochet in first stitch, * 1 chain stitch, skip 2 stitches, 1 single crochet in next stitch *, repeat from *-* and finish with 1 slip stitch in first single crochet at beginning of round. ROUND 2: Work 1 chain stitch, 1 single crochet around first chain stitch, * 4 chain stitches, 1 double crochet in 4th chain stitch from hook, skip 1 single crochet + 1 chain stitch + 1 single crochet, work 1 single crochet around next chain stitch *, repeat from *-* the entire round, finish with 1 slip stitch in first single crochet at beginning of round. Crochet on hook size 2.5 mm = US C/2 with light beige mix at the edge around both sleeves as follows: ROUND 1: Work 1 single crochet in first stitch at the bottom of sleeve, * 1 chain stitch, skip approx. 1 cm = ⅜", 1 single crochet in next stitch *, repeat from *-* (make sure to avoid a tight edge) and finish with 1 slip stitch in first single crochet at beginning of round. ROUND 2: Work 1 chain stitch, 1 single crochet around first chain stitch, * 4 chain stitches, 1 double crochet in 4th chain stitch from hook, skip 1 single crochet + 1 chain stitch + 1 single crochet, work 1 single crochet around next chain stitch *, repeat from *-* the entire round, finish with 1 slip stitch in first single crochet at beginning of round. Then work 1 tie like the one in the tip on right and left front piece, on the outside of left front piece, under sleeve (i.e. in the side) and on the inside of right front piece – make sure that the ties are at the same hight as tips on front piece. ---------------------------------------------------------- BEGIN PIECE FOR HAT HERE: ---------------------------------------------------------- HAT: Worked in the round on double pointed needles. Loosely cast on (68) 80-92-96-104 (112-116) stitches on double pointed needles size 2.5 mm = US 1,5 with light lavender. Work rib = knit 2/purl 2 for (2) 2-3-3-3 (4-4) cm = (3/4") ¾"-1⅛"-1⅛"-1⅛" (1½"-1½"). Switch to double pointed needles size 3 mm = US 2,5 and knit 1 round while AT THE SAME TIME decreasing 8 stitches evenly = (60) 72-84-88-96 (104-108) stitches. Continue with MOSS STITCH - see explanation above. When piece measures (9) 10-11-11-13 (13-14) cm = (3½") 4"-4⅜"-4⅜"-5⅛" (5⅛"-5½"), work in GARTER STITCH - see explanation above. On next knit round decrease (6) 8-7-8-8 (8-9) stitches evenly. Repeat decrease every other round (i.e. every knit round) (5) 5-5-5-5 (6-6) more times (= (6) 6-6-6-6 (7-7) decrease rounds in total) = (24) 24-42-40-48 (48-45) stitches. On next round knit all stitches together 2 by 2. Purl 1 round and repeat decrease on next knit round in size 6/9 and 12/18 months and (2 - 3/4) years (do not decrease in the other sizes) = (12) 12-11-10-12 (12-12) stitches. Pull a double yarn through the remaining stitches and fasten tightly. |
||||
Diagram explanations |
||||
|
||||

|
||||
|
Have you made this or any other of our designs? Tag your pictures in social media with #dropsdesign so we can see them! Do you need help with this pattern?You'll find tutorial videos, a Comments/Questions area and more by visiting the pattern on garnstudio.com. © 1982-2024 DROPS Design A/S. We reserve all rights. This document, including all its sub-sections, has copyrights. Read more about what you can do with our patterns at the bottom of each pattern on our site. |
||||


With over 40 years in knitting and crochet design, DROPS Design offers one of the most extensive collections of free patterns on the internet - translated to 17 languages. As of today we count 304 catalogs and 11422 patterns - 11417 of which are translated into English (US/in).
We work hard to bring you the best knitting and crochet have to offer, inspiration and advice as well as great quality yarns at incredible prices! Would you like to use our patterns for other than personal use? You can read what you are allowed to do in the Copyright text at the bottom of all our patterns. Happy crafting!
Comments / Questions (86)
Hallo, ich möchte die Teile zusammennähen. In der Anleitung steht für die Ärmel: ... im Maschenstich von der Vorderseite ...schließen. Wie geht der Maschenstich und heißt das, die Seite, auf der ich zusammennähe, ist nach Fertigstellung sichtbar, also nicht „links“? Sieht die Naht dann wie Perlmuster aus? Auch die Nähte der anderen Teile sind mir nicht ganz klar. Ein Video zum Maschenstich (auch für Perlmuster) habe ich nicht gefunden. Vielen Dank!
08.01.2020 - 18:13DROPS Design answered:
Liebe Lucie, die Naht unter den Ärmeln können Sie mit diesen beiden Techniken; für die rechten Maschen und für die linken Maschen. Viel Spaß beim zusammennähen!
09.01.2020 - 09:24Comment realiser le modele avec une ouverture dans l entre jambe beaucoup plus pratique pour changer un bebe.merci
01.12.2019 - 10:37Þegar ég hef prjónað galla þá eru engar afgangans lykkjur . fyrir háls á baki. Þær virðast vera jafnmargar.
18.11.2019 - 08:48Hallo, wie fahre ich beim Einteiler fort, wenn ich je 3 Maschen am Ende der Reihen angeschlagen habe. 1. Nehme ich gleich am Anfang der nächsten Reihe nach der Randmasche eine Masche zu? 2. In der Beschreibung steht dann - "In dieser Weise in jeder 4. Reihe noch weitere 3-2-0-3 (2-13) x zunehmen"-. Bedeutet dies, dass ich bei Größe 3 in jeder 4. Reihe keine Masche zunehme, also gleich mit der Zunahme in jeder 6. Reihe fortfahre? Vielen Dank für die Hilfe!
14.11.2019 - 15:16DROPS Design answered:
Liebe Lucie, die 3 neuen Maschen werden wie in diesem Video am Ende der 2 nächsten Reihe angeschlagen, dh nach der Randmasche. Die nächsten Zunahmen werden wie unter ZUNAHMETIPP (gilt für den Einteiler) gearbeitet, dh bei der 3. Größe nehmen Sie in jeder 6. Reihe (= keine Zunahme in jeder 4. Reihe). Viel Spaß beim stricken!
14.11.2019 - 15:48Hej. Denne opskrift er strikket med Drops Baby Merino, som er 4 ply. Kan jeg i stedet strikke denne opskrift med "Drops Merino Extra Fine" garn som er 8 ply? Hvordan vil det påvirke arbejdet? Tak. Mvh. Malene.
03.11.2019 - 13:43DROPS Design answered:
Hej Malene, dragten vil blive for kompakt eller for stor. Hvis du hellere vil strikke i DROPS Merino Extra fine, så skal du vælge en opskrift med ca 20-21 masker på 10 cm. overalls
04.11.2019 - 13:30Förstår inte riktigt hur knytbanden ska fungera. Dels är de väldigt korta med 20-25 maskor och det på vänster framstycke hamnar under det högra. Det når inte fram för att kunna knytas, vänster framstycke viks framåt.
15.10.2019 - 21:38DROPS Design answered:
Hej Inge, du virkar knytbanden 20-25 cm (du får gärna virka dom längre). Har du läst: Sedan virkas det 1 knytband motsvarande det i spetsen på höger och vänster framstycke, på utsidan av vänster framstycke, under ärmen (dvs i sidan) och på insidan av höger framstycke – se till att banden kommer i samma höjd som spetsarna på framstyckena. Lycka till :)
16.10.2019 - 16:15Hei Skal til å felle til halsen å forstår ikke forklaringen her. Skal jeg felle de to på hver side av merketråden og så dele arbeidet å gjøre det ferdig hver for seg deretter ? Å så legge opp til armene når lengden er det den er oppgitt?
15.10.2019 - 19:30DROPS Design answered:
Hej, du feller til hals innenfor 1 kantmaske i hver side av arbejdet, det gør du på hver 2. pind til du når målet for at legger opp nye masker til ærmet. Da sætter du alle de andre masker på en tråd og strikker frem og tilbage over først det ene forstykke, så det andet og sidst ryggen. God fornøjelse!
16.10.2019 - 16:19Grand merci pour la rapidité avec laquelle vous m'avez répondu. Vous êtes vraiment des pros et charmantes en plus!!! Ce que je voulais dire c'est surtout que les explications en français ne sont pas claires, difficilement décryptables. Peut-être faudrait-il les éclaircir, simplifier, pour que les tricoteuses / crocheteuses amateurs n'aient pas à se crever les yeux sur les photos et ensuite œuvrer selon leur bon sens mais avec plein de doutes. Mille mercis de toute façon.
23.09.2019 - 12:43DROPS Design answered:
Bonjour Mme Pol et merci pour votre retour; Les modèles DROPS sont réalisés par des milliers de personnes dans le monde entier. Nous comprenons toutefois qu’en fonction du pays, les explications puissent être formulées différemment. Nous faisons naturellement en sorte que nos modèles soient compréhensibles. Vous pouvez volontiers poser votre question ici, comme vous l'avez fait, et pour toute assistance individuelle, vous adresser au magasin où vous avez acheté votre laine – même par mail ou téléphone. Bon tricot!
23.09.2019 - 13:06Je ne comprends pas les explications pour le rang 2 de la bordure. Pourriez-vous m'aider?
23.09.2019 - 01:01DROPS Design answered:
Bonjour Mme Pol, cette vidéo montre comment réaliser ces grands picots, attention à bien crocheter le même nombre de mailles en l'air (4 dans le modèle; 3 dans la vidéo) et à sauter le nombre de mailles indiqué entre chaque picot. Bon crochet!
23.09.2019 - 09:58Aunque veo que se han corregido los materiales sigo sin entender: hay 4 tallas + los paréntesis y en materiales hay 3 cantidades + los paréntesis.
13.09.2019 - 18:28DROPS Design answered:
Hola Olga. Ha sido un fallo al publicar el patrón. Ya están los materiales actualizados. Disculpe las molestias.
15.09.2019 - 21:14