
Popular categories
Looking for a yarn?


|
||||
Baby Talk |
||||
 |
 |
|||
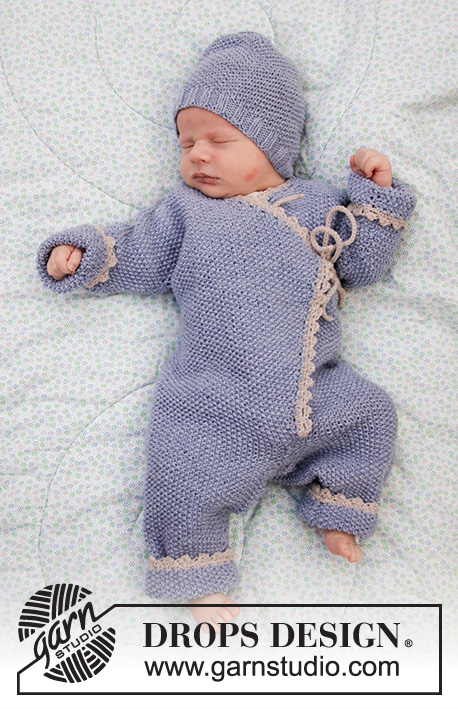
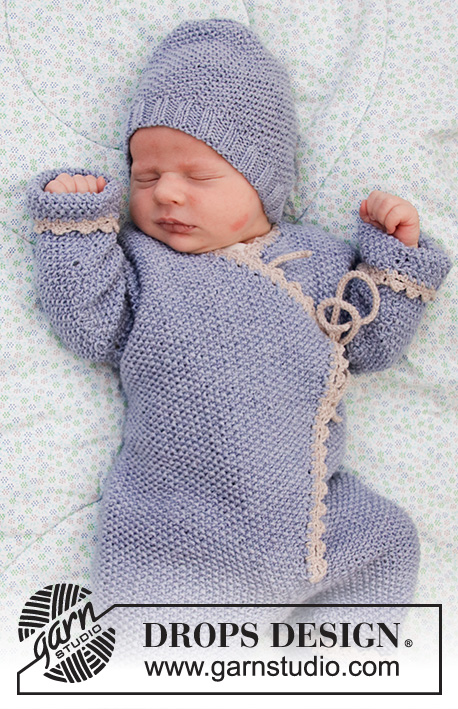
Knitted overall and hat for baby with moss stitch, garter stitch and crochet edge. The set is knitted in DROPS BabyMerino. Size overall: 1 month to 2 years Size hat: Premature to 4 years
DROPS Baby 33-30 |
||||
|
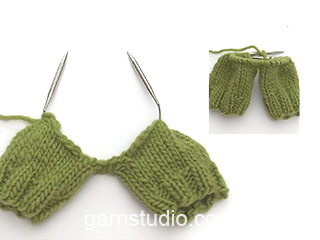
---------------------------------------------------------- EXPLANATION FOR THE PATTERN: ---------------------------------------------------------- GARTER STITCH (in the round - applies to hat): 1 ridge vertically = 2 rounds. Knit 1 round and purl 1 round. MOSS STITCH: Row 1: * Knit 1, purl 1 *, repeat from *-*. Row 2: Knit over purl and purl over knit. Repeat 2nd row upwards. INCREASE TIP (applies to overall): Increase inside 1 edge stitch. All increases are done from the right side. Increase by making 1 yarn over. Knit yarn over twisted on next row, it should not make holes. DECREASE TIP (applies to overall): Decrease inside 1 edge stitch. All decreases are done from the right side. Decrease as follows after 1 edge stitch: Slip 1 stitch knitwise, knit 1, pass slipped stitch over. Decrease as follows before 1 edge stitch: Knit 2 together. ---------------------------------------------------------- BEGIN PIECE FOR OVERALL HERE: ---------------------------------------------------------- OVERALL - SHORT OVERVIEW OF THE PIECE: Work from bottom up. First work 2 legs, then work the legs together and knit back and forth up to sleeve. Cast on stitches for sleeve in each side of piece, and work front and back piece separately until finished. Sew shoulder and sleeve seams and crochet an edge around the opening on overall at the end. Work entire overall in moss stitch. LEG: Worked back and forth on circular needle to make room for all the stitches. Cast on 46-50-54-58 (66-70) stitches (including 1 edge stitch in each side) on circular needle size 3 mm = US 2,5 with light lavender. Work in MOSS STITCH over all stitches - see explanation above. REMEMBER THE KNITTING GAUGE! When piece measures 6 cm = 2⅜", increase 1 stitch in each side of piece inside 1 edge stitch (= 2 stitches increased). Increase like this every 3rd-4th-5th-5th (8th-8th) row 11-11-12-14 (13-16) times in total = 68-72-78-86 (92-102) stitches. When piece measures 15-18-21-24 (29-34) cm = 6"-7"-8¼"-9½" (11⅜"-13⅜"), bind off 5 stitches at the beginning of the 2 next rows for gusset (i.e. bind off stitches in each side of piece) = 58-62-68-76 (82-92) stitches. Put piece aside and knit another leg the same way. OVERALL: Slip both legs on to same circular needle size 3 mm = US 2,5, with bind off stitches towards each other = 116-124-136-152 (164-184) stitches. Insert 1 marker thread in the piece. NOW MEASURE PIECE FROM HERE! Work 6 rows moss stitch back and forth, begin mid front. Then work as follows: Cast on 3 stitches at the end of the next 2 rows (for front bands) = 122-130-142-158 (170-190) stitches. Insert 1 marker after 32-34-37-41 (44-49) stitches in from each side. Move the markers upwards when working, they mark front pieces and back piece. Now increase stitches mid front (i.e. in each side of piece) so that the front pieces overlap. Increase 1 stitch inside 1 edge stitch in each side of piece (= 2 stitches increased) - read INCREASE TIP! Increase on every 4th row 3-2-0-3 (2-13) more times, then on every 6th row 8-11-16-17 (21-15) times (= 12-14-17-21 (24-29) stitches increased in total in each side of piece) = 44-48-54-62 (68-78) stitches on each front piece = 146-158-176-200-218-248 stitches in total. READ ALL OF THE FOLLOWING SECTION BEFORE CONTINUING! DECREASE MID FRONT FOR NECK INSIDE 1 EDGE STITCH WHILE AT THE SAME TIME DIVIDING THE PIECE AND CASTING ON STITCHES FOR SLEEVE. DECREASE MID FRONT FOR NECK AS FOLLOWS: Work over all stitches until piece measures 17-20-25-28 (32-34) cm = 6¾"-8"-9¾"-11" (12½"-13⅜") from marker thread. Then decrease 1 stitch inside 1 edge stitch for neck in each side of piece (= 2 stitches decreased) - read DECREASE TIP! Decrease like this on every other row 20-24-27-31 (35-41) more times, then on every 4th row 2 times (= 23-27-30-34 (38-44) stitches decreased in total in each side of piece). DIVIDE THE PIECE AND CAST ON STITCHES FOR SLEEVE AS FOLLOWS: RIGHT FRONT PIECE: When piece measures 21-26-30-35 (40-43) cm = 8¼"-10¼"-11¾"-13¾" (15¾"-17") from marker thread, divide piece at the 2 markers and finish front and back piece separately. Adjust so that next row is from right side. Now work over stitches until first marker (= right front piece). Slip the remaining stitches on a stitch holder. Now cast on stitches for sleeve at the end of every row from right side as follows (NOTE: Continue to decrease inside 1 edge stitch at the beginning of row as before): Cast on 4-6-6-6 (6-6) stitches in 4-4-5-6 (7-8) times in total, then 17-17-16-16 (18-20) stitches 1 time in total (= 33-41-46-52 (60-68) stitches cast on in total for sleeve). When all stitches are cast on and all decreases are done, there are 54-62-70-80 (90-102) stitches on needle. Work until piece measures 45-53-62-70 (81-90) cm = 17¾"-21"-24⅜"-27½" (32"-35½") in total, measured from leg to shoulder. Bind off. LEFT FRONT PIECE: Work over the last stitches slipped on a stitch holder, until marker. Work as right front piece but reversed - i.e. cast on stitches for sleeve at the end of row from wrong side. Continue to decrease inside 1 edge stitch at the end of row as before for neck. BACK PIECE: = 58-62-68-76 (82-92) stitches. Cast on new stitches at the end of every row in each side for sleeves as follows: Cast on 4-6-6-6 (6-6) stitches in 4-4-5-6 (7-8) times in total, then 17-17-16-16 (18-20) stitches 1 time in total (= 33-41-46-52 (60-68) stitches cast on in total for sleeve in each side of piece) = 124-144-160-180 (202-228) stitches. When piece measures 44-52-61-69 (80-89) cm = 17¼"-20½"-24"-27⅛" (31½"-35") in total, bind off the middle 16-20-20-20 (22-24) stitches for neck and finish each shoulder/sleeve separately (= 54-62-70-80 (90-102) stitches remain on each shoulder). Work like this until piece measures 45-53-62-70 (81-90) cm = 17¾"-21"-24⅜"-27½" (32"-35½") in total, measured from leg to shoulder, adjust according to front pieces. Bind off. Work the other shoulder the same way. ASSEMBLY: Sew overarm/shoulder seams with grafting/kitchener stitches from right side. Sew underarm seams together edge to edge in front loop of outermost stitches. Sew legs together inside 1 edge stitch, and sew the 5 stitches bind off between legs together. Sew vent up to where the 3 new stitches were cast on in each side for band stitches and sew the 3 band stitches in each side of piece to overall. CROCHET EDGE: Crochet on hook size 2.5 mm = US C/2 with light beige around the entire opening mid front on overall as follows: ROW 1 (= from wrong side): Begin mid front at the bottom of left front piece, work 1 single crochet in first stitch where 3 band stitches were cast on, * 1 chain stitch, skip approx. 1 cm = ⅜", 1 single crochet in next stitch *, repeat from *-* (make sure to avoid a tight edge), continue crochet edge around overall until corner where decrease for neck began on left front piece, work tie as follows: 1 single crochet in tip, then work chain stitches for approx. 20-25 cm = 8"-9¾", turn and work 1 slip stitch in every chain stitch, then work 1 single crochet in tip on front piece again, work in the round until next tip (i.e. on right front piece), work tie, continue as before around the rest of overall down to where 3 band stitches were cast on, adjust to finish with 1 single crochet. ROW 2 (= from right side): Work 1 chain stitch, 1 single crochet around first chain stitch, * 4 chain stitches, 1 double crochet in 4th chain stitch from hook, skip 1 single crochet + 1 chain stitch + 1 single crochet, work 1 single crochet around next chain stitch *, repeat from *-* (make sure to work over ties so that the ties are under the edge, i.e. do not work in stitch in tie), finish with 1 slip stitch in first single crochet on previous row. Cut and fasten the yarn. Crochet on hook size 2.5 mm = US C/2 with light beige mix at the bottom around both legs as follows: ROUND 1: Begin at the seam. Work 1 single crochet in first stitch, * 1 chain stitch, skip 2 stitches, 1 single crochet in next stitch *, repeat from *-* and finish with 1 slip stitch in first single crochet at beginning of round. ROUND 2: Work 1 chain stitch, 1 single crochet around first chain stitch, * 4 chain stitches, 1 double crochet in 4th chain stitch from hook, skip 1 single crochet + 1 chain stitch + 1 single crochet, work 1 single crochet around next chain stitch *, repeat from *-* the entire round, finish with 1 slip stitch in first single crochet at beginning of round. Crochet on hook size 2.5 mm = US C/2 with light beige mix at the edge around both sleeves as follows: ROUND 1: Work 1 single crochet in first stitch at the bottom of sleeve, * 1 chain stitch, skip approx. 1 cm = ⅜", 1 single crochet in next stitch *, repeat from *-* (make sure to avoid a tight edge) and finish with 1 slip stitch in first single crochet at beginning of round. ROUND 2: Work 1 chain stitch, 1 single crochet around first chain stitch, * 4 chain stitches, 1 double crochet in 4th chain stitch from hook, skip 1 single crochet + 1 chain stitch + 1 single crochet, work 1 single crochet around next chain stitch *, repeat from *-* the entire round, finish with 1 slip stitch in first single crochet at beginning of round. Then work 1 tie like the one in the tip on right and left front piece, on the outside of left front piece, under sleeve (i.e. in the side) and on the inside of right front piece – make sure that the ties are at the same hight as tips on front piece. ---------------------------------------------------------- BEGIN PIECE FOR HAT HERE: ---------------------------------------------------------- HAT: Worked in the round on double pointed needles. Loosely cast on (68) 80-92-96-104 (112-116) stitches on double pointed needles size 2.5 mm = US 1,5 with light lavender. Work rib = knit 2/purl 2 for (2) 2-3-3-3 (4-4) cm = (3/4") ¾"-1⅛"-1⅛"-1⅛" (1½"-1½"). Switch to double pointed needles size 3 mm = US 2,5 and knit 1 round while AT THE SAME TIME decreasing 8 stitches evenly = (60) 72-84-88-96 (104-108) stitches. Continue with MOSS STITCH - see explanation above. When piece measures (9) 10-11-11-13 (13-14) cm = (3½") 4"-4⅜"-4⅜"-5⅛" (5⅛"-5½"), work in GARTER STITCH - see explanation above. On next knit round decrease (6) 8-7-8-8 (8-9) stitches evenly. Repeat decrease every other round (i.e. every knit round) (5) 5-5-5-5 (6-6) more times (= (6) 6-6-6-6 (7-7) decrease rounds in total) = (24) 24-42-40-48 (48-45) stitches. On next round knit all stitches together 2 by 2. Purl 1 round and repeat decrease on next knit round in size 6/9 and 12/18 months and (2 - 3/4) years (do not decrease in the other sizes) = (12) 12-11-10-12 (12-12) stitches. Pull a double yarn through the remaining stitches and fasten tightly. |
||||
Diagram explanations |
||||
|
||||

|
||||
|
Have you made this or any other of our designs? Tag your pictures in social media with #dropsdesign so we can see them! Do you need help with this pattern?You'll find tutorial videos, a Comments/Questions area and more by visiting the pattern on garnstudio.com. © 1982-2024 DROPS Design A/S. We reserve all rights. This document, including all its sub-sections, has copyrights. Read more about what you can do with our patterns at the bottom of each pattern on our site. |
||||


With over 40 years in knitting and crochet design, DROPS Design offers one of the most extensive collections of free patterns on the internet - translated to 17 languages. As of today we count 304 catalogs and 11422 patterns - 11417 of which are translated into English (US/in).
We work hard to bring you the best knitting and crochet have to offer, inspiration and advice as well as great quality yarns at incredible prices! Would you like to use our patterns for other than personal use? You can read what you are allowed to do in the Copyright text at the bottom of all our patterns. Happy crafting!
Comments / Questions (86)
Jeg fik trykket kommentar da det ikke var et egentligt spørgsmål, men ønsker selvfølgelig svar vedrørende min netop indsendte “klage” over fejl i garnmængde i jeres opskrift.
06.11.2020 - 15:05DROPS Design answered:
Hei Lea. Ja, det er ergelig å få for lite garn. Denne dressen er strikket opp og det er regnet ut hvor mye garn som er brukt i forhold til den strikkefastheten som er oppgitt i oppskriften. Er strikkefastheten overholdt? Denne dressen er også vært populær å strikke og vi har ikke fått tilbakemeldiger om for lite garn tidligere. mvh DROPS design
09.11.2020 - 12:33Jeg beklager at være den utilfredse kunde her, men efter at have fulgt jeres opskrift str.6-9 mdr kan jeg konstatere at der er et garnnøgle for lidt i den lavendel farvede og et for meget i den lyse til hækle kant. Det er for det første utilfredsstillende da min mormor der sidder og strikker denne fine dragt til min datter ikke kan blive færdig plus vi brænder inde med en hel garnnøgle. Men porto for en enkelt garnnøgle, det er ikke ok når man følger en opskrift.
06.11.2020 - 15:03Jeg har satt sammen benene og strikket 6 pinner med perlestrikk. Så har jeg lagt opp 3 masker på slutten av de to neste pinnene, altså foran på arbeidet. Men disse stolpemaskene forvirrer meg. Når jeg videre skal øke masker, skal dette skje på pinnen innenfor de tre maskene, altså slik at disse tre maskene hele veien skal ligge først og sist på pinnen og tilslutt brettes inn og sys til dressen?
05.11.2020 - 00:06DROPS Design answered:
Hei Guri, Du øker innenfor den 1 kantmasken på begge sider. God fornøyelse!
06.11.2020 - 10:10Dropsin Baby 33- 30 luodaanko hian silmukat heti kun aletaan kaventaan pääntietä
27.10.2020 - 14:58DROPS Design answered:
Hei, pääntien kavennukset alkavat ennen kuin luodaan hihojen silmukat.
17.11.2020 - 16:27Ich habe den Einteiler gestrickt und bin dabei zusammenzunähen. Leider verstehe ich überhaupt nicht wie man die Beine und den Schritt zusammennäht. Ich benötige Ihre Hilfe. Vielen Dank im Voraus
22.10.2020 - 18:34DROPS Design answered:
Liebe Anke, Sie nähen zwischen den Beinen die 5 Maschen, die Sie an beiden Beinen abgekettet haben, zusammen. Nachdem Sie die Beine auf dieselbe Nadel genommen haben, haben Sie 6 Reihen hin- und zurückgestrickt. Dieser Bereich wird nun zusammengenäht, d.h. bis zum Anschlagen der Blenden-Maschen. Den unteren Rand der Blenden-Maschen nähen Sie dann an, damit die Blenden unten befestigt sind.
23.10.2020 - 09:25Hallo, ich stricke die Babymütze und habe folgende Frage: In der Anleitung steht, dann im Perlmuster stricken. Bei einer Länge von 11 cm Krausrippen stricken. Diese angegebenen cm beziehen die sich auf die Länge vom Perlmuster oder die gesamte Länge der Mütze incl. Bündchen. Vielen Dank für Ihre Info.
02.09.2020 - 10:05DROPS Design answered:
Liebe Christel, die 11 cm werden von der Anschlagskante gemessen. Viel Spaß beim stricken!
02.09.2020 - 11:16Bonjour je n’ai pas compris qd vous dites diviser l’ouvrage et monter les mailles de manches est ce qu’il faut diviser ts l’ouvrage en 2 et travailler chaque côté séparément merci de me répondre
25.08.2020 - 16:19DROPS Design answered:
Bonjour Mme Sima, vous divisez l'ouvrage en 3 parties et terminez chaque devant et le dos séparément. La séparation des 3 pièces se fait au niveau des marqueurs de chaque côté. Tricotez les mailles du devant droit sur l'endroit jusqu'au 1er marqueur et mettez toutes les autres mailles (= dos + devant gauche) en attente, tricotez maintenant le devant droit en montant les mailles à la fin de ce rang (= sur l'endroit). Bon tricot!
25.08.2020 - 16:30Ik snap het begin al niet! Moet ik de pijp gewoon doorbreken? En ze dan later bij 6 cm ze naast elkaar zetten en verder in het rond breien? En later de pijp dichtnaaien? Groetjes
20.08.2020 - 19:15DROPS Design answered:
Dag Karin,
Je breit beide pijpen heen en weer en de zijkanten van het breiwerk zijn de binnenbeen naden. Je naait ze op het eind in elkaar.
21.08.2020 - 10:41Jeg stilte et spørsmål for noen minutter siden. Nå forstår jeg sammenhengen 👍
12.08.2020 - 19:59Hei! Jeg har satt i sammen beina, og økt tre masker i hver ende av rundpinnen (som da er foran på dressen). Videre skal det økes med 1 maske i hver ende. Men på str. 6/9 mnd. skal økningen gjentas hver 4. pinne 0 ganger. Når skal jeg begynne med økning hver 6. pinne? Med en gang? Totalt 17 ganger? Da vil dressen bli kortere i ryggen enn str. 1/3 mnd. Vennlig hilsen Sylvi
12.08.2020 - 19:46DROPS Design answered:
Hej Sylvi. Så fint att det löste sig. Mvh DROPS Design
13.08.2020 - 11:47