
Popular categories
Looking for a yarn?


|
||||
Baby Talk |
||||
 |
 |
|||
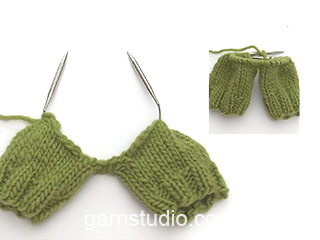
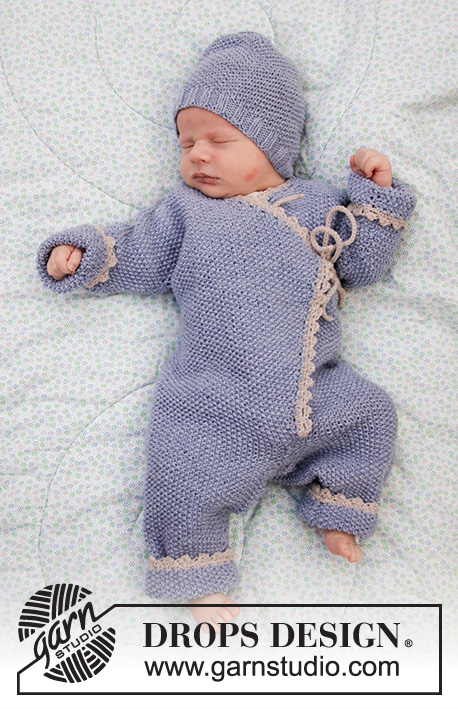
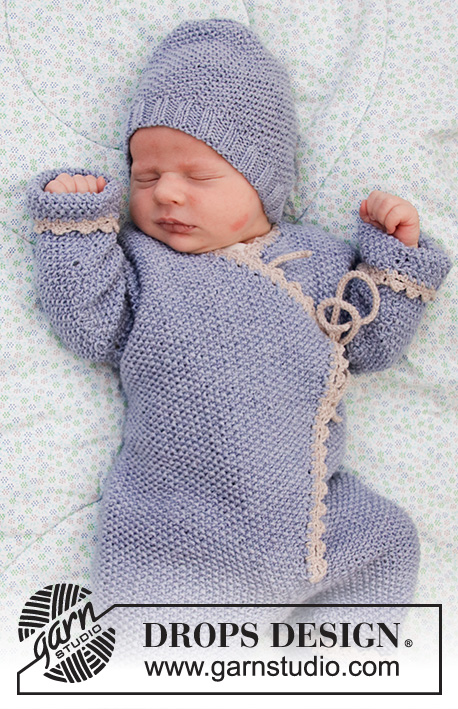
Knitted overall and hat for baby with moss stitch, garter stitch and crochet edge. The set is knitted in DROPS BabyMerino. Size overall: 1 month to 2 years Size hat: Premature to 4 years
DROPS Baby 33-30 |
||||
|
---------------------------------------------------------- EXPLANATION FOR THE PATTERN: ---------------------------------------------------------- GARTER STITCH (in the round - applies to hat): 1 ridge vertically = 2 rounds. Knit 1 round and purl 1 round. MOSS STITCH: Row 1: * Knit 1, purl 1 *, repeat from *-*. Row 2: Knit over purl and purl over knit. Repeat 2nd row upwards. INCREASE TIP (applies to overall): Increase inside 1 edge stitch. All increases are done from the right side. Increase by making 1 yarn over. Knit yarn over twisted on next row, it should not make holes. DECREASE TIP (applies to overall): Decrease inside 1 edge stitch. All decreases are done from the right side. Decrease as follows after 1 edge stitch: Slip 1 stitch knitwise, knit 1, pass slipped stitch over. Decrease as follows before 1 edge stitch: Knit 2 together. ---------------------------------------------------------- BEGIN PIECE FOR OVERALL HERE: ---------------------------------------------------------- OVERALL - SHORT OVERVIEW OF THE PIECE: Work from bottom up. First work 2 legs, then work the legs together and knit back and forth up to sleeve. Cast on stitches for sleeve in each side of piece, and work front and back piece separately until finished. Sew shoulder and sleeve seams and crochet an edge around the opening on overall at the end. Work entire overall in moss stitch. LEG: Worked back and forth on circular needle to make room for all the stitches. Cast on 46-50-54-58 (66-70) stitches (including 1 edge stitch in each side) on circular needle size 3 mm with light lavender. Work in MOSS STITCH over all stitches - see explanation above. REMEMBER THE KNITTING TENSION! When piece measures 6 cm, increase 1 stitch in each side of piece inside 1 edge stitch (= 2 stitches increased). Increase like this every 3rd-4th-5th-5th (8th-8th) row 11-11-12-14 (13-16) times in total = 68-72-78-86 (92-102) stitches. When piece measures 15-18-21-24 (29-34) cm, cast off 5 stitches at the beginning of the 2 next rows for gusset (i.e. cast off stitches in each side of piece) = 58-62-68-76 (82-92) stitches. Put piece aside and knit another leg the same way. OVERALL: Slip both legs on to same circular needle size 3 mm, with cast off stitches towards each other = 116-124-136-152 (164-184) stitches. Insert 1 marker thread in the piece. NOW MEASURE PIECE FROM HERE! Work 6 rows moss stitch back and forth, begin mid front. Then work as follows: Cast on 3 stitches at the end of the next 2 rows (for front bands) = 122-130-142-158 (170-190) stitches. Insert 1 marker after 32-34-37-41 (44-49) stitches in from each side. Move the markers upwards when working, they mark front pieces and back piece. Now increase stitches mid front (i.e. in each side of piece) so that the front pieces overlap. Increase 1 stitch inside 1 edge stitch in each side of piece (= 2 stitches increased) - read INCREASE TIP! Increase on every 4th row 3-2-0-3 (2-13) more times, then on every 6th row 8-11-16-17 (21-15) times (= 12-14-17-21 (24-29) stitches increased in total in each side of piece) = 44-48-54-62 (68-78) stitches on each front piece = 146-158-176-200-218-248 stitches in total. READ ALL OF THE FOLLOWING SECTION BEFORE CONTINUING! DECREASE MID FRONT FOR NECK INSIDE 1 EDGE STITCH WHILE AT THE SAME TIME DIVIDING THE PIECE AND CASTING ON STITCHES FOR SLEEVE. DECREASE MID FRONT FOR NECK AS FOLLOWS: Work over all stitches until piece measures 17-20-25-28 (32-34) cm from marker thread. Then decrease 1 stitch inside 1 edge stitch for neck in each side of piece (= 2 stitches decreased) - read DECREASE TIP! Decrease like this on every other row 20-24-27-31 (35-41) more times, then on every 4th row 2 times (= 23-27-30-34 (38-44) stitches decreased in total in each side of piece). DIVIDE THE PIECE AND CAST ON STITCHES FOR SLEEVE AS FOLLOWS: RIGHT FRONT PIECE: When piece measures 21-26-30-35 (40-43) cm from marker thread, divide piece at the 2 markers and finish front and back piece separately. Adjust so that next row is from right side. Now work over stitches until first marker (= right front piece). Slip the remaining stitches on a stitch holder. Now cast on stitches for sleeve at the end of every row from right side as follows (NOTE: Continue to decrease inside 1 edge stitch at the beginning of row as before): Cast on 4-6-6-6 (6-6) stitches in 4-4-5-6 (7-8) times in total, then 17-17-16-16 (18-20) stitches 1 time in total (= 33-41-46-52 (60-68) stitches cast on in total for sleeve). When all stitches are cast on and all decreases are done, there are 54-62-70-80 (90-102) stitches on needle. Work until piece measures 45-53-62-70 (81-90) cm in total, measured from leg to shoulder. Cast off. LEFT FRONT PIECE: Work over the last stitches slipped on a stitch holder, until marker. Work as right front piece but reversed - i.e. cast on stitches for sleeve at the end of row from wrong side. Continue to decrease inside 1 edge stitch at the end of row as before for neck. BACK PIECE: = 58-62-68-76 (82-92) stitches. Cast on new stitches at the end of every row in each side for sleeves as follows: Cast on 4-6-6-6 (6-6) stitches in 4-4-5-6 (7-8) times in total, then 17-17-16-16 (18-20) stitches 1 time in total (= 33-41-46-52 (60-68) stitches cast on in total for sleeve in each side of piece) = 124-144-160-180 (202-228) stitches. When piece measures 44-52-61-69 (80-89) cm in total, cast off the middle 16-20-20-20 (22-24) stitches for neck and finish each shoulder/sleeve separately (= 54-62-70-80 (90-102) stitches remain on each shoulder). Work like this until piece measures 45-53-62-70 (81-90) cm in total, measured from leg to shoulder, adjust according to front pieces. Cast off. Work the other shoulder the same way. ASSEMBLY: Sew overarm/shoulder seams with grafting/kitchener stitches from right side. Sew underarm seams together edge to edge in front loop of outermost stitches. Sew legs together inside 1 edge stitch, and sew the 5 stitches cast off between legs together. Sew vent up to where the 3 new stitches were cast on in each side for band stitches and sew the 3 band stitches in each side of piece to overall. CROCHET EDGE: Crochet on hook size 2.5 mm with light beige around the entire opening mid front on overall as follows: ROW 1 (= from wrong side): Begin mid front at the bottom of left front piece, work 1 double crochet in first stitch where 3 band stitches were cast on, * 1 chain stitch, skip approx. 1 cm, 1 double crochet in next stitch *, repeat from *-* (make sure to avoid a tight edge), continue crochet edge around overall until corner where decrease for neck began on left front piece, work tie as follows: 1 double crochet in tip, then work chain stitches for approx. 20-25 cm, turn and work 1 slip stitch in every chain stitch, then work 1 double crochet in tip on front piece again, work in the round until next tip (i.e. on right front piece), work tie, continue as before around the rest of overall down to where 3 band stitches were cast on, adjust to finish with 1 double crochet. ROW 2 (= from right side): Work 1 chain stitch, 1 double crochet around first chain stitch, * 4 chain stitches, 1 treble crochet in 4th chain stitch from hook, skip 1 double crochet + 1 chain stitch + 1 double crochet, work 1 double crochet around next chain stitch *, repeat from *-* (make sure to work over ties so that the ties are under the edge, i.e. do not work in stitch in tie), finish with 1 slip stitch in first double crochet on previous row. Cut and fasten the yarn. Crochet on hook size 2.5 mm with light beige mix at the bottom around both legs as follows: ROUND 1: Begin at the seam. Work 1 double crochet in first stitch, * 1 chain stitch, skip 2 stitches, 1 double crochet in next stitch *, repeat from *-* and finish with 1 slip stitch in first double crochet at beginning of round. ROUND 2: Work 1 chain stitch, 1 double crochet around first chain stitch, * 4 chain stitches, 1 treble crochet in 4th chain stitch from hook, skip 1 double crochet + 1 chain stitch + 1 double crochet, work 1 double crochet around next chain stitch *, repeat from *-* the entire round, finish with 1 slip stitch in first double crochet at beginning of round. Crochet on hook size 2.5 mm with light beige mix at the edge around both sleeves as follows: ROUND 1: Work 1 double crochet in first stitch at the bottom of sleeve, * 1 chain stitch, skip approx. 1 cm, 1 double crochet in next stitch *, repeat from *-* (make sure to avoid a tight edge) and finish with 1 slip stitch in first double crochet at beginning of round. ROUND 2: Work 1 chain stitch, 1 double crochet around first chain stitch, * 4 chain stitches, 1 treble crochet in 4th chain stitch from hook, skip 1 double crochet + 1 chain stitch + 1 double crochet, work 1 double crochet around next chain stitch *, repeat from *-* the entire round, finish with 1 slip stitch in first double crochet at beginning of round. Then work 1 tie like the one in the tip on right and left front piece, on the outside of left front piece, under sleeve (i.e. in the side) and on the inside of right front piece – make sure that the ties are at the same hight as tips on front piece. ---------------------------------------------------------- BEGIN PIECE FOR HAT HERE: ---------------------------------------------------------- HAT: Worked in the round on double pointed needles. Loosely cast on (68) 80-92-96-104 (112-116) stitches on double pointed needles size 2.5 mm with light lavender. Work rib = knit 2/purl 2 for (2) 2-3-3-3 (4-4) cm. Switch to double pointed needles size 3 mm and knit 1 round while AT THE SAME TIME decreasing 8 stitches evenly = (60) 72-84-88-96 (104-108) stitches. Continue with MOSS STITCH - see explanation above. When piece measures (9) 10-11-11-13 (13-14) cm, work in GARTER STITCH - see explanation above. On next knit round decrease (6) 8-7-8-8 (8-9) stitches evenly. Repeat decrease every other round (i.e. every knit round) (5) 5-5-5-5 (6-6) more times (= (6) 6-6-6-6 (7-7) decrease rounds in total) = (24) 24-42-40-48 (48-45) stitches. On next round knit all stitches together 2 by 2. Purl 1 round and repeat decrease on next knit round in size 6/9 and 12/18 months and (2 - 3/4) years (do not decrease in the other sizes) = (12) 12-11-10-12 (12-12) stitches. Pull a double yarn through the remaining stitches and fasten tightly. |
||||
Diagram explanations |
||||
|
||||

|
||||
|
Have you made this or any other of our designs? Tag your pictures in social media with #dropsdesign so we can see them! Do you need help with this pattern?You'll find tutorial videos, a Comments/Questions area and more by visiting the pattern on garnstudio.com. © 1982-2024 DROPS Design A/S. We reserve all rights. This document, including all its sub-sections, has copyrights. Read more about what you can do with our patterns at the bottom of each pattern on our site. |
||||


With over 40 years in knitting and crochet design, DROPS Design offers one of the most extensive collections of free patterns on the internet - translated to 17 languages. As of today we count 304 catalogues and 11422 patterns - 11422 of which are translated into English (UK/cm).
We work hard to bring you the best knitting and crochet have to offer, inspiration and advice as well as great quality yarns at incredible prices! Would you like to use our patterns for other than personal use? You can read what you are allowed to do in the Copyright text at the bottom of all our patterns. Happy crafting!
Comments / Questions (86)
Vielen lieben Dank 🤗 jetzt ist mir alles klar
25.06.2021 - 12:50Wunderschönen guten Tag. Habe baby talk angefangen, ist sehr gut erklärt, nur beim Teil "EINTEILER" bin ich verunsichert. Es steht geschrieben : in jeder 6. Reihe bei Grösse 68/74 17x 2 Maschen beidseitig zunehmen und maschen beidseitig zugenommen 54. Insgesamt maschen 176. (Ursprünglich 142 maschen) bei mir stimmt die rechnung nicht... bitte sind es nun nur 34 statt 54 Maschen zugenommen? Danke im voraus
24.06.2021 - 17:54DROPS Design answered:
Liebe Renata, es wurden 17 Maschen beidseitig zugenommen (= 1 M + 16 M in jeder6. Reihe = 17) - es waren davor 142 M + 17 +17 = 176 Maschen. Für jedes Vorderteil haben Sie jetzt insgesamt 54 Maschen (37 M vor den Zunahmen + 17 = 54 M) - (beim Rückenteil haben Sie immer noch 88 M wie zuvor). Viel Spaß beim stricken!
25.06.2021 - 07:20Can i get this pattern in stocking stitch. Thank you
05.06.2021 - 14:31DROPS Design answered:
Dear Rebecca, please understand, that we cannot modify our patterns to each individual request. We do have a number of patterns for baabyl overals, look through them, and you might find something similar to what you are looking for. Happy Knitting!
07.06.2021 - 03:43Auch ich verstehe nicht, wie man das ganze im Schritt zusammennähet, besonders nicht, wie man den Schlitz zu den 3 Blendemaschen schließt. Ich habe mir die Erklärungen aus den vorangegangenen Fragen mehrfach durchgelesen, aber nicht verstanden. Haben Sie vielleicht Bilder, ein Video oder eine andere Formulierung? Mit den bisherigen Formulierungen bin ich nicht weitergekommen.
17.05.2021 - 08:22DROPS Design answered:
Liebe Cécile, Sie nähen ja zuerst jedes Bein bis zu den abgeketteten Maschen zusammen, sodass Sie jeweils eine "Röhre" als Bein haben. Die je 5 Maschen, die Sie an beiden Seiten des Beins abgekettet haben, ergeben dann zusammen am oberen Ende des Beins 10 abgekettete Maschen. Es ist nun ein Schlitz zwischen den Beinen vorhanden, der von der Vorderseite des Einteilers zur Rückseite reicht. Diesen Schlitz nähen Sie nun zusammen, d.h. die 10 abgeketteten Maschen des einen Beins nähen Sie an die 10 abgeketteten Maschen des anderen Beins.
17.05.2021 - 22:27Ich habe noch eine Frage. Ich weiß nicht genau, wo ich das linke Vorderteil beginne. Wenn ich vom Rand zur Markierung an der Seite stricke, fehlt mir ja quasi ein Stück von der Hinreihe, und ich stricke zwei Rückreihen aufeinander. Und auf welcher Seite beginne ich das Rückenteil? Liebe Grüße!
17.05.2021 - 08:07DROPS Design answered:
Liebe Cécile, Sie können das linke Vorderteil ab dem Markierer mit der Hin-Reihe weiterstricken (den Maschenanschlag für den Ärmel machen Sie am Ende der nächsten Rück-Reihe) und können auch beim Rückenteil mit der Hin-Reihe weiterstricken (die Ärmelmaschen werden am Ende jeder Reihe angeschlagen). Möglich ist es aber auch, beim linken Vorderteil ab der Rück-Reihe zu stricken - Hauptsache, Sie bleiben weiter korrekt im Perlmuster und schlagen die Maschen am Ende der Rück-Reihen an. Weiterhin gutes Gelingen!
17.05.2021 - 22:36Hallo Zusammen,\r\nich bin an der Stelle, an der solange abgenommen wird, bis die Arbeit eine Länge von 30cm hat (Größe 3) und dann das Ganze geteilt wird. Hier steht der Hinweis, dass weiter neben einer Randmasche wie zuvor abgenommen werden soll. Bisher wurde jeweils beidseitig abgenommen. Verstehe ich es richtig, dass nach dem Teilen nur noch auf einer Seite abgenommen wird, auf der Seite des Kragens?
13.05.2021 - 00:14DROPS Design answered:
Liebe Cécile, ja ganz genau, nachdem die Arbeit in 3 Teilen verteilt wurde wird es für den Hals beim rechten Vorderteil am Anfang einer Hinreihe/beim linken Vorderteil am Ende einer Hinreihe abgenommen. Und jetzt schlagen Sie neuen Maschen für die Ärmel an, am Ende einer Hinreihe beim rechten Vorderteil/einer Rückreihe beim linken Vorderteil/beiseitig beim Rückenteil. Viel Spaß beim stricken!
17.05.2021 - 07:47Grüezi\r\nGibt es ein Video, wie ich den Einteiler umhäkeln kann
08.05.2021 - 11:20DROPS Design answered:
Liebe Barbara, solche Video haben wir nicht, aber hier finden Sie unsere Anleitungen für gehäkelte Overall. Viel Spaß beim häkeln!
20.05.2021 - 08:35Die ANleitungen hier sind echt tolle. Aber mich wundern warum das meiste von unten nach oben gestrickt wird und nicht von oben nach unten, was viel einfacher ist, und es gibt nachher meist weniger zu vernähen. Ausserdem ist es viel leicht anpassungen an die Grösse vorzunehmen. Egal ob Pullover (Raglan von oben) Jäcke, Hose Latzhose oder Overall. Ich hatte letzens eine Latzhose nach Anleitung von unten nach oben gestricht und dann die gleiche von oben nach unten, kein Vergleich!
27.04.2021 - 14:59Ich finde es braucht ein Video um zu sehen wie der Einteiler im Schritt zusammen genäht wird. Es gibt einige, die nicht wissen , wie man das macht. Mit der Antwort komme ich nicht weiter. Ich weiss immer noch nicht, wie man das richtig zusammen näht
21.04.2021 - 14:09DROPS Design answered:
Liebe Barbara, Sie haben ja an beiden Beinen jeweils 10 Maschen abgekettet (jeweils 5 beidseitig beim Stricken der Beine). Die 10 abgeketteten Maschen des einen Beins liegen, wenn Sie den Einteiler zurechtlegen, neben den 10 abgeketteten Maschen des anderen Beins. Diesen Schlitz schließen Sie, indem Sie die abgeketteten Maschen beider Beine aneinandernähen. Gutes Gelingen!
21.04.2021 - 17:43Ich weiss nicht, wie ich das verstehen soll: die 5 Maschen die zwischen den Beinen abgekettet wurden, zusammen nähen. Welche Maschen muss ich mit welchen Maschen zusammen nähen. Und wo gibt es einen Schlitz bis zu den 3 neu angeschlagenen Maschen.
20.04.2021 - 10:50DROPS Design answered:
Liebe Barbara, Sie nähen zwischen den Beinen die 5 Maschen, die Sie an beiden Beinen abgekettet haben, zusammen. Nachdem Sie die Beine auf dieselbe Nadel genommen haben, haben Sie 6 Reihen hin- und zurückgestrickt. Dieser Bereich wird nun zusammengenäht, d.h. bis zum Anschlagen der Blenden-Maschen. Den unteren Rand der Blenden-Maschen nähen Sie dann an, damit die Blenden unten befestigt sind.
20.04.2021 - 13:19