
Popular categories
Looking for a yarn?


|
||||||||||||||||||||||||||||||||||
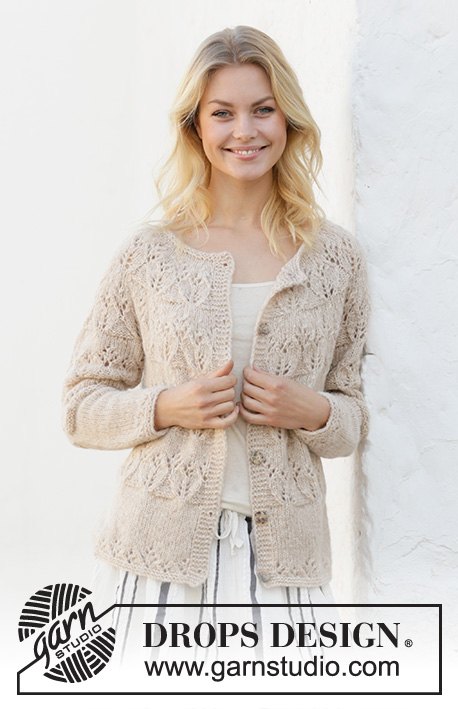
Birch Woods Jacket |
||||||||||||||||||||||||||||||||||
 |
 |
|||||||||||||||||||||||||||||||||
Knitted jacket with round yoke in DROPS Air. Piece is knitted with lace pattern. Size: S - XXXL
DROPS 202-12 |
||||||||||||||||||||||||||||||||||
|
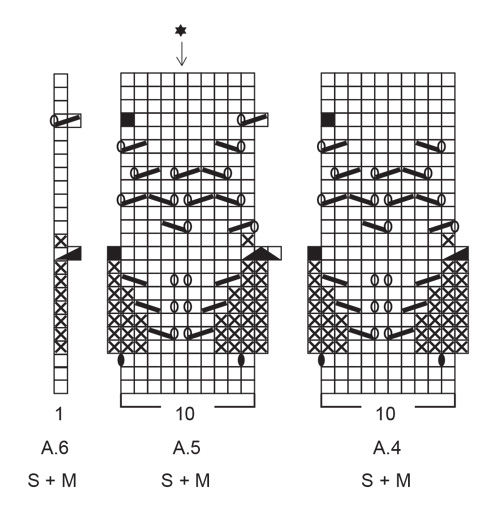
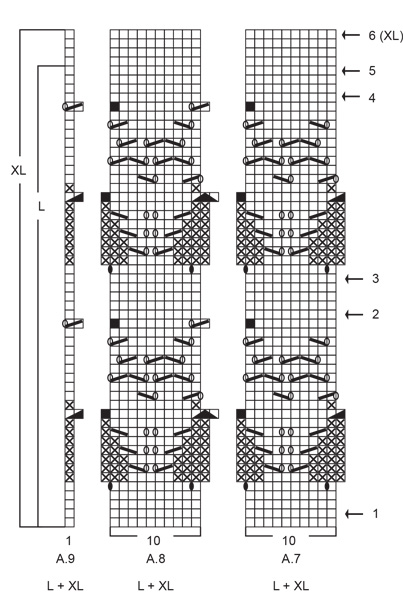
---------------------------------------------------------- EXPLANATION FOR THE PATTERN: ---------------------------------------------------------- GARTER STITCH (back and forth): Knit all rows. 1 ridge vertically = knit 2 rows. GARTER STITCH (worked in the round): 1 ridge = 2 rounds. Knit 1 round and purl 1 round. BUTTONHOLES: Decrease for buttonholes on right band. 1 BUTTONHOLE = knit third and fourth stitch from edge together and make 1 yarn over. On next row knit yarn over = hole. Decrease for buttonholes when piece measures: S: 3, 12, 22, 32, 42 and 51 cm M: 3, 13, 23, 33, 43 and 53 cm L: 4, 15, 25, 35, 45 and 55 cm XL: 3, 12, 21, 30, 39, 48 and 57, cm XXL: 3, 13, 22, 31, 40, 49 and 59, cm XXXL: 4, 15, 24, 33, 42, 51 and 61, cm PATTERN: See diagrams A.1 to A.9. Choose diagram for your size (applies to A.4 to A.9). INCREASE TIP (applies to sleeves): Work until 1 stitch remains before marker thread, 1 yarn over, knit 2 (marker thread is in the middle of these 2 stitches), 1 yarn over. On next round knit yarn overs twisted to avoid holes. Then work the new stitches in stocking stitch/pattern. DECREASE TIP (evenly): All decreases are done from the right side! To calculate how to decrease evenly, use the total number of stitches on row (e.g. 249 stitches), minus band stitches (10 stitches) and divide the remaining stitches by number of decreases to be done (e.g. 38) = 6.3. In this example decrease by knitting alternately approx. every 5th and 6th stitch and every 6th and 7th stitch together. ---------------------------------------------------------- START THE PIECE HERE: ---------------------------------------------------------- JACKET - SHORT OVERVIEW OF THE PIECE: Work back and forth on circular needle from mid front, and work bottom up to armholes. Work sleeves in the round on double pointed needles/a short circular needle, bottom up. Then slip body and sleeves together and finish yoke back and forth on circular needle from mid front. BODY: Cast on 171-181-201-211-231-251 stitches (including 5 band stitches in each side towards mid front) on circular needle size 5 mm with Air. Work 2 ridges in GARTER STITCH back and forth - read explanation above! Remember BUTTONHOLES on right band - read explanation above. Switch to circular needle size 5.5 mm and work from right side as follows: 5 band stitches in garter stitch, A.1 over the next 10 stitches, repeat A.2 until 6 stitches remain (= 15-16-18-19-21-23 repetitions of 10 stitches), A.3 over next stitch, finish with 5 band stitches in garter stitch. Continue until A.1, A.2 and A.3 have been worked vertically. Then work in stocking stitch with 5 band stitches in garter stitch towards mid front until piece measures 12-12-13-14-13-13 cm (or desired measurements - adjust the length of garment here is desired) - REMEMBER THE KNITTING TENSION! Work next row from right side as follows: 5 band stitches in garter stitch, A.4 over the next 10 stitches, repeat A.5 until 6 stitches remain (= 15-16-18-19-21-23 repetitions of 10 stitches), A.6 over next stitch, finish with 5 band stitches in garter stitch. Continue this pattern until A.4, A.5 and A.6 have been worked vertically. Repeat A.4, A.5 and A.6 1 more time vertically, but work last row from wrong side as follows: Work 42-45-49-51-55-59 stitches as before (= left front piece), cast off the next 6-6-8-8-10-12 stitches for armhole, work 75-79-87-93-101-109 stitches as before (= back piece), cast off the next 6-6-8-8-10-12 stitches for armhole and work the last 42-45-49-51-55-59 stitches as before (= right front piece) = 159-169-185-195-211-227 stitches. Piece measures approx. 32-32-33-34-35-35 cm. Put piece aside and work the sleeves. SLEEVE: Cast on 31-33-35-37-39-41 stitches on double pointed needles size 5 mm with Air. Work 2 ridges in GARTER STITCH in the round - read explanation above. Insert 1 marker at beginning of round and move the marker thread upwards when working. Use marker thread later when increasing mid under sleeve. Switch to double pointed needles/circular needle size 5.5 mm. Work next round as follows: Knit 0-1-2-3-4-0, A.1 over the next 10 stitches, repeat A.2 until 1-2-3-4-5-1 stitch remains on round (= 2-2-2-2-2-3 repetitions of 10 stitches), finish by knitting 1-2-3-4-5-1. Continue until A.1 and A.2 have been worked vertically. Then work in stocking stitch - REMEMBER THE KNITTING TENSION! When piece measures 7-7-8-7-9-8 cm, increase 1 stitch on each side of marker thread mid under sleeve - read INCREASE TIP. Increase like this every 3½-2½-2-2-1½-1½ cm 10-12-14-15-16-16 times in total = 51-57-63-67-71-73 stitches. AT THE SAME TIME when piece measures 21-19-19-18-16-14 cm (or desired measurements - adjust the sleeve length here if desired), work A.5 over all stitches – adjust so that stitch with star is mid on top of sleeve, and adjust pattern out to each side. I.e. when increases under sleeve are done, work as follows: Knit 0-3-1-3-0-1, A.4 (= 10 stitches), A.5 (= 4-4-5-5-6-6 repetitions of 10 stitches), A.6 over 1 stitch and knit 0-3-1-3-0-1. Work the stitches that do not fit the pattern in stocking stitch, and work the increased stitches in pattern A.4/A.5/A.6 (make sure to have the same number of decreases and yarn overs in the pattern). Continue this pattern until A.5 has been worked vertically. Repeat A.4/A.5/A.6 1 more time vertically, but work last round as follows: Cast off the first 3-3-4-4-5-6 stitches for armhole, work 45-51-55-59-61-61 stitches as before and cast off the last 3-3-4-4-5-6 stitches for armhole = 45-51-55-59-61-61 stitches. Piece measures approx. 41-39-39-38-38-36 cm (shorter measurements in the larger sizes because of longer yoke). Put piece aside and knit the other sleeve the same way. YOKE: Slip sleeves on to same circular needle 5.5 mm as body where armholes were cast off = 249-271-295-313-333-349 stitches (including 5 band stitches in each side towards mid front). NOW MEASURE PIECE FROM HERE! Begin from right side and work first row as follows: 5 band stitches in garter stitch, A.7 over the next 10 stitches, repeat A.8 until 6 stitches remain (number of stitches does not fit on 1st row – except in size M), A.9 over next stitch, finish with 5 band stitches in garter stitch. Continue this pattern - AT THE SAME TIME on round marked with arrow in A.7/A.8 decrease evenly as explained below: ARROW-1 (= wrong side): Decrease 38-40-44-42-42-38 stitches evenly - read DECREASE TIP = 211-231-251-271-291-311 stitches. (Now work A.8 19-21-23-25-27-29 times in width). ARROW-2 (= wrong side): Decrease 40-50-50-50-40-40 stitches evenly = 171-181-201-221-251-271 stitches. (Now work A.8 15-16-18-20-23-25 times in width). ARROW-3 (= wrong side): Decrease 40-40-40-40-40-40 stitches evenly = 131-141-161-181-211-231 stitches. (Now work A.8 11-12-14-16-19-21 times in width). ARROW-4 (= wrong side): Decrease 28-30-42-30-40-40 stitches evenly = 103-111-119-151-171-191 stitches. ARROW-5: Decrease 16-20-18-28-42-30 stitches evenly = 87-91-101-123-129-161 stitches. SIZE: XL-XXL: ARROW-6: Decrease 18-20 stitches evenly = 105-109 stitches. SIZE XXXL: ARROW-6 (= wrong side): Decrease 28 stitches evenly = 133 stitches. ARROW-7 (= wrong side): Decrease 20 stitches evenly = 113 stitches. ALL SIZES: When entire A.7, A.8 and A.9 have been worked, yoke measures approx. 20-22-23-24-25-27 cm. Switch to circular needle size 5 mm and work 2 ridges in garter stitch back and forth. Loosely cast off by knitting from right side but make sure to avoid a tight cast-off edge (switch to larger needle size if needed). ASSEMBLY: Sew the opening under the sleeves. Sew the buttons on to the left band. |
||||||||||||||||||||||||||||||||||
Diagram explanations |
||||||||||||||||||||||||||||||||||
|
||||||||||||||||||||||||||||||||||

|
||||||||||||||||||||||||||||||||||
|
||||||||||||||||||||||||||||||||||

|
||||||||||||||||||||||||||||||||||

|
||||||||||||||||||||||||||||||||||

|
||||||||||||||||||||||||||||||||||
|
||||||||||||||||||||||||||||||||||

|
||||||||||||||||||||||||||||||||||
|
Have you made this or any other of our designs? Tag your pictures in social media with #dropsdesign so we can see them! Do you need help with this pattern?You'll find tutorial videos, a Comments/Questions area and more by visiting the pattern on garnstudio.com. © 1982-2024 DROPS Design A/S. We reserve all rights. This document, including all its sub-sections, has copyrights. Read more about what you can do with our patterns at the bottom of each pattern on our site. |
||||||||||||||||||||||||||||||||||


With over 40 years in knitting and crochet design, DROPS Design offers one of the most extensive collections of free patterns on the internet - translated to 17 languages. As of today we count 304 catalogues and 11422 patterns - 11422 of which are translated into English (UK/cm).
We work hard to bring you the best knitting and crochet have to offer, inspiration and advice as well as great quality yarns at incredible prices! Would you like to use our patterns for other than personal use? You can read what you are allowed to do in the Copyright text at the bottom of all our patterns. Happy crafting!
Comments / Questions (35)
One more quick question: What does "I.e." in the sleeve directions mean?
28.06.2022 - 20:11DROPS Design answered:
Dear Mrs Walk, I.e. means "that is", or "in other words" or "that is to say". Hope it can help, happy knitting!
29.06.2022 - 09:13I am having such a hard time understanding on the sleeve directions what "adjust so that stitch with star is mid on top of sleeve, and adjust pattern out to each side "means ? Also how will I know " when increases under sleeve are done"? Thank you so much for your help.
28.06.2022 - 19:44DROPS Design answered:
Dear Mrs Walk, this lesson explains how to center a diagram mid on the sleeve - you have to increase 2 sts mid under sleeves on every 3½-2½-2-2-1½-1½ cm 10-12-14-15-16-16 times in total - the last increase is done when you get the 51-57-63-67-71-73 stitches. Happy knitting!
29.06.2022 - 09:10Betreft telpatroon A4 en A5 maat XXL+XXXL op één na bovenste toer. Als ik hier de steken tel kom ik op 19 steken uit . Alle andere toeren bestaan uit 20 steken. Hoe moet ik deze toer breien?
01.10.2021 - 23:31DROPS Design answered:
Dag Gerda,
Deze een na laatste toer heeft hetzelfde aantal steken, alleen brei je aan het eind van het telpatroon de laatste steek van A.4 samen met de eerste steek van A.5. Hetzelfde geld voor A.5 en A.6. Dit is aangegeven met een zwart blokje in het ene telpatroon en een extra steek in het volgende telpatroon. Het totaal aantal steken blijft dus gelijk.
12.10.2021 - 10:41I am having trouble understanding the sleeve instructions. I have centred the pattern over the mid sleeve but just can't make sense of what to do with the under portion. I don't know when I'm.supposed to be using the A4 and A6, only on the rows when I'm making the increases? Also I am making a large size and the increases bring me to 63 stitches after 14 repetitions instead of 16. Any tips would be helpful.
27.09.2021 - 18:02DROPS Design answered:
Dear Lorna D, when your sleeve is 19 cm (for size L), work A.5 over all stitches – adjust so that stitch with star is mid on top of sleeve, and from the middle count out . So when increases under sleeve are done, work as follows: Knit 1, A.4 (= 10 stitches), A.5 (= 5 repetitions of 10 stitches), A.6 over 1 stitch and knit 1. The stitches under the sleeve that cannot be fitted into the pattern should be knitted (with stotcking stitch). Happy Stitching!
27.09.2021 - 20:44Jeg har et spørgsmål til ærmet. Jeg har allerede pillet op 1 gang, men kan ikke få mønster A1, 2 og 3 til at passe. På første pind efter retkanten skal man starte med 1 retmaske før A1 og 2 retmasker efter A3. Det er jeg fortsat med på alle pinde i mønsteret - er det forkert ? Hullerne i mønsteret passer ikke. Med venlig hilsen, Susanne Guldberg
23.07.2021 - 15:22DROPS Design answered:
Hej Susanne, det kan være en god ide at sætte 1 mærke imellem hver rapport A.1/A.2 (10masker), så er du sikker på at du ikke kommer til at forskyde mønsteret. Du tager ud på hver side af de 2 midterste masker (dem i ret). God fornøjelse!
05.08.2021 - 13:48Row 9 for A1 and A2 show a black blocked stitch - described as “this square is not a stitch” ...how do I handle it ...in A1 the # of stitches goes from 10 to 9 and then back to 10 next row....could you please write out directions for the rows that have this symbol ...I am stuck!
01.05.2021 - 01:47DROPS Design answered:
Dear Donna, there are 2 stitches indreased at the beginning of the pattern on both side of the pattern on each sleeve (= 8 extra stitches). You start with 90 stitch, , increas 8 stitch 22 times (176 stitch), 90 + 176 + 8 = 274 stitch. Changed of stitch number comes form either having yarnovers without corresponding decreases or vica versa. Happy Knitting!
01.05.2021 - 03:56Undskyld mit sidste spørgsmål. Jeg manglede en pind.
07.06.2020 - 22:39DROPS Design answered:
God fornøyelse videre på denne flotte jakken. mvh DROPS dedsign
09.06.2020 - 11:59Hej, i mønster A.5 på 19 pind må der også være fejl i slutningen, for jeg slutter også her med 2 ret og 5 kantmasker, i stedet for 1 ret og 5 kanrmasker. Hvor opstår fejlen? Strikker str. M.
07.06.2020 - 22:20DROPS Design answered:
Hei Lisa. Flott at du selv fant du hvor feilen oppstod. mvh DROPS design
09.06.2020 - 11:56Nu er jeg begyndt at strikke i str. M, og i sidste mønsterpind på kroppen i mønster A.2 slutter jeg med 10 ret og 5 kantmasker. Jeg har strikket om 3-4 gange, og kan ikke få det anderledes, med mindre jeg vil slutte med 2 sammen, slå om, 1 ret, 5 kantm. Hvor er fejlen?
05.06.2020 - 22:07DROPS Design answered:
Hei Lisa. Her burde det være lagt til en maske i A.3 / 9. rad. Takk for at du gjorde oss oppmerksom på dette, vi lager en rettelse. mvh DROPS design
09.06.2020 - 08:48Hej Det ser ud til der er fejl i mønster A.2. 9. pind. Jeg er sikker på omslaget skal være før de 2 masker ret sammen. Så ligner mønsteret bedre som på billedet.
23.05.2020 - 21:04DROPS Design answered:
Hej Lisa, hvis du kigger på det øverste hul i diagrammet (det hul som er alene), så kan du se på trøjen at indtagningen er lavet inden omslaget. Du er selvfølgelig velkommen til at flytte hullet :)
27.05.2020 - 16:02