
Popular categories
Looking for a yarn?


|
|||||||||||||||||||||||||
DROPS 60-9 |
|||||||||||||||||||||||||
 |
 |
||||||||||||||||||||||||
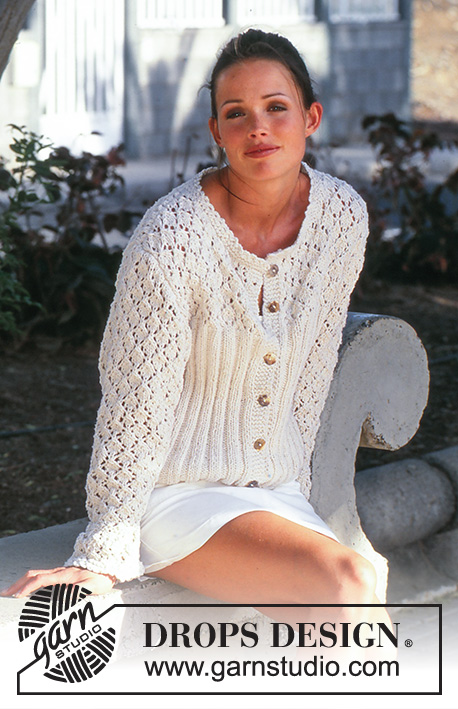
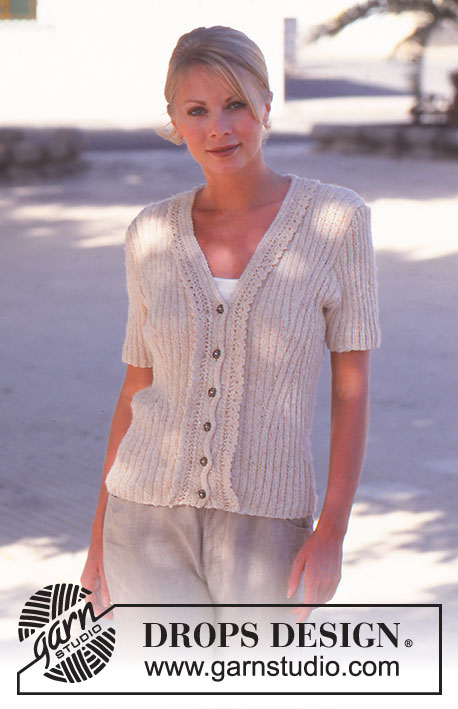
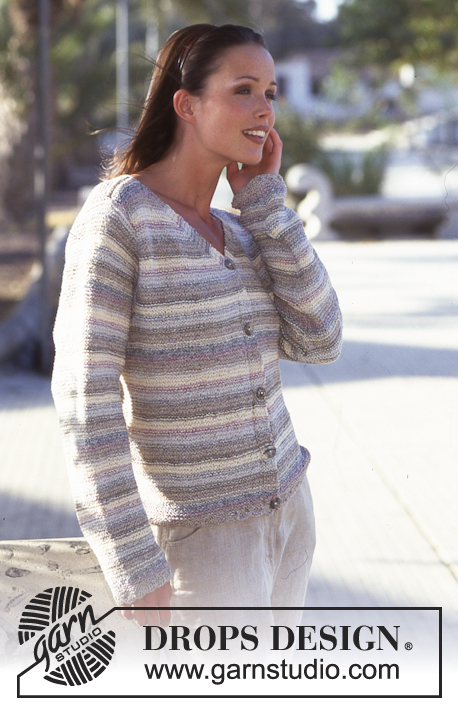
DROPS Cardigan in Denim with cables and rib.
DROPS 60-9 |
|||||||||||||||||||||||||
|
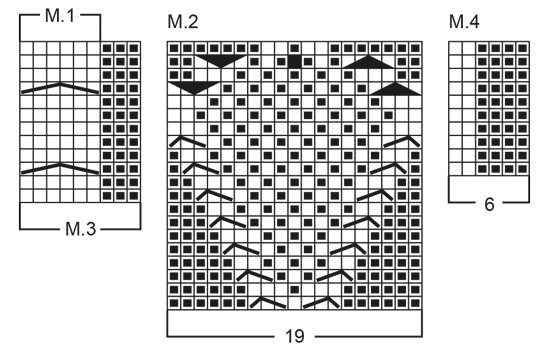
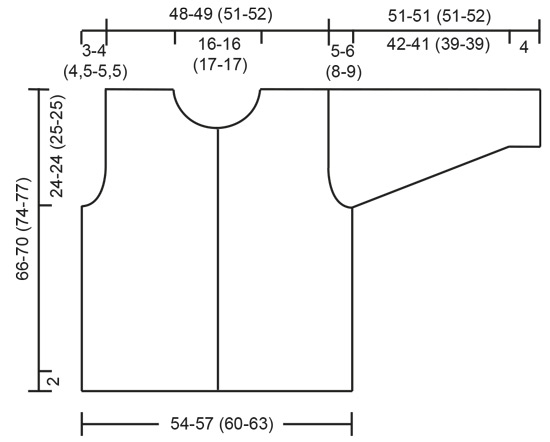
Gauge: 20 sts x 26 rows on needles size 4.5 and stockinette st = 10 x 10 cm [4" x 4"]. Washing: This pattern is written based on the assumption that the garment will be washed at 40 C [104 F], laid out in its proper dimensions (see schematic chart) and dried flat before use (not in an electric dryer). Under these circumstances the denim yarn will not shrink more than other cotton yarn! The denim yarn will become lighter (in color) every time it is washed (exactly like jeans). The garment should be washed separately the first times. Rib: * K 2, P 2 *. Repeat from * - *. Garter st, when knitting flat: Knit all sts, all rows. Garter st, when knitting in the round: *Rnd 1, knit. Rnd 2, purl.* Repeat from * - *. Bobble: Increase 1 st to 4 sts by knitting alternately into the front and back of the st (two sets). Knit 4 rows of stockinette st back and forth over these 4 sts. After the 4th row pass the 3rd, 2nd and 1st sts over the 4th st. Pattern: See chart (1 chart = 1 repeat). The pattern is seen from the right side. Binding off over cable: When you are binding off over the cable you must reduce the number of sts from 6 to 3. Decrease by K 2 tog 3 times across cable sts, then bind off sts in the normal fashion. Body: Cast on 216-228 (240-252) sts on larger circular needles and knit rib for 3 cm [1.25"] with 1 edge st at each side (center front) kept in garter st throughout. Establish the pattern and at the same time increase 10 sts evenly distributed over the first 38 sts, 10 sts over the center 15 sts at the back, 10 sts evenly distributed over the last 38 sts = 246-258 (270-282) sts - establish the pattern as follows: 1 edge st, Pattern 1 (6 sts), 3 sts reverse stockinette st, Pattern 2 (19 sts), 2 repeats of Pattern 3 (18 sts), 64-70 (76-82) sts of Pattern 4, Pattern 1 (6 sts), 2 repeats of Pattern 3 (18 sts), 64-70 (76-82) sts of Pattern 4, Pattern 1 (6 sts), Pattern 3 (9 sts), 3 sts reverse stockinette st, Pattern 2 (19 sts), Pattern 3 (9 sts), 1 edge st. Knit in pattern as established. When the work measures 42-46 (49-52) cm [16.5" - 18-⅛" (19.25" - 20.5")], keeping in pattern knit the next row as follows: 62-65 (68-71) sts for the front, bind off 4 sts for armhole, 114-120 (126-132) sts for the back, bind off 4 sts for armhole, 62-65 (68-71) sts for the front. Knit the rest of each part separately. Front: = 62-65 (68-71) sts. Bind off for armholes every other row: 3 sts 0-1 (1-2) times, 2 sts 1 time, 1 st 3-2 (3-3) times = 57-58 (60-60) sts. When the work measures 58-62 (66-69) cm [22-⅞" - 24-⅜" (26" - 27-⅛")] bind off for the neck every other row: 10-10 (11-11) sts 1 time (see «Binding off over cable»), 3 sts 1 time, 2 sts 2 times, 1 st 2 times. On the row before the work measures 66-70 (74-77) cm [26" - 27-⅝" (29-⅛" - 30.25")] dec 6 sts evenly distributed on the row. Bind off. Back: = 114-120 (126-132) sts. Bind off for armholes as on the front = 104-106 (110-110) sts. When the work measures 64-68 (72-75) cm [25.25" - 26.75" (28.25" - 29.5")] bind off the center 36-36 (38-38) sts for the neck (see «Binding off over cable»). Bind off 2 sts at each neck edge on the next row. Bind off when the work measures 66-70 (74-77) cm [26" - 27-⅝" (29-⅛" - 30.25")]. Sleeves: Cast on 48-48 (54-54) sts on double pointed needles; join and place a marker at the join. Knit rib for 4 cm [1.5"]. Change to Pattern 4 and inc 1 st each side of marker 24-24 (23-23) times every 4th row = 96-96 (100-100) sts. When the work measures 46-45 (43-43) cm [18-⅛" - 17.75" (16-⅞" - 16-⅞")] bind off 2 sts each side of marker and knit the rest back and forth on the needles. Bind off for sleeve caps at each side every other row: 4-4 (3-3) sts 7-8 (11-12) times, bind off. The work measures approx. 51-51 (51-52) cm [20" - 20" (20" - 20.5")]. Assembly: Sew shoulder seams. Pick up approx. 130-140 (150-160) sts along the left front on smaller needles and knit rib for 3 cm [1.25"] back and forth on the needles, bind off. Repeat along the right front, but after 1 cm [3/8"] make 8 buttonholes evenly distributed on the row (1 buttonhole = bind off 2 sts and cast on 2 new sts over the bound-off sts on the next row). Collar: Pick up approx. 92-96 sts (divisible by 4) from the wrong side around the neck on larger needles and knit 2 rows garter st, then knit rib, keeping 1 st at each center front edge in garter st throughout. When the collar measures 3 cm [1.25"] increase on the right side as follows: each 2 purl sts are increased to 3 purl sts over the whole row. When the collar measures 5 cm [2"] increase on the right side as follows: each 3 purl sts are increased to 4 purl sts over the whole row. When the collar measures 9 cm [3.5"] knit 2 rows garter st, bind off. Sew on the sleeves and the buttons. |
|||||||||||||||||||||||||
Diagram explanations |
|||||||||||||||||||||||||
|
|||||||||||||||||||||||||
|
|||||||||||||||||||||||||
|
|||||||||||||||||||||||||
|
Have you made this or any other of our designs? Tag your pictures in social media with #dropsdesign so we can see them! Do you need help with this pattern?You'll find tutorial videos, a Comments/Questions area and more by visiting the pattern on garnstudio.com. © 1982-2024 DROPS Design A/S. We reserve all rights. This document, including all its sub-sections, has copyrights. Read more about what you can do with our patterns at the bottom of each pattern on our site. |
|||||||||||||||||||||||||


With over 40 years in knitting and crochet design, DROPS Design offers one of the most extensive collections of free patterns on the internet - translated to 17 languages. As of today we count 304 catalogs and 11422 patterns - 11417 of which are translated into English (US/in).
We work hard to bring you the best knitting and crochet have to offer, inspiration and advice as well as great quality yarns at incredible prices! Would you like to use our patterns for other than personal use? You can read what you are allowed to do in the Copyright text at the bottom of all our patterns. Happy crafting!
Comments / Questions (15)
Lynne Thompson wrote:
Could you tell me what the 'finished measurement' refer to - is it the measurement from the circumference - button band to button band? I am wanting to knit this but don't know which size to do. Many thanks.
23.03.2016 - 16:21DROPS Design answered:
Dear Mrs Thompson, the finished measurements at the beg of the pattern refers to circumference - you will find at the bottom of the pattern a measurement chart with all measurements in cm (convert here into inch), compare these to a similar garment you have and like the shape to find out the matching size (read more here). Happy knitting!
23.03.2016 - 17:26Der er for mange masker i opskriften L der mangler 6 m hvis man følger opskriften, det er surt! Det passer med at de to gange der skal strikke 3 glatmasker, - at de udelades??? Hvad gør jeg? Det er opskrift 60-9
26.03.2015 - 11:39DROPS Design answered:
Hej Joan, jo opskriften stemmer! Du strikker: 1, M1 3 M2 M3x2 82 M1 M3x2 82 M1 M3 3 M2 M3 1 = 1+6+3+19+18+82+6+18+82+6+9+3+19+9+1=282m God fornøjelse!
18.05.2015 - 10:21Geachte Graag zou ik deze trui willen breien maar een patroontje nl. de M3 is tekort
06.01.2013 - 13:55DROPS Design answered:
Het patroon zou moeten kloppen. Ook telpatroon M.3. Hij loopt over 9 st in de breedte. U herhaalt het patroon gewoon door in de hoogte.
06.01.2013 - 14:55Bij 54 steken voor de boord van de mouw kom je uit bij twee rechts twee links op vier rechts achter elkaar. Boord 52 steken maken is mooier. Naam voor het vest: raja's vest. Verder prima patroon. Met dank.
28.11.2012 - 00:01Es steht doch "76 Maschen VON M4", also nicht die letzten 2 rechts. Wegen der Symmetrie!
04.07.2012 - 11:11Danke. 270 M habe ich auch, aber wie ist es damit??? Bei Grösse M: 76 M in M4 . M4 sind 6M . 76M geteilt duch 6M = 12,6x der Rapport von M4. Schreibfehler?? Sollen es nur 72M sein = 12x??? Verstehe ich echt nicht.
03.07.2012 - 14:54So, jetzt bin ich soweit... 24 M sind für den Zopf in der Rm, das lässt mir die 76M für M4, aber da sind 4M irgendwie zuviel, ich müsste mit 4 li M aufhören vor M1 in der RM und ebenfalls mit 4 li M vor M1 an der Seite/Vt. M1, M3, 3 M. glatt mit der linken Seite nach aussen, M2, M3, 1 Randm. Ist das richtig???
03.07.2012 - 13:08DROPS Design answered:
Ich habe nochmals durchgerechnet, die Aufteilung in der Anleitung ist richtig. (Rm+6+3+19+18+76+6+18+76+6+9+3+19+9+1Rm = 270 M)
03.07.2012 - 13:58Jana Lelanz wrote:
Ich komme auf 47 M hier(1 RM+6M M1+ 3liM+ 19M von M2 und 18M von M3 x2) und das lässt mir 29 M laut eurer Rechnung für M4 bis 1. Zopf M1 in der RM. Könntet ihr die Anleitung bitte etwas genauer schreiben?? Punkte und Kommas helfen hier nicht um die Reihenfolge in welcher M-Rapport wann, wieviele Male gestrickt über welche Maschenanzahl gestrickt werden soll? Haben andere dieselben Probleme hier?
03.07.2012 - 10:37Jep, habe den 3. Zopf gefunden, aber die 76 M mit M4 sind noch verwirrend. Was mache ich falsch??
03.07.2012 - 10:16DROPS Design answered:
Siehe oben
03.07.2012 - 13:58Noch eine Frage. Bei Grösse M: 76 M in M4 . M4 sind 6M . 76M geteilt duch 6M = 12,6x der Rapport von M4. Schreibfehler?? Sollen es nur 72M sein = 12x??? Verstehe ich echt nicht.
03.07.2012 - 10:06