DROPS Snow
DROPS Snow
100% Wool
from 2.65 $ /50g
Get the yarn to make this pattern from 29.15$.

The yarn cost is calculated from the pattern’s smallest size and the yarn’s cheapest product type. Looking for an even better price? You might find it on the DROPS Deals!

DROPS SS24

Summer Shells

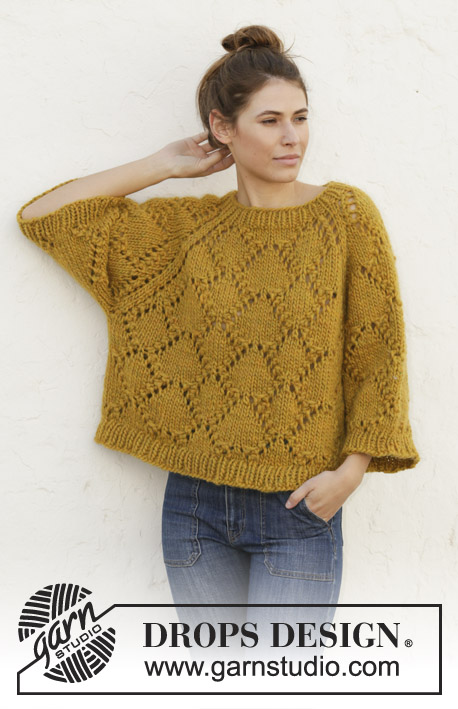
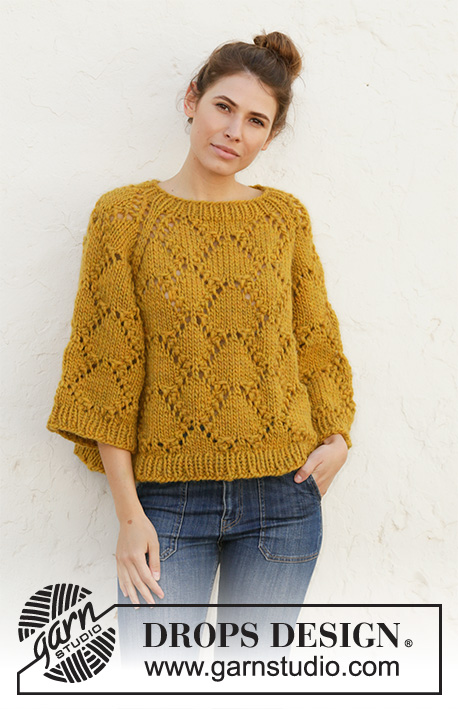
Knitted sweater with raglan in 1 thread DROPS Snow or 1 thread DROPS Wish or 2 threads Air. The piece is worked top down with lace pattern. Sizes S - XXXL.

DROPS 200-5
DROPS Design: Pattern no ee-657
Yarn group E or C + C
-------------------------------------------------------

SIZES:
S - M - L - XL - XXL – XXXL

Finished measurements:
Chest measurements: 118-122-134-142-154-158 cm = 46½"-48"-52¾"-55¾"-60½"-62"
Full length: 56-58-60-62-64-66 cm = 22"-22¾"-23⅝"-24⅜"-25¼"-26"

All measurements in charts are in cm.

MATERIALS:
DROPS SNOW from Garnstudio (belongs to yarn group E)
550-600-650-700-800-850 g color 85, curry

or use:
DROPS WISH from Garnstudio (belongs to yarn group E)
400-450-450-500-650-650 g color 12, curry

Or use:
DROPS AIR from Garnstudio (belongs to yarn group C)
400-400-450-500-550-600 g color 22, yellow

KNITTING GAUGE:
10 stitches in width and 14 rows in height with stockinette stitch = 10 x 10 cm = 4" x 4" with 1 thread Snow 1 thread Wish or 2 threads Air.

NEEDLES:
DROPS CIRCULAR NEEDLE SIZE 9 MM = US 13: length 40 cm = 16" and 80 cm = 32" for pattern.
DROPS CIRCULAR NEEDLE SIZE 8 MM = US 11: length 40 cm = 16" and 80 cm = 32" for rib.
The needle size is only a guide. If you get too many stitches on 10 cm = 4", change to a larger needle size. If you get too few stitches on 10 cm = 4", change to a smaller needle size.

-------------------------------------------------------

Alternative Yarn – See how to change yarns here
Yarn Groups A to F – Use the same pattern and change the yarn here
Yarn usage using an alternative yarn – Use our yarn converter here

-------------------------------------------------------

DROPS Snow
DROPS Snow
100% Wool
from 2.65 $ /50g
Get the yarn to make this pattern from 29.15$.

The yarn cost is calculated from the pattern’s smallest size and the yarn’s cheapest product type. Looking for an even better price? You might find it on the DROPS Deals!

Pattern instructions

NOTE: This pattern is written in American English. All measurements in charts are in cm. For conversion from inches to cm - click here. There are different terms for crocheting in American and British English. If this pattern includes crochet, click for "crochet terms" here. For this pattern in British English, please click here.
-------------------------------------------------------

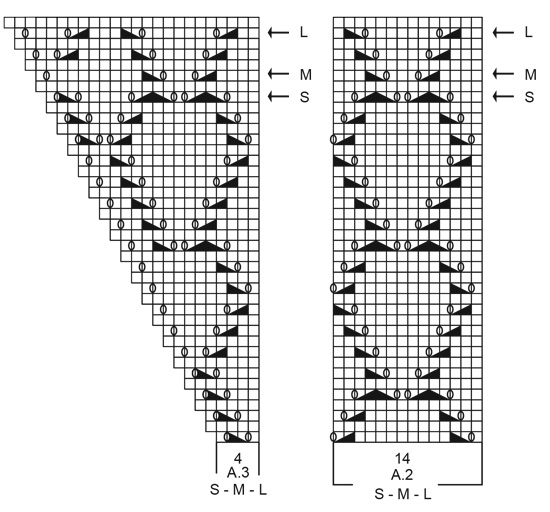
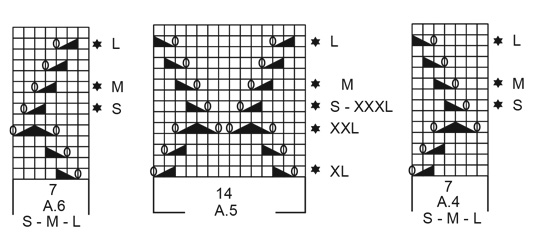
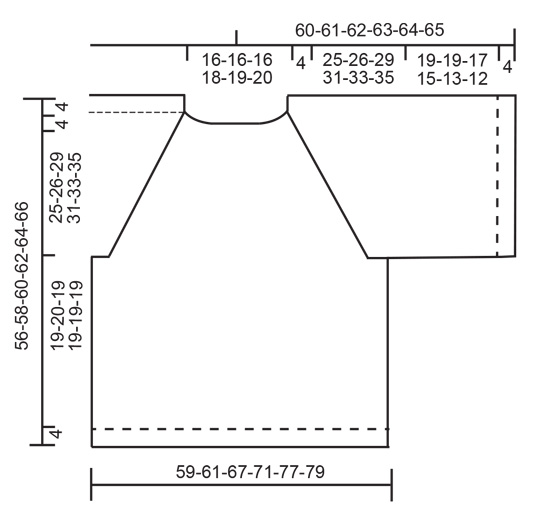
EXPLANATIONS FOR THE PATTERN:

-------------------------------------------------------

PATTERN:
See diagrams A.1 to A.6 (A.4 and A.6 apply to sizes S, M and L). Choose diagram for your size.

DECREASE TIP (evenly spaced):
To work out how to decrease evenly, count the total number of stitches on the needle (e.g. 58 stitches) and divide by the number of decreases to be made (e.g. 2) = 29.
In this example decrease by knitting each 28th and 29th stitch together.

INCREASE TIP (evenly spaced):
To work out how to increase evenly, count the total number of stitches on the needle (e.g. 118 stitches) and divide by the number of increases to be made (e.g. 24) = 4.9.
In this example increase by making 1 yarn over after approx. each 5th stitch. On the next row work the yarn overs twisted to avoid holes.

-------------------------------------------------------

START THE PIECE HERE:

-------------------------------------------------------

SWEATER - SHORT OVERVIEW OF THE PIECE:
The piece is worked in the round with circular needle top down. Sleeves are worked in the round with short circular needle.

SWEATER:
NECK:
Cast on 56-58-60-64-64-68 stitches with circular needle size 8 mm = US 11 and 1 thread Snow 1 thread Wish or 2 threads Air. Knit 1 round. Then work rib (knit 1, purl 1) for 4 cm.

YOKE:
Change to circular needle size 9 mm = US 13. Knit 1 round where you decrease 0-2-4-0-0-4 stitches evenly spaced – read DECREASE TIP = 56-56-56-64-64-64 stitches. Now work pattern – choose diagram for your size, as follows: * insert a marker thread here, A.1 over the first 3-3-3-4-4-4 stitches, A.2 over the next 14 stitches, A.3 over the next 4-4-4-5-5-5 stitches (= back/ front piece), insert a marker thread here, A.1 over the next 3-3-3-4-4-4 stitches, A.3 over the next 4-4-4-5-5-5 stitches (= sleeve) *, work from *-* 1 more time on the round. There are now 4 marker threads in the piece. They follow your work onwards and mark the transitions between body and sleeves. Continue this pattern in the round. Increase on each side of the diagrams to raglan (increases are drawn into the diagrams). REMEMBER THE KNITTING GAUGE! When you have worked as far as the round with an arrow in the diagrams (see arrow for your size), there are 192-200-216-232-248-256 stitches on the round. The piece measures approx. 29-30-33-35-37-39 cm = 11⅜"-11¾"-13"-13¾"-14½"-15¼" from the cast-on edge and down mid front. The next round is worked as follows:
Work the first 55-57-61-65-69-71 stitches (= back piece), place the next 41-43-47-51-55-57 stitches on a thread (= sleeve), cast on 4-4-6-6-8-8 new stitches on the needle (= in side under sleeve), work the next 55-57-61-65-69-71 stitches (= front piece), place the next 41-43-47-51-55-57 stitches on a thread (= sleeve), cast on 4-4-6-6-8-8 new stitches under sleeve. THE PIECE IS NOW MEASURED FROM HERE!

BODY:
= 118-122-134-142-154-158 stitches. Insert a marker thread in each side, in the middle of the 4-4-6-6-8-8 new stitches cast on under the sleeves (= 2-2-3-3-4-4 new stitches on each side of the marker thread). Start the round by the marker thread on one side of the piece and work pattern, beginning on the round marked with a star for your size in the diagram(s) as follows:

Sizes S, M and L:
* Knit 1-2-5 stitches, A.4 over the next 7 stitches, A.5 over the next 42 stitches (= 3 repeats of 14 stitches), A.6 over the next 7 stitches, knit 2-3-6 stitches *, work from *-* 1 more time on the round.

Sizes XL, XXL and XXXL:
* Knit 0-3-4 stitches, A.5 over the next 70 stitches (= 5 repeats of 14 stitches), knit 1-4-5 stitches *, work from *-* 1 more time on the round.

Continue in the round like this until the piece measures approx. 19-20-19-19-19-19 cm = 7½"-8"-7½"- 7½"- 7½"- 7½" – adjust so that you finish after round 5 or 13 in A.5. Knit 1 round where you increase 24-24-26-28-30-32 stitches evenly spaced – read INCREASE TIP = 142-146-160-170-184-190 stitches. Change to circular needle size 8 mm = US 11. Work rib (knit 1, purl 1) in the round for 4 cm = 1½". Bind off with knit over knit and purl over purl. Make sure that the bind-off edge is not tight. Use a size larger needle if necessary. The sweater measures approx. 56-58-60-62-64-66 cm = 22"-22¾"-23⅝"-24⅜"-25¼"-26" from the shoulder down.

SLEEVE:
Place the 41-43-47-51-55-57 stitches from the thread on the one side of the piece back on short circular needle size 9 mm = US 13 and knit up 1 stitch in each of the 4-4-6-6-8-8 stitches cast on under the sleeve = 45-47-53-57-63-65 stitches. Insert a marker thread in the middle of the 4-4-6-6-8-8 stitches cast on under the sleeve (= 2-2-3-3-4-4 new stitches on each side of the marker thread). Start the round by the marker thread and work pattern, beginning on the round marked with a star for you size in the diagram(s) as follows:

Sizes S, M and L:
Knit 1-2-5 stitches, A.4 over the next 7 stitches, A.5 over the next 28 stitches (= 2 repeats of 14 stitches), A.6 over the next 7 stitches, knit 2-3-6 stitches.

Sizes XL, XXL and XXXL:
Knit 0-3-4 stitches, A.5 over the next 56 stitches (= 4 reports of 14 stitches), knit 1-4-5 stitches.

Continue in the round like this until the piece measures approx. 19-19-17-15-13-12 cm = 7½"-7½"-6¾"-6"-5⅛"-4¾" – adjust so that you finish after round 5 or 13 in A.5. Knit 1 round where you increase 9-9-11-11-13-13 stitches evenly spaced = 54-56-64-68-76-78 stitches. Change to circular needle size 8 mm = US 11. Work rib (knit 1, purl 1) in the round for 4 cm = 1½". Bind off with knit over knit and purl over purl. Make sure that the bind-off edge is not tight. Use a size larger needle if necessary. The sleeve measures approx. 23-23-21-19-17-16 cm = 9"-9"-8¼"-7½"-6¾"-6¼". Work the other sleeve in the same way.

This pattern has been corrected.

Updated online: 28.02.2019
Correction to diagrams A.1 and A.3 size S-M-L: dec on row 35 removed

Diagram

All measurements in charts are in cm.

symbols = knit
symbols = between 2 stitches make 1 yarn over; on the next round knit the yarn over (there will be a hole)
symbols = purl 2 together
symbols = purl 2 twisted together
symbols = arrow shows where the yoke finishes in the diagram for the different sizes - read description in text
symbols = star shows which row the different sizes start on in the diagram - read description in the text
diagram
diagram
diagram
diagram
diagram

Each of our patterns has specific tutorial videos to help you.

Do you have a question? See a list of frequently asked questions (FAQ)

Knitting tension is what determines the final measurements of your work, and is usually measured per 10 x 10 cm. It is provided like so: number of stitches in width x number of rows in height - eg: 19 stitches x 26 rows = 10 x 10 cm.

The knitting tension is very individual; some people knit/crochet loosely while others work tightly. You adjust the knitting tension with the needle size, which is why the suggested needle size only serve as a guide! You need to adjust this (up or down) to ensure that YOUR knitting tension matches the knitting tension provided in the pattern. If you work with a different knitting tension than provided you will have a different yarn consumption, and your work will have different measurements than what the pattern suggests.

The knitting tension also determines which yarns can replace each other. As long as you achieve the same knitting tension you can replace one yarn with another.

See DROPS lesson: How to measure your tension/gauge

See DROPS video: How to make a gauge tension swatch

The required amount of yarn is provided in grams, eg: 450 g. To calculate how many balls you’ll need you first need to know how many grams are in 1 ball (25g, 50g or 100g). This information is available if you click on the individual yarn quality on our pages. Divide the amount required with the amount of each ball. For example, if each ball is 50g (the most common amount), the calculation will be as follows: 450 / 50 = 9 balls.

The important thing when changing from one yarn to another is that the knitting/crochet tension remains the same. This is so that the measurements of the finished piece will be the same as on the sketch provided. It is easier to achieve the same knitting tension using yarns from the same yarn group. It is also possible to work with multiple strands of a thinner yarn to achieve the knitting tension of a thicker one. Please try our yarn converter. We recommend you to always work a test swatch.

Please NOTE: when changing yarn the garment might have a different look and feel to the garment in the photo, due to individual properties and qualities of each yarn.

See DROPS lesson: Can I use a different yarn than the one mentioned in the pattern?

All our yarns are categorised into yarn groups (from A to F) according to thickness and knitting tension – group A contains the thinnest yarns and group F the thickest. This makes it easier for you to find alternative yarns to our patterns, should you wish to switch yarn. All yarns within the same group have a similar knitting tension and can easily replace each other. However, different yarn qualities have different structures and properties which will give the finished work a unique look and feel.

Click here for an overview of the yarns in each yarn group

At the top of all our patterns you’ll find a link to our yarn converter, which is a helpful tool should you wish to use a different yarn than suggested. By filling in the yarn quality you wish to replace, the amount (in your size) and number of strands, the converter will present good alternative yarns with the same knitting tension. Additionally it will tell you how much you’ll require in the new qualities and whether you’ll need to work with multiple strands. Most skeins are 50g (some are 25g or 100g).

If the pattern is worked with multiple colours, every colour will have to be converted separately. Similarly, if the pattern is worked with several strands of different yarns (for example 1 strand Alpaca and 1 strand Kid-Silk) you will have to find alternatives for each, individually.

Click here to see our yarn converter

Since different yarns have different qualities and textures we have chosen to keep the original yarn in our patterns. However, you can easily find options among our available qualities by using our yarn converter, or simply pick a yarn from the same yarn group.

It is possible that some retailers still have discontinued yarns in stock, or that someone has a few skeins at home that they would like to find patterns for.

The yarn converter will provide both alternative yarn as well as required amount in the new quality.

If you think it's hard to decide what size to make, it can be a good idea to measure a garment you own already and like the size of. Then you can pick the size by comparing those measures with the ones available in the pattern's size chart.

You'll find the size chart at the bottom of the pattern.

See DROPS lesson: How to read size chart

The needle size provided in the pattern serves only as a guide, the important thing is to follow the knitting tension. And since knitting tension is very individual, you will have to adjust the needle size to ensure that YOUR tension is the same as in the pattern – maybe you’ll have to adjust 1, or even 2 needle sizes, up or down to achieve the correct tension. For this, we recommend that you work test swatches.

Should you work with a different knitting tension than the one provided, the measurements of the finished garment might deviate from the measurement sketch.

See DROPS lesson: How to measure your tension/gauge

See DROPS video: How to make a gauge tension swatch

Working a garment top-down provides more flexibility and room for personal adjustment. For example it is easier to try the garment on while working, as well as making adjustments to length of yoke and shoulder caps.

The instructions are carefully explaining every step, in the correct order. Diagrams are adjusted to the knitting direction and are worked as usual.

The diagram depicts all rows/rounds, and every stitch seen from the right side. It is read from bottom to top, from right to left. 1 square = 1 stitch.

When working back and forth, every other row is worked from the right side and every other row is worked from the wrong side. When working from the wrong side, the diagram will have to be worked reversed: from left to right, knit stitches are purled, purl stitches are knit etc.

When working in the round every round is worked from the right side and the diagram are worked from right to left on all rounds.

See DROPS lesson: How to read knitting diagrams

The diagram depicts all rows/rounds, and every stitch seen from the right side. It is worked from bottom to top, from right to left.

When working back and forth every other row is worked from the right side: from right to left and every other row is worked from the wrong side: from left to right.

When working in the round, every row in the diagram are worked from the right side, from right to left.

When working a circular diagram you start in the middle and work your way outwards, counter clockwise, row by row.

The rows usually start with a given number of chain stitches (equivalent to the height of the following stitch), this will either be depicted in the diagram or explained in the pattern.

See DROPS lesson: How to read crochet diagrams

Instructions for working several diagrams after each other on the same row/round, will often be written like so: “work A.1, A.2, A.3 a total of 0-0-2-3-4 times". This means you work A.1 once, then A.2 is worked once, and A.3 is repeated (in width) the number of times provided for your size – in this case like so: S = 0 times, M = 0 times, L=2 times, XL= 3 times and XXL = 4 times.

The diagrams are worked as usual: begin with the first row in A.1, then work the first row in A.2 etc.

See DROPS lesson: How to read knitting diagrams

See DROPS lesson: How to read crochet diagrams

The total width of the garment (from wrist-to-wrist) will be larger in the larger sizes, despite the actual sleeves being shorter. The larger sizes have longer sleeve caps and wider shoulders, so there will be a good fit in all sizes.

The measurement sketch/schematic drawing provides information regarding the full length of the garment. If it’s a jumper or a jacket the length is measured from the highest point on the shoulder (usually closest to the neckline), and straight down to the bottom of the garment. It is NOT measured from the tip of shoulder. Similarly, the length of yoke is measured from the highest point on the shoulder and down to where yoke is split into body and sleeves.

See DROPS lesson: How to read a schematic drawing

Diagrams are often repeated on the round or in height. 1 repeat is the diagram the way it appears in the pattern. If it says to work 5 repeats of A.1 in the round, then you work A.1 a total of 5 times after/next to each other in the round. If it says to work 2 repeats of A.1 vertically/in height you work the entire diagram once, then begin again at the start and work the entire diagram one more time.

Chain stitches are slightly narrower than other stitches and to avoid working the cast-on edge too tight, we simply chain more stitches to begin with. The stitch count will be adjusted on the following row to fit the pattern and measurement sketch.

The rib edge is more elastic and will contract slightly compared to, for example, stocking stitch. By increasing before the rib edge, you avoid a visible difference in width between the rib edge and the rest of the body.

It’s very easy to cast off too tightly, and by making yarn overs while casting off (and simultaneously casting these off) you avoid a too tight cast off edge.

See DROPS video: How to bind off with yarn overs (yo)

To achieve an even increase (or decrease) you can increase on, for example: every 3rd and 4th row alternately, like so: work 2 rows and increase on the 3rd row, work 3 rows and increase on the 4th. Repeat this until the increase is complete.

See DROPS lesson: Increase or decrease 1 st on every 3rd and 4th row alternately

Should you prefer to work in the round instead of back and forth, you may of course adjust the pattern. You’ll need to add steeks mid-front (usually 5 stitches), and follow the instructions. When you would normally turn and work from the wrong side, simply work across the steek and continue in the round. At the end you’ll cut the piece open, pick up stitches to work bands, and cover the cut edges.

See DROPS video: How to knit steeks and cut open

Should you prefer to work back and forth instead of in the round, you may of course adjust the pattern so you work the pieces separately and then assemble them at the end. Divide the stitches for the body in 2, add 1 edge stitch in each side (for sewing) and work the front and back pieces separately.

See DROPS lesson: Can I adapt a pattern for circular needles into straight needles?

Pattern repeats can vary slightly in the different sizes, in order to get the correct proportions. If you’re not working the exact same size as the garment in the photo, yours might deviate slightly. This has been carefully developed and adjusted so that the complete impression of the garment is the same in all sizes.

Make sure to follow instructions and diagrams for your size!

If you have found a pattern you like which is available in women’s size it’s not very difficult to convert it to men’s size. The biggest difference will be the length of sleeves and body. Start working on the women size that you think would fit across the chest. The additional length will be worked right before you cast off for the armhole/sleeve cap. If the pattern is worked top-down you can add the length right after the armhole or before the first decrease on sleeve.

Regarding additional yarn amount, this will depend on how much length you add, but it is better with a skein too many than too few.

All yarns will have excess fibres (from production) that might come off as lint or shedding. Brushed yarns (ie hairier yarns) have more of these loose, excess fibres, causing more shedding.

Shedding also depends on what is worn under or over the garment, and whether this pulls at the yarn fibres. It’s therefore not possible to guarantee that there will be no shedding

Below are some tips on how to get the best result when working with hairier yarns:

1. When the garment is finished (before you wash it) shake it vigorously so the looser hairs come off. NOTE: do NOT use a lint roller, brush or any method that pulls at the yarn.

2. Place the garment in a plastic bag and put it in your freezer - the temperature will cause the fibres to become less attached to each other, and excess fibres will come off easier.

3. Leave in the freezer for a few hours before taking it out and shaking it again.

4. Wash the garment according to the instructions on the yarn label.

Pilling is a natural process that happens to even the most exclusive of fibers. It's a natural sign of wear and tear that is hard to avoid, and that is most visible in high friction areas of your garment like a sweater's arms and cuffs.

You can make your garment look as new by removing the pilling, using a fabric comb or a pill/lint remover.

Still can't find the answer you need? Then scroll down and leave your question so one of our experts can try to help you. This will be done normally within 5 to 10 working days.
In the meantime, you can read the questions and answers that others have left to this pattern or join the DROPS Workshop on Facebook to get help from fellow knitters/crocheters!

You might also like...

Summer Shells

mariayawa, Norway

Summer Shells

Anna Korotkevich, Belarus

Summer Shells

NeedlesWLove, Portugal

Summer Shells

rktaylor1984, United States

Summer Shells

Anne, United States

Summer Shells sweater

Randa, Norway

Summer Shells

Mária, Slovakia

Summer Shells

Leena, Finland

Post a comment to pattern DROPS 200-5

We would love to hear what you have to say about this pattern!

If you want to leave a question, please make sure you select the correct category in the form below, to speed up the answering process. Required fields are marked *.

Comments / Questions (199)

country flag Jen wrote:

For example. - A1 first row you start with 3 stitches and increase to 4. Row 2 says you increase to 4 - meaning there are no increases even though the diagram shows there is. What am I missing?

08.03.2021 - 14:19

country flag Jen wrote:

No I’m sorry I have started and re-started this about a dozen times and there are alwayyyyys extra stitches after each round. And the extra stitches just increase the further along I get. I am following the pattern exactly as directed. I can’t be the only one who has had this problem, I’m almost ready to give up. Do better instructions exist?

08.03.2021 - 14:13

country flag Christine Marjeram wrote:

I am just about to order the circular needles which I have never used befor, and am confused about the different length needed. I need to work in a larger needle size of 10mm so I will up the 8mm to a 9mm and the 9mm to a 10mm. Is this correct? But, why the different length? Great pattern and wool by the way. Just discovered it. Great customer service as well: I'm impressed. Cheers. Christine from the UK.

08.03.2021 - 10:03

DROPS Design answered:

Dear Mrs Marjeram, if you need needle size 10 mm to get the tension, then you will have to use 9 mm and 10 mm, correct. You will use the 40 cm needle to start with then continue with the 80 cm needle when you have worked enough increases to fit the needle. Happy knitting!

08.03.2021 - 10:24

country flag Jen wrote:

I've got an issue with having extra stitches on every round. I've started over a million times and the stitches shown in the diagram are less than what I get on my needles. My only guess is that the diagram doesn't account for all stitches, just the raglan increase shaping which I am following.

07.03.2021 - 04:23

DROPS Design answered:

Dear Jen, diagrams are showing all stitches, including raglan increases in A.1 and A.3 - just work: *A.1, A.2, A.3 (= front/back piece), A.1, A.3 (= sleeve)* and repeat from *-* for the 2nd half of round and continue like this following diagrams to the arrow for your size. Do not work extra stitches/yarn overs than the one shown in diagrams. Hope this will help. Happy knitting!

08.03.2021 - 08:32

country flag Jennifer wrote:

Hi there! Silly question but I’m assuming the blank rows between patterned rows mean knitting the entire round not just x numbered stitches as indicated. Also - diagram A.6 does the star indicate where to start and moving upwards like the other diagrams?

01.03.2021 - 13:44

DROPS Design answered:

Dear Jennifer, the "blank" squares refer to stitches that should be knitted from the right sight. When you see a whole row of blank stitches, then the whole row should be knitted. Also yes, the star refers to the point where the pattern shoul dbe started for different sizes.

01.03.2021 - 14:36

country flag Andrea Turkalo wrote:

On the diagrams, are the blank squares knit stitches or purl stitches ? No where in the directions is this indicated. In the diagram legend this is not indicated.

25.02.2021 - 14:40

DROPS Design answered:

Dear Mrs Turkalo; the blank squares are knitted (= stitches in stocking stitch, always knitted from RS since we work here in the round) - see 1st symbol under diagram key. Happy knitting!

25.02.2021 - 15:32

country flag Francesconi wrote:

Bonjour, Je souhaite savoir avec quel choix de laine a été tricoté ce modèle ? La drops snow est une laine spécialement faite pour le feutrage, non ? Merci d'avance pour votre réponse. Bien cordialement Isabelle

14.02.2021 - 10:01

DROPS Design answered:

Bonjour Mme Francesconi, Ce pull a été tricoté en DROPS Snow sur la photo, si cette laine est spécialement idéale pour le feutrage, elle fait également de merveilleux ouvrages bien chauds, qui ne seront pas feutrés, tout comme ce pull par exemple. Bon tricot!

15.02.2021 - 08:56

country flag Martine Kriesch wrote:

In de legenda van het patroon staat de mindering over 4 steken (piramide) niet toelicht. Ik hou naar de mindering hierover 1 steek over, maar dat moeten er 2 zijn?

08.01.2021 - 10:47

DROPS Design answered:

Dag Martine,

De 'piramide' is eigenlijk 2 symbolen naast elkaar, namelijk 2 gedraaid averecht samen en dan 2 averecht samen. Je mindert dus die 4 steken naar 2 steken.

09.01.2021 - 09:21

country flag Jackie Manley wrote:

I cannot find the quantity of wool I need for this jumper

04.01.2021 - 10:42

DROPS Design answered:

Dear Mrs Manley, you will find the amount of yarn in grams required in each size under the header, eg in size S if you choose DROPS Snow, you will require: 550 g DROPS Snow / 50 g a ball = 11 balls - if you choose DROPS Air: 400 g DROPS Air/50 g a ball = 8 balls Air in S. Happy knitting!

05.01.2021 - 10:27

country flag JANSSENS NADINE wrote:

J ai choisi , de realiser ce modèle 200-5 (,qui etait prévu en laine ESKIMO) , en \" COTON LIGHT \"en doublant le fil , combien de pelotes faut il commander ? \r\n,est il possible d avoir la possibilité de contacter une tricoteuse, française , ayant fait ce modèle (200-5) , qui pourrait m aider ? PAR EXEMPLE, SON MAIL OU SON TEL ? j essaye de rejoindre le groupe FACEBOOK aussi MERCI

17.11.2020 - 10:23

DROPS Design answered:

Bonjour Mme Janssens, DROPS Cotton Light appartient au groupe B de nos fils à tricoter et n'est pas une alternative, même tricoté en double, à DROPS Eskimo - utilisez 2 fils du groupe C - comme DROPS Air, autrement dit DROPS Paris ou Bomull-lin si vous voulez du coton, -utilisez notre convertisseur pour avoir toutes les alternatives possibles et les quantités correspondantes. Rejoindre le groupe facebook est une bonne idée, vous pouvez poser vos questions ici ou bien contacter votre magasin DROPS pour toute assistance au choix d'une alternative et à la réalisation de votre pull. Bon tricot!

17.11.2020 - 10:57