DROPS Snow
DROPS Snow
100% Wool
from 2.65 $ /50g
Get the yarn to make this pattern from 31.80$.

The yarn cost is calculated from the pattern’s smallest size and the yarn’s cheapest product type. Looking for an even better price? You might find it on the DROPS Deals!

DROPS SS24

Summer Cocoon

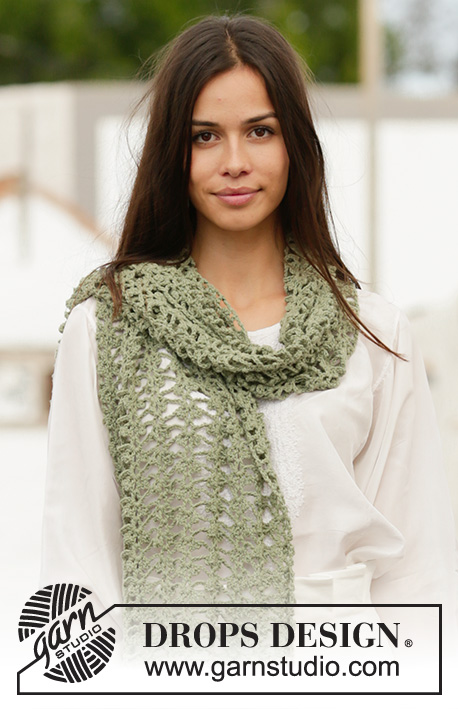
Knitted vest in DROPS Snow. The piece is worked back and forth with lace pattern and moss stitch. Sizes S - XXXL.

DROPS 202-35
DROPS Design: Pattern no ee-663
Yarn group E or C + C
-------------------------------------------------------

SIZES:
S/M – L/XL - XXL – XXXL

Finished measurements:
Chest measurements: 91-99-107-115 cm = 35¾"-39"-42"-45¼"
Full length: 80-88-96-100 = 31½"-34⅝"-37 ⅜"-39⅜"

All measurements in charts are in cm.

MATERIALS:
DROPS SNOW from Garnstudio (belongs to yarn group E)
600-700-800-850 g color 83, mauve

KNITTING GAUGE:
10 stitches in width and 14 rows in height with stockinette stitch = 10 x 10 cm = 4" x 4".

NEEDLES:
DROPS CIRCULAR NEEDLE SIZE 9 MM = US 13: length 80 cm = 32" for stockinette stitch.
The needle size is only a guide. If you get too many stitches on 10 cm = 4", change to a larger needle size. If you get too few stitches on 10 cm = 4", change to a smaller needle size.

-------------------------------------------------------

Alternative Yarn – See how to change yarns here
Yarn Groups A to F – Use the same pattern and change the yarn here
Yarn usage using an alternative yarn – Use our yarn converter here

-------------------------------------------------------

DROPS Snow
DROPS Snow
100% Wool
from 2.65 $ /50g
Get the yarn to make this pattern from 31.80$.

The yarn cost is calculated from the pattern’s smallest size and the yarn’s cheapest product type. Looking for an even better price? You might find it on the DROPS Deals!

Pattern instructions

NOTE: This pattern is written in American English. All measurements in charts are in cm. For conversion from inches to cm - click here. There are different terms for crocheting in American and British English. If this pattern includes crochet, click for "crochet terms" here. For this pattern in British English, please click here.
-------------------------------------------------------

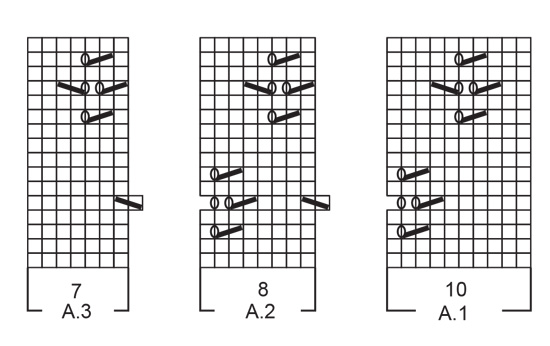
EXPLANATIONS FOR THE PIECE:

-------------------------------------------------------

RIDGE/GARTER STITCH (worked back and forth):
1 ridge = Knit 2 rows.

PATTERN:
See diagrams A.1 to A.3. The diagrams show all the rows in the pattern seen from the right side.

MOSS STITCH:
ROW 1: * Knit 1, purl 1 *, work from *-*, until there is 1 stitch left on row, knit 1.
ROW 2: Purl over knit and knit over purl.
Repeat row 2.

INCREASE TIP-1:
All increases are worked from the right side!
Increase 1 stitch inside the 5 moss stitches in each side. Increase 1 stitch by making 1 yarn over. On the next row (wrong side) purl the yarn overs twisted to avoid holes. Then work the new stitches in stockinette stitch – until there are enough stitches to work a complete repeat of the lace pattern on each side of the piece. NOTE: there should always be at least 2 stitches in stockinette stitch inside the 1 edge stitch in garter stitch, before working another repeat of lace pattern, as shown on row 13 in patterns A.1 and A.3.

INCREASE TIP-2 (evenly spaced):
To work out how to increase evenly, count the total number of stitches on the needle (e.g. 111 stitches) minus 1 edge stitch in garter stitch on each side (= 2 stitches) and divide the remaining stitches by the number of increases to be made (e.g. 10) = 10.9. In this example, increase by making 1 yarn over after approx. each 11th stitch. On the next row work the yarn overs twisted to avoid holes.

-------------------------------------------------------

START THE PIECE HERE:

-------------------------------------------------------

VEST - SHORT OVERVIEW OF THE PIECE:
The piece is worked back and forth with circular needle, top down and sewn together in the sides under the sleeves.

VEST:
Cast on 91-99-107-115 stitches with circular needle size 9 mm = US 13 and Snow. Work MOSS STITCH - see description above, for 10 cm = 4" – adjust so that the next row is worked from the right side. Now work pattern as follows: 1 edge stitch in GARTER STITCH – read description above, A.1 over the next 10 stitches, A.2 until there are 8 stitches left on the row (= 9-10-11-12 repeats in width), A.3 over the next 7 stitches, 1 edge stitch in garter stitch. Continue this pattern back and forth. REMEMBER THE KNITTING GAUGE! When the piece measures 21-23-25-26 cm = 8¼"-9¾"-9¾"-10¼" cast on 4 new stitches at the end of the next 2 rows for sleeves = 99-107-115-123 stitches. Continue with pattern as follows: 5 stitches in moss stitch, pattern as before until there are 5 stitches left on row, 5 stitches in moss stitch. When the piece measures 52-60-66-70 cm = 20½"-23⅝"-26"-27½" increase 1 stitch inside the 5 stitches in moss stitch on each side - read INCREASE TIP-1. Increase like this every row from the right side a total of 10-10-11-11 times, AT THE SAME TIME when the piece measures 36-40-44-46 cm = 14¼"-15¾"-17¼"-18" from where you cast on stitches for the sleeves, bind off the first 4 stitches on the next 2 rows (= 1 edge stitch in each side. This edge stitch is worked in garter stitch). Continue increases inside 1 edge stitch in garter stitch in each side. When all increases are finished there are 111-119-129-137 stitches on the row. Continue with pattern and 1 edge stitch in garter stitch on each side until the piece measures 11-13-15-16 cm = 4⅜"-5⅛"-6"-6¼" from where stitches were bind off for sleeves – but adjust so that the pattern ends after a complete lace pattern in height (i.e. after row 8 or row 16 in the diagrams). If there is not room for a complete lace pattern in height, work stockinette stitch for a few rows before continuing as follows: Knit 1 row from the right side where you increase 10-12-14-16 stitches evenly spaced – read INCREASE TIP-2 = 121-131-143-153 stitches. Now work moss stitch back and forth over all stitches for 10 cm = 4". The piece measures approx. 80-88-96-100 cm = 31½"-34⅝"-37¾"-39⅜". Bind off, but to avoid the bind-off edge being tight make 1 yarn over after approx. each 4th stitch (the yarn overs are bind off as normal stitches).

ASSEMBLY:
Sew the under-sleeve and side seams in one go – see broken line on sketch. Sew inside the 1 edge stitch in garter stitch on each side. Cut and fasten the strand.

Diagram

All measurements in charts are in cm.

symbols = knit from right side, purl from wrong side
symbols = between 2 stitches make 1 yarn over; on the next row (wrong side) purl the yarn over to leave a hole
symbols = knit 2 together
symbols = slip 1 stitch as if to knit, knit 1 and pass the slipped stitch over the knitted stitch
symbols = the sketch shows the garment after assembly
diagram
diagram
diagram
Do you have a question? See a list of frequently asked questions (FAQ)

Knitting tension is what determines the final measurements of your work, and is usually measured per 10 x 10 cm. It is provided like so: number of stitches in width x number of rows in height - eg: 19 stitches x 26 rows = 10 x 10 cm.

The knitting tension is very individual; some people knit/crochet loosely while others work tightly. You adjust the knitting tension with the needle size, which is why the suggested needle size only serve as a guide! You need to adjust this (up or down) to ensure that YOUR knitting tension matches the knitting tension provided in the pattern. If you work with a different knitting tension than provided you will have a different yarn consumption, and your work will have different measurements than what the pattern suggests.

The knitting tension also determines which yarns can replace each other. As long as you achieve the same knitting tension you can replace one yarn with another.

See DROPS lesson: How to measure your tension/gauge

See DROPS video: How to make a gauge tension swatch

The required amount of yarn is provided in grams, eg: 450 g. To calculate how many balls you’ll need you first need to know how many grams are in 1 ball (25g, 50g or 100g). This information is available if you click on the individual yarn quality on our pages. Divide the amount required with the amount of each ball. For example, if each ball is 50g (the most common amount), the calculation will be as follows: 450 / 50 = 9 balls.

The important thing when changing from one yarn to another is that the knitting/crochet tension remains the same. This is so that the measurements of the finished piece will be the same as on the sketch provided. It is easier to achieve the same knitting tension using yarns from the same yarn group. It is also possible to work with multiple strands of a thinner yarn to achieve the knitting tension of a thicker one. Please try our yarn converter. We recommend you to always work a test swatch.

Please NOTE: when changing yarn the garment might have a different look and feel to the garment in the photo, due to individual properties and qualities of each yarn.

See DROPS lesson: Can I use a different yarn than the one mentioned in the pattern?

All our yarns are categorised into yarn groups (from A to F) according to thickness and knitting tension – group A contains the thinnest yarns and group F the thickest. This makes it easier for you to find alternative yarns to our patterns, should you wish to switch yarn. All yarns within the same group have a similar knitting tension and can easily replace each other. However, different yarn qualities have different structures and properties which will give the finished work a unique look and feel.

Click here for an overview of the yarns in each yarn group

At the top of all our patterns you’ll find a link to our yarn converter, which is a helpful tool should you wish to use a different yarn than suggested. By filling in the yarn quality you wish to replace, the amount (in your size) and number of strands, the converter will present good alternative yarns with the same knitting tension. Additionally it will tell you how much you’ll require in the new qualities and whether you’ll need to work with multiple strands. Most skeins are 50g (some are 25g or 100g).

If the pattern is worked with multiple colours, every colour will have to be converted separately. Similarly, if the pattern is worked with several strands of different yarns (for example 1 strand Alpaca and 1 strand Kid-Silk) you will have to find alternatives for each, individually.

Click here to see our yarn converter

Since different yarns have different qualities and textures we have chosen to keep the original yarn in our patterns. However, you can easily find options among our available qualities by using our yarn converter, or simply pick a yarn from the same yarn group.

It is possible that some retailers still have discontinued yarns in stock, or that someone has a few skeins at home that they would like to find patterns for.

The yarn converter will provide both alternative yarn as well as required amount in the new quality.

If you think it's hard to decide what size to make, it can be a good idea to measure a garment you own already and like the size of. Then you can pick the size by comparing those measures with the ones available in the pattern's size chart.

You'll find the size chart at the bottom of the pattern.

See DROPS lesson: How to read size chart

The needle size provided in the pattern serves only as a guide, the important thing is to follow the knitting tension. And since knitting tension is very individual, you will have to adjust the needle size to ensure that YOUR tension is the same as in the pattern – maybe you’ll have to adjust 1, or even 2 needle sizes, up or down to achieve the correct tension. For this, we recommend that you work test swatches.

Should you work with a different knitting tension than the one provided, the measurements of the finished garment might deviate from the measurement sketch.

See DROPS lesson: How to measure your tension/gauge

See DROPS video: How to make a gauge tension swatch

Working a garment top-down provides more flexibility and room for personal adjustment. For example it is easier to try the garment on while working, as well as making adjustments to length of yoke and shoulder caps.

The instructions are carefully explaining every step, in the correct order. Diagrams are adjusted to the knitting direction and are worked as usual.

The diagram depicts all rows/rounds, and every stitch seen from the right side. It is read from bottom to top, from right to left. 1 square = 1 stitch.

When working back and forth, every other row is worked from the right side and every other row is worked from the wrong side. When working from the wrong side, the diagram will have to be worked reversed: from left to right, knit stitches are purled, purl stitches are knit etc.

When working in the round every round is worked from the right side and the diagram are worked from right to left on all rounds.

See DROPS lesson: How to read knitting diagrams

The diagram depicts all rows/rounds, and every stitch seen from the right side. It is worked from bottom to top, from right to left.

When working back and forth every other row is worked from the right side: from right to left and every other row is worked from the wrong side: from left to right.

When working in the round, every row in the diagram are worked from the right side, from right to left.

When working a circular diagram you start in the middle and work your way outwards, counter clockwise, row by row.

The rows usually start with a given number of chain stitches (equivalent to the height of the following stitch), this will either be depicted in the diagram or explained in the pattern.

See DROPS lesson: How to read crochet diagrams

Instructions for working several diagrams after each other on the same row/round, will often be written like so: “work A.1, A.2, A.3 a total of 0-0-2-3-4 times". This means you work A.1 once, then A.2 is worked once, and A.3 is repeated (in width) the number of times provided for your size – in this case like so: S = 0 times, M = 0 times, L=2 times, XL= 3 times and XXL = 4 times.

The diagrams are worked as usual: begin with the first row in A.1, then work the first row in A.2 etc.

See DROPS lesson: How to read knitting diagrams

See DROPS lesson: How to read crochet diagrams

The total width of the garment (from wrist-to-wrist) will be larger in the larger sizes, despite the actual sleeves being shorter. The larger sizes have longer sleeve caps and wider shoulders, so there will be a good fit in all sizes.

The measurement sketch/schematic drawing provides information regarding the full length of the garment. If it’s a jumper or a jacket the length is measured from the highest point on the shoulder (usually closest to the neckline), and straight down to the bottom of the garment. It is NOT measured from the tip of shoulder. Similarly, the length of yoke is measured from the highest point on the shoulder and down to where yoke is split into body and sleeves.

See DROPS lesson: How to read a schematic drawing

Diagrams are often repeated on the round or in height. 1 repeat is the diagram the way it appears in the pattern. If it says to work 5 repeats of A.1 in the round, then you work A.1 a total of 5 times after/next to each other in the round. If it says to work 2 repeats of A.1 vertically/in height you work the entire diagram once, then begin again at the start and work the entire diagram one more time.

Chain stitches are slightly narrower than other stitches and to avoid working the cast-on edge too tight, we simply chain more stitches to begin with. The stitch count will be adjusted on the following row to fit the pattern and measurement sketch.

The rib edge is more elastic and will contract slightly compared to, for example, stocking stitch. By increasing before the rib edge, you avoid a visible difference in width between the rib edge and the rest of the body.

It’s very easy to cast off too tightly, and by making yarn overs while casting off (and simultaneously casting these off) you avoid a too tight cast off edge.

See DROPS video: How to bind off with yarn overs (yo)

To achieve an even increase (or decrease) you can increase on, for example: every 3rd and 4th row alternately, like so: work 2 rows and increase on the 3rd row, work 3 rows and increase on the 4th. Repeat this until the increase is complete.

See DROPS lesson: Increase or decrease 1 st on every 3rd and 4th row alternately

Should you prefer to work in the round instead of back and forth, you may of course adjust the pattern. You’ll need to add steeks mid-front (usually 5 stitches), and follow the instructions. When you would normally turn and work from the wrong side, simply work across the steek and continue in the round. At the end you’ll cut the piece open, pick up stitches to work bands, and cover the cut edges.

See DROPS video: How to knit steeks and cut open

Should you prefer to work back and forth instead of in the round, you may of course adjust the pattern so you work the pieces separately and then assemble them at the end. Divide the stitches for the body in 2, add 1 edge stitch in each side (for sewing) and work the front and back pieces separately.

See DROPS lesson: Can I adapt a pattern for circular needles into straight needles?

Pattern repeats can vary slightly in the different sizes, in order to get the correct proportions. If you’re not working the exact same size as the garment in the photo, yours might deviate slightly. This has been carefully developed and adjusted so that the complete impression of the garment is the same in all sizes.

Make sure to follow instructions and diagrams for your size!

If you have found a pattern you like which is available in women’s size it’s not very difficult to convert it to men’s size. The biggest difference will be the length of sleeves and body. Start working on the women size that you think would fit across the chest. The additional length will be worked right before you cast off for the armhole/sleeve cap. If the pattern is worked top-down you can add the length right after the armhole or before the first decrease on sleeve.

Regarding additional yarn amount, this will depend on how much length you add, but it is better with a skein too many than too few.

All yarns will have excess fibres (from production) that might come off as lint or shedding. Brushed yarns (ie hairier yarns) have more of these loose, excess fibres, causing more shedding.

Shedding also depends on what is worn under or over the garment, and whether this pulls at the yarn fibres. It’s therefore not possible to guarantee that there will be no shedding

Below are some tips on how to get the best result when working with hairier yarns:

1. When the garment is finished (before you wash it) shake it vigorously so the looser hairs come off. NOTE: do NOT use a lint roller, brush or any method that pulls at the yarn.

2. Place the garment in a plastic bag and put it in your freezer - the temperature will cause the fibres to become less attached to each other, and excess fibres will come off easier.

3. Leave in the freezer for a few hours before taking it out and shaking it again.

4. Wash the garment according to the instructions on the yarn label.

Pilling is a natural process that happens to even the most exclusive of fibers. It's a natural sign of wear and tear that is hard to avoid, and that is most visible in high friction areas of your garment like a sweater's arms and cuffs.

You can make your garment look as new by removing the pilling, using a fabric comb or a pill/lint remover.

Still can't find the answer you need? Then scroll down and leave your question so one of our experts can try to help you. This will be done normally within 5 to 10 working days.
In the meantime, you can read the questions and answers that others have left to this pattern or join the DROPS Workshop on Facebook to get help from fellow knitters/crocheters!

You might also like...

Post a comment to pattern DROPS 202-35

We would love to hear what you have to say about this pattern!

If you want to leave a question, please make sure you select the correct category in the form below, to speed up the answering process. Required fields are marked *.

Comments / Questions (29)

country flag Szénási Enikő wrote:

Sziasztok! Még csak az elején vagyok a kötésnek, de a magyar fordítás hibás a rizsmintánál. A második sor helyesen: simára fordítottat, fordítottra simát kötünk. Kérlek javítsátok

23.05.2019 - 16:45

DROPS Design answered:

Kedves Enikő! Köszönjük, a hiba javításra került! További sikeres kézimunkázást!

25.05.2019 - 10:36

country flag Helle Andersen wrote:

Er det muligt at få hjælp til omregning af maskeantal, når jeg gerne vil strikke den i DROPS air mix?

18.05.2019 - 10:22

DROPS Design answered:

Hei Helle. Du kan strikke etter denne oppskriften om du strikker med 2 tråder DROPS Air, da dette skal gi tilsvarende strikkefasthet. Evt kan du strikke med 1 tråd Air, og 1 tråd av et annet garn i garngruppe C. Lag deg en strikkeprøve så du er sikker. Om du vil strikke med 1 tråd Air innebærer dette at alle maskeantall må regnes om etter ny strikkefasthet. Du må gjerne gjøre dette selv, men vi har dessverre ikke mulighet til å gjøre det for deg. Ta da utgangaspunkt i de ønskede målene, og gang med strikkefastheten i bredden (feks 120 cm x 1,7 maske per cm = 204 masker). God fornøyelse

20.05.2019 - 08:02

country flag Lorraine Métivier wrote:

Super beau

21.03.2019 - 01:52

country flag Annica Gustafsson wrote:

Om jag vill göra denna men i stället väljer att göra den i Drops Bomull-Lin 2 trådar i ställer, går det då åt dubbla garnmängden?

14.03.2019 - 14:29

DROPS Design answered:

Hej. Du kan använda vår konverterare (klicka här) för att se hur många gram det går åt i ett alternativt garn. Du fyller i vilket garn du vill ersätta, hur många gram samt hur många trådar det stickas med och du får då fram flera olika alternativ (bl.a. bomull-lin). Lycka till!

18.03.2019 - 10:40

country flag Mindy wrote:

With respect of the placement of the charts, is this pattern worked right to left? Thanks

09.03.2019 - 16:23

DROPS Design answered:

Dear Mindy, yes, you should read RS rows (rows 1., 3., 5., 7. etc) from right to left, and WS rows from (all purl rows) from left to right. Happy Knitting!

10.03.2019 - 16:39

country flag Martine HOUSSAY wrote:

Bonjour, pour une taille XXL combien faut-il de pelotes ? Merci. Cordialement Martine HOUSSAY

22.02.2019 - 09:51

DROPS Design answered:

Bonjour Mme Houssay, la quantité nécessaire pour chaque taille figure toujours au poids dans l'en-tête, ainsi, en XXL il vous faudra 800g DROPS Eskimo/50 g la pelote = 16 pelotes Eskimo. Bon tricot!

22.02.2019 - 14:36

country flag Karine wrote:

Est ce un modèle pour débutante ?

20.02.2019 - 10:13

DROPS Design answered:

Bonjour Karine, ce modèle me paraît tout à fait réalisable pour une débutante. Lisez attentivement les explications, et si vous avez une question ou un doute, n'hésitez pas à utiliser cet espace pour demander. Votre magasin DROPS saura également vous conseiller, même par mail ou téléphone. Bon tricot!

21.02.2019 - 09:52

country flag Silvana wrote:

Comodo

01.02.2019 - 12:46

country flag Anett wrote:

Tolles Jäckchen für Leute wie mich, die auch im Sommer immer mal frösteln.

05.01.2019 - 09:53