DROPS Air
DROPS Air
65% Alpaca, 28% Polyamide, 7% Wool
from 4.80 £ /50g
Get the yarn to make this pattern from 38.40£.

The yarn cost is calculated from the pattern’s smallest size and the yarn’s cheapest product type. Looking for an even better price? You might find it on the DROPS Deals!

DROPS SS24

Valencia Cardigan

Knitted jacket with stripes, V-neck and raglan. Piece is worked in DROPS Air, top down. Size: S - XXXL

DROPS 202-10
DROPS design: Pattern ai-200
Yarn group C or A + A
----------------------------------------------------------

SIZE:
S - M - L - XL - XXL - XXXL

MATERIALS:
DROPS AIR from Garnstudio (belongs to yarn group C)
100-100-150-150-150-150 g colour 16, blue
100-100-100-100-100-100 g colour 03, pearl grey
100-100-100-100-100-100 g colour 06, black
50-50-100-100-100-100 g colour 22, yellow
50-50-50-50-50-50 g colour no 10, fog

KNITTING TENSION:
16 stitches in width and 20 rows vertically in stocking stitch = 10 x 10 cm.

NEEDLES:
DROPS DOUBLE POINTED NEEDLES SIZE 5.5 mm
DROPS CIRCULAR NEEDLE SIZE 5.5 mm, length 40 and 80 cm for stocking stitch.
DROPS DOUBLE POINTED NEEDLES SIZE 4.5 mm
DROPS CIRCULAR NEEDLE SIZE 4.5 mm, length 80 cm for rib.
Needle size is only a suggestion! If you have too many stitches on 10 cm switch to larger needles. If you have too few stitches on 10 cm switch to smaller needles.

DROPS METAL BUTTON, ROUND (steel), NO 542: 3 pieces for all sizes

----------------------------------------------------------

-------------------------------------------------------

Alternative Yarn – See how to change yarns here
Yarn Groups A to F – Use the same pattern and change the yarn here
Yarn usage using an alternative yarn – Use our yarn converter here

-------------------------------------------------------

DROPS Air
DROPS Air
65% Alpaca, 28% Polyamide, 7% Wool
from 4.80 £ /50g
Get the yarn to make this pattern from 38.40£.

The yarn cost is calculated from the pattern’s smallest size and the yarn’s cheapest product type. Looking for an even better price? You might find it on the DROPS Deals!

Pattern instructions

NOTE: This pattern is written in British English. All measurements in charts are in cm. For conversion from cm to inches - click here. There are different terms for crocheting in British and American English. If this pattern includes crochet, click for "crochet terms" here. For this pattern in American English, please click here.
----------------------------------------------------------

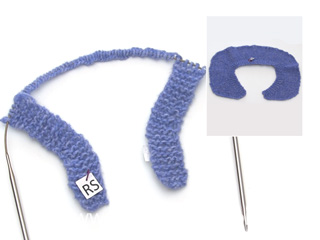
EXPLANATION FOR THE PATTERN:

----------------------------------------------------------

GARTER STITCH (back and forth):
Knit all rows.
1 ridge vertically = knit 2 rows.

SHORT ROWS 1 (applies to first neck edge worked):
Begin from right side and work as follows: * 1 ridge in garter stitch back and forth over the first 4 stitches, 1 ridge in garter stitch over all 5 stitches *, work from *-* 3 times in total.

SHORT ROWS 2 (applies to second neck edge worked):
Beginning from wrong side and work as follows: * 1 ridge in garter stitch back and forth over the first 4 stitches, 1 ridge in garter stitch over all 5 stitches *, work from *-* 3 times in total, then knit 1 row from wrong side over all 5 stitches.

INCREASE TIP (evenly):
To calculate how to increase evenly, use the total number of stitches on row (e.g. 62 stitches), minus neck edges/bands (e.g. 10 stitches) and divide the remaining stitches by number of increases to be done (e.g. 12) = 4.3.
In this example increase by making 1 yarn over after approx. every 4th stitch (do not increase over neck edges/bands). On next row work yarn overs twisted to avoid holes.

DECREASE TIP (evenly):
To calculate how to decrease evenly, use the total number of stitches on row (e.g. 54 stitches) and divide stitches by number of decreases to be done (e.g. 14) = 3.9.
In this example decrease by knitting approx. every 3rd and 4th stitch together.

STRIPES YOKE:
Work stripes in stocking stitch, top down as explained below but work the 5 outermost stitches in each side in garter stitch (= neck edges).
9-10-10-11-11-12 cm with colour 10, fog,
9-10-10-11-11-12 cm with colour 22, yellow,
0-0-2-2-4-4 cm with colour 06, black

STRIPES BODY:
Work stripes in stocking stitch, top down as explained below but work the 5 outermost stitches in each side in garter stitch (= bands).
9-10-8-9-7-8 cm with colour 06, black (i.e. the stripe in black is 9-10-10-11-11-12 cm in total including rounds from yoke),
9-10-10-11-11-12 cm with colour 03, pearl grey,
12-10-12-10-12-10 cm (or until finished measurements) with colour 16, blue.

STRIPES SLEEVE:
Work stripes in stocking stitch, top down as follows:
13-13-11-11-9-9 cm with colour 06, black (i.e. the stripe in black is 13 cm in all sizes including rounds from yoke),
13-13-13-13-13-13 cm with colour 03, pearl grey,
20-19-20-18-19-18 cm (or until finished measurements) with colour 16, blue.

V-NECK:
All increases are done from the right side.
Increase 1 stitch on the inside of 5 band stitches by making 1 yarn over after the 5 band stitches at the beginning of row and before the 5 band stitches at the end of row.
On next row (wrong side) purl yarn overs twisted to avoid holes. Then work the new stitches in stocking stitch.

RAGLAN:
All increases are done from the right side.
Increase 1 stitch on each side of the 4 markers in every transition between sleeves and body as follows: Work until 1 stitch remains before marker, make 1 yarn over, knit 2 (marker is between these 2 stitches), make 1 yarn over (= 2 stitches increased at the marker and 8 stitches increased in total on row.) On next row (wrong side) purl yarn overs twisted to avoid holes. Then work the new stitches in stocking stitch.

BUTTONHOLES:
Decrease for buttonholes on right band (when garment is worn). Decrease from right side when 3 stitches remain on row as follows: Make 1 yarn over, knit the next 2 stitches together, knit last stitch. On next row knit yarn over to make holes.
Decrease first buttonhole when approx. 1 cm has been worked after last increase for V-neck. Then decrease the next 2 buttonholes approx. 10 cm apart.

----------------------------------------------------------

START THE PIECE HERE:

----------------------------------------------------------

JACKET - SHORT OVERVIEW OF THE PIECE:
First work 2 loose neck edges. Slip these on the circular needle when casting on stitches for neck as explained in pattern (sew neck edges together mid back later and then sew neck line at the back of neck).
Then work yoke back and forth on circular needle from mid front, work top down. AT THE SAME TIME increase V-neck and raglan. Now divide yoke for body and sleeves. Work body back and forth from mid front, top down. Work sleeves in the round on double pointed needles/short circular needle, top down.

NECK EDGE:
Cast on 5 stitches on needle size 5.5 mm with fog and work in GARTER STITCH back and forth – read explanation above (1st row = right side).
When neck edge measures approx. 6-6-6-7-7-7 cm, work SHORT ROWS 1 – read explanation above. When the short rows have been worked as explained above, continue in garter stitch back and forth over all 5 stitches for 6 cm in all sizes, finish after a row knit with from wrong side (the entire neck edge measures approx. 14-14-14-15-15-15 cm along the shortest edge) cut the yarn and put neck edge aside.
Work another neck edge the same way, but when neck edge measures approx. 6-6-6-7-7-7 cm, work SHORT ROWS 2 – read explanation above. When the short rows have been worked as explained above, continue in garter stitch back and forth over all 5 stitches for 6 cm in all sizes, finish after a row with knit from right side (the entire neck edge measures approx. 14-14-14-15-15-15 cm along the shortest edge). Place stitches on circular needle size 5.5 mm, do not cut the yarn, but cast on 52-52-56-58-54-54 stitches on same circular needle straight after neck edge and knit from right side over the 5 stitches from the other neck edge = 62-62-66-68-64-64 stitches on needle.
Knit 1 row from wrong side over all stitches. Knit 1 row from right side while increasing 12-12-8-10-14-22 stitches evenly - read INCREASE TIP = 74-74-74-78-78-86 stitches on needle. Knit 1 row from wrong side (work neck edges in garter stitch as before). Then work yoke as explained below.

YOKE:
READ ALL OF THE FOLLOWING SECTION ON YOKE BEFORE WORKING!
Insert 4 marker in piece as follows (without working the stitches): Count 7 stitches (= front piece), insert 1 marker before next stitch, count 12 stitches (= sleeve), insert 1 marker before next stitch, count 36-36-36-40-40-48 stitches (= back piece), insert 1 marker before next stitch, count 12 stitches (= sleeve), insert 1 marker before next stitch. 7 stitches remain in all sizes after last marker (= front piece).
Work STRIPES YOKE - see explanation above.
AT THE SAME TIME on first row (right side) increase for V-NECK and RAGLAN – see explanation above. REMEMBER THE KNITTING TENSION!
Increase like this for V-neck (2 stitches) and raglan (8 stitches) on every other row (i.e. every row from right side) 18-20-22-24-26-28 times in total = 254-274-294-318-338-366 stitches. After last increase for V-neck and raglan, piece measures approx. 22-24-26-28-30-32 cm from shoulder. If the garment is shorter than this, continue until correct measurements without increases. Remember BUTTONHOLES on right band - read explanation above.
Work next row as follows from wrong side: Work 42-45-47-51-55-60 stitches in garter stitch and stocking stitch as before (= front piece), slip the next 48-52-58-62-64-68 stitches on 1 stitch holder for sleeve, cast on 6-6-8-8-10-10 new stitches on row (= in the side under sleeve), purl 74-80-84-92-100-110 stitches (= back piece), slip the next 48-52-58-62-64-68 stitches on 1 stitch holder for sleeve, cast on 6-6-8-8-10-10 new stitches on row (= in the side under sleeve) and work the 42-45-47-51-55-60 stitches in stocking stitch and garter stitch as before (= front piece). Finish body and sleeves separately. NOW MEASURE THE PIECE FROM HERE!

BODY:
= 170-182-194-210-230-250 stitches. Work STRIPES BODY - see explanation above. Remember BUTTONHOLES on right band!
When piece measures 23 cm from division in all sizes, knit 1 row from wrong side (work bands in garter stitch) while increasing 6 stitches evenly - read INCREASE TIP = 176-188-200-216-236-256 stitches. Switch to circular needle size 4.5 mm. Work next row as follows from right side (with blue): 5 band stitches in garter stitch, * knit 2, purl 2 *, repeat from *-* until 7 stitches remain on needle, knit 2 and finish with 5 band stitches in garter stitch. Continue rib like this for 6 cm. Loosely cast off stitches with knit over knit and purl over purl. To avoid a tight cast-off edge you may use circular needle size 5.5 mm. Jacket measures approx. 52-54-56-58-60-62 cm from shoulder and down.

SLEEVE:
Slip the 48-52-58-62-64-68 stitches from stitch holder in one side of piece double pointed needles/a short circular needle size 5.5 mm and pick in addition up 1 stitch in each of the 6-6-8-8-10-10 new stitches cast on under sleeve = 54-58-66-70-74-78 stitches.
Work STRIPES SLEEVE - see explanation above. When piece measures 40-39-38-36-35-34 cm from division (or at desired length – approx. 6 cm remain until finished measurements), knit 1 round while decreasing 14-18-22-26-26-30 stitches evenly – read DECREASE TIP = 40-40-44-44-48-48 stitches. Switch to double pointed needles size 4.5 mm. Work rib in the round = knit 2/purl 2 for 6 cm with blue. Loosely cast off stitches with knit over knit and purl over purl. To avoid a tight cast-off edge you may use double pointed needles size 5.5 mm. Sleeve measures approx. 46-45-44-42-41-40 cm from division. Work the other sleeve the same way.

ASSEMBLY:
Sew the buttons on to the left band.
Sew neck edge together mid back so that seam is facing inwards. Stretch neck edge slightly and sew neck edge to neck line in the back of neck.

This pattern has been corrected.

Updated online: 12.02.2019
Correction - NECK EDGE: When neck edge measures approx. 6-6-6-7-7-7 cm, work SHORT ROWS 1 – read explanation above. When the short rows have been worked as explained above, continue in garter stitch back and forth over all 5 stitches for 6 cm in all sizes (the entire neck edge measures approx. 14-14-14-15-15-15 cm along the shortest edge)
Updated online: 20.04.2021
YOKE:
... count 36-36-36-40-40-48 stitches (= back piece), insert 1 marker before next stitch ...

Diagram

diagram measurements

Each of our patterns has specific tutorial videos to help you.

Do you have a question? See a list of frequently asked questions (FAQ)

Knitting tension is what determines the final measurements of your work, and is usually measured per 10 x 10 cm. It is provided like so: number of stitches in width x number of rows in height - eg: 19 stitches x 26 rows = 10 x 10 cm.

The knitting tension is very individual; some people knit/crochet loosely while others work tightly. You adjust the knitting tension with the needle size, which is why the suggested needle size is only meant as a guide! You need to adjust this (up or down) to ensure that YOUR knitting tension matches the knitting tension provided in the pattern. If you work with a different knitting tension than provided you will have a different yarn consumption, and your work will have different measurements than what the pattern suggests.

The knitting tension also determines which yarns can replace each other. As long as you achieve the same knitting tension you can replace one yarn with another.

See DROPS lesson: How to measure your tension/gauge

See DROPS video: How to make a gauge tension swatch

The required amount of yarn is provided in grams, eg: 450 g. To calculate how many balls you’ll need you first need to know how many grams are in 1 ball (25g, 50g or 100g). This information is available if you click on the individual yarn quality on our pages. Divide the amount required with the amount of each ball. For example, if each ball is 50g (the most common amount), the calculation will be as follows: 450 / 50 = 9 balls.

The important thing when changing from one yarn to another is that the knitting/crochet tension remains the same. This is so that the measurements of the finished piece will be the same as on the sketch provided. It is easier to achieve the same knitting tension using yarns from the same yarn group. It is also possible to work with multiple strands of a thinner yarn to achieve the knitting tension of a thicker one. Please try our yarn converter. We recommend you to always work a test swatch.

Please NOTE: when changing yarn the garment might have a different look and feel to the garment in the photo, due to individual properties and qualities of each yarn.

See DROPS lesson: Can I use a different yarn than the one mentioned in the pattern?

All our yarns are categorised into yarn groups (from A to F) according to thickness and knitting tension – group A contains the thinnest yarns and group F the thickest. This makes it easier for you to find alternative yarns to our patterns, should you wish to switch yarn. All yarns within the same group have a similar knitting tension and can easily replace each other. However, different yarn qualities have different structures and properties which will give the finished work a unique look and feel.

Click here for an overview of the yarns in each yarn group

At the top of all our patterns you’ll find a link to our yarn calculator, which is a helpful tool should you wish to use a different yarn than suggested. By filling in the yarn quality you wish to replace, the amount (in your size) and number of strands, the calculator will present good alternative yarns with the same knitting tension. Additionally it will tell you how much you’ll require in the new qualities and whether you’ll need to work with multiple strands. Most skeins are 50g (some are 25g or 100g).

If the pattern is worked with multiple colours, every colour will have to be calculated separately. Similarly, if the pattern is worked with several strands of different yarns (for example 1 strand Alpaca and 1 strand Kid-Silk) you will have to find alternatives for each, individually.

Click here to see our yarn calculator

Since different yarns have different qualities and textures we have chosen to keep the original yarn in our patterns. However, you can easily find options among our available qualities by using our yarn calculator, or simply pick a yarn from the same yarn group.

It is possible that some retailers still have discontinued yarns in stock, or that someone has a few skeins at home that they would like to find patterns for.

The yarn calculator will provide both alternative yarn as well as required amount in the new quality.

If you think it's hard to decide what size to make, it can be a good idea to measure a garment you own already and like the size of. Then you can pick the size by comparing those measures with the ones available in the pattern's size chart.

You'll find the size chart at the bottom of the pattern.

See DROPS lesson: How to read size chart

The needle size provided in the pattern serves only as a guide, the important thing is to follow the knitting tension. And since knitting tension is very individual, you will have to adjust the needle size to ensure that YOUR tension is the same as in the pattern – maybe you’ll have to adjust 1, or even 2 needle sizes, up or down to achieve the correct tension. For this, we recommend that you work test swatches.

Should you work with a different knitting tension than the one provided, the measurements of the finished garment might deviate from the measurement sketch.

See DROPS lesson: How to measure your tension/gauge

See DROPS video: How to make a tension/gauge swatch

Working a garment top-down provides more flexibility and room for personal adjustment. For example it is easier to try the garment on while working, as well as making adjustments to length of yoke and shoulder caps.

The instructions are carefully explaining every step, in the correct order. Diagrams are adjusted to the knitting direction and are worked as usual.

The diagram depicts all rows/rounds, and every stitch seen from the right side. It is read from bottom to top, from right to left. 1 square = 1 stitch.

When working back and forth, every other row is worked from the right side and every other row is worked from the wrong side. When working from the wrong side, the diagram will have to be worked reversed: from left to right, knit stitches are purled, purl stitches are knit etc.

When working in the round every round is worked from the right side and the diagram are worked from right to left on all rounds.

See DROPS lesson: How to read knitting diagrams

The diagram depicts all rows/rounds, and every stitch seen from the right side. It is worked from bottom to top, from right to left.

When working back and forth every other row is worked from the right side: from right to left and every other row is worked from the wrong side: from left to right.

When working in the round, every row in the diagram are worked from the right side, from right to left.

When working a circular diagram you start in the middle and work your way outwards, counter clockwise, row by row.

The rows usually start with a given number of chain stitches (equivalent to the height of the following stitch), this will either be depicted in the diagram or explained in the pattern.

See DROPS lesson: How to read crochet diagrams

Instructions for working several diagrams after each other on the same row/round, will often be written like so: “work A.1, A.2, A.3 a total of 0-0-2-3-4 times". This means you work A.1 once, then A.2 is worked once, and A.3 is repeated (in width) the number of times provided for your size – in this case like so: S = 0 times, M = 0 times, L=2 times, XL= 3 times and XXL = 4 times.

The diagrams are worked as usual: begin with the first row in A.1, then work the first row in A.2 etc.

See DROPS lesson: How to read knitting diagrams

See DROPS lesson: How to read crochet diagrams

The total width of the garment (from wrist-to-wrist) will be larger in the larger sizes, despite the actual sleeves being shorter. The larger sizes have longer sleeve caps and wider shoulders, so there will be a good fit in all sizes.

The measurement sketch/schematic drawing provides information regarding the full length of the garment. If it’s a jumper or a jacket the length is measured from the highest point on the shoulder closest to the neckline, and straight down to the bottom of the garment. It is NOT measured from the tip of shoulder. Similarly, the length of yoke is measured from the highest point on the shoulder and down to where yoke is split into body and sleeves.

On a jacket measures are never taken along bands, unless specifically stated. Always measure inside band stitches when measuring the length.

See DROPS lesson: How to read a schematic drawing

Diagrams are often repeated on the round or in height. 1 repeat is the diagram the way it appears in the pattern. If it says to work 5 repeats of A.1 in the round, then you work A.1 a total of 5 times after/next to each other in the round. If it says to work 2 repeats of A.1 vertically/in height you work the entire diagram once, then begin again at the start and work the entire diagram one more time.

Chain stitches are slightly narrower than other stitches and to avoid working the cast-on edge too tight, we simply chain more stitches to begin with. The stitch count will be adjusted on the following row to fit the pattern and measurement sketch.

The rib edge is more elastic and will contract slightly compared to, for example, stocking stitch. By increasing before the rib edge, you avoid a visible difference in width between the rib edge and the rest of the body.

It’s very easy to cast off too tightly, and by making yarn overs while casting off (and simultaneously casting these off) you avoid a too tight cast off edge.

See DROPS video: How to bind off with yarn overs (yo)

To achieve an even increase (or decrease) you can increase on, for example: every 3rd and 4th row alternately, like so: work 2 rows and increase on the 3rd row, work 3 rows and increase on the 4th. Repeat this until the increase is complete.

See DROPS lesson: Increase or decrease 1 st on every 3rd and 4th row alternately

Should you prefer to work in the round instead of back and forth, you may of course adjust the pattern. You’ll need to add steeks mid-front (usually 5 stitches), and follow the instructions. When you would normally turn and work from the wrong side, simply work across the steek and continue in the round. At the end you’ll cut the piece open, pick up stitches to work bands, and cover the cut edges.

See DROPS video: How to knit steeks and cut open

Should you prefer to work back and forth instead of in the round, you may of course adjust the pattern so you work the pieces separately and then assemble them at the end. Divide the stitches for the body in 2, add 1 edge stitch in each side (for sewing) and work the front and back pieces separately.

See DROPS lesson: Can I adapt a pattern for circular needles into straight needles?

Pattern repeats can vary slightly in the different sizes, in order to get the correct proportions. If you’re not working the exact same size as the garment in the photo, yours might deviate slightly. This has been carefully developed and adjusted so that the complete impression of the garment is the same in all sizes.

Make sure to follow instructions and diagrams for your size!

If you have found a pattern you like which is available in women’s size it’s not very difficult to convert it to men’s size. The biggest difference will be the length of sleeves and body. Start working on the women size that you think would fit across the chest. The additional length will be worked right before you cast off for the armhole/sleeve cap. If the pattern is worked top-down you can add the length right after the armhole or before the first decrease on sleeve.

Regarding additional yarn amount, this will depend on how much length you add, but it is better with a skein too many than too few.

All yarns will have excess fibres (from production) that might come off as lint or shedding. Brushed yarns (ie hairier yarns) have more of these loose, excess fibres, causing more shedding.

Shedding also depends on what is worn under or over the garment, and whether this pulls at the yarn fibres. It’s therefore not possible to guarantee that there will be no shedding

Below are some tips on how to get the best result when working with hairier yarns:

1. When the garment is finished (before you wash it) shake it vigorously so the looser hairs come off. NOTE: do NOT use a lint roller, brush or any method that pulls at the yarn.

2. Place the garment in a plastic bag and put it in your freezer - the temperature will cause the fibres to become less attached to each other, and excess fibres will come off easier.

3. Leave in the freezer for a few hours before taking it out and shaking it again.

4. Wash the garment according to the instructions on the yarn label.

Pilling is a natural process that happens to even the most exclusive of fibers. It's a natural sign of wear and tear that is hard to avoid, and that is most visible in high friction areas of your garment like a sweater's arms and cuffs.

You can make your garment look as new by removing the pilling, using a fabric comb or a pill/lint remover.

Still can't find the answer you need? Then scroll down and leave your question so one of our experts can try to help you. This will be done normally within 5 to 10 working days.
In the meantime, you can read the questions and answers that others have left to this pattern or join the DROPS Workshop on Facebook to get help from fellow knitters/crocheters!

You might also like...

Post a comment to pattern DROPS 202-10

We would love to hear what you have to say about this pattern!

If you want to leave a question, please make sure you select the correct category in the form below, to speed up the answering process. Required fields are marked *.

Comments / Questions (24)

country flag Birsen özgüder wrote:

Guten Tag, \r\nIch möchte bald dieses Cardigan mir stricken aber die Frage, wie und wo ich die Fadenenden, und/oder -reste die waehrend des Farbwechsels entstehen werden, verstecken werde, findet bei mir keine Antwort. Vielleicht haben Sie dafür eine Lösung .\r\n\r\nDanke im Voraus für eine Antwort und\r\nLiebe Grüsse\r\nBirsen özgüder

08.04.2024 - 16:09

DROPS Design answered:

Liebe Frau Özgüder, die Fäden vernähen Sie so: bei kraus rechts und in glatt rechts. Sie könnnen auch den Faden nach der 1. (oder mehr) Maschen - siehe hier. Viel Spaß beim Stricken!

09.04.2024 - 08:28

country flag Carole Dormer wrote:

I would like to knit the Valencia Cardigan - please can you tell me what cast on with FOG means ?

07.08.2023 - 15:45

DROPS Design answered:

Dear Mrs Dormer, "Fog" refers to DROPS Air colour no 10 - read more under shadecard here. Happy knitting!

08.08.2023 - 09:01

country flag Tatiana wrote:

Hola, gracias por el patrón. Quería comentarles que este patrón tiene varios errores en la versión español, por ej: se tejen 6cm de cenefa antes de las filas acortadas, no están los cm tejidos después de las filas acortadas, el orden de los marcadores está desordenado, debería ser delantero, manga, espalda, manga, delantero. Rectifique las instrucciones del patrón en el idioma original, ya que no entendía cómo seguir las instrucciones. Gracias

21.04.2023 - 17:51

country flag Katelijne wrote:

Ik vind het jammer dat je nooit de achterkant van de kraag in foto toont. Dit held voor alle truien Heeft deze trui een doorlopende kraag? Wordt er een deel in het achterpand gebreid? Dank je

26.10.2022 - 10:28

country flag Jo wrote:

I would like to make this in a different color way. If I replaced Blue 16 with Heather 14, kept the Pearl grey 03 then replaced Black 06 with Ruby Red 07 what would you suggest for the last 2 colors? Pink 24 & Off white 01 or maybe Pink sand 33? Thanks

03.11.2021 - 13:57

DROPS Design answered:

Dear Jo, please contact your DROPS store, even per mail or telephone, it will be much easier for them to help you choosing the best matching colours. Happy knitting!

03.11.2021 - 16:42

country flag Karin wrote:

Skal striberne på ærmerne være længere end på kroppen?

18.10.2020 - 17:13

DROPS Design answered:

Hei Karin. Ja, de er litt lengre. Du finner målene i oppskriften, både til bærestykket, bolen og ermene. God Fornøyelse!

19.10.2020 - 21:13

country flag Francina wrote:

Könnte es sein, dass ein Fehler sich eingeschlichen hat? Halsblende am Ende: 74-74-74-78-78-86. FÜR L sind dann 74 Maschen auf dem Nadel. Danach muss mann für die Pässe 38 Maschen für den Rückenteil abzählen. Dafür bräuchte man dann aber 76 Maschen statt 74.

13.07.2020 - 13:54

DROPS Design answered:

Liebe Francina, es sieht so aus, am besten nehmen Sie 10 Maschen (und nicht nur 8 M) damit Sie 76 M für die Passe haben - eine Korrektur erfolgt sicher nach den Sommerferien. Viel Spaß beim stricken!

13.07.2020 - 15:36

country flag Francina wrote:

Welche Grösse hat der Metalknopf 542? Leider finde ich diesen Knopf nicht bei den aufgelisteten Läden.

08.07.2020 - 17:51

DROPS Design answered:

Liebe Francina, hier finden Sie alle Knöpfe, Die Rund (Stahl) Nr542 sind 23 mm. Viel Spaß beim stricken!

09.07.2020 - 09:10

country flag Avila Janssen wrote:

I mean 8 balls seems a lot :)

26.06.2020 - 16:02

country flag Avila Janssen wrote:

Hello, how much yarn (Air) is needed if knitted in one colour only? 16 balls seems a lot...Thank you!

26.06.2020 - 16:01

DROPS Design answered:

Dear Mrs Janssen, this jacket has been worked with stripes, we therefore do not have the amount of yarn in one colour - you can add all colours but you will probably request less - check other patterns with Air to compare and request help from your DROPS store - even per mail or telephone. Happy knitting!

29.06.2020 - 07:17