DROPS Merino Extra Fine
100% vlna
od 98.00 Kč /50g
Přízi na tento model můžete mít už za 686.00Kč.

Cenu za klubka počítáme podle spotřeby při výrobě modelu v nejmenší velikosti a nejlevnější variantě příze. Rádi byste ještě lepší cenu? Třeba ji najdete mezi DROPS Deals!

Daisy Delight

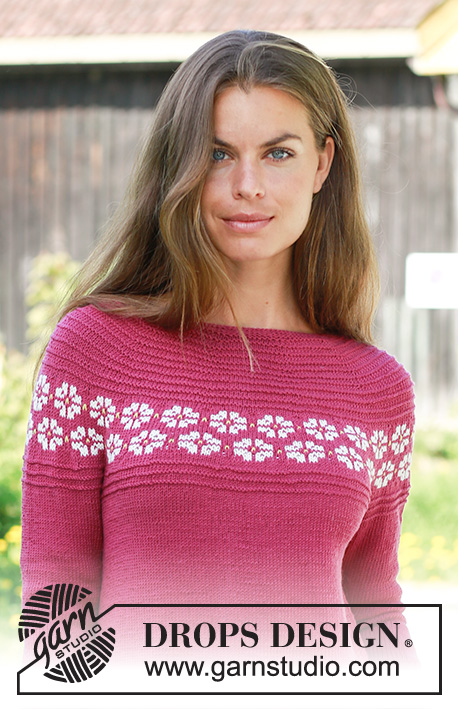
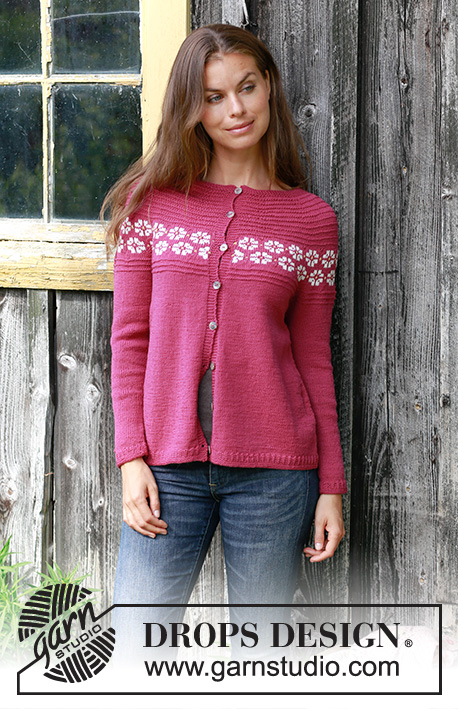
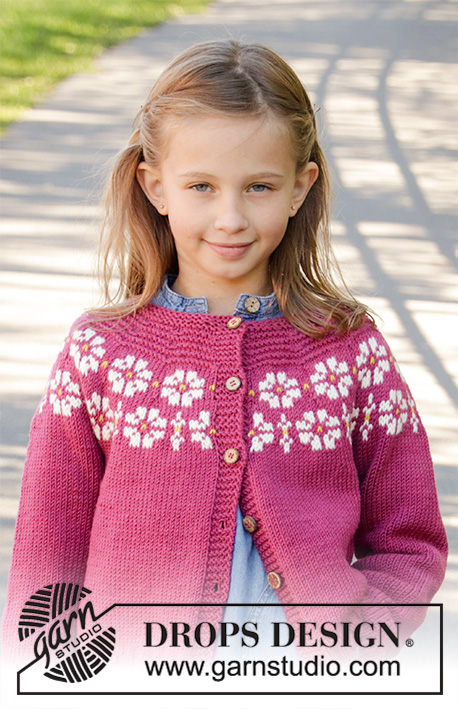
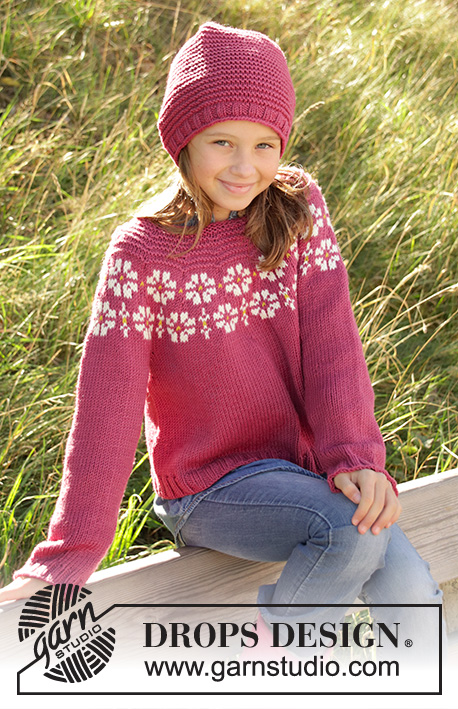
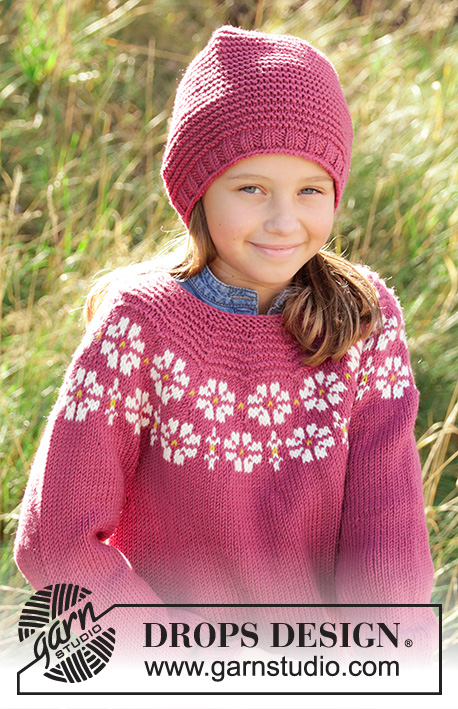
Dětský pulovr s kruhovým sedlem s vroubkovým a norským vzorem s kytičkami pletený shora dolů z příze DROPS Merino Extra Fine nebo DROPS Lima. Velikost 3-12 let.

DROPS Children 34-7
DROPS Design: model č. me-052-bn
Skupina přízí B
-------------------------------------------------------

VELIKOST:
3/4 - 5/6 - 7/8 - 9/10 - 11/12 let
Velikost v cm:
98/104 - 110/116 - 122/128 - 134/140 - 146/152

MATERIÁL:
DROPS MERINO EXTRA FINE firmy Garnstudio (spadá do skupiny přízí B)
250-300-300-350-350 g, barva č. 34, vřes
50-50-50-50-50 g, barva č. 01, smetanová
50-50-50-50-50 g, barva č. 30, zlatá

nebo:
DROPS LIMA firmy Garnstudio (spadá do skupiny přízí B)
250-300-300-350-350 g, barva č. 6273, pink
50-50-50-50-50 g, barva č. 0100, smetanová
50-50-50-50-50 g, barva č. 2923, žlutá

ZKUŠEBNÍ VZOREK:
21 ok na šířku a 28 řad na výšku lícovým žerzejem = 10 x 10 cm.

JEHLICE:
DROPS PONOŽKOVÉ JEHLICE a KRUHOVÁ JEHLICE č.4, dlouhá 40 a 60 cm.
Uvedená síla jehlic je pouze orientační. Máte-li ve svém zkušebním vzorku více ok na 10 cm, použijte jehlice silnější. Pokud máte naopak méně ok na 10 cm, použijte jehlice slabší.

-------------------------------------------------------

Náhradní příze – Podívejte se, jak změnit přízi
Skupina přízí A až F – Neměňte návod, změňte přízi
Spotřeba příze při použití náhradní příze – Využijte náš převodník

-------------------------------------------------------

DROPS Merino Extra Fine
100% vlna
od 98.00 Kč /50g
Přízi na tento model můžete mít už za 686.00Kč.

Cenu za klubka počítáme podle spotřeby při výrobě modelu v nejmenší velikosti a nejlevnější variantě příze. Rádi byste ještě lepší cenu? Třeba ji najdete mezi DROPS Deals!

DROPS Super Sale

SAVE 30% on 6 cotton favourites!
Platí do 12.04.2024

Návod

----------------------------------------------------------

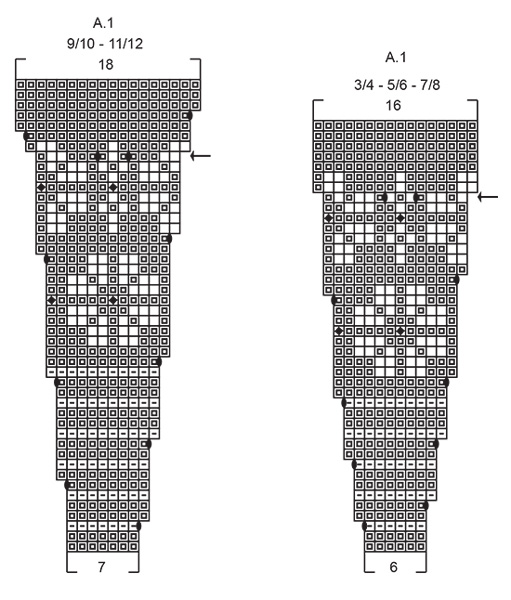
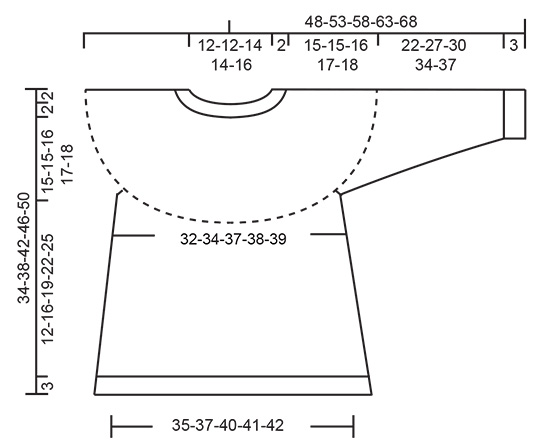
VYSVĚTLIVKY:

----------------------------------------------------------

VROUBKOVÝ VZOR:
1 vroubek = 2 kruhové řady. Pleteme střídavě 1 kruhovou řadu hladce, 1 obrace.

VZOR:
Viz schéma A.1. Zvolte si schéma pro požadovanou velikost. Zobrazeny jsou všechny řady vzoru nahlížené z lícové strany.

TIP – PŘIDÁVÁNÍ 1:
Abychom vypočítali, jak často musíme přidávat, vydělíme celkový počet ok na jehlici (např. 72 ok) počtem ok, která potřebujeme přidat (tj. 17), takže 72 : 17 = 4,2.
V tomto případě tedy 1x nahodíme za každým zhruba 4. okem. V následující kruhové řadě pleteme nahození za zadní nit, aby se v pletenině netvořily dírky.

TIP – PŘIDÁVÁNÍ 2 (boky):
Začínáme 1 oko před značkou: 1x nahodíme, 2 oka upleteme hladce (značka leží mezi nimi), 1x nahodíme (= přidali jsme 2 oka). V následující kruhové řadě pleteme nahození za zadní nit, aby se v pletenině netvořily dírky. Přidaná oka pak dál pleteme lícovým žerzejem.

TIP – UJÍMÁNÍ (podpaží, rukávy):
Na každé straně značky ujmeme 1 oko, takto – začínáme 3 oka před značkou: 2 oka spleteme hladce, 2 oka upleteme hladce (značka leží mezi nimi), 1 oko sejmeme hladce, 1 oko upleteme hladce a sejmuté přes ně přetáhneme (= ujmuli jsme 2 oka).

-------------------------------------------------------

POPIS PRÁCE:

-------------------------------------------------------

PULOVR - JAK BUDEME POSTUPOVAT:
Pleteme v kruhových řadách na kruhové jehlici, shora dolů. Po dokončení sedla pleteme v kruhových řadách trup. Rukávy pleteme v kruhových řadách na krátké kruhové jehlici či ponožkových jehlicích.

SEDLO:
Na kruhovou jehlici č.4 nahodíme vřesovou přízí 62-66-70-76-82 ok a upleteme 2 VROUBKY – viz výše. Pak pleteme 1 kruhovou řadu hladce a SOUČASNĚ přidáme rovnoměrně 16-18-20-22-23 ok – viz TIP – PŘIDÁVÁNÍ 1 = 78-84-90-98-105 ok.
Upleteme 1 kruhovou řadu obrace. Tuto kruhovou řadu si označíme značkou a NYNÍ MĚŘÍME DÍL OD TOHOTO MÍSTA!
V následující kruhové řadě začneme plést vzor A.1 (zvolte si schéma podle požadované velikosti) – sekvenci vzoru opakujeme v kruhové řadě celkem 13-14-15-14-15x.
Po dokončení celé sekvence vzoru A.1 (na výšku), máme na jehlici 208-224-240-252-270 ok. V následující kruhové řadě přidáme rovnoměrně 4-4-6-2-6 ok = 212-228-246-254-276 ok.
Pokračujeme hladce až do výše 15-15-16-17-18 cm od značky. Následující kruhovou řadu pleteme takto: prvních 44-48-51-53-62 ok odložíme na pomocnou jehlici (= rukáv), nahodíme 6 nových ok (= podpaží), 62-66-72-74-76 ok upleteme hladce (= přední díl), dalších 44-48-51-53-62 ok odložíme na pomocnou jehlici (= rukáv), nahodíme 6 nových ok (= podpaží), 62-66-72-74-76 ok upleteme hladce (= zadní díl).

TRUP:
V kruhové řadě máme 136-144-156-160-164 ok.
NYNÍ MĚŘÍME DÍL OD TOHOTO MÍSTA!
Doprostřed 6 nových ok v podpaží na každé straně dílu vložíme značku (= boky). Pleteme v kruhových řadách lícovým žerzejem. Ve výši 3 cm přidáme na obou stranách obou značek 1 oko (= celkem 4 oka) – viz TIP – PŘIDÁVÁNÍ 2! Toto přidávání opakujeme vždy po 3-4-5-6-7 cm výšky, celkem 3x = na jehlici máme 148-156-168-172-176 ok. Pokračujeme v pletení jako dosud až do výše 12-16-19-22-25 cm. Pak upleteme 1 kruhovou řadu a SOUČASNĚ přidáme rovnoměrně 12-12-12-12-12 ok = 160-168-180-184-188 ok.
Nyní pleteme lem pružným vzorem 2/2 (tj. střídáme 2 oka hladce, 2 obrace). Když je lem vysoký 3 cm, všechna oka dle vzoru uzavřeme. Přízi odstřihneme a zapošijeme.

RUKÁV:
Odložená oka jednoho rukávu vrátíme z pomocné jehlice zpět na krátkou kruhovou jehlici/ponožkové jehlice č.4 (= 44-48-51-53-62 ok) a navíc k nim nabereme po 1 oku z každého ze 6 nových ok v podpaží (= 50-54-57-59-68 ok). Doprostřed těchto 6 ok vložíme značku. Pleteme v kruhových řadách lícovým žerzejem. Ve výši 2 cm ujmeme na každé straně značky 1 oko – viz TIP - UJÍMÁNÍ. Toto ujímání opakujeme vždy po 4-3,5-4-4-3,5 cm výšky, celkem 5-7-7-8-10x = na jehlici máme 40-40-43-43-48 ok. Pokračujeme lícovým žerzejem až do výše 22-27-30-34-37 cm. Pak upleteme 1 kruhovou řadu a SOUČASNĚ přidáme rovnoměrně 4-4-5-5-4 ok = 44-44-48-48-52 ok. Nyní pleteme lem pružným vzorem 2/2. Když je lem vysoký 3 cm, všechna oka volně dle vzoru uzavřeme. Přízi odstřihneme a zapošijeme.
Stejným způsobem upleteme i druhý rukáv.

Schéma

symbols = hladce
symbols = obrace
symbols = hladce smetanovou
symbols = hladce zlatou
symbols = 1x nahodíme mezi 2 oky, v následující kruhové řadě pleteme nahození za zadní nit, aby se v pletenině netvořily dírky
symbols = v této kruhové řadě přidáváme uprostřed schématu - dejte pozor, aby vzor v následujících řadích správně navazoval
diagram
diagram

Každý náš návod je doprovázen speciálními video-ukázkami, které vás navedou.

Chcete se na něco zeptat? Projděte si seznam nejčastějších otázek (FAQ).

Knitting tension is what determines the final measurements of your work, and is usually measured per 10 x 10 cm. It is provided like so: number of stitches in width x number of rows in height - eg: 19 stitches x 26 rows = 10 x 10 cm.

The knitting tension is very individual; some people knit/crochet loosely while others work tightly. You adjust the knitting tension with the needle size, which is why the suggested needle size is only meant as a guide! You need to adjust this (up or down) to ensure that YOUR knitting tension matches the knitting tension provided in the pattern. If you work with a different knitting tension than provided you will have a different yarn consumption, and your work will have different measurements than what the pattern suggests.

The knitting tension also determines which yarns can replace each other. As long as you achieve the same knitting tension you can replace one yarn with another.

See DROPS lesson: How to measure your tension/gauge

See DROPS video: How to make a gauge tension swatch

The required amount of yarn is provided in grams, eg: 450 g. To calculate how many balls you’ll need you first need to know how many grams are in 1 ball (25g, 50g or 100g). This information is available if you click on the individual yarn quality on our pages. Divide the amount required with the amount of each ball. For example, if each ball is 50g (the most common amount), the calculation will be as follows: 450 / 50 = 9 balls.

The important thing when changing from one yarn to another is that the knitting/crochet tension remains the same. This is so that the measurements of the finished piece will be the same as on the sketch provided. It is easier to achieve the same knitting tension using yarns from the same yarn group. It is also possible to work with multiple strands of a thinner yarn to achieve the knitting tension of a thicker one. Please try our yarn converter. We recommend you to always work a test swatch.

Please NOTE: when changing yarn the garment might have a different look and feel to the garment in the photo, due to individual properties and qualities of each yarn.

See DROPS lesson: Can I use a different yarn than the one mentioned in the pattern?

All our yarns are categorised into yarn groups (from A to F) according to thickness and knitting tension – group A contains the thinnest yarns and group F the thickest. This makes it easier for you to find alternative yarns to our patterns, should you wish to switch yarn. All yarns within the same group have a similar knitting tension and can easily replace each other. However, different yarn qualities have different structures and properties which will give the finished work a unique look and feel.

Click here for an overview of the yarns in each yarn group

At the top of all our patterns you’ll find a link to our yarn calculator, which is a helpful tool should you wish to use a different yarn than suggested. By filling in the yarn quality you wish to replace, the amount (in your size) and number of strands, the calculator will present good alternative yarns with the same knitting tension. Additionally it will tell you how much you’ll require in the new qualities and whether you’ll need to work with multiple strands. Most skeins are 50g (some are 25g or 100g).

If the pattern is worked with multiple colours, every colour will have to be calculated separately. Similarly, if the pattern is worked with several strands of different yarns (for example 1 strand Alpaca and 1 strand Kid-Silk) you will have to find alternatives for each, individually.

Click here to see our yarn calculator

Since different yarns have different qualities and textures we have chosen to keep the original yarn in our patterns. However, you can easily find options among our available qualities by using our yarn calculator, or simply pick a yarn from the same yarn group.

It is possible that some retailers still have discontinued yarns in stock, or that someone has a few skeins at home that they would like to find patterns for.

The yarn calculator will provide both alternative yarn as well as required amount in the new quality.

If you think it's hard to decide what size to make, it can be a good idea to measure a garment you own already and like the size of. Then you can pick the size by comparing those measures with the ones available in the pattern's size chart.

You'll find the size chart at the bottom of the pattern.

See DROPS lesson: How to read size chart

The needle size provided in the pattern serves only as a guide, the important thing is to follow the knitting tension. And since knitting tension is very individual, you will have to adjust the needle size to ensure that YOUR tension is the same as in the pattern – maybe you’ll have to adjust 1, or even 2 needle sizes, up or down to achieve the correct tension. For this, we recommend that you work test swatches.

Should you work with a different knitting tension than the one provided, the measurements of the finished garment might deviate from the measurement sketch.

See DROPS lesson: How to measure your tension/gauge

See DROPS video: How to make a tension/gauge swatch

Working a garment top-down provides more flexibility and room for personal adjustment. For example it is easier to try the garment on while working, as well as making adjustments to length of yoke and shoulder caps.

The instructions are carefully explaining every step, in the correct order. Diagrams are adjusted to the knitting direction and are worked as usual.

The diagram depicts all rows/rounds, and every stitch seen from the right side. It is read from bottom to top, from right to left. 1 square = 1 stitch.

When working back and forth, every other row is worked from the right side and every other row is worked from the wrong side. When working from the wrong side, the diagram will have to be worked reversed: from left to right, knit stitches are purled, purl stitches are knit etc.

When working in the round every round is worked from the right side and the diagram are worked from right to left on all rounds.

See DROPS lesson: How to read knitting diagrams

The diagram depicts all rows/rounds, and every stitch seen from the right side. It is worked from bottom to top, from right to left.

When working back and forth every other row is worked from the right side: from right to left and every other row is worked from the wrong side: from left to right.

When working in the round, every row in the diagram are worked from the right side, from right to left.

When working a circular diagram you start in the middle and work your way outwards, counter clockwise, row by row.

The rows usually start with a given number of chain stitches (equivalent to the height of the following stitch), this will either be depicted in the diagram or explained in the pattern.

See DROPS lesson: How to read crochet diagrams

Instructions for working several diagrams after each other on the same row/round, will often be written like so: “work A.1, A.2, A.3 a total of 0-0-2-3-4 times". This means you work A.1 once, then A.2 is worked once, and A.3 is repeated (in width) the number of times provided for your size – in this case like so: S = 0 times, M = 0 times, L=2 times, XL= 3 times and XXL = 4 times.

The diagrams are worked as usual: begin with the first row in A.1, then work the first row in A.2 etc.

See DROPS lesson: How to read knitting diagrams

See DROPS lesson: How to read crochet diagrams

The total width of the garment (from wrist-to-wrist) will be larger in the larger sizes, despite the actual sleeves being shorter. The larger sizes have longer sleeve caps and wider shoulders, so there will be a good fit in all sizes.

The measurement sketch/schematic drawing provides information regarding the full length of the garment. If it’s a jumper or a jacket the length is measured from the highest point on the shoulder closest to the neckline, and straight down to the bottom of the garment. It is NOT measured from the tip of shoulder. Similarly, the length of yoke is measured from the highest point on the shoulder and down to where yoke is split into body and sleeves.

On a jacket measures are never taken along bands, unless specifically stated. Always measure inside band stitches when measuring the length.

See DROPS lesson: How to read a schematic drawing

Diagrams are often repeated on the round or in height. 1 repeat is the diagram the way it appears in the pattern. If it says to work 5 repeats of A.1 in the round, then you work A.1 a total of 5 times after/next to each other in the round. If it says to work 2 repeats of A.1 vertically/in height you work the entire diagram once, then begin again at the start and work the entire diagram one more time.

Chain stitches are slightly narrower than other stitches and to avoid working the cast-on edge too tight, we simply chain more stitches to begin with. The stitch count will be adjusted on the following row to fit the pattern and measurement sketch.

The rib edge is more elastic and will contract slightly compared to, for example, stocking stitch. By increasing before the rib edge, you avoid a visible difference in width between the rib edge and the rest of the body.

It’s very easy to cast off too tightly, and by making yarn overs while casting off (and simultaneously casting these off) you avoid a too tight cast off edge.

See DROPS video: How to bind off with yarn overs (yo)

To achieve an even increase (or decrease) you can increase on, for example: every 3rd and 4th row alternately, like so: work 2 rows and increase on the 3rd row, work 3 rows and increase on the 4th. Repeat this until the increase is complete.

See DROPS lesson: Increase or decrease 1 st on every 3rd and 4th row alternately

Should you prefer to work in the round instead of back and forth, you may of course adjust the pattern. You’ll need to add steeks mid-front (usually 5 stitches), and follow the instructions. When you would normally turn and work from the wrong side, simply work across the steek and continue in the round. At the end you’ll cut the piece open, pick up stitches to work bands, and cover the cut edges.

See DROPS video: How to knit steeks and cut open

Should you prefer to work back and forth instead of in the round, you may of course adjust the pattern so you work the pieces separately and then assemble them at the end. Divide the stitches for the body in 2, add 1 edge stitch in each side (for sewing) and work the front and back pieces separately.

See DROPS lesson: Can I adapt a pattern for circular needles into straight needles?

Pattern repeats can vary slightly in the different sizes, in order to get the correct proportions. If you’re not working the exact same size as the garment in the photo, yours might deviate slightly. This has been carefully developed and adjusted so that the complete impression of the garment is the same in all sizes.

Make sure to follow instructions and diagrams for your size!

If you have found a pattern you like which is available in women’s size it’s not very difficult to convert it to men’s size. The biggest difference will be the length of sleeves and body. Start working on the women size that you think would fit across the chest. The additional length will be worked right before you cast off for the armhole/sleeve cap. If the pattern is worked top-down you can add the length right after the armhole or before the first decrease on sleeve.

Regarding additional yarn amount, this will depend on how much length you add, but it is better with a skein too many than too few.

All yarns will have excess fibres (from production) that might come off as lint or shedding. Brushed yarns (ie hairier yarns) have more of these loose, excess fibres, causing more shedding.

Shedding also depends on what is worn under or over the garment, and whether this pulls at the yarn fibres. It’s therefore not possible to guarantee that there will be no shedding

Below are some tips on how to get the best result when working with hairier yarns:

1. When the garment is finished (before you wash it) shake it vigorously so the looser hairs come off. NOTE: do NOT use a lint roller, brush or any method that pulls at the yarn.

2. Place the garment in a plastic bag and put it in your freezer - the temperature will cause the fibres to become less attached to each other, and excess fibres will come off easier.

3. Leave in the freezer for a few hours before taking it out and shaking it again.

4. Wash the garment according to the instructions on the yarn label.

Pilling is a natural process that happens to even the most exclusive of fibers. It's a natural sign of wear and tear that is hard to avoid, and that is most visible in high friction areas of your garment like a sweater's arms and cuffs.

You can make your garment look as new by removing the pilling, using a fabric comb or a pill/lint remover.

Pořád se nemůžete dobrat odpovědi, kterou hledáte? Pak posuňte stránku dolů a napište nám svůj dotaz, naši specialisté se vám pokusí poradit. Obvykle to zvládneme během 5 až 10 pracovních dnů..
Mezitím si můžete pročíst otázky a odpovědi, které k tomuto modelu položili ostatní, nebo navštívit skupinu DROPS Workshop na Facebooku, kde vám může poradit některá spřízněná duše!

Mohly by se vám líbit...

Daisy Delight

Barbara, United States

Daisy Delight

Simone, Germany

Přidejte komentář k návodu DROPS Children 34-7

Rádi bychom věděli, co si o tomto modelu myslíte!

Pokud se chcete na něco zeptat, dbejte prosím na to, abyste ve formuláři níže vybrali správnou kategorii - díky tomu se dříve dozvíte, co potřebujete vědět. Povinná pole jsou označena *.

Komentáře / Otázky (38)

country flag Julia wrote:

Hallo, kann es sein, dass die Strickschrift einen Fehler enthält? In Reihe 36/37 müssten meiner Meinung nach die weißen Maschen anders sein, damit wieder eine Blume entsteht.

11.12.2023 - 22:22

DROPS Design answered:

Liebe Julia, die Zunahmen werden in der Mitte vom Diagram gestrickt, so wird das Diagram so aussehen, aber wenn Sie das Diagram folgen genauso wie beschrieben, werden die Blumen richtig aussehen. Viel Spaß beim stricken!

12.12.2023 - 08:59

country flag Laubscher wrote:

Pouvez-vous me dire dans quelle qualité de laine le modèle en photo a été réalisé ? Est-ce en Drops Merino extra fine ou Cotton Light ou Drops Lima? Je me pose la question car le modèle en photo me semble d'un rose plus magenta que le bruyère 34 Drops merino que je viens de recevoir Merci de votre réponse. Cordialement Véronique Laubscher

31.10.2023 - 12:18

DROPS Design answered:

Bonjour Mme Laubscher, le modèle photographié a été tricoté en DROPS Merino Extra Fine, notez que les couleurs peuvent varier d'un ordinateur à l'autre, mais également en fonction de la luminosité de la photo du modèle, et du bain des couleurs. Bon tricot!

31.10.2023 - 16:19

country flag Chevrier wrote:

Bonjour. Je pense qu il y a une erreur de mesure pour la taille 5/6 ans car c est indiqué 16 cm des emmanchures jusqu au côtes et j ai fait 23 cm et c est juste en hauteur.

30.10.2023 - 16:11

country flag Christa wrote:

Ich habe dieses Modell für meine Urenkelin nachgearbeitet. Ist wunderschön geworden, mit passender Mütze. Sieht super aus! Danke fürderhin perfekte Anleitung!

24.10.2023 - 11:40

country flag Leanne Hart wrote:

Do you have the pattern of the hat shown in the main picture?

09.08.2023 - 00:37

DROPS Design answered:

Hi Leanne, You can find all our children's hats if you search for 'Children's hats' in the search box. Happy crafting!

09.08.2023 - 07:15

country flag Laila wrote:

Hei jeg forstår ikke denne biten følgende biten:strikk opp 1 ny maske i hver av de 6 maskene som ble lagt opp på bolen (= 50-54-57-59-68 masker) skal de 6 maskene strikkes opp fra bilen eller legger de opp?

09.06.2023 - 16:12

DROPS Design answered:

Hei Laila. Når du delte bærestykket og satte erm maskene på 1 tråd og fortsatte med bolen, la du opp 6 nye masker under hvert erme. Så når du skal strikke ermene og har satt erm-maskene på en liten rundpinne, skal du nå strikke opp 1 maske i hver av de 6 maskene du la opp på bolen. På den måten unngår du å sy hullet under ermet etterpå dersom du legger opp 6 nye masker under ermet. Se Nederst på siden og Leksjonen: Hvordan strikke en genser ovenfra og ned. Pkt. 18. Eller se videoen: Hvordan strikke opp masker under erme. mvh DROPS Design

12.06.2023 - 08:58

country flag Françoise TEYCHENEY wrote:

Bonjour, je suis en train de réaliser ce modèle en 11/12 ans et je ne comprend pas pourquoi après les augmentations qui se situent au milieu du diagramme , on recommence par 2 mailles endroit en naturel au dessus de la flèche, puisque les augmentations sont situées plus loin ? Merci pour votre réponse

25.02.2023 - 10:50

DROPS Design answered:

Bonjour Mme Teycheney, les 2 m en naturel du rang suivant sont les mêmes 2 mailles qu'au rang précédent, et, au lieu d'avoir 4 m rose, on a maintenant 5 m rose - Les pétales vont ainsi être alignés comme avant, on a simplement augmenté le nombre de mailles en rose entre les fleurs (de part et d'autre de la maille naturel au milieu du diagramme. Suivez simplement le diagramme comme il est, vous verrez comment le motif va se former de lui-même. Bon tricot!

27.02.2023 - 09:53

country flag Nina wrote:

Hei igjen og takk for svar om vaskingen. Men hvordan skal jeg se at skyllevannet er helt klart når jeg vasker det i maskin? Jeg prøvde å vaske den igjen i maskin uten noe vaskemiddel, men det hjalp ikke. Mvh Nina

29.11.2021 - 17:43

DROPS Design answered:

Hej Nina, det kan du se hvis du skyller i håndvasken. Tag kontakt med butikken hvor du har købt garnet, så hjælper de dig.

03.12.2021 - 15:27

country flag Nina wrote:

Hei! Jeg har strikket denne genseren, men fikk problem da jeg vasket den i vaskemaskin. Jeg fulgte vaskeanvisningen, men den rosa fargen farget over på den hvite. Jeg strikket også en prøvelapp med blå og hvit og vasket den i maskin, men der skjedde det samme. Det hvite garnet ble liksom grått/blått. Hva skal jeg gjøre for at det ikke skal skje? Mvh Nina

26.11.2021 - 19:38

DROPS Design answered:

Hej Nina, hvis det er overskudsfarve, så skal blusen skylles til skyllevandet er helt klart, da vil den ikke farve over på den hvide. Hvis du vil reklamere skal du tage kontakt med butikken hvor du har købt garnet, så hjælper de dig. Butikken vil se banderoler, og de vil vide at tøjet er vaske separat ifølge vaskeanvisningen. Men prøv at se om du kan skylle farven ud af det hvide. Held og lykke!

29.11.2021 - 14:57

country flag Maryvonne wrote:

Bonjour, Pour la taille 5/6 ans, comment répartit-on les augmentations et sur quelle hauteur en cm pour passer de 84 mailles à 224 mailles ? Vous parlez de moutarde, ocre, bruyère, cerise,rouge foncé ... ce n'est pas le même modèle, si ? Merci de vos explications. Cordialement

23.08.2021 - 16:28

DROPS Design answered:

Bonjour Maryvonne, lorsque vous tricoterez le diagramme A.1 (= 14 fois en largeur en 5/6 ans), vous augmenterez comme indiqué dans le diagramme, autrement dit A.1 se commence par 6 mailles et se termine sur 16 mailles (= 16 x 14 m =224 m). Ce modèle est donné avec 3 possibilités de fils différents: Merino Extra Fine, Lima ou Cotton Light, les couleurs indiquées se réfèrent à la qualité concernée, cf FOURNITURES. Bon tricot!

24.08.2021 - 08:04