
Popular categories
Looking for a yarn?


|
|||||||||||||||||||
Water Lines |
|||||||||||||||||||
 |
 |
||||||||||||||||||
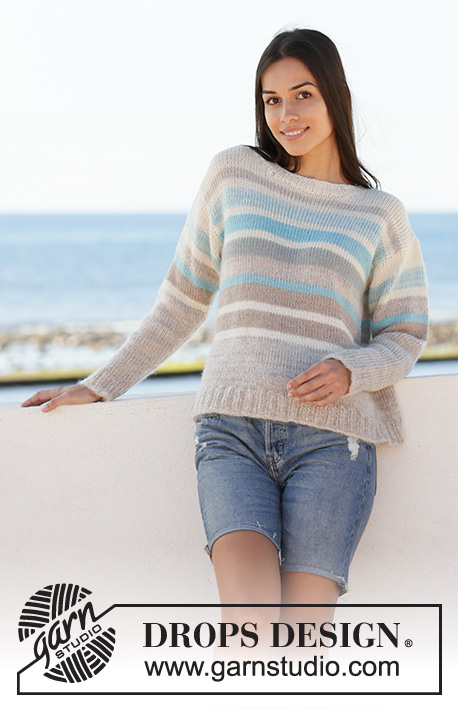
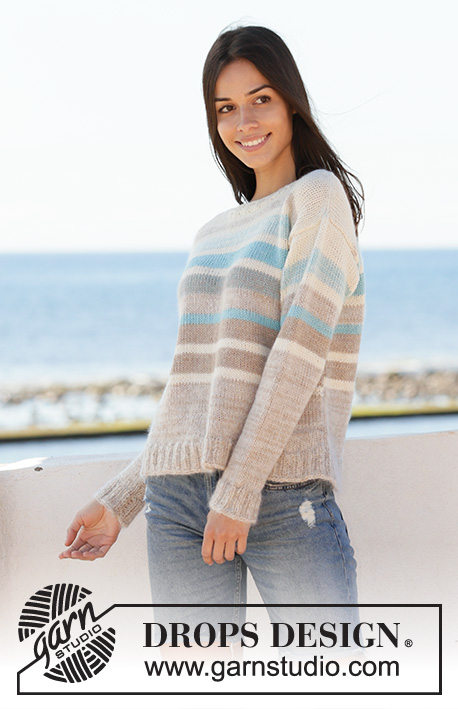
Knitted jumper with stripes in DROPS Alpaca. Sizes S - XXXL.
DROPS 199-5 |
|||||||||||||||||||
|
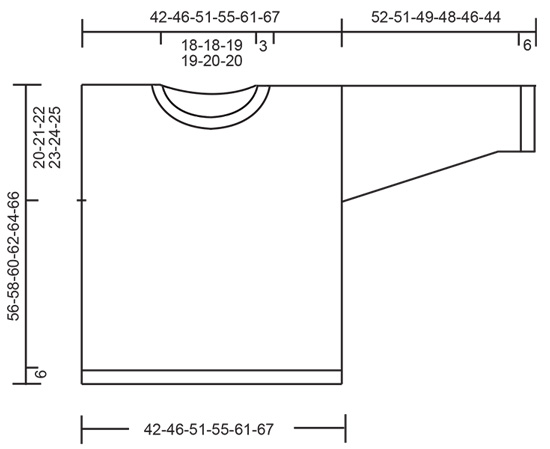
------------------------------------------------------- EXPLANATIONS FOR THE PATTERN: ------------------------------------------------------- DECREASE TIP (evenly spaced): To work out how to decrease evenly, count the total number of stitches on needle (e.g. 144 stitches) and divide by the number of decreases to be made (e.g. 8) = 18. In this example, decrease by knitting together each 17th and 18th stitch. STRIPES: See diagrams A.1 and A.2. A.1 shows stripes for body and A.2 stripes for sleeves. All rounds/rows are worked in stocking stitch. INCREASE TIP (for sleeves): Work until there is 1 stitch left before marker thread, 1 yarn over, knit 2 (marker thread sits between these 2 stitches), 1 yarn over. On next round knit yarn overs twisted to avoid holes. ------------------------------------------------------- START THE PIECE HERE: ------------------------------------------------------- JUMPER – SHORT OVERVIEW OF THE PIECE: The piece is worked in the round with circular needle as far as the armholes, and then the front/back pieces are worked separately, back and forth on needle. Sleeves are worked in the round with double pointed needles; change to short circular needle when there are enough stitches. BODY: Cast on 144-156-172-184-204-224 stitches with circular needle size 5 mm and 1 strand off-white and 1 strand light camel. Knit 1 round, then work rib (= knit 2 / purl 2) for 6 cm. Change to circular needle size 5.5 mm and knit 1 round where you decrease 8 evenly spaced in all sizes – read DECREASE TIP = 136-148-164-176-196-216 stitches. Work stocking stitch until the piece measures 13-15-16-18-19-21 cm from the cast-on edge. Then work STRIPES – see diagram A.1. AT THE SAME TIME when the piece measures 36-37-38-39-40-41 cm, divide the piece for front and back pieces as follows: Cast off 1 stitch, work 67-73-81-87-97-107 stitches (= front piece), cast off 1 stitch and work the remaining 67-73-81-87-97-107 stitches (= back piece). REMEMBER THE KNITTING TENSION! Place the stitches for the front piece on 1 thread. Then work back and forth over the back-piece stitches. BACK PIECE: = 67-73-81-87-97-107 stitches. Continue working according to diagram A.1, but in addition cast on 1 edge stitch at the end of the next 2 rows (work edge stitches in garter stitch) = 69-75-83-89-99-109 stitches. When you have completed the diagram continue with 2 strands off-white. Work until the piece measures 54-56-58-60-62-64 cm from the cast-on edge. On the next row from the right side cast off the middle 27-27-29-29-31-31 stitches for neck and each shoulder is finished separately. Cast off 1 stitch on next row from the neck = 20-23-26-29-33-38 stitches left on shoulder. Continue working until the piece measures 56-58-60-62-64-66 cm and cast off. Work the other shoulder in the same way. FRONT PIECE: = 67-73-81-87-97-107 stitches. Continue working according to diagram A.1, but in addition cast on 1 edge stitch at the end of the next 2 rows (work edge stitches in garter stitch) = 69-75-83-89-99-109 stitches. When you have completed the diagram continue with 2 strands off-white. Work until the piece measures 51-53-54-56-57-59 cm from the cast-on edge. On the next row from the right side cast off the middle 15 stitches for neck and each shoulder is finished separately. Then cast off at the beginning of each row from the neck as follows: Cast off 2 stitches 2 times and 1 stitch 3-3-4-4-5-5 times = 20-23-26-29-33-38 stitches left on shoulder. Continue working until the piece measures 56-58-60-62-64-66 cm and cast off. Work the other shoulder the same way. SLEEVE: Cast on 40-40-40-44-44-48 stitches with double pointed needles size 5 mm and with 1 strand light camel and 1 strand off-white. Knit 1 round then work rib with knit 2/ purl 2 for 6 cm. Change to double pointed needles size 5.5 mm and work 1 round stocking stitch at the same time as you decrease 6-4-4-4-2-2 stitches evenly spaced = 34-36-36-40-42-46 stitches. Insert 1 marker thread at the beginning of the round and continue with stocking stitch. READ THE NEXT SECTION BEFORE CONTINUING! When the piece measures 8-8-8-10-10-10 cm, increase 2 stitches mid under sleeve – read INCREASE TIP. Increase like this every 3-2½-2½-2-2-2 cm a total of 15-16-17-17-17-17 times = 64-68-70-74-76-80 stitches – AT THE SAME TIME when the piece measures approx. 28-27-25-24-22-20 cm work STRIPES – see diagram A.2. When the diagram has been completed, continue with 2 strands off white until the piece measures 52-51-49-48-46-44 cm in all sizes. Cast off. Work the other sleeve in the same way. ASSEMBLY: Sew shoulder seams. Sew in sleeves inside the 1 edge stitch along the armholes. NECK: Using a short circular needle size 5 mm and 2 strands off-white, knit up approx. 76-76-80-80-84-84 stitches (number of stitches must be divisible by 4 so that the rib fits). Work rib with knit 2/ purl 2 for 3 cm. Loosely cast off with knit. |
|||||||||||||||||||
Diagram explanations |
|||||||||||||||||||
|
|||||||||||||||||||

|
|||||||||||||||||||
|
|||||||||||||||||||
|
Have you made this or any other of our designs? Tag your pictures in social media with #dropsdesign so we can see them! Do you need help with this pattern?You'll find tutorial videos, a Comments/Questions area and more by visiting the pattern on garnstudio.com. © 1982-2024 DROPS Design A/S. We reserve all rights. This document, including all its sub-sections, has copyrights. Read more about what you can do with our patterns at the bottom of each pattern on our site. |
|||||||||||||||||||


With over 40 years in knitting and crochet design, DROPS Design offers one of the most extensive collections of free patterns on the internet - translated to 17 languages. As of today we count 304 catalogues and 11422 patterns - 11422 of which are translated into English (UK/cm).
We work hard to bring you the best knitting and crochet have to offer, inspiration and advice as well as great quality yarns at incredible prices! Would you like to use our patterns for other than personal use? You can read what you are allowed to do in the Copyright text at the bottom of all our patterns. Happy crafting!
Comments / Questions (14)
Hallo, werden im Diagramm nur die Hinreihen oder Hin- UND Rückreihen gezeigt? Vielen Dank und viele Grüße
23.03.2024 - 15:18DROPS Design answered:
Liebe Gabi, alle Reihen sind im Diagram gezeigt, dh die Hin- sowie die Rückreihen. Viel Spaß beim Stricken!
02.04.2024 - 08:33Bonjour, Est-il normal que le diagramme de couleurs ne corresponde pas au déroulé des explications? Sur la photo, on commence aec du fil naturel sur +/- 10cm vsiblement alors que dans les explications on tricote 15 cm avec mélange de fil naturel et fil chameau clair sur 15 cm. Cela ne a t-il pas compromettre le résultat final corps/ manches? Merci de votre réponse. Bien à vous , Fabienne
22.12.2023 - 13:18Fabienne Daniels answered:
Erreur de dèpart corrigée par une lecture tout succinte du déroulé à la base. Tout va bien. Merci. Fabienne
24.12.2023 - 10:05Bonjour Concernant les manches de ce modèle je n'ai pas d aiguilles double pointe peux t on monter les manches avec la méthode magic toop. Sinon peux t on les faire en aller et retour aiguille droite,ds ce cas comment faire les augmentations. D'autre part il faut augmenter tous les 2 cm 1/2 ça correspond à combien de rangs. Merci pour votre réponse Cordialement Michelle j'adore vos modeles
11.06.2022 - 13:44DROPS Design answered:
Bonjour Mme Arpin, les deux sont possibles, si vous tricotez en rangs, vous devez ajouter 1 m lis de chaque côté (cf leçon, augmentez alors à 2 m des bords de chaque côté. Mesurez votre tension en hauteur et comptez le nombre de rangs correspondant à 2,5 cm, ce sera le meilleur moyen d'avoir des augmentations bien réparties en hauteur. Bon tricot!
13.06.2022 - 12:09Bonjour, Pour ce modèle faut il couper les fils a chaque fois qu'on change de couleur ou faut il faire grimper le fil. Avez vous une astuce. Merci Michelle
03.06.2022 - 09:13DROPS Design answered:
Bonjour Michelle, cette vidéo montre comment tricoter des rayures en rond, si elles sont trop espacées les unes des autres, vous pouvez couper le fil, sinon, faites-le suivre comme le montre la vidéo. Bon tricot!
03.06.2022 - 15:53Hej, vill byta ut Ljus kamel 2020 till en grå ton. Bör jag välja Ecomellangrå 501 hellre än Ljuspärlgrå 9020 för att ha samma intensitet mot de andra färgerna. Inte bara en smakfråga utan tacksam för er professionella uppfattning. Jag är melerat gråhårig och 71 år. Och gladlätt! Tusen tack!
28.01.2022 - 14:43Welche Farben werden für Variante C genommen (rosa)?
18.02.2020 - 15:23DROPS Design answered:
LIebe Lisa, bei Variante C sind diese Farben vorgeschlagen: DROPS Alpaca 100, 9020, 3112. Viel Spaß beim stricken!
18.02.2020 - 16:31Bonjour, J'aimerais beaucoup faire ce pull pour ma fille de 12 ans. Comment pourrais-je m'y prendre pour l'adapter? Merci beaucoup,
08.05.2019 - 20:49DROPS Design answered:
Bonjour Marie, vous pouvez vous inspirer d'un modèle de pull adapté à la taille de l'enfant (filtrez ces exemples en fonction de la laine souhaitée), votre magasin DROPS saura vous assister -même par mail ou téléphone- si besoin. Bon tricot!
09.05.2019 - 10:31Om jag vill sticka denna enfärgad, hur mycket garn går det åt då?
04.02.2019 - 18:32DROPS Design answered:
Hej Lena, det har vi ikke kalkuleret, men du kan nok spare et par nystan. Lycka till!
06.02.2019 - 10:43Super cool forårssweater i smukke farver.
31.01.2019 - 22:52Wunderschöne Farbauswahl. Bitte unbedingt als Anleitung aufnehmen!!
09.01.2019 - 13:22