DROPS Air
DROPS Air
65% Alpaca, 28% Polyamide, 7% Wool
from 4.80 £ /50g
Get the yarn to make this pattern from 28.80£.

The yarn cost is calculated from the pattern’s smallest size and the yarn’s cheapest product type. Looking for an even better price? You might find it on the DROPS Deals!

DROPS SS24

Blue Pagoda

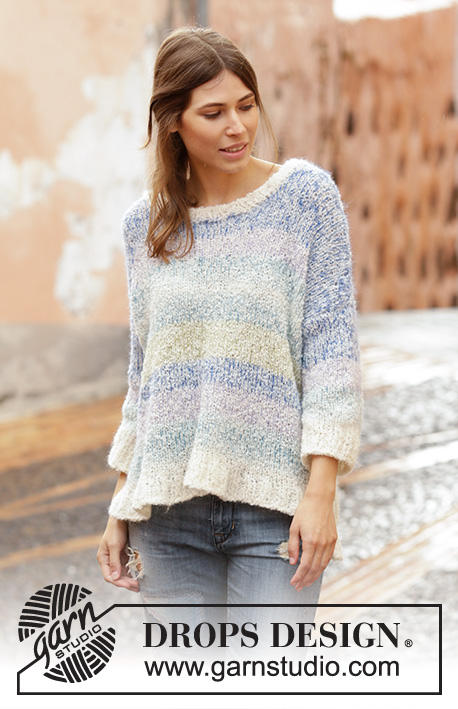
Knitted poncho jumper in DROPS Air. The piece is worked top down with raglan and stripes. Sizes S - XXXL.

DROPS 199-25
DROPS Design: Pattern no ai-201
Yarn group C or A + A
-------------------------------------------------------

SIZES:
S - M - L - XL - XXL - XXXL

MATERIALS:
DROPS AIR from Garnstudio (belongs to yarn group C)
150-150-200-200-200-250 g colour 02, wheat
150-200-200-200-250-250 g colour 10, fog

KNITTING TENSION:
15 stitches in width and 19 rows in height with stocking stitch = 10 x 10 cm.

NEEDLES:
DROPS DOUBLE POINTED NEEDLES SIZE 6 MM.
DROPS CIRCULAR NEEDLE SIZE 6 MM: Length 40 cm and 80 cm for stocking stitch.
DROPS DOUBLE POINTED NEEDLES SIZE 5.5 MM.
DROPS CIRCULAR NEEDLE SIZE 5.5 MM: Length 40 cm and 80 cm for garter stitch edges.
Needle size is only a guide. If you get too many stitches on 10 cm, change to a larger needle size. If you get too few stitches on 10 cm, change to a smaller needle size.

-------------------------------------------------------

-------------------------------------------------------

Alternative Yarn – See how to change yarns here
Yarn Groups A to F – Use the same pattern and change the yarn here
Yarn usage using an alternative yarn – Use our yarn converter here

-------------------------------------------------------

DROPS Air
DROPS Air
65% Alpaca, 28% Polyamide, 7% Wool
from 4.80 £ /50g
Get the yarn to make this pattern from 28.80£.

The yarn cost is calculated from the pattern’s smallest size and the yarn’s cheapest product type. Looking for an even better price? You might find it on the DROPS Deals!

Pattern instructions

NOTE: This pattern is written in British English. All measurements in charts are in cm. For conversion from cm to inches - click here. There are different terms for crocheting in British and American English. If this pattern includes crochet, click for "crochet terms" here. For this pattern in American English, please click here.
-------------------------------------------------------

EXPLANATIONS FOR THE PATTERN:

-------------------------------------------------------

RIDGE/GARTER STITCH (worked in the round):
1 ridge = 2 rounds. Knit 1 round and purl 1 round.

STRIPES:
When the piece measures 3 cm, continue with stripes as follows:
STRIPE 1: Stocking stitch with fog for 11 cm.
STRIPE 2: Stocking stitch with wheat for 11 cm.
Repeat stripes 1 and 2 to finished length.

RAGLAN-INFO:
When increasing on each round, yarn over will alternately become a hole, on every other row – work as follows:
Knit yarn over on 1. round (= holes), and knit yarn over on 2. Round twisted (= no holes)
When increasing every 2nd round knit all yarn overs (holes).

RAGLAN-BODY:
Increase with 1 yarn over on each side of markers 2 and 5 as follows - READ RAGLAN-INFO:
Increase every round a total of 16-18-20-24-28-32 times.
Increase every 2nd round a total of 11-12-12-12-12-12 times (= a total of 27-30-32-36-40-44 times).

RAGLAN-SLEEVES:
Increase with 1 yarn over AFTER markers 3 and 6 and BEFORE markers 4 and 1 as follows - READ RAGLAN-INFO:
Increase every round a total of 0-0-2-2-0-0 times.
Increase every 2nd round a total of 17-21-21-23-24-26 times.
Increase every 4th round a total of 1-0-0-0-1-1 times (= a total of 18-21-23-25-25-27 times).

DECREASE TIP:
Decrease as follows: Work until there are 3 stitches left before marker thread, knit 2 together (= 1 stitch decreased), knit 2 (marker thread sits between these 2 stitches), slip 1 stitch as if to knit, knit 1 and pass the slipped stitch over the knitted stitch (= 1 stitch decreased).

-------------------------------------------------------

START THE PIECE HERE:

-------------------------------------------------------

PONCHO JUMPER - SHORT OVERVIEW OF THE PIECE:
The piece is worked top down at an angle, in the round with circular needle.
The yoke is divided for body and sleeves. The body is continued in the round with circular needle, the sleeves are worked in the round with double pointed needles.

YOKE:
The piece is worked in the round with STRIPES – read description above. Cast on 62-66-70-74-78-82 stitches with circular needle size 5.5 mm and wheat. Work 2 RIDGES – read description above and increase 24-24-28-32-32-36 stitches evenly spaced on last knitted round = 86-90-98-106-110-118 stitches. Change to circular needle size 6 mm.
On the next round insert 6 markers as follows: Insert marker 1 in first stitch, work 16-17-19-21-22-24 stitches, marker 2 in next stitch (= mid back), work 16-17-19-21-22-24 stitches (= back piece), insert marker 3 in next stitch, work 8 stitches, marker 4 in next stitch (= sleeve), work 16-17-19-21-22-24 stitches, insert marker 5 in next stitch (= mid front), work 16-17-19-21-22-24 stitches (= front piece), marker 6 in next stitch and work the remaining 8 stitches (= sleeve). Increase to RAGLAN – read description above. REMEMBER THE KNITTING TENSION!
After the raglan-increases there are 44-50-54-58-58-62 stitches on each sleeve, 89-97-105-117-127-139 stitches on front piece and 89-97-105-117-127-139 stitches on back piece (i.e. 44-48-52-58-63-69 stitches on each side of the stitch with marker) = a total of 266-294-318-350-370-402 stitches.
The next round is worked as follows: Work 44-48-52-58-63-69 stitches, 1 yarn over, work stitch with marker-2 (= mid back), 1 yarn over, work 44-48-52-58-63-69 stitches, place the next 44-50-54-58-58-62 stitches on a thread for sleeve, cast on 6-6-8-8-10-10 stitches under the sleeve (insert 1 marker thread in the middle of these new stitches), work 44-48-52-58-63-69 stitches, 1 yarn over, work stitch with marker 5 (= mid front), 1 yarn over, work 44-48-52-58-63-69 stitches, place the next 44-50-54-58-58-62 stitches on a thread for sleeve, cast on 6-6-8-8-10-10 stitches under the sleeve (insert 1 marker thread in the middle of these new stitches) = 194-210-230-254-278-302 stitches.

BODY:
The body is continued in the round with stocking stitch and stripes as before. Insert 1 marker in the piece and THE PIECE IS NOW MEASURED FROM HERE!
ROUND 1: Knit.
ROUND 2 (round with yarn overs and decreases): Make 1 yarn over on each side of stitch with marker mid front and mid back (= 4 stitches increased), and decrease 1 stitch on each side of the marker thread under each sleeve – read DECREASE TIP (= 4 stitches decreased, i.e. the number of stitches stays the same).
ROUND 3: Knit.
ROUND 4 (round with yarn overs and decreases): Work as round 2.
ROUND 5: Knit.
ROUND 6 (round with yarn overs): Make 1 yarn over on each side of stitch with marker mid front and mid back (= 4 stitches increased).
ROUND 7: Knit.
ROUND 8 (round with yarn overs): Work as round 6 = 4 stitches increased.
Repeat rounds 1 to 8 until the piece measures 35 cm from the marker (or to desired length) = approx. 64-68-73-79-85-91 stitches on each side of stitch with marker = approx. 258-274-294-318-342-366 stitches in total. Change to circular needle size 5.5 mm and work 2 ridges. Cast off.

SLEEVE:
= 44-50-54-58-58-62 stitches. The sleeve is continued with stocking stitch and stripes as before and is worked in the round with double pointed needles. Place the stitches from the thread on double pointed needles size 6 mm and knit up 1 stitch in each of the 6-6-8-8-10-10 stitches cast on under sleeve = 50-56-62-66-68-72 stitches. Insert 1 marker thread in the middle of these new stitches. THE PIECE IS NOW MEASURED FROM HERE!
When the piece measures 3 cm decrease 1 stitch on each side of the marker thread. Decrease like this every 4-3½-2½-2-2-2 cm a total of 9-11-14-15-15-16 times = 32-34-34-36-38-40 stitches. When the sleeve measures 44-43-42-41-40-38 cm (NOTE: Shorter measurements in larger sizes due to longer yoke), change to double pointed needles size 5.5 mm. Work 2 ridges and cast off. Work the other sleeve in the same way.

Diagram

symbols = knitting direction
diagram

Each of our patterns has specific tutorial videos to help you.

Do you have a question? See a list of frequently asked questions (FAQ)

Knitting tension is what determines the final measurements of your work, and is usually measured per 10 x 10 cm. It is provided like so: number of stitches in width x number of rows in height - eg: 19 stitches x 26 rows = 10 x 10 cm.

The knitting tension is very individual; some people knit/crochet loosely while others work tightly. You adjust the knitting tension with the needle size, which is why the suggested needle size is only meant as a guide! You need to adjust this (up or down) to ensure that YOUR knitting tension matches the knitting tension provided in the pattern. If you work with a different knitting tension than provided you will have a different yarn consumption, and your work will have different measurements than what the pattern suggests.

The knitting tension also determines which yarns can replace each other. As long as you achieve the same knitting tension you can replace one yarn with another.

See DROPS lesson: How to measure your tension/gauge

See DROPS video: How to make a gauge tension swatch

The required amount of yarn is provided in grams, eg: 450 g. To calculate how many balls you’ll need you first need to know how many grams are in 1 ball (25g, 50g or 100g). This information is available if you click on the individual yarn quality on our pages. Divide the amount required with the amount of each ball. For example, if each ball is 50g (the most common amount), the calculation will be as follows: 450 / 50 = 9 balls.

The important thing when changing from one yarn to another is that the knitting/crochet tension remains the same. This is so that the measurements of the finished piece will be the same as on the sketch provided. It is easier to achieve the same knitting tension using yarns from the same yarn group. It is also possible to work with multiple strands of a thinner yarn to achieve the knitting tension of a thicker one. Please try our yarn converter. We recommend you to always work a test swatch.

Please NOTE: when changing yarn the garment might have a different look and feel to the garment in the photo, due to individual properties and qualities of each yarn.

See DROPS lesson: Can I use a different yarn than the one mentioned in the pattern?

All our yarns are categorised into yarn groups (from A to F) according to thickness and knitting tension – group A contains the thinnest yarns and group F the thickest. This makes it easier for you to find alternative yarns to our patterns, should you wish to switch yarn. All yarns within the same group have a similar knitting tension and can easily replace each other. However, different yarn qualities have different structures and properties which will give the finished work a unique look and feel.

Click here for an overview of the yarns in each yarn group

At the top of all our patterns you’ll find a link to our yarn calculator, which is a helpful tool should you wish to use a different yarn than suggested. By filling in the yarn quality you wish to replace, the amount (in your size) and number of strands, the calculator will present good alternative yarns with the same knitting tension. Additionally it will tell you how much you’ll require in the new qualities and whether you’ll need to work with multiple strands. Most skeins are 50g (some are 25g or 100g).

If the pattern is worked with multiple colours, every colour will have to be calculated separately. Similarly, if the pattern is worked with several strands of different yarns (for example 1 strand Alpaca and 1 strand Kid-Silk) you will have to find alternatives for each, individually.

Click here to see our yarn calculator

Since different yarns have different qualities and textures we have chosen to keep the original yarn in our patterns. However, you can easily find options among our available qualities by using our yarn calculator, or simply pick a yarn from the same yarn group.

It is possible that some retailers still have discontinued yarns in stock, or that someone has a few skeins at home that they would like to find patterns for.

The yarn calculator will provide both alternative yarn as well as required amount in the new quality.

If you think it's hard to decide what size to make, it can be a good idea to measure a garment you own already and like the size of. Then you can pick the size by comparing those measures with the ones available in the pattern's size chart.

You'll find the size chart at the bottom of the pattern.

See DROPS lesson: How to read size chart

The needle size provided in the pattern serves only as a guide, the important thing is to follow the knitting tension. And since knitting tension is very individual, you will have to adjust the needle size to ensure that YOUR tension is the same as in the pattern – maybe you’ll have to adjust 1, or even 2 needle sizes, up or down to achieve the correct tension. For this, we recommend that you work test swatches.

Should you work with a different knitting tension than the one provided, the measurements of the finished garment might deviate from the measurement sketch.

See DROPS lesson: How to measure your tension/gauge

See DROPS video: How to make a tension/gauge swatch

Working a garment top-down provides more flexibility and room for personal adjustment. For example it is easier to try the garment on while working, as well as making adjustments to length of yoke and shoulder caps.

The instructions are carefully explaining every step, in the correct order. Diagrams are adjusted to the knitting direction and are worked as usual.

The diagram depicts all rows/rounds, and every stitch seen from the right side. It is read from bottom to top, from right to left. 1 square = 1 stitch.

When working back and forth, every other row is worked from the right side and every other row is worked from the wrong side. When working from the wrong side, the diagram will have to be worked reversed: from left to right, knit stitches are purled, purl stitches are knit etc.

When working in the round every round is worked from the right side and the diagram are worked from right to left on all rounds.

See DROPS lesson: How to read knitting diagrams

The diagram depicts all rows/rounds, and every stitch seen from the right side. It is worked from bottom to top, from right to left.

When working back and forth every other row is worked from the right side: from right to left and every other row is worked from the wrong side: from left to right.

When working in the round, every row in the diagram are worked from the right side, from right to left.

When working a circular diagram you start in the middle and work your way outwards, counter clockwise, row by row.

The rows usually start with a given number of chain stitches (equivalent to the height of the following stitch), this will either be depicted in the diagram or explained in the pattern.

See DROPS lesson: How to read crochet diagrams

Instructions for working several diagrams after each other on the same row/round, will often be written like so: “work A.1, A.2, A.3 a total of 0-0-2-3-4 times". This means you work A.1 once, then A.2 is worked once, and A.3 is repeated (in width) the number of times provided for your size – in this case like so: S = 0 times, M = 0 times, L=2 times, XL= 3 times and XXL = 4 times.

The diagrams are worked as usual: begin with the first row in A.1, then work the first row in A.2 etc.

See DROPS lesson: How to read knitting diagrams

See DROPS lesson: How to read crochet diagrams

The total width of the garment (from wrist-to-wrist) will be larger in the larger sizes, despite the actual sleeves being shorter. The larger sizes have longer sleeve caps and wider shoulders, so there will be a good fit in all sizes.

The measurement sketch/schematic drawing provides information regarding the full length of the garment. If it’s a jumper or a jacket the length is measured from the highest point on the shoulder closest to the neckline, and straight down to the bottom of the garment. It is NOT measured from the tip of shoulder. Similarly, the length of yoke is measured from the highest point on the shoulder and down to where yoke is split into body and sleeves.

On a jacket measures are never taken along bands, unless specifically stated. Always measure inside band stitches when measuring the length.

See DROPS lesson: How to read a schematic drawing

Diagrams are often repeated on the round or in height. 1 repeat is the diagram the way it appears in the pattern. If it says to work 5 repeats of A.1 in the round, then you work A.1 a total of 5 times after/next to each other in the round. If it says to work 2 repeats of A.1 vertically/in height you work the entire diagram once, then begin again at the start and work the entire diagram one more time.

Chain stitches are slightly narrower than other stitches and to avoid working the cast-on edge too tight, we simply chain more stitches to begin with. The stitch count will be adjusted on the following row to fit the pattern and measurement sketch.

The rib edge is more elastic and will contract slightly compared to, for example, stocking stitch. By increasing before the rib edge, you avoid a visible difference in width between the rib edge and the rest of the body.

It’s very easy to cast off too tightly, and by making yarn overs while casting off (and simultaneously casting these off) you avoid a too tight cast off edge.

See DROPS video: How to bind off with yarn overs (yo)

To achieve an even increase (or decrease) you can increase on, for example: every 3rd and 4th row alternately, like so: work 2 rows and increase on the 3rd row, work 3 rows and increase on the 4th. Repeat this until the increase is complete.

See DROPS lesson: Increase or decrease 1 st on every 3rd and 4th row alternately

Should you prefer to work in the round instead of back and forth, you may of course adjust the pattern. You’ll need to add steeks mid-front (usually 5 stitches), and follow the instructions. When you would normally turn and work from the wrong side, simply work across the steek and continue in the round. At the end you’ll cut the piece open, pick up stitches to work bands, and cover the cut edges.

See DROPS video: How to knit steeks and cut open

Should you prefer to work back and forth instead of in the round, you may of course adjust the pattern so you work the pieces separately and then assemble them at the end. Divide the stitches for the body in 2, add 1 edge stitch in each side (for sewing) and work the front and back pieces separately.

See DROPS lesson: Can I adapt a pattern for circular needles into straight needles?

Pattern repeats can vary slightly in the different sizes, in order to get the correct proportions. If you’re not working the exact same size as the garment in the photo, yours might deviate slightly. This has been carefully developed and adjusted so that the complete impression of the garment is the same in all sizes.

Make sure to follow instructions and diagrams for your size!

If you have found a pattern you like which is available in women’s size it’s not very difficult to convert it to men’s size. The biggest difference will be the length of sleeves and body. Start working on the women size that you think would fit across the chest. The additional length will be worked right before you cast off for the armhole/sleeve cap. If the pattern is worked top-down you can add the length right after the armhole or before the first decrease on sleeve.

Regarding additional yarn amount, this will depend on how much length you add, but it is better with a skein too many than too few.

All yarns will have excess fibres (from production) that might come off as lint or shedding. Brushed yarns (ie hairier yarns) have more of these loose, excess fibres, causing more shedding.

Shedding also depends on what is worn under or over the garment, and whether this pulls at the yarn fibres. It’s therefore not possible to guarantee that there will be no shedding

Below are some tips on how to get the best result when working with hairier yarns:

1. When the garment is finished (before you wash it) shake it vigorously so the looser hairs come off. NOTE: do NOT use a lint roller, brush or any method that pulls at the yarn.

2. Place the garment in a plastic bag and put it in your freezer - the temperature will cause the fibres to become less attached to each other, and excess fibres will come off easier.

3. Leave in the freezer for a few hours before taking it out and shaking it again.

4. Wash the garment according to the instructions on the yarn label.

Pilling is a natural process that happens to even the most exclusive of fibers. It's a natural sign of wear and tear that is hard to avoid, and that is most visible in high friction areas of your garment like a sweater's arms and cuffs.

You can make your garment look as new by removing the pilling, using a fabric comb or a pill/lint remover.

Still can't find the answer you need? Then scroll down and leave your question so one of our experts can try to help you. This will be done normally within 5 to 10 working days.
In the meantime, you can read the questions and answers that others have left to this pattern or join the DROPS Workshop on Facebook to get help from fellow knitters/crocheters!

You might also like...

Post a comment to pattern DROPS 199-25

We would love to hear what you have to say about this pattern!

If you want to leave a question, please make sure you select the correct category in the form below, to speed up the answering process. Required fields are marked *.

Comments / Questions (32)

country flag Romana Frauzem wrote:

Leider verstehe ich die Raglanzunahmen nicht. Ich stricke Größe S. Es wird immer mit 4 Zunahmen gearbeitet. Aber mit der Zahl 4 kommen ich nicht auf die gewünschten 11 Zunahmen insgesamt beim Rumpfteil. Und auch bei den Ärmeln geht es nicht auf. Wie verstehe ich „in jeder Runde insgesamt 11 Mal zunehmen“? Und ergeben sich die nach unten zulaufenden Spitzen von selber?

06.06.2020 - 08:46

DROPS Design answered:

Liebe Frau Frauzem, die Raglanzunahmen werden nach einem unterschiedlichen Rythmus beim Rumpfteil und bei den Ärmeln gearbeitet. Es wird beim Rumpfteil zuerst 16 Mal in jede Runde (16 x 2 M= 32 M) dann 11 x in jede 2. Runde (11 x 2 M = 22 M) und gleichzeitig bei den Ärmeln nehmen Sie 17 Mal (17 x 2 = 34 M) in jeder 2. Reihe dann 1 x in jede 4. Runde (=2 M). dh Es wird zuerst abwechslungsweise 4 Maschen (= Rumpfteil+ Ärmel) zugenommen und 2 Maschen (nur Rumpfteil) zugenommen. Viel Spaß beim stricken!

08.06.2020 - 08:15

country flag Brenda wrote:

I am working the XL. I increased the 32 stitches to equal 106. Now inserting markers. At st 1, 21, 21, 8, 21, 21, 8. That doesn't equal 106.

14.04.2020 - 16:08

DROPS Design answered:

Dear Brenda, in size XL you cast on 74 stitches and increase evenly 32 stitches = 74+32=106 stitches. When inserting markers, remember that there should be 1 marker in each stitch (not between stitches) so that you will have: K1 (marker), K21, K1 (marker), K21 (marker), K1 (marker), K8, K1 (marker), K21, K1 (marker), K21, K1 (marker), K8 = 1+21+1+21+1+8+1+21+1+21+1+8= 106 stitches. Hope this helps. Happy knitting!

14.04.2020 - 16:51

country flag Brenda wrote:

Also, the questions other people have dont help me as I only understand English.

14.04.2020 - 15:45

DROPS Design answered:

Dear Brenda, we are unfortunately not able to translate every question in every language, but you can try to use an online translator, or simply contact the store where you bought the yarn or ask your question here, as you did. Happy knitting :)

14.04.2020 - 16:53

country flag Brenda wrote:

The yoke increases do not add up. The wording is difficult to understand. How do you insert a marker into a stitch?

14.04.2020 - 15:42

DROPS Design answered:

Dear Brenda, our stitch markers can be inserted easily in one stitch - in order to help you, can you please tell us which size you are working on and where the number of stitches doesn't add up. Thank you!

14.04.2020 - 15:48

country flag Louise Johansen wrote:

Hej, jeg har nu strikket så jeg har 62 masker på hvert ærme, men jeg har kun 51 masker på hver side af midter mærket for og bag . Hva har jeg gjort fejl ?

11.02.2020 - 19:32

DROPS Design answered:

Hej Louise, har du alle Raglan-udtagninger med fra Ryg & forstykke? RAGLAN-RYG & FORSTYKKE: Der tages ud med omslag på hver side af 2. og 5.mærke således - læs RAGLAN-INFO: Tag ud på hver omgang totalt 16-18-20-24-28-32 gange. Tag ud på hver 2.omgang totalt 11-12-12-12-12-12 gange (= totalt 27-30-32-36-40-44 gange).

13.02.2020 - 11:29

country flag Diana wrote:

Thank you ever so much for the explanation. Unfortunately the Hungarian translation is wrong: it repeats the 3 and 6 instead of 4 and 1: A 3. és az 6. jelölő UTÁN és a 3. és a 6. jelölő előtt 1-1 rh-t készítve szaporítunk a következő módon - olvassuk el a fenti információt a raglánvonal kialakításáról! Can it be corrected somehow?

14.01.2020 - 09:33

country flag Diana wrote:

I'd like to ask the role of marker 1 and 4. Why do they need if the work is only done with 2-5 and 3-6? I couldn't figure it out. Please help!

14.01.2020 - 08:32

DROPS Design answered:

Dear Diana, you will increase with 1 yarn over before these markers - see RAGLAN SLEEVES. Happy knitting!

14.01.2020 - 09:28

country flag Linda Förster wrote:

Leider verstehe ich absolut nicht wie die Raglanzunahmen gemeint sind.

19.09.2019 - 20:28

DROPS Design answered:

Liebe Frau Förster, die Zunahmen für Vorder- und Rückenteil werden auf beiden Seiten der Markierung (mitte Vorder- bzw Rückenteil) und die Zunahmen für die Ärmel werden: nach 3. Mark. + vor 4. Mark. (1. Ärmel) und nach 6. Mark. + vor 1. Mark (=2. Ärmel). Je nach der Größe werden Sie 4 Maschen (nur Vorder + Rückenteil) oder 8 Maschen (Vorder + Rückenteil + Ärmel) zunehmen. Siehe Ihre Größe. Viel Spaß beim stricken!

20.09.2019 - 09:19

country flag Gateira Criativa wrote:

Adorei esse modelo! Farei com certeza! Obrigada pelas receitas. Pena que não vendem no Brasil, mas tento adaptar aos fios nacionais quando possível. Adoro o site!

27.03.2019 - 05:19

country flag Jeannette wrote:

Hej, efter raglan-udtagning har jeg nu 402 masker (største størrelse) på pinden. På næste pind skal strikkes 69m til 2. mærke, men jeg har 96m til 2. mærke??? Og fra 2.-3. mærke 96m; fra 3.-4. mærke 9m; fra 4.-5. mærke 96m; fra 5.-6. mærke 96m; fra 6. mærke til slut 9m = totalt 402m. Hvor er det gået galt? Mvh

17.03.2019 - 13:20