
Popular categories
Looking for a yarn?


|
|
DROPS 63-5 |
|
|
|
|
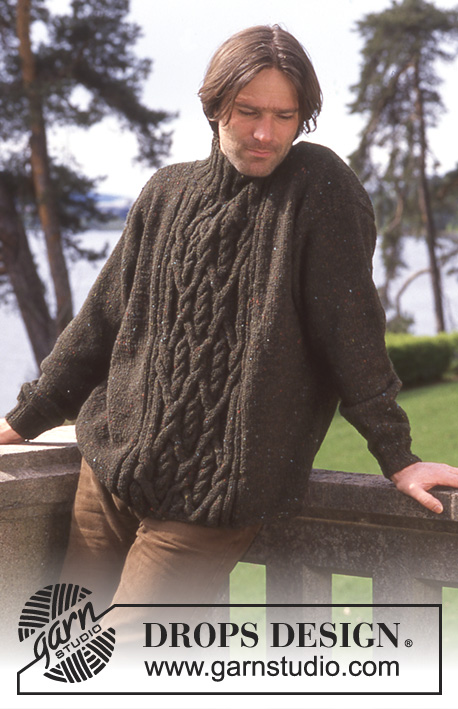
DROPS Men’s Raglan Sweater in Karisma Ull Tweed
DROPS 63-5 |
|
|
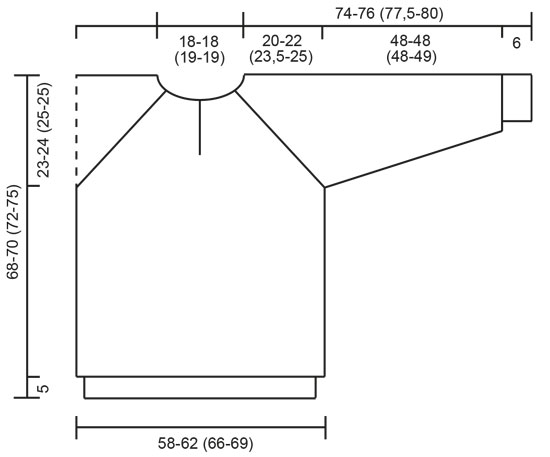
Gauge: 17 sts on larger needles in stockinette st = 10 x 10 cm [4" x 4"]. Rib: * K 2, P 2 *. Repeat from * - *. Garter Stitch, when knitting flat: Knit all sts, all rows. Garter Stitch, when knitting in the round: *Rnd 1, knit. Rnd 2, purl *. Repeat from * - *. Raglan shaping: Decrease only from the right side. Dec 2 sts as follows: After edge sts: Put 1 st on a cable needle behind the work, K 3 tog, K 1 from the cable needle. Before the edge st: Put 3 sts on a st holder in front of the work, K 1, knit sts from the cable needle: slip 1, K 2 tog into back of st, psso. Dec 3 sts as follows: After the edge sts: Put 1 st on a cable needle behind the work, K 4 tog, K 1 from the cable needle. Before the edge sts: Put 4 sts on a cable needle in front of the work, K 1, knit sts from the cable needle as follows: slip 1, K 3 sts into back of st, psso. Front: Cast on 98-106 (110-110) sts (including 1 edge st at each side which is knit in garter st throughout) on smaller needles, knit rib for 5 cm [2"]. Change to larger needles and stockinette st, increasing 2-2 (4-10) sts evenly distributed on the first row = 100-108 (114-120) sts. When the work measures 45-46 (47-50) cm [17.75" - 18-⅛" (18.5" - 19.75")] bind off 2-2 (2-2) sts at each side for armholes = 96-104 (110-116) sts. Dec for raglan inside 4 edge sts (which are knit in stockinette st) every 2 cm [0.75"]: 2 sts 4-3 (1-1) times, 3 sts 7-9 (11-12) times - see Raglan shaping note above! When the work measures 58-60 (62-65) cm [22-⅞" - 23-⅝" (24-⅜" - 25-⅝")], bind off the center 2-2 (2-2) sts for zipper split. Continue in stockinette st but keep the 2 edges sts at the zipper split in garter st throughout. When the work measures 64-66 (68-71) cm [25.25" - 26" (26.75" - 28")], bind off at each neck edge every other row: 7-7 (8-8) sts 1 time, 3 sts 1 time, 2 sts 2 times. When all raglan and neck shaping is complete, 4-4 (4-4) sts remain at each side; put these sts on a st holder. The work measures 68-70 (72-75) cm [26.75" - 27-⅝" (28.25" - 29.5")]. Back: Cast on and knit as for the front. Bind off the center 26-26 (28-28) sts for the neck when the work measures 66-68 (70-73) cm [26" - 26.75" (27-⅝" -28.75")]. Bind off 2 sts at each neck edge on the next row. When all raglan and neck shaping is complete 4-4 (4-4) sts remain at each side; put these sts on a st holder. The work measures approx. 68-70 (72-75) cm [26.75" - 27-⅝" (28.25" - 29.5")]. Sleeve: Cast on 48-52 (52-52) sts on smaller double pointed needles, join and place a marker at the join. Knit rib for 6 cm [2-⅜"]. Change to larger double pointed needles and stockinette st. After the rib, inc 1 st each side of marker 15-15 (17-17) times: Sizes S/M+M/L: every 3 cm [1.25"] Sizes XL+XXL: alternately every 2 cm [0.75"] and every 3 cm [1.25"] = 78-82 (86-86) sts. When the work measures 54-54 (54-55) cm [21.25" - 21.25" (21.25" - 21-⅝")] bind off 3 sts each side of marker and knit the rest of the work back and forth on the needles = 72-76 (80-80) needles. Dec for raglan inside 1 edge st (which is knit in stockinette st) at each side every 2 cm [0.75"] - see Raglan shaping note above: 2 sts 0-1 (2-2) times, 3 sts 10-10 (10-10) times = 12-12 (12-12) sts. When the sleeve measures 74-76 (77.5-80) cm [29-⅛" - 29-⅞" (30.5" - 31.5")] put sts on a st holder. Assembly: Sew side and raglan seams. Put sts from the st holder at the neck on the needles and pick up so that there are a total of approx. 110 sts (divisible by 4 + 2) around the neck on smaller double pointed needles. Knit back and forth from the center front as follows (begin with a right side row): P 1 row, K 1 row, knit the next row as follows: K 2, * K 2, P 2 *, repeat * - * until 4 sts remain, finish with K 2, K 2. Continue until the collar measures 10 cm [4"], bind off loosely in rib. Sew in the zipper. |
|
|
|
|
Have you made this or any other of our designs? Tag your pictures in social media with #dropsdesign so we can see them! Do you need help with this pattern?You'll find tutorial videos, a Comments/Questions area and more by visiting the pattern on garnstudio.com. © 1982-2024 DROPS Design A/S. We reserve all rights. This document, including all its sub-sections, has copyrights. Read more about what you can do with our patterns at the bottom of each pattern on our site. |


With over 40 years in knitting and crochet design, DROPS Design offers one of the most extensive collections of free patterns on the internet - translated to 17 languages. As of today we count 304 catalogs and 11422 patterns - 11417 of which are translated into English (US/in).
We work hard to bring you the best knitting and crochet have to offer, inspiration and advice as well as great quality yarns at incredible prices! Would you like to use our patterns for other than personal use? You can read what you are allowed to do in the Copyright text at the bottom of all our patterns. Happy crafting!
Comments / Questions (6)
In het patroon staat voor rugpand 1x2 en 13 x 3 minderingen ..voor voorpand 1x2 en 12x3 minderingen ...voor de mouwen 2x2 en 12x3 Klopt dit ?
09.02.2023 - 15:50DROPS Design answered:
Dag Peeters,
Ja, het komt vaak voor dat de minderen voor de raglan op de mouwen en de panden verschillend zijn.
12.02.2023 - 18:29In the raglan shaping are there 4 clear stitches before the decrease? Should I decrease by 2 at the beginning plus 2 at the end ie decrease by 4 every decrease row? Could I simply decrease by knitting 2 together at the beginning and end of each decrease row?
08.06.2019 - 16:37DROPS Design answered:
Dear Mrs Barley, you decrease for the raglan after the first 4 stitches at the beginning of the row and there should be 4 stitches in stocking stitch after the decrease for raglan at the end of the row. Happy knitting!
11.06.2019 - 13:26Can I make this. Without the zip?
06.05.2019 - 19:21DROPS Design answered:
Dear Mrs Barley, sure you can, do not cast off the middle 2 sts for the zip, and continue until piece measures 64-71 cm (see size), then cast off for neck the middle 16-18 sts (= 7-8 sts on each side of vent + middle 2 sts) and continue casting off for neck as explained in the pattern. Happy knitting!
07.05.2019 - 08:49Hei, den svarte genseren er det samme oppskrift man skal bruke som til den grå? Eller finner jeg den svarte på en annenoppskrift?
26.12.2015 - 20:21DROPS Design answered:
Hei Limakr. Den finder du under DROPS 63-4
06.01.2016 - 17:03Jeg har et garn som er 16 masker pr 10 cm.. hvordan kan jeg regne ut og få rett ant masker til genser?
16.11.2015 - 19:54DROPS Design answered:
Hej. För att få rätt storlek på detta mönster ska du ha 17 m på 10 cm. Har du inte rätt stickfasthet så kommer måtten inte stämma med de vi har på måttskissen. Du kan alltid testa att gå upp en halv storlek på stickor och se om du då får rätt stickfasthet. Lycka till!
17.11.2015 - 10:14Comment puis je commander de la Karisma Ull Tweed ? Je souhaite faire le modèle Drops 63-5. Merci
14.08.2015 - 01:52DROPS Design answered:
Bonjour Mme Ayrault, Ull-Tweed n'est plus disponible, elle appartenait au groupe B de nos fils - cliquez sur le lien ci-dessus pour voir les alternatives actuelles et calculer les fournitures nécessaires dans la qualité choisie. Bon tricot!
14.08.2015 - 10:03