Clicking the ORDER button will redirect you to Wool Warehouse Direct Ltd website
The yarn cost is calculated from the pattern’s smallest size and the yarn’s cheapest product type. Looking for an even better price? You might find it on the DROPS Deals!
-------------------------------------------------------
Alternative Yarn – See how to change yarns here
Yarn Groups A to F – Use the same pattern and change the yarn here
Yarn usage using an alternative yarn – Use our yarn converter here
-------------------------------------------------------
Clicking the ORDER button will redirect you to Wool Warehouse Direct Ltd website
The yarn cost is calculated from the pattern’s smallest size and the yarn’s cheapest product type. Looking for an even better price? You might find it on the DROPS Deals!
This pattern has been corrected. Click here to see the correction/s.
Each of our patterns has specific tutorial videos to help you.
These step-by-step tutorials might also help you:
Why is the knitting/crochet tension so important?
Knitting tension is what determines the final measurements of your work, and is usually measured per 10 x 10 cm. It is provided like so: number of stitches in width x number of rows in height - eg: 19 stitches x 26 rows = 10 x 10 cm.
The knitting tension is very individual; some people knit/crochet loosely while others work tightly. You adjust the knitting tension with the needle size, which is why the suggested needle size is only meant as a guide! You need to adjust this (up or down) to ensure that YOUR knitting tension matches the knitting tension provided in the pattern. If you work with a different knitting tension than provided you will have a different yarn consumption, and your work will have different measurements than what the pattern suggests.
The knitting tension also determines which yarns can replace each other. As long as you achieve the same knitting tension you can replace one yarn with another.
See DROPS lesson: How to measure your tension/gauge
See DROPS video: How to make a gauge tension swatch
How do I know how many balls of yarn I need?
The required amount of yarn is provided in grams, eg: 450 g. To calculate how many balls you’ll need you first need to know how many grams are in 1 ball (25g, 50g or 100g). This information is available if you click on the individual yarn quality on our pages. Divide the amount required with the amount of each ball. For example, if each ball is 50g (the most common amount), the calculation will be as follows: 450 / 50 = 9 balls.
Can I use a different yarn than what the pattern suggests?
The important thing when changing from one yarn to another is that the knitting/crochet tension remains the same. This is so that the measurements of the finished piece will be the same as on the sketch provided. It is easier to achieve the same knitting tension using yarns from the same yarn group. It is also possible to work with multiple strands of a thinner yarn to achieve the knitting tension of a thicker one. Please try our yarn converter. We recommend you to always work a test swatch.
Please NOTE: when changing yarn the garment might have a different look and feel to the garment in the photo, due to individual properties and qualities of each yarn.
See DROPS lesson: Can I use a different yarn than the one mentioned in the pattern?
What are the yarn groups?
All our yarns are categorised into yarn groups (from A to F) according to thickness and knitting tension – group A contains the thinnest yarns and group F the thickest. This makes it easier for you to find alternative yarns to our patterns, should you wish to switch yarn. All yarns within the same group have a similar knitting tension and can easily replace each other. However, different yarn qualities have different structures and properties which will give the finished work a unique look and feel.
How do I use the yarn calculator?
At the top of all our patterns you’ll find a link to our yarn calculator, which is a helpful tool should you wish to use a different yarn than suggested. By filling in the yarn quality you wish to replace, the amount (in your size) and number of strands, the calculator will present good alternative yarns with the same knitting tension. Additionally it will tell you how much you’ll require in the new qualities and whether you’ll need to work with multiple strands. Most skeins are 50g (some are 25g or 100g).
If the pattern is worked with multiple colours, every colour will have to be calculated separately. Similarly, if the pattern is worked with several strands of different yarns (for example 1 strand Alpaca and 1 strand Kid-Silk) you will have to find alternatives for each, individually.
Why do you show discontinued yarns in the patterns?
Since different yarns have different qualities and textures we have chosen to keep the original yarn in our patterns. However, you can easily find options among our available qualities by using our yarn calculator, or simply pick a yarn from the same yarn group.
It is possible that some retailers still have discontinued yarns in stock, or that someone has a few skeins at home that they would like to find patterns for.
The yarn calculator will provide both alternative yarn as well as required amount in the new quality.
What size should I knit?
If you think it's hard to decide what size to make, it can be a good idea to measure a garment you own already and like the size of. Then you can pick the size by comparing those measures with the ones available in the pattern's size chart.
You'll find the size chart at the bottom of the pattern.
See DROPS lesson: How to read size chart
Why do I get the wrong knitting tension with the suggested needle size?
The needle size provided in the pattern serves only as a guide, the important thing is to follow the knitting tension. And since knitting tension is very individual, you will have to adjust the needle size to ensure that YOUR tension is the same as in the pattern – maybe you’ll have to adjust 1, or even 2 needle sizes, up or down to achieve the correct tension. For this, we recommend that you work test swatches.
Should you work with a different knitting tension than the one provided, the measurements of the finished garment might deviate from the measurement sketch.
See DROPS lesson: How to measure your tension/gauge
See DROPS video: How to make a tension/gauge swatch
Why is the pattern worked top-down?
Working a garment top-down provides more flexibility and room for personal adjustment. For example it is easier to try the garment on while working, as well as making adjustments to length of yoke and shoulder caps.
The instructions are carefully explaining every step, in the correct order. Diagrams are adjusted to the knitting direction and are worked as usual.
How do I work according to a knitting diagram?
The diagram depicts all rows/rounds, and every stitch seen from the right side. It is read from bottom to top, from right to left. 1 square = 1 stitch.
When working back and forth, every other row is worked from the right side and every other row is worked from the wrong side. When working from the wrong side, the diagram will have to be worked reversed: from left to right, knit stitches are purled, purl stitches are knit etc.
When working in the round every round is worked from the right side and the diagram are worked from right to left on all rounds.
See DROPS lesson: How to read knitting diagrams
How do I work according to a crochet diagram?
The diagram depicts all rows/rounds, and every stitch seen from the right side. It is worked from bottom to top, from right to left.
When working back and forth every other row is worked from the right side: from right to left and every other row is worked from the wrong side: from left to right.
When working in the round, every row in the diagram are worked from the right side, from right to left.
When working a circular diagram you start in the middle and work your way outwards, counter clockwise, row by row.
The rows usually start with a given number of chain stitches (equivalent to the height of the following stitch), this will either be depicted in the diagram or explained in the pattern.
See DROPS lesson: How to read crochet diagrams
How do I work several diagrams simultaneously on the same row/round?
Instructions for working several diagrams after each other on the same row/round, will often be written like so: “work A.1, A.2, A.3 a total of 0-0-2-3-4 times". This means you work A.1 once, then A.2 is worked once, and A.3 is repeated (in width) the number of times provided for your size – in this case like so: S = 0 times, M = 0 times, L=2 times, XL= 3 times and XXL = 4 times.
The diagrams are worked as usual: begin with the first row in A.1, then work the first row in A.2 etc.
See DROPS lesson: How to read knitting diagrams
See DROPS lesson: How to read crochet diagrams
Why are the sleeves shorter in larger sizes?
The total width of the garment (from wrist-to-wrist) will be larger in the larger sizes, despite the actual sleeves being shorter. The larger sizes have longer sleeve caps and wider shoulders, so there will be a good fit in all sizes.
Where on the garment is the length measured?
The measurement sketch/schematic drawing provides information regarding the full length of the garment. If it’s a jumper or a jacket the length is measured from the highest point on the shoulder closest to the neckline, and straight down to the bottom of the garment. It is NOT measured from the tip of shoulder. Similarly, the length of yoke is measured from the highest point on the shoulder and down to where yoke is split into body and sleeves.
On a jacket measures are never taken along bands, unless specifically stated. Always measure inside band stitches when measuring the length.
See DROPS lesson: How to read a schematic drawing
What is a repeat?
Diagrams are often repeated on the round or in height. 1 repeat is the diagram the way it appears in the pattern. If it says to work 5 repeats of A.1 in the round, then you work A.1 a total of 5 times after/next to each other in the round. If it says to work 2 repeats of A.1 vertically/in height you work the entire diagram once, then begin again at the start and work the entire diagram one more time.
Why does the piece start with more chain stitches than it’s worked with?
Chain stitches are slightly narrower than other stitches and to avoid working the cast-on edge too tight, we simply chain more stitches to begin with. The stitch count will be adjusted on the following row to fit the pattern and measurement sketch.
Why increase before the rib edge when the piece is worked top-down?
The rib edge is more elastic and will contract slightly compared to, for example, stocking stitch. By increasing before the rib edge, you avoid a visible difference in width between the rib edge and the rest of the body.
Why increase in the cast-off edge?
It’s very easy to cast off too tightly, and by making yarn overs while casting off (and simultaneously casting these off) you avoid a too tight cast off edge.
See DROPS video: How to bind off with yarn overs (yo)
How do I increase/decrease on every 3rd and 4th row/round alternately?
To achieve an even increase (or decrease) you can increase on, for example: every 3rd and 4th row alternately, like so: work 2 rows and increase on the 3rd row, work 3 rows and increase on the 4th. Repeat this until the increase is complete.
See DROPS lesson: Increase or decrease 1 st on every 3rd and 4th row alternately
How can I work a jacket in the round instead of back and forth?
Should you prefer to work in the round instead of back and forth, you may of course adjust the pattern. You’ll need to add steeks mid-front (usually 5 stitches), and follow the instructions. When you would normally turn and work from the wrong side, simply work across the steek and continue in the round. At the end you’ll cut the piece open, pick up stitches to work bands, and cover the cut edges.
See DROPS video: How to knit steeks and cut open
Can I work a jumper back and forth instead of in the round?
Should you prefer to work back and forth instead of in the round, you may of course adjust the pattern so you work the pieces separately and then assemble them at the end. Divide the stitches for the body in 2, add 1 edge stitch in each side (for sewing) and work the front and back pieces separately.
See DROPS lesson: Can I adapt a pattern for circular needles into straight needles?
Why is the pattern slightly different than what I see in the photo?
Pattern repeats can vary slightly in the different sizes, in order to get the correct proportions. If you’re not working the exact same size as the garment in the photo, yours might deviate slightly. This has been carefully developed and adjusted so that the complete impression of the garment is the same in all sizes.
Make sure to follow instructions and diagrams for your size!
How do I make a women’s size garment into a men’s size one?
If you have found a pattern you like which is available in women’s size it’s not very difficult to convert it to men’s size. The biggest difference will be the length of sleeves and body. Start working on the women size that you think would fit across the chest. The additional length will be worked right before you cast off for the armhole/sleeve cap. If the pattern is worked top-down you can add the length right after the armhole or before the first decrease on sleeve.
Regarding additional yarn amount, this will depend on how much length you add, but it is better with a skein too many than too few.
How do I prevent a hairy garment from shedding?
All yarns will have excess fibres (from production) that might come off as lint or shedding. Brushed yarns (ie hairier yarns) have more of these loose, excess fibres, causing more shedding.
Shedding also depends on what is worn under or over the garment, and whether this pulls at the yarn fibres. It’s therefore not possible to guarantee that there will be no shedding
Below are some tips on how to get the best result when working with hairier yarns:
1. When the garment is finished (before you wash it) shake it vigorously so the looser hairs come off. NOTE: do NOT use a lint roller, brush or any method that pulls at the yarn.
2. Place the garment in a plastic bag and put it in your freezer - the temperature will cause the fibres to become less attached to each other, and excess fibres will come off easier.
3. Leave in the freezer for a few hours before taking it out and shaking it again.
4. Wash the garment according to the instructions on the yarn label.
Why does my garment pill?
Pilling is a natural process that happens to even the most exclusive of fibers. It's a natural sign of wear and tear that is hard to avoid, and that is most visible in high friction areas of your garment like a sweater's arms and cuffs.
You can make your garment look as new by removing the pilling, using a fabric comb or a pill/lint remover.
Stone Fields |
|
|
|
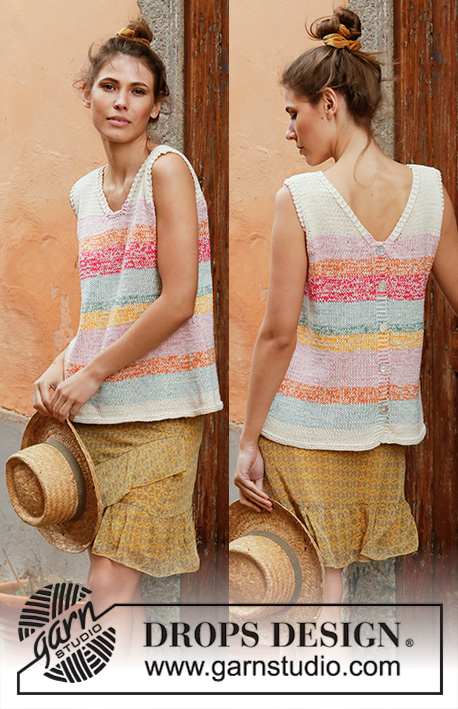
Knitted jumper with raglan in DROPS Sky. Piece is knitted top down in garter stitch and stocking stitch. Size: S - XXXL
DROPS 202-8 |
|
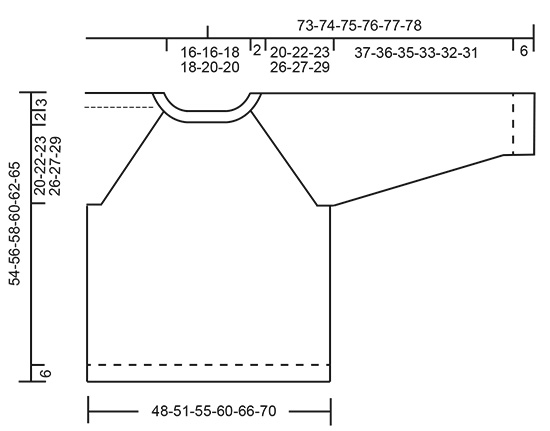
---------------------------------------------------------- EXPLANATION FOR THE PATTERN: ---------------------------------------------------------- GARTER STITCH (worked in the round): 1 ridge vertically = 2 rounds, i.e. purl 1 round and knit 1 round. DECREASE/INCREASE TIP (evenly): To calculate how to decrease/increase evenly, use the total number of stitches to be decreased/increased over (e.g. 96 stitches) and divide stitches by number of decreases/increases to be done (e.g. 8) = 12. In this example decrease by knitting every 11th and 12th stitch together. When increasing evenly make 1 yarn over after every 12th stitch. On next round knit yarn over twisted to avoid holes. KNITTING TIP: Because of the ridges in garter stitch the yoke will contract vertically when places flat, measurements should be done when the garment is held up, or lightly pull while measuring. If the yoke is too short continue pattern as before (without increasing.) DECREASE TIP (applies to sleeves): Decrease 1 stitch on each side of marker thread as follows: Work until 3 stitches remain before marker thread, slip 1 stitch knitwise, knit 1, pass slipped stitch over stitch worked, knit 2 (marker is in the middle of these stitches), knit the next 2 stitches together. ---------------------------------------------------------- START THE PIECE HERE: ---------------------------------------------------------- JUMPER - SHORT OVERVIEW OF THE PIECE: Worked in the round on circular needle, top down. After yoke work body in the round on circular needle. Work sleeves in the round on double pointed needles/a short circular needle. YOKE: Cast on 96-100-104-112-120-124 stitches on circular needle size 4 mm with Sky. Work 4 ridges in GARTER STITCH - see explanation above. Work 1 round in stocking stitch while decreasing 8-8-8-12-12-12 stitches evenly - read DECREASE/INCREASE TIP = 88-92-96-100-108-112 stitches. Switch to circular needle size 5 mm. Insert 1 marker here - NOW MEASURE PIECE FROM HERE! On next round start the pattern and increase for raglan as follows: (Beginning of round is mid back.) Work 5-6-7-8-9-10 stitches in stocking stitch (= half back piece), 1 yarn over, purl 16 (= ridge, begin first round with purl), 1 yarn over, work 2-2-2-2-4-4 stitches in stocking stitch (= sleeve), 1 yarn over, purl 16 (= ridge), 1 yarn over, work 10-12-14-16-18-20 stitches in stocking stitch (= front piece), 1 yarn over, purl 16 (= ridge),1 yarn over, work 2-2-2-2-4-4 stitches in stocking stitch (= sleeve), 1 yarn over, purl 16 (= ridge), 1 yarn over and work 5-6-7-8-9-10 stitches in stocking stitch (= half back piece) until mid back. Knit 1 round, work yarn overs twisted (= the increased stitches are worked in stocking stitch). First increase for raglan is now done (= 8 stitches increased on round). Continue with stocking stitch / garter stitch and increase 1 stitch on each side of the 16 stitches in garter stitch between sleeves and body, and increase every other round 25-27-29-32-34-36 times in total (including first increase explained above). After last increase for raglan there are 288-308-328-356-380-400 stitches on needle. Yoke should measure 20-22-23-26-27-29 cm from marker - READ KNITTING TIP! Work next round as follows: Work 30-33-36-40-43-46 stitches in stocking stitch, 12-11-11-12-14-14 stitches in garter stitch (= half back piece), slip the next 60-66-70-74-76-80 stitches on 1 stitch holder for sleeve, cast on 8-8-10-10-12-12 new stitches on needle (= in the side under sleeve), work in garter stitch over the next 12-11-11-12-14-14 stitches, work in stocking stitch over the next 60-66-72-80-86-92 stitches, work 12-11-11-12-14-14 stitches in garter stitch (= front piece), slip the next 60-66-70-74-76-80 stitches on 1 stitch holder for sleeve, cast on 8-8-10-10-12-12 new stitches on needle (= in the side under sleeve), work 12-11-11-12-14-14 stitches in garter stitch, work in stocking stitch over the last 30-33-36-40-43-46 stitches (= half back piece). Finish body and sleeves separately. NOW MEASURE PIECE FROM HERE! BODY: = 184-192-208-228-252-264 stitches. Insert 1 marker thread in the middle of the 8-8-10-10-12-12 new stitches that were cast on under sleeve in each side. Begin round at one of the marker thread and move the marker threads when working. READ ALL OF THE FOLLOWING SECTION BEFORE CONTINUING! Continue in the round with stocking stitch and in garter stitch over stitches in the side (= the stitches in garter stitch left on each side of front/back piece and the new stitches cast on under sleeve), AT THE SAME TIME on every other round make 1 yarn over on the outside of each section in garter stitch towards mid front and mid back as before (= 4 stitches increased in total on round) and decrease 2 stitches in the middle of each section in garter stitch by working the middle 4 stitches together 2 by 2 (= 4 stitches decreased in total on round). Increase/decrease like this until there are only 8 stitches in garter stitch in each side of garment. NOTE: Number of stitches on round will stay the same but stitches in garter stitch will gradually disappear and there will be more stitches in stocking stitch. Continue in stocking stitch and 8 stitches in garter stitch in each side until piece measures 23-23-24-23-24-25 cm from division (approx. 48-50-52-54-56-59 cm from shoulder). Switch to circular needle size 4 mm and work in garter stitch for 6 cm. Loosely cast off. Jumper measures approx. 54-56-58-60-62-65 cm from shoulder. SLEEVE: Slip the 60-66-70-74-76-80 stitches from stitch holder in one side of piece on circular needle/double pointed needles size 5 mm and pick in addition up 1 stitch in each of the 8-8-10-10-12-12 new stitches cast on under sleeve = 68-74-80-84-88-92 stitches. Insert 1 marker thread in the middle of the 8-8-10-10-12-12 stitches under sleeve and begin round here. Continue in the round with stocking stitch and in garter stitch over stitches on the underside of sleeve (= the garter stitches that are on sleeve and the new stitches cast on under sleeve), AT THE SAME TIME on every other round make 1 yarn over on the outside of each section in garter stitch as before (= 2 stitches increased in total on round) and decrease 2 stitches in the middle of each section in garter stitch by working the middle 4 stitches together 2 by 2 (= 2 stitches decreased in total on round). NOTE: Number of stitches will stay the same on round but stitches in garter stitch will gradually disappear and there will be more stitches in stocking stitch. Increase/decrease like this until there are no more stitches in garter stitch left, and then continue in stocking stitch over all stitches. Now decrease 2 stitches mid under sleeve - read DECREASE TIP. Decrease like this every 6th-5th-4th-4th-4th-4th round 13-15-17-18-18-19 times in total = 42-44-46-48-50-54 stitches. Work until sleeve measures 37-36-35-33-32-31 cm from division (shorter measurements in the larger sizes because of longer yoke). Switch to double pointed needles size 4 mm and work 6 cm in garter stitch. Sleeve measures approx. 43-42-41-39-38-37 cm from division. Loosely cast off. Work the other sleeve the same way. |
|
Have you made this or any other of our designs? Tag your pictures in social media with #dropsdesign so we can see them! Do you need help with this pattern?You'll find tutorial videos, a Comments/Questions area and more by visiting the pattern on garnstudio.com. © 1982-2024 DROPS Design A/S. We reserve all rights. This document, including all its sub-sections, has copyrights. Read more about what you can do with our patterns at the bottom of each pattern on our site. |
With over 40 years in knitting and crochet design, DROPS Design offers one of the most extensive collections of free patterns on the internet - translated to 17 languages. As of today we count 304 catalogues and 11422 patterns - 11422 of which are translated into English (UK/cm).
We work hard to bring you the best knitting and crochet have to offer, inspiration and advice as well as great quality yarns at incredible prices! Would you like to use our patterns for other than personal use? You can read what you are allowed to do in the Copyright text at the bottom of all our patterns. Happy crafting!
Comments / Questions (91)
Linda wrote:
Je viens de le tricoter,je débute en tricot circulaire ,je l adore , Vos modèles sont magnifiques,j ai repéré pleins d autres modèles 😉
23.10.2019 - 19:40Griet wrote:
Vraag bij tips voor het minderen voor de mouwen. Moet het niet zijn: Minder 1 steek aan elke kant van de markeerdraad als volgt: Brei tot er 3 steken over zijn voor de markeerdraad en brei 2 recht samen, 2 recht (de markeerdraad zit tussen deze steken), 1 steek recht afhalen, 1 recht, haal de afgehaalde steek over de gebreide steek?
22.10.2019 - 06:21DROPS Design answered:
Dag Griet,
Nee, het is wel bedoeld zoals beschreven staat in het patroon. De mouw wordt immers van boven naar beneden gebreid. Maar natuurlijk staat het je vrij om het andersom te doen :)
30.10.2019 - 12:22Montse wrote:
Hola, cuando hago las disminuciones de dos en dos en el centro inferior de las mangas, la lana va cogiendo forma de punta, y creo que no tendría que pasar, me queda como una montaña!! Como se tienen que hacer esas disminuciones? Yo las he trabajado como si hiciera un punto del derecho en las primeras y las segundas, cogiendo la hebra de atrás en dirección contraria al punto derecho...no se si me explico....
14.10.2019 - 18:19DROPS Design answered:
Hola Montse. Te sugiero este vídeo para ver cómo se trabajan las disminuciones:
14.10.2019 - 21:01Montse wrote:
Hola, cuando trabajo a punto derecho la lazada antes y después del punto musgo, el dibujo me queda diferente en un lado que en el otro. Después, cuando empiezo mangas también me queda diferente del que hice con anterioridad.....supongo que debo trabajarlos de diferente manera un lado y el otro para que me quede igual, no? y si es así, como hay que trabajarlos?
14.10.2019 - 18:16DROPS Design answered:
Hola Montse. Por tu descripción no puedo decir dónde está el fallo. Si no has encontrado la solución en nuestros vídeos bajo el patrón, contacta con la tienda DROPS más cercana para obtener ayuda especializada
21.10.2019 - 00:09Despoina wrote:
At the BODY section you indicate that every other round to make the increases/ decreases. The first round should be all knit, to make the garter stitch (because on the previous round when I had to separate the sleeves from the body I needed to purl the garter part). So on the first round all stitches should be knitted and from the second the increases/ decreases should be made. Is this correct?
25.08.2019 - 18:04DROPS Design answered:
Dear Desponia, you can adjust the increase/decrease round to be worked on a round with K stitches in the garter stitch sections, then you dec by K2 tog in the garter st sections - the increased stitches will be anyway worked K = in stocking stitch (twisted to avoid holes). Happy knitting!
26.08.2019 - 09:19Barbara wrote:
Hallo liebes Strickteam, wird nur die Maschenprobe mit doppeltem Faden gestrickt oder der gesamte Pullover? Ich finde in der Anleitung keine Angabe zu doppeltem Faden. Dank und Grüße Barbara
07.08.2019 - 17:20DROPS Design answered:
Liebe Barbara, der Pullover wird nur mit 1 Faden DROPS Sky gestrickt, etwas locker als gewöhnlich mit grösseren Nadeln und eine Maschenprobe von 19 M x 25 R = 10 x 10 cm. Viel Spaß beim stricken!
08.08.2019 - 09:25Barbara Wallochny wrote:
Kann ich den Pulli auch aufteilen und als Jacke stricken? Ich habe mir 350 gr sky bestellt für Grösse M. Liebe Grüße barbara Wallochny
14.07.2019 - 18:37DROPS Design answered:
Liebe Frau Wallochny, bei diesem Modell haben wir leider nur das Pullover, aber wahrscheinlich können Sie ihn als Jacke anpassen. Wenn sie Hilfe damit brauchen, wenden Sie sich bitte an dem Laden wo Sie die Wolle gekauft haben, dort hilft man Ihnen gerne weiter. Viel Spaß beim stricken!
15.07.2019 - 10:57Flausse wrote:
Bonjour, je trouve vos modèles super beau mais sont tous commencé par en haut avec aiguille circulaire j ai du mal à les comprendre c est dommage
21.06.2019 - 08:23DROPS Design answered:
Bonjour Mme Flausse, la technique de haut en bas est très demandée, et le tricot en rond évite les coutures, vous trouverez ici un tuto en photos pour un pull (simple) en rond de haut en bas, n'hésitez pas à consulter nos vidéos pour vous familiariser avec les aiguilles circulaires. Vous trouverez également ici comment adapter un modèle sur aiguilles droites. Bon tricot!
21.06.2019 - 12:30Kamila Boudová wrote:
Chci se zeptat, kdy bude tento model přeložený do češtiny? Koupila jsem si na to vlnu ale v anglickém návodu se nevyznám.Kamila
15.06.2019 - 08:53DROPS Design answered:
Dobrý den, Kamilo, návod už je v češtině dostupný - text je aktuální, včetně všech oprav. Příjemné pletení! Hana
03.07.2019 - 08:25Linda wrote:
This is a lovely pattern. Many thanks.My question is concerning the underarm decrease. I understand the increase of 4'total yarn over and the decrease also of 4'.stitches in the underarm garter section. Do I decrease by purling 2 together --garter or do I knit 2 together creating a line to separate front part and back part on sides
04.04.2019 - 19:18DROPS Design answered:
Dear Linda, you should decrease 2 stitches under each sleeve, if you are working a knit row over the garter stitches section, then knit 2 together, if you are working a purl row over the garter stitches section, then purl 2 together, ie decrease these stitches as you are working the stitches in garter stitches. Happy knitting!
05.04.2019 - 09:21