DROPS Sky
DROPS Sky
74% Alpaca, 18% Polyamide, 8% Wool
from 7.20 $ /50g
Get the yarn to make this pattern from 36.00$.

The yarn cost is calculated from the pattern’s smallest size and the yarn’s cheapest product type. Looking for an even better price? You might find it on the DROPS Deals!

DROPS SS24

Stone Fields

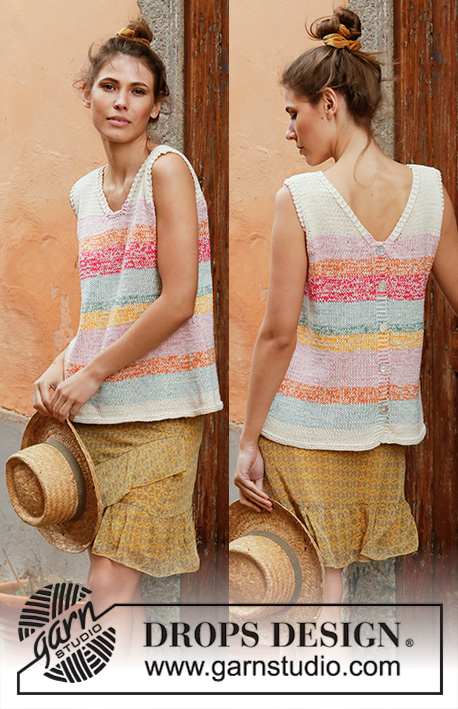
Knitted sweater with raglan in DROPS Sky. Piece is knitted top down in garter stitch and stockinette stitch. Size: S - XXXL

DROPS 202-8
DROPS design: Pattern sk-035
Yarn group B
----------------------------------------------------------

SIZE:
S - M - L - XL - XXL – XXXL

Finished measurements:
Chest measurements: 96-102-110-120-132-140 cm = 37¾"-40"-43⅜"-47¼"-52"-55"
Full length: 54-56-58-60-62-65 cm = 21¼"-22"-22¾"-23⅝"-24⅜"-25½"

All measurements in charts are in cm.

MATERIALS:
DROPS SKY from Garnstudio (belongs to yarn group B)
250-300-300-350-400-400 g color 07, light sea green

KNITTING GAUGE:
19 stitches in width and 25 rows vertically in stockinette stitch = 10 x 10 cm = 4" x 4".

NEEDLES:
DROPS DOUBLE POINTED NEEDLES SIZE 5 mm = US 8
DROPS CIRCULAR NEEDLE SIZE 5 mm = US 8: Length 40 and 60 or 80 cm = 16" and 24" or 32" for stockinette stitch.
DROPS DOUBLE POINTED NEEDLES SIZE 4 mm = US 6 – for edge in garter stitch.
DROPS CIRCULAR NEEDLE SIZE 4 mm = US 6: Length 60 or 80 cm = 24" or 32" for edges in garter stitch.
Needle size is only a suggestion! If you have too many stitches on 10 cm = 4" switch to larger needles. If you have too few stitches on 10 cm = 4" switch to smaller needles.

-------------------------------------------------------

Alternative Yarn – See how to change yarns here
Yarn Groups A to F – Use the same pattern and change the yarn here
Yarn usage using an alternative yarn – Use our yarn converter here

-------------------------------------------------------

DROPS Sky
DROPS Sky
74% Alpaca, 18% Polyamide, 8% Wool
from 7.20 $ /50g
Get the yarn to make this pattern from 36.00$.

The yarn cost is calculated from the pattern’s smallest size and the yarn’s cheapest product type. Looking for an even better price? You might find it on the DROPS Deals!

Pattern instructions

NOTE: This pattern is written in American English. All measurements in charts are in cm. For conversion from inches to cm - click here. There are different terms for crocheting in American and British English. If this pattern includes crochet, click for "crochet terms" here. For this pattern in British English, please click here.
----------------------------------------------------------

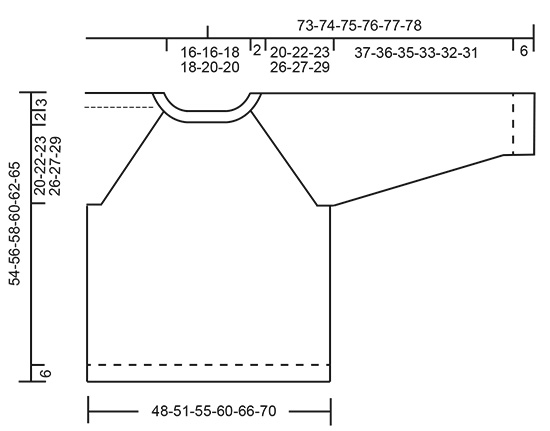
EXPLANATION FOR THE PATTERN:

----------------------------------------------------------

GARTER STITCH (worked in the round):
1 ridge vertically = 2 rounds, i.e. purl 1 round and knit 1 round.

DECREASE/INCREASE TIP (evenly):
To calculate how to decrease/increase evenly, use the total number of stitches to be decreased/increased over (e.g. 96 stitches) and divide stitches by number of decreases/increases to be done (e.g. 8) = 12.
In this example decrease by knitting every 11th and 12th stitch together.
When increasing evenly make 1 yarn over after every 12th stitch. On next round knit yarn over twisted to avoid holes.

KNITTING TIP:
Because of the ridges in garter stitch the yoke will contract vertically when places flat, measurements should be done when the garment is held up, or lightly pull while measuring. If the yoke is too short continue pattern as before (without increasing.)

DECREASE TIP (applies to sleeves):
Decrease 1 stitch on each side of marker thread as follows: Work until 3 stitches remain before marker thread, slip 1 stitch knitwise, knit 1, pass slipped stitch over stitch worked, knit 2 (marker is in the middle of these stitches), knit the next 2 stitches together.
----------------------------------------------------------

START THE PIECE HERE:

----------------------------------------------------------

SWEATER - SHORT OVERVIEW OF THE PIECE:
Worked in the round on circular needle, top down. After yoke work body in the round on circular needle. Work sleeves in the round on double pointed needles/a short circular needle.

YOKE:
Cast on 96-100-104-112-120-124 stitches on circular needle size 4 mm = US 6 with Sky. Work 4 ridges in GARTER STITCH - see explanation above. Work 1 round in stockinette stitch while decreasing 8-8-8-12-12-12 stitches evenly - read DECREASE/INCREASE TIP = 88-92-96-100-108-112 stitches. Switch to circular needle size 5 mm = US 8. Insert 1 marker here - NOW MEASURE PIECE FROM HERE!
On next round start the pattern and increase for raglan as follows:
(Beginning of round is mid back.) Work 5-6-7-8-9-10 stitches in stockinette stitch (= half back piece), 1 yarn over, purl 16 (= ridge, begin first round with purl), 1 yarn over, work 2-2-2-2-4-4 stitches in stockinette stitch (= sleeve), 1 yarn over, purl 16 (= ridge), 1 yarn over, work 10-12-14-16-18-20 stitches in stockinette stitch (= front piece), 1 yarn over, purl 16 (= ridge),1 yarn over, work 2-2-2-2-4-4 stitches in stockinette stitch (= sleeve), 1 yarn over, purl 16 (= ridge), 1 yarn over and work 5-6-7-8-9-10 stitches in stockinette stitch (= half back piece) until mid back. Knit 1 round, work yarn overs twisted (= the increased stitches are worked in stockinette stitch).
First increase for raglan is now done (= 8 stitches increased on round). Continue with stockinette stitch / garter stitch and increase 1 stitch on each side of the 16 stitches in garter stitch between sleeves and body, and increase every other round 25-27-29-32-34-36 times in total (including first increase explained above).
After last increase for raglan there are 288-308-328-356-380-400 stitches on needle.
Yoke should measure 20-22-23-26-27-29 cm = 8"-8¾"-9"-10¼"-10⅝"-11⅜" from marker - READ KNITTING TIP!

Work next round as follows: Work 30-33-36-40-43-46 stitches in stockinette stitch, 12-11-11-12-14-14 stitches in garter stitch (= half back piece), slip the next 60-66-70-74-76-80 stitches on 1 stitch holder for sleeve, cast on 8-8-10-10-12-12 new stitches on needle (= in the side under sleeve), work in garter stitch over the next 12-11-11-12-14-14 stitches, work in stockinette stitch over the next 60-66-72-80-86-92 stitches, work 12-11-11-12-14-14 stitches in garter stitch (= front piece), slip the next 60-66-70-74-76-80 stitches on 1 stitch holder for sleeve, cast on 8-8-10-10-12-12 new stitches on needle (= in the side under sleeve), work 12-11-11-12-14-14 stitches in garter stitch, work in stockinette stitch over the last 30-33-36-40-43-46 stitches (= half back piece). Finish body and sleeves separately.
NOW MEASURE PIECE FROM HERE!

BODY:
= 184-192-208-228-252-264 stitches. Insert 1 marker thread in the middle of the 8-8-10-10-12-12 new stitches that were cast on under sleeve in each side. Begin round at one of the marker threads and move the marker threads when working.
READ ALL OF THE FOLLOWING SECTION BEFORE CONTINUING!
Continue in the round with stockinette stitch and in garter stitch over stitches in the side (= the stitches in garter stitch left on each side of front/back piece and the new stitches cast on under sleeve), AT THE SAME TIME on every other round make 1 yarn over on the outside of each section in garter stitch towards mid front and mid back as before (= 4 stitches increased in total on round) and decrease 2 stitches in the middle of each section in garter stitch by working the middle 4 stitches together 2 by 2 (= 4 stitches decreased in total on round). Increase/decrease like this until there are only 8 stitches in garter stitch in each side of garment. NOTE: Number of stitches on round will stay the same but stitches in garter stitch will gradually disappear and there will be more stitches in stockinette stitch.
Continue in stockinette stitch and 8 stitches in garter stitch in each side until piece measures 23-23-24-23-24-25 cm = 9"-9"-9½"-9"-9½"-9¾" from division (approx. 48-50-52-54-56-59 cm = 19"-19¾"-20½"-21¼"-22"-23¼" from shoulder). Switch to circular needle size 4 mm = US 6 and work in garter stitch for 6 cm = 2⅜". Loosely bind off. Sweater measures approx. 54-56-58-60-62-65 cm = 21¼"-22"-22¾"-23⅝"-24⅜"-25½" from shoulder.

SLEEVE:
Slip the 60-66-70-74-76-80 stitches from stitch holder in one side of piece on circular needle/double pointed needles size 5 mm = US 9 and pick in addition up 1 stitch in each of the 8-8-10-10-12-12 new stitches cast on under sleeve = 68-74-80-84-88-92 stitches. Insert 1 marker thread in the middle of the 8-8-10-10-12-12 stitches under sleeve and begin round here.
Continue in the round with stockinette stitch and in garter stitch over stitches on the underside of sleeve (= the garter stitches that are on sleeve and the new stitches cast on under sleeve), AT THE SAME TIME on every other round make 1 yarn over on the outside of each section in garter stitch as before (= 2 stitches increased in total on round) and decrease 2 stitches in the middle of each section in garter stitch by working the middle 4 stitches together 2 by 2 (= 2 stitches decreased in total on round). NOTE: Number of stitches will stay the same on round but stitches in garter stitch will gradually disappear and there will be more stitches in stockinette stitch. Increase/decrease like this until there are no more stitches in garter stitch left, and then continue in stockinette stitch over all stitches. Now decrease 2 stitches mid under sleeve - read DECREASE TIP. Decrease like this every 6th-5th-4th-4th-4th-4th round 13-15-17-18-18-19 times in total = 42-44-46-48-50-54 stitches. Work until sleeve measures 37-36-35-33-32-31 cm = 14½"-14¼"-13¾"-13"-12½"-12¼" from division (shorter measurements in the larger sizes because of longer yoke). Switch to double pointed needles size 4 mm = US 6 and work 6 cm = 2⅜" in garter stitch.
Sleeve measures approx. 43-42-41-39-38-37 cm = 17"-16½"-16 1/8-15¼"-15"-14½" from division. Loosely bind off. Work the other sleeve the same way.

This pattern has been corrected.

Updated online: 01.03.2019
Correction - YOKE: Work next round as follows: Work 30-33-36-40-43-46 stitches in stocking stitch, 12-11-11-12-14-14 stitches in garter stitch (= half back piece), slip the next 60-66-70-74-76-80 stitches on 1 stitch holder for sleeve, cast on 8-8-10-10-12-12 new stitches on needle (= in the side under sleeve), work in garter stitch over the next 12-11-11-12-14-14 stitches, work in stocking stitch over the next 60-66-72-80-86-92 stitches, work 12-11-11-12-14-14 stitches in garter stitch (= front piece), slip the next 60-66-70-74-76-80 stitches on 1 stitch holder for sleeve, cast on 8-8-10-10-12-12 new stitches on needle (= in the side under sleeve), work 12-11-11-12-14-14 stitches in garter stitch, work in stocking stitch over the last 30-33-36-40-43-46 stitches (= half back piece). Finish body and sleeves separately.

Diagram

All measurements in charts are in cm.

diagram measurements

Each of our patterns has specific tutorial videos to help you.

Do you have a question? See a list of frequently asked questions (FAQ)

Knitting tension is what determines the final measurements of your work, and is usually measured per 10 x 10 cm. It is provided like so: number of stitches in width x number of rows in height - eg: 19 stitches x 26 rows = 10 x 10 cm.

The knitting tension is very individual; some people knit/crochet loosely while others work tightly. You adjust the knitting tension with the needle size, which is why the suggested needle size only serve as a guide! You need to adjust this (up or down) to ensure that YOUR knitting tension matches the knitting tension provided in the pattern. If you work with a different knitting tension than provided you will have a different yarn consumption, and your work will have different measurements than what the pattern suggests.

The knitting tension also determines which yarns can replace each other. As long as you achieve the same knitting tension you can replace one yarn with another.

See DROPS lesson: How to measure your tension/gauge

See DROPS video: How to make a gauge tension swatch

The required amount of yarn is provided in grams, eg: 450 g. To calculate how many balls you’ll need you first need to know how many grams are in 1 ball (25g, 50g or 100g). This information is available if you click on the individual yarn quality on our pages. Divide the amount required with the amount of each ball. For example, if each ball is 50g (the most common amount), the calculation will be as follows: 450 / 50 = 9 balls.

The important thing when changing from one yarn to another is that the knitting/crochet tension remains the same. This is so that the measurements of the finished piece will be the same as on the sketch provided. It is easier to achieve the same knitting tension using yarns from the same yarn group. It is also possible to work with multiple strands of a thinner yarn to achieve the knitting tension of a thicker one. Please try our yarn converter. We recommend you to always work a test swatch.

Please NOTE: when changing yarn the garment might have a different look and feel to the garment in the photo, due to individual properties and qualities of each yarn.

See DROPS lesson: Can I use a different yarn than the one mentioned in the pattern?

All our yarns are categorised into yarn groups (from A to F) according to thickness and knitting tension – group A contains the thinnest yarns and group F the thickest. This makes it easier for you to find alternative yarns to our patterns, should you wish to switch yarn. All yarns within the same group have a similar knitting tension and can easily replace each other. However, different yarn qualities have different structures and properties which will give the finished work a unique look and feel.

Click here for an overview of the yarns in each yarn group

At the top of all our patterns you’ll find a link to our yarn converter, which is a helpful tool should you wish to use a different yarn than suggested. By filling in the yarn quality you wish to replace, the amount (in your size) and number of strands, the converter will present good alternative yarns with the same knitting tension. Additionally it will tell you how much you’ll require in the new qualities and whether you’ll need to work with multiple strands. Most skeins are 50g (some are 25g or 100g).

If the pattern is worked with multiple colours, every colour will have to be converted separately. Similarly, if the pattern is worked with several strands of different yarns (for example 1 strand Alpaca and 1 strand Kid-Silk) you will have to find alternatives for each, individually.

Click here to see our yarn converter

Since different yarns have different qualities and textures we have chosen to keep the original yarn in our patterns. However, you can easily find options among our available qualities by using our yarn converter, or simply pick a yarn from the same yarn group.

It is possible that some retailers still have discontinued yarns in stock, or that someone has a few skeins at home that they would like to find patterns for.

The yarn converter will provide both alternative yarn as well as required amount in the new quality.

If you think it's hard to decide what size to make, it can be a good idea to measure a garment you own already and like the size of. Then you can pick the size by comparing those measures with the ones available in the pattern's size chart.

You'll find the size chart at the bottom of the pattern.

See DROPS lesson: How to read size chart

The needle size provided in the pattern serves only as a guide, the important thing is to follow the knitting tension. And since knitting tension is very individual, you will have to adjust the needle size to ensure that YOUR tension is the same as in the pattern – maybe you’ll have to adjust 1, or even 2 needle sizes, up or down to achieve the correct tension. For this, we recommend that you work test swatches.

Should you work with a different knitting tension than the one provided, the measurements of the finished garment might deviate from the measurement sketch.

See DROPS lesson: How to measure your tension/gauge

See DROPS video: How to make a gauge tension swatch

Working a garment top-down provides more flexibility and room for personal adjustment. For example it is easier to try the garment on while working, as well as making adjustments to length of yoke and shoulder caps.

The instructions are carefully explaining every step, in the correct order. Diagrams are adjusted to the knitting direction and are worked as usual.

The diagram depicts all rows/rounds, and every stitch seen from the right side. It is read from bottom to top, from right to left. 1 square = 1 stitch.

When working back and forth, every other row is worked from the right side and every other row is worked from the wrong side. When working from the wrong side, the diagram will have to be worked reversed: from left to right, knit stitches are purled, purl stitches are knit etc.

When working in the round every round is worked from the right side and the diagram are worked from right to left on all rounds.

See DROPS lesson: How to read knitting diagrams

The diagram depicts all rows/rounds, and every stitch seen from the right side. It is worked from bottom to top, from right to left.

When working back and forth every other row is worked from the right side: from right to left and every other row is worked from the wrong side: from left to right.

When working in the round, every row in the diagram are worked from the right side, from right to left.

When working a circular diagram you start in the middle and work your way outwards, counter clockwise, row by row.

The rows usually start with a given number of chain stitches (equivalent to the height of the following stitch), this will either be depicted in the diagram or explained in the pattern.

See DROPS lesson: How to read crochet diagrams

Instructions for working several diagrams after each other on the same row/round, will often be written like so: “work A.1, A.2, A.3 a total of 0-0-2-3-4 times". This means you work A.1 once, then A.2 is worked once, and A.3 is repeated (in width) the number of times provided for your size – in this case like so: S = 0 times, M = 0 times, L=2 times, XL= 3 times and XXL = 4 times.

The diagrams are worked as usual: begin with the first row in A.1, then work the first row in A.2 etc.

See DROPS lesson: How to read knitting diagrams

See DROPS lesson: How to read crochet diagrams

The total width of the garment (from wrist-to-wrist) will be larger in the larger sizes, despite the actual sleeves being shorter. The larger sizes have longer sleeve caps and wider shoulders, so there will be a good fit in all sizes.

The measurement sketch/schematic drawing provides information regarding the full length of the garment. If it’s a jumper or a jacket the length is measured from the highest point on the shoulder (usually closest to the neckline), and straight down to the bottom of the garment. It is NOT measured from the tip of shoulder. Similarly, the length of yoke is measured from the highest point on the shoulder and down to where yoke is split into body and sleeves.

See DROPS lesson: How to read a schematic drawing

Diagrams are often repeated on the round or in height. 1 repeat is the diagram the way it appears in the pattern. If it says to work 5 repeats of A.1 in the round, then you work A.1 a total of 5 times after/next to each other in the round. If it says to work 2 repeats of A.1 vertically/in height you work the entire diagram once, then begin again at the start and work the entire diagram one more time.

Chain stitches are slightly narrower than other stitches and to avoid working the cast-on edge too tight, we simply chain more stitches to begin with. The stitch count will be adjusted on the following row to fit the pattern and measurement sketch.

The rib edge is more elastic and will contract slightly compared to, for example, stocking stitch. By increasing before the rib edge, you avoid a visible difference in width between the rib edge and the rest of the body.

It’s very easy to cast off too tightly, and by making yarn overs while casting off (and simultaneously casting these off) you avoid a too tight cast off edge.

See DROPS video: How to bind off with yarn overs (yo)

To achieve an even increase (or decrease) you can increase on, for example: every 3rd and 4th row alternately, like so: work 2 rows and increase on the 3rd row, work 3 rows and increase on the 4th. Repeat this until the increase is complete.

See DROPS lesson: Increase or decrease 1 st on every 3rd and 4th row alternately

Should you prefer to work in the round instead of back and forth, you may of course adjust the pattern. You’ll need to add steeks mid-front (usually 5 stitches), and follow the instructions. When you would normally turn and work from the wrong side, simply work across the steek and continue in the round. At the end you’ll cut the piece open, pick up stitches to work bands, and cover the cut edges.

See DROPS video: How to knit steeks and cut open

Should you prefer to work back and forth instead of in the round, you may of course adjust the pattern so you work the pieces separately and then assemble them at the end. Divide the stitches for the body in 2, add 1 edge stitch in each side (for sewing) and work the front and back pieces separately.

See DROPS lesson: Can I adapt a pattern for circular needles into straight needles?

Pattern repeats can vary slightly in the different sizes, in order to get the correct proportions. If you’re not working the exact same size as the garment in the photo, yours might deviate slightly. This has been carefully developed and adjusted so that the complete impression of the garment is the same in all sizes.

Make sure to follow instructions and diagrams for your size!

If you have found a pattern you like which is available in women’s size it’s not very difficult to convert it to men’s size. The biggest difference will be the length of sleeves and body. Start working on the women size that you think would fit across the chest. The additional length will be worked right before you cast off for the armhole/sleeve cap. If the pattern is worked top-down you can add the length right after the armhole or before the first decrease on sleeve.

Regarding additional yarn amount, this will depend on how much length you add, but it is better with a skein too many than too few.

All yarns will have excess fibres (from production) that might come off as lint or shedding. Brushed yarns (ie hairier yarns) have more of these loose, excess fibres, causing more shedding.

Shedding also depends on what is worn under or over the garment, and whether this pulls at the yarn fibres. It’s therefore not possible to guarantee that there will be no shedding

Below are some tips on how to get the best result when working with hairier yarns:

1. When the garment is finished (before you wash it) shake it vigorously so the looser hairs come off. NOTE: do NOT use a lint roller, brush or any method that pulls at the yarn.

2. Place the garment in a plastic bag and put it in your freezer - the temperature will cause the fibres to become less attached to each other, and excess fibres will come off easier.

3. Leave in the freezer for a few hours before taking it out and shaking it again.

4. Wash the garment according to the instructions on the yarn label.

Pilling is a natural process that happens to even the most exclusive of fibers. It's a natural sign of wear and tear that is hard to avoid, and that is most visible in high friction areas of your garment like a sweater's arms and cuffs.

You can make your garment look as new by removing the pilling, using a fabric comb or a pill/lint remover.

Still can't find the answer you need? Then scroll down and leave your question so one of our experts can try to help you. This will be done normally within 5 to 10 working days.
In the meantime, you can read the questions and answers that others have left to this pattern or join the DROPS Workshop on Facebook to get help from fellow knitters/crocheters!

You might also like...

Post a comment to pattern DROPS 202-8

We would love to hear what you have to say about this pattern!

If you want to leave a question, please make sure you select the correct category in the form below, to speed up the answering process. Required fields are marked *.

Comments / Questions (91)

country flag Louison wrote:

Bonjour, je commence le pull après l'empiècement et je ne comprends pas les diminutions au milieu du point mousse. Est-ce que ça veut dire qu'on va diminuer le point mousse sous les manches sur les mailles qu'on vient de monter, ce qui représente le milieu du pt mousse? Merci

01.02.2021 - 17:58

DROPS Design answered:

Bonjour Louison, les mailles point mousse sur les côtés du pull sont celles qui restent des raglans et ces mailles vont être diminuées en leur milieu en tricotant 2 m ens à l'end de chaque côté du fil marqueur sur chacun des côtés du pull, et pour ne pas diminuer le nombre de mailles, on va augmenter 1 m de part et d'autre des mailles point mousse pour augmenter le nombre de mailles jersey. Bon tricot!

02.02.2021 - 09:38

country flag Dorothee Bozler wrote:

Der Pulli ist wunderbar. Gibt es auch eine Anleitung für Kinder? ( ca 5 Jahre ). Wie rechnet man das um? Dankesgrüße D. Bozler

29.01.2021 - 17:53

DROPS Design answered:

Liebe Frau Bozler, dieses Modell gibt es nicht für Kinder, hier finden Sie Modellen, die von oben nach unten gestrickt sind, um Ihnen zu helfen, das Modell anzupassen. Gerne kann Ihnen Ihr DROPS Laden oder ein Strickforum damithelfen. Viel Spaß beim stricken!

01.02.2021 - 07:43

country flag Gerda Meijer wrote:

Als ik deze trui Maat XL wil breien en dan het dobbelsteen gedeelte in een contrasterende kleur wil maken hoeveel heb ik van deze kleur dan nodig?

11.01.2021 - 09:10

DROPS Design answered:

Dag Gerda,

Dat zou ik zo niet weten, maar zou je ongeveer uit kunnen rekenen aan de hand van het oppervlak van het 'dobbelsteen' gedeelte.

17.01.2021 - 13:02

country flag Petra wrote:

In der Anleitung steht: ÄRMEL: Die 60-66-70-74-76-80 stillgelegten Maschen der einen Seite der Arbeit auf Rundnadel/Nadelspiel Nr. 5, zusätzlich je 1 Masche aus den 8-8-10-10-12-12 unter dem Arm angeschlagenen Maschen auffassen = 68-74-80-84-88-92 Maschen. Meine Frage: Wenn ich nun beidseitig der 66 M des krausen Teiles je eine Masche auffasse, habe ich nur 68M auf der Nadel, nicht 74. Wie ist der Arbeitsschritt tatsächlich zu verstehen?

03.01.2021 - 09:05

DROPS Design answered:

Liebe Petra, wenn Sie bei der Verteilung 66 Maschen für den Ärmel stillgelegt haben, und 8 neuen Maschen angeschlagen haben, dann stricken Sie für den Ärmel: die 66 Maschen + 1 Maschen aus den 8 neuen Maschen = 74 Maschen (= 2. Größe) . Viel Spaß beim stricken!

04.01.2021 - 16:08

country flag CATHERINE LEJEUNE wrote:

Bonjour, à la fin de l'empiècement le nombre de mailles pour chaque portion est détaillé . Pour la taille L, on passe des 16 m en mousse (qui si j'ai bien compris sont 16 tout le long de l'empiècement ?) à 11 . Je ne comprends pas où sont passées les 5 autres ! Merci d'éclairer ma lanterne !

02.01.2021 - 09:09

DROPS Design answered:

Bonjour Mme Lejeune, effectivement, les 16 mailles point mousse vont rester à 16 tout le long de l'empiècement, ce sont les mailles des raglans - lors de la division de l'ouvrage, 11 de ces mailles sont attribuées au devant/dos et les 5 restantes iront en attente avec les mailles des manches. Bon tricot!

04.01.2021 - 15:23

country flag Marie Françoise wrote:

Bonjour, je viens d'enfiler ce modèle que j'ai réalisé, je vais avoir du mal à l'enlever :il est tout doux, ultra léger, très chaud bref un doudou. Merci

15.10.2020 - 10:19

country flag Catherine wrote:

Bonjour Je viens de commencer ce modèle qui me plait beaucoup. Cependant sur les photos les jetés de l'empiècement n'ont pas l'air d'être tricotés torses comme il est précisé dans les explications. Il me semble que des trous apparaissent et j'aimerais bien garder cet effet. Merc i d'avance pour votre réponse

05.10.2020 - 13:07

DROPS Design answered:

Bonjour Catherine, les jetés ont bien été tricotés torse dans le modèle photographié, un petit trou se forme malgré tout, mais plus petit que si vous l'aviez tricoté dans le brin avant. Bon tricot!

05.10.2020 - 15:38

country flag Suzie wrote:

Merci beaucoup et bonne journée.

21.09.2020 - 15:19

country flag Tina Leibetseder wrote:

Habs leider noch nicht ganz verstanden. Stricke die Grösse Xxl. Mache 9 M rechts ,1U, Maschenmackierer,16 M links,Maschenmackierer, 1U,4Ma rechts,1U,Maschenmackierer. Oder mache ich 9 Ma rechts Maschenmakierer, 1U,16 M links,1U,Maschenmackierer, 4Maschen rechts,Maschenmackierer, 1U?

19.09.2020 - 20:37

DROPS Design answered:

LIebe Frau Leibetseder, wenn Sie Markierer setzen möchten, dann sollen Sie sie beiseitig von den 16 Maschen die krausrechts getrickt sind, dh vor und nach den 16 Maschen die Sie bei der1. Runde links stricken = die Zunahmen werden jeweils vor/nach diesen Maschen gestrickt. Beachten Sie nur, daß die Zunahmen unterschiedlich bei den Ärmeln und bei dem Vorder- Rückenteil gestrickt werden. Viel Spaß beim stricken!

21.09.2020 - 09:33

country flag Suzie wrote:

Bonjour, très joli pull mais j'aimerais savoir si il est possible de le tricoter de bas en haut et de faire ensuite les coutures ?

19.09.2020 - 16:28

DROPS Design answered:

Bonjour Suzie, vous trouverez ici comment adapter un modèle sur aiguilles droites, il vous faudra ensuite adapter les explications pour le tricoter dans l'autre sens ou bien consulter cette leçon qui explique comment tricoter un pull de haut en bas. Bon tricot!

21.09.2020 - 08:53