DROPS Sky
DROPS Sky
74% Alpaca, 18% Polyamide, 8% Wool
from 7.20 $ /50g
Get the yarn to make this pattern from 43.20$.

The yarn cost is calculated from the pattern’s smallest size and the yarn’s cheapest product type. Looking for an even better price? You might find it on the DROPS Deals!

DROPS SS24

Sjøbris

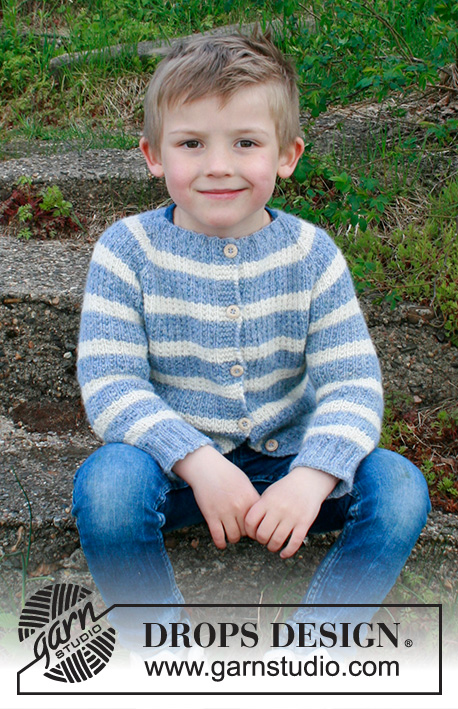
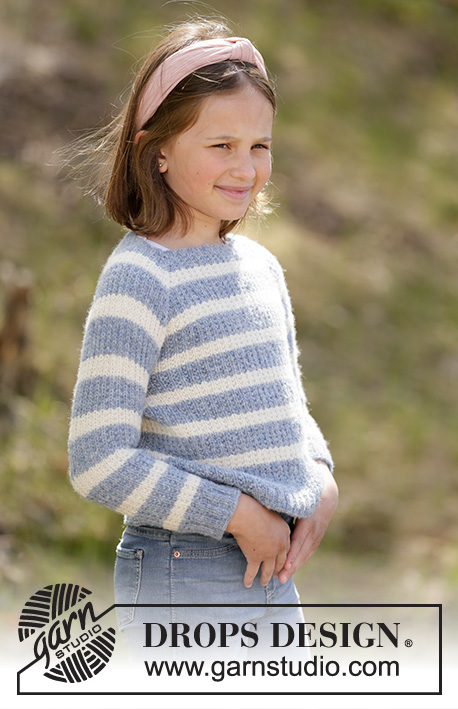
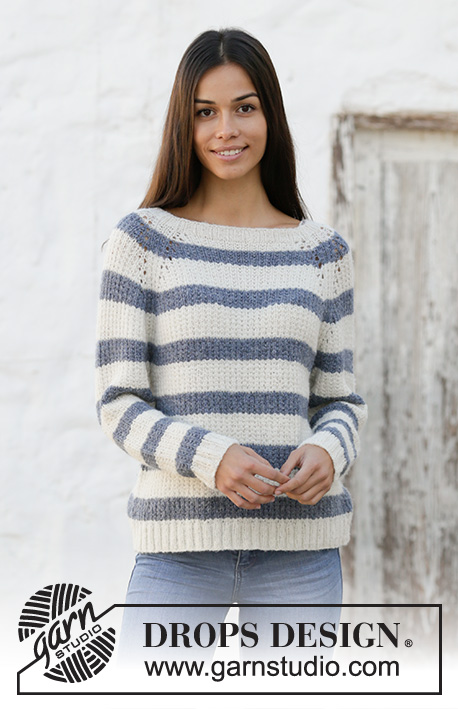
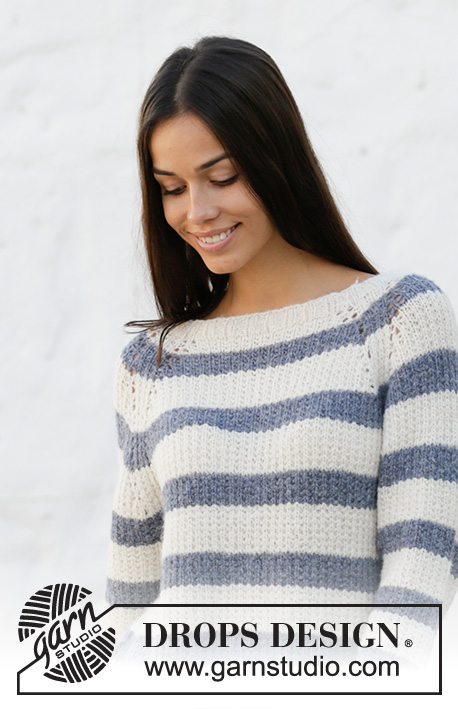
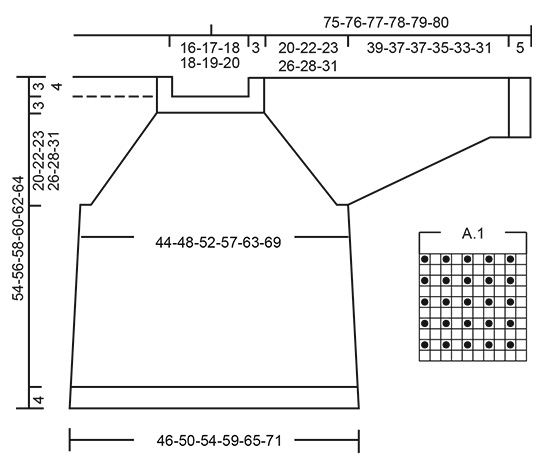
Knitted sweater with raglan and stripes in DROPS Sky. The piece is worked top down. Sizes S - XXXL.

DROPS 199-1
DROPS Design: Pattern no sk-023
Yarn group B
-------------------------------------------------------

Sizes: S - M - L - XL - XXL – XXXL

Finished measurements:
Chest measurements: 88-96-104-114-126-138 cm = 34⅝"-37¾"-41"-45"-49½"-54¼"
Full length: 54-56-58-60-62-64 cm = 21¼"-22"-22¾"-23⅝"-24⅜"-25¼"

All measurements in charts are in cm.

Materials:
DROPS SKY from Garnstudio (belongs to yarn group B)
100-100-150-150-150-150 g color 12, jeans blue
200-200-200-250-250-250 g color 01, white

-------------------------------------------------------
ACCESSORIES FOR THE PIECE:

KNITTING GAUGE:
20 stitches in width and 26 rows in height with A.1 = 10 x 10 cm = 4" x 4".

NEEDLES:
DROPS DOUBLE POINTED NEEDLES AND CIRCULAR NEEDLE SIZE 4.5 MM = US 7: length 40 cm = 16" and 60 cm = 24" or 80 cm = 32".

DROPS DOUBLE POINTED NEEDLES AND CIRCULAR NEEDLE SIZE 3.5 MM = US 4: length 80 cm = 32" for rib.
Needle size is only a guide. If you get too many stitches on 10 cm = 4", change to a larger needle size. If you get too few stitches on 10 cm = 4", change to a smaller needle size.

-------------------------------------------------------

Alternative Yarn – See how to change yarns here
Yarn Groups A to F – Use the same pattern and change the yarn here
Yarn usage using an alternative yarn – Use our yarn converter here

-------------------------------------------------------

DROPS Sky
DROPS Sky
74% Alpaca, 18% Polyamide, 8% Wool
from 7.20 $ /50g
Get the yarn to make this pattern from 43.20$.

The yarn cost is calculated from the pattern’s smallest size and the yarn’s cheapest product type. Looking for an even better price? You might find it on the DROPS Deals!

Pattern instructions

NOTE: This pattern is written in American English. All measurements in charts are in cm. For conversion from inches to cm - click here. There are different terms for crocheting in American and British English. If this pattern includes crochet, click for "crochet terms" here. For this pattern in British English, please click here.
-------------------------------------------------------

EXPLANATIONS FOR THE PATTERN:

-------------------------------------------------------

DECREASE/INCREASE TIP (evenly spaced):
To work out how to decrease/increase evenly, count the total number of stitches to be decreased/increased over (e.g. 96 stitches), and divide by the number of decreases/increases to be made (e.g. 8) = 12.
In this example, decrease by knitting each 11th and 12th stitch together.
When increasing make 1 yarn over after each 12th stitch. On the next round, knit the yarn overs twisted to avoid holes.

RAGLAN:
Increase 4 stitches in each transition between body and sleeves as follows:
Work until there are 4 stitches left before the marker thread, 1 yarn over, knit 1, 1 yarn over, knit 6 (the marker thread sits in the middle of these 6 stitches), 1 yarn over, knit 1, 1 yarn over. On the next round knit the yarn overs to leave holes. Then work the new stitches in stripes and pattern.

INCREASE TIP (for sides of body):
Work until there are 2 stitches left before the marker thread, 1 yarn over, knit 4 (marker thread sits in the middle of these 4 stitches), 1 yarn over. On the next round knit the yarn overs twisted to avoid holes. Then work the new stitches in stripes and pattern.

DECREASE TIP (for sleeves):
Decrease 1 stitch on each side of the marker thread as follows: Work until there are 3 stitches left before the marker thread, knit 2 together, knit 2 (marker thread sits between these 2 stitches), slip 1 stitch as if to knit, knit 1 and pass the slipped stitch over the knitted stitch.

STRIPES AND PATTERN:
* Work 5 cm = 2" in white (including neck) and then 3 cm = 1⅛" jeans blue * – repeat these stripes at the same time as the whole piece is worked in pattern – see diagram A.1; when increasing to raglan work the new stitches into the pattern as you go.


-------------------------------------------------------

START THE PIECE HERE:

-------------------------------------------------------

SWEATER - SHORT OVERVIEW OF THE PIECE:
The piece is worked in the round with circular needle, top down.
After the yoke the body is continued in the round with circular needle. The sleeves are worked in the round with short circular needle/double pointed needles.

NECK:
Cast on 96-100-104-112-120-124 stitches with circular needle size 3.5 mm = US 4 and white. Knit 1 round. Then work rib (= knit 2 / purl 2) for 3 cm = 1⅛". Knit 1 round where you decrease 8-8-8-12-12-12 stitches evenly spaced – read DECREASE/INCREASE TIP = 88-92-96-100-108-112 stitches. Change to circular needle size 4.5 mm = US 7. Now continue with STRIPES AND PATTERN - see description above.

YOKE:
Insert 1 marker - THE PIECE IS NOW MEASURED FROM HERE!
Insert 4 marker threads in the piece at the same time as you work stripes and pattern in the round as follows: Knit 3 stitches (= 3 stitches on back piece), insert 1 marker thread, work the next 12-12-14-14-16-16 stitches (= sleeve), insert 1 marker thread, work the next 32-34-34-36-38-40 stitches (= front piece), insert 1 marker thread, work 12-12-14-14-16-16 stitches (= sleeve), insert 1 marker thread, work the last 29-31-31-33-35-37 stitches (= back piece) after the last marker thread (there are 3 stitches left to the first marker thread).
The next round is worked as follows: 6 stitches in pattern (marker thread sits in the middle of these 6 stitches), make 1 yarn over, knit 1, make 1 yarn over, 4-4-6-6-8-8 stitches in pattern (= sleeve), 1 yarn over, knit 1, make 1 yarn over, 6 stitches in pattern (marker thread sits in the middle of these 6 stitches), 1 yarn over, knit 1, make 1 yarn over, 24-26-26-28-30-32 stitches in pattern (= front piece), 1 yarn over, knit 1, make 1 yarn over, 6 stitches in pattern (marker thread sits in the middle of these 6 stitches), 1 yarn over, knit 1, make 1 yarn over, 4-4-6-6-8-8 stitches in pattern (= sleeve), 1 yarn over, knit 1, make 1 yarn over, 6 stitches pattern (marker thread sits in the middle of these 6 stitches), 1 yarn over, knit 1, make 1 yarn over, work 24-26-26-28-30-32 stitches in pattern (= back piece), 1 yarn over, knit 1, make 1 yarn over.
The first increase to RAGLAN – read description above, is now finished (= 16 stitches increased on the round). Continue to increase to raglan every 4th round a total of 11-13-14-16-17-19 times (including the first increase described above) = 264-300-320-356-380-416 stitches on needle
Size XL and XXL: The increase for raglan is complete.
Size S, M, L and XXXL: The next round is worked as follows: 6 stitches in pattern
(marker thread sits in the middle of these 6 stitches), make 1 yarn over, work pattern
until 3 sts remain before the next marker thread (= sleeve), 1 yarn over, 6 stitches in
pattern (marker thread sits in the middle of these 6 stitches), 1 yarn over, work
pattern until 3 sts remain before the next marker thread (= front piece), 1 yarn over, 6
stitches in pattern (marker thread sits in the middle of these 6 stitches), 1 yarn over,
work pattern until 3 sts remain before the next marker thread (= sleeve), 1 yarn over,
6 stitches in pattern (marker thread sits in the middle of these 6 stitches), 1 yarn over,
work pattern until 3 sts remain before the next marker thread (= back piece), 1 yarn
over = 8 stitches increased.
All sizes: After the last increase to raglan there are 272-308-328-356-380-424 stitches on the needle. Continue with stripes and pattern without increasing until the piece measures 20-22-23-26-28-31 cm = 8"-8¾"-9"-10¼"-11"-12¼" from the marker at the beginning of the yoke.
The next round is worked as follows: Work 4-3-4-5-7-7 stitches (= on back piece), place the next 56-66-70-74-76-86 stitches on 1 thread for sleeve, cast on 8-8-10-10-12-12 new stitches on needle (= in side under sleeve), work the next 80-88-94-104-114-126 stitches (= front piece), place the next 56-66-70-74-76-86 stitches on 1 thread for sleeve, cast on 8-8-10-10-12-12 new stitches on needle (= in side under sleeve) and work the last 76-85-90-99-107-119 stitches (= back piece). Body and sleeves are finished separately. THE PIECE IS NOW MEASURED FROM HERE!

BODY:
= 176-192-208-228-252-276 stitches. Insert 1 marker thread in the middle of the 8-8-10-10-12-12 new stitches cast on under each sleeve. Start the round by one of these marker threads and allow the marker threads to follow your work onwards; continue with stripes and pattern. When the piece measures 8 cm = 3⅛" from the division, increase 1 stitch on each side of both marker threads – read INCREASE TIP (= 4 stitches increased). Repeat this increase when the piece measures 17 cm = 6¾" from the division = 184-200-216-236-260-284 stitches.
When the piece measures 27-27-28-26-26-25 cm = 10⅝"-10⅝"-11"-10¼"-10¼"-9¾" from the division (approx. 50-52-54-56-58-60 cm = 19¾"-20½"-21¼"-22"-22¾"-23⅝" from shoulder) knit 1 round where you increase 36-40-44-48-52-56 stitches evenly spaced = 220-240-260-284-312-340 stitches.
Change to circular needle size 3.5 mm = US 4 and work rib (= knit 2 / purl 2) for 4 cm = 1½". Loosely bind off with knit over knit and purl over purl - to avoid the bind-off edge being tight you can bind off with needle size 4.5 mm = US 7. The sweater measures approx. 54-56-58-60-62-64 cm = 21¼"-22"-22¾"-23⅝"-24⅜"-25¼" from the shoulder.

SLEEVE:
Place the 56-66-70-74-76-86 stitches from the thread on the one side of the piece on short circular needle/double pointed needles size 4.5.mm = US 7 and knit up 1 stitch in each of the 8-8-10-10-12-12 stitches cast on under the sleeve = 64-74-80-84-88-98 stitches. Insert 1 marker thread in the middle of the 8-8-10-10-12-12 stitches. Work stripes and pattern in the round. When the piece measures 2 cm = ¾" from the division decrease 2 stitches mid under sleeve – read DECREASE TIP. Decrease like this every 7th-5th-4th-4th-3rd-3rd round a total of 13-17-19-20-21-25 times = 38-40-42-44-46-48 stitches. Continue working until the sleeve measures 39-37-37-35-33-31 cm = 15¼"-14½"-14½"-13¾"-13"-12¼" from the division (shorter measurements in larger sizes due to longer yoke). Knit 1 round where you increase 6-4-6-8-6-8 stitches evenly spaced = 44-44-48-52-52-56 stitches. Change to double pointed needles size 3.5 mm = US 4 and work rib (= knit 2 / purl 2) for 5 cm = 2". The sleeve measures approx. 44-42-42-40-38-36 cm = 17¼"-16½"-16½"-15¾"-15"-14¼" from the division. Loosely bind off with knit over knit and purl over purl - to avoid the bind-off edge being tight you can bind off with needle size 4.5 mm = US 7. Work the other sleeve in the same way.

This pattern has been corrected.

Updated online: 18.03.2019
Correction - YOKE: ... knit 1, make 1 yarn over, 24-26-26-28-30-32 stitches in pattern (= front piece)...knit 1, make 1 yarn over, work 24-26-26-28-30-32 stitches in pattern (= back piece)
Updated online: 30.08.2023
RAGLAN: Increase 4 stitches in each transition between body and sleeves as follows: Work until there are 4 stitches left before the marker thread, 1 yarn over, knit 1, 1 yarn over, work 6 stitches in pattern (the marker thread sits in the middle of these 6 stitches), ...

Diagram

All measurements in charts are in cm.

symbols = knit 1
symbols = purl 1
diagram

Each of our patterns has specific tutorial videos to help you.

Do you have a question? See a list of frequently asked questions (FAQ)

Knitting tension is what determines the final measurements of your work, and is usually measured per 10 x 10 cm. It is provided like so: number of stitches in width x number of rows in height - eg: 19 stitches x 26 rows = 10 x 10 cm.

The knitting tension is very individual; some people knit/crochet loosely while others work tightly. You adjust the knitting tension with the needle size, which is why the suggested needle size only serve as a guide! You need to adjust this (up or down) to ensure that YOUR knitting tension matches the knitting tension provided in the pattern. If you work with a different knitting tension than provided you will have a different yarn consumption, and your work will have different measurements than what the pattern suggests.

The knitting tension also determines which yarns can replace each other. As long as you achieve the same knitting tension you can replace one yarn with another.

See DROPS lesson: How to measure your tension/gauge

See DROPS video: How to make a gauge tension swatch

The required amount of yarn is provided in grams, eg: 450 g. To calculate how many balls you’ll need you first need to know how many grams are in 1 ball (25g, 50g or 100g). This information is available if you click on the individual yarn quality on our pages. Divide the amount required with the amount of each ball. For example, if each ball is 50g (the most common amount), the calculation will be as follows: 450 / 50 = 9 balls.

The important thing when changing from one yarn to another is that the knitting/crochet tension remains the same. This is so that the measurements of the finished piece will be the same as on the sketch provided. It is easier to achieve the same knitting tension using yarns from the same yarn group. It is also possible to work with multiple strands of a thinner yarn to achieve the knitting tension of a thicker one. Please try our yarn converter. We recommend you to always work a test swatch.

Please NOTE: when changing yarn the garment might have a different look and feel to the garment in the photo, due to individual properties and qualities of each yarn.

See DROPS lesson: Can I use a different yarn than the one mentioned in the pattern?

All our yarns are categorised into yarn groups (from A to F) according to thickness and knitting tension – group A contains the thinnest yarns and group F the thickest. This makes it easier for you to find alternative yarns to our patterns, should you wish to switch yarn. All yarns within the same group have a similar knitting tension and can easily replace each other. However, different yarn qualities have different structures and properties which will give the finished work a unique look and feel.

Click here for an overview of the yarns in each yarn group

At the top of all our patterns you’ll find a link to our yarn converter, which is a helpful tool should you wish to use a different yarn than suggested. By filling in the yarn quality you wish to replace, the amount (in your size) and number of strands, the converter will present good alternative yarns with the same knitting tension. Additionally it will tell you how much you’ll require in the new qualities and whether you’ll need to work with multiple strands. Most skeins are 50g (some are 25g or 100g).

If the pattern is worked with multiple colours, every colour will have to be converted separately. Similarly, if the pattern is worked with several strands of different yarns (for example 1 strand Alpaca and 1 strand Kid-Silk) you will have to find alternatives for each, individually.

Click here to see our yarn converter

Since different yarns have different qualities and textures we have chosen to keep the original yarn in our patterns. However, you can easily find options among our available qualities by using our yarn converter, or simply pick a yarn from the same yarn group.

It is possible that some retailers still have discontinued yarns in stock, or that someone has a few skeins at home that they would like to find patterns for.

The yarn converter will provide both alternative yarn as well as required amount in the new quality.

If you think it's hard to decide what size to make, it can be a good idea to measure a garment you own already and like the size of. Then you can pick the size by comparing those measures with the ones available in the pattern's size chart.

You'll find the size chart at the bottom of the pattern.

See DROPS lesson: How to read size chart

The needle size provided in the pattern serves only as a guide, the important thing is to follow the knitting tension. And since knitting tension is very individual, you will have to adjust the needle size to ensure that YOUR tension is the same as in the pattern – maybe you’ll have to adjust 1, or even 2 needle sizes, up or down to achieve the correct tension. For this, we recommend that you work test swatches.

Should you work with a different knitting tension than the one provided, the measurements of the finished garment might deviate from the measurement sketch.

See DROPS lesson: How to measure your tension/gauge

See DROPS video: How to make a gauge tension swatch

Working a garment top-down provides more flexibility and room for personal adjustment. For example it is easier to try the garment on while working, as well as making adjustments to length of yoke and shoulder caps.

The instructions are carefully explaining every step, in the correct order. Diagrams are adjusted to the knitting direction and are worked as usual.

The diagram depicts all rows/rounds, and every stitch seen from the right side. It is read from bottom to top, from right to left. 1 square = 1 stitch.

When working back and forth, every other row is worked from the right side and every other row is worked from the wrong side. When working from the wrong side, the diagram will have to be worked reversed: from left to right, knit stitches are purled, purl stitches are knit etc.

When working in the round every round is worked from the right side and the diagram are worked from right to left on all rounds.

See DROPS lesson: How to read knitting diagrams

The diagram depicts all rows/rounds, and every stitch seen from the right side. It is worked from bottom to top, from right to left.

When working back and forth every other row is worked from the right side: from right to left and every other row is worked from the wrong side: from left to right.

When working in the round, every row in the diagram are worked from the right side, from right to left.

When working a circular diagram you start in the middle and work your way outwards, counter clockwise, row by row.

The rows usually start with a given number of chain stitches (equivalent to the height of the following stitch), this will either be depicted in the diagram or explained in the pattern.

See DROPS lesson: How to read crochet diagrams

Instructions for working several diagrams after each other on the same row/round, will often be written like so: “work A.1, A.2, A.3 a total of 0-0-2-3-4 times". This means you work A.1 once, then A.2 is worked once, and A.3 is repeated (in width) the number of times provided for your size – in this case like so: S = 0 times, M = 0 times, L=2 times, XL= 3 times and XXL = 4 times.

The diagrams are worked as usual: begin with the first row in A.1, then work the first row in A.2 etc.

See DROPS lesson: How to read knitting diagrams

See DROPS lesson: How to read crochet diagrams

The total width of the garment (from wrist-to-wrist) will be larger in the larger sizes, despite the actual sleeves being shorter. The larger sizes have longer sleeve caps and wider shoulders, so there will be a good fit in all sizes.

The measurement sketch/schematic drawing provides information regarding the full length of the garment. If it’s a jumper or a jacket the length is measured from the highest point on the shoulder (usually closest to the neckline), and straight down to the bottom of the garment. It is NOT measured from the tip of shoulder. Similarly, the length of yoke is measured from the highest point on the shoulder and down to where yoke is split into body and sleeves.

See DROPS lesson: How to read a schematic drawing

Diagrams are often repeated on the round or in height. 1 repeat is the diagram the way it appears in the pattern. If it says to work 5 repeats of A.1 in the round, then you work A.1 a total of 5 times after/next to each other in the round. If it says to work 2 repeats of A.1 vertically/in height you work the entire diagram once, then begin again at the start and work the entire diagram one more time.

Chain stitches are slightly narrower than other stitches and to avoid working the cast-on edge too tight, we simply chain more stitches to begin with. The stitch count will be adjusted on the following row to fit the pattern and measurement sketch.

The rib edge is more elastic and will contract slightly compared to, for example, stocking stitch. By increasing before the rib edge, you avoid a visible difference in width between the rib edge and the rest of the body.

It’s very easy to cast off too tightly, and by making yarn overs while casting off (and simultaneously casting these off) you avoid a too tight cast off edge.

See DROPS video: How to bind off with yarn overs (yo)

To achieve an even increase (or decrease) you can increase on, for example: every 3rd and 4th row alternately, like so: work 2 rows and increase on the 3rd row, work 3 rows and increase on the 4th. Repeat this until the increase is complete.

See DROPS lesson: Increase or decrease 1 st on every 3rd and 4th row alternately

Should you prefer to work in the round instead of back and forth, you may of course adjust the pattern. You’ll need to add steeks mid-front (usually 5 stitches), and follow the instructions. When you would normally turn and work from the wrong side, simply work across the steek and continue in the round. At the end you’ll cut the piece open, pick up stitches to work bands, and cover the cut edges.

See DROPS video: How to knit steeks and cut open

Should you prefer to work back and forth instead of in the round, you may of course adjust the pattern so you work the pieces separately and then assemble them at the end. Divide the stitches for the body in 2, add 1 edge stitch in each side (for sewing) and work the front and back pieces separately.

See DROPS lesson: Can I adapt a pattern for circular needles into straight needles?

Pattern repeats can vary slightly in the different sizes, in order to get the correct proportions. If you’re not working the exact same size as the garment in the photo, yours might deviate slightly. This has been carefully developed and adjusted so that the complete impression of the garment is the same in all sizes.

Make sure to follow instructions and diagrams for your size!

If you have found a pattern you like which is available in women’s size it’s not very difficult to convert it to men’s size. The biggest difference will be the length of sleeves and body. Start working on the women size that you think would fit across the chest. The additional length will be worked right before you cast off for the armhole/sleeve cap. If the pattern is worked top-down you can add the length right after the armhole or before the first decrease on sleeve.

Regarding additional yarn amount, this will depend on how much length you add, but it is better with a skein too many than too few.

All yarns will have excess fibres (from production) that might come off as lint or shedding. Brushed yarns (ie hairier yarns) have more of these loose, excess fibres, causing more shedding.

Shedding also depends on what is worn under or over the garment, and whether this pulls at the yarn fibres. It’s therefore not possible to guarantee that there will be no shedding

Below are some tips on how to get the best result when working with hairier yarns:

1. When the garment is finished (before you wash it) shake it vigorously so the looser hairs come off. NOTE: do NOT use a lint roller, brush or any method that pulls at the yarn.

2. Place the garment in a plastic bag and put it in your freezer - the temperature will cause the fibres to become less attached to each other, and excess fibres will come off easier.

3. Leave in the freezer for a few hours before taking it out and shaking it again.

4. Wash the garment according to the instructions on the yarn label.

Pilling is a natural process that happens to even the most exclusive of fibers. It's a natural sign of wear and tear that is hard to avoid, and that is most visible in high friction areas of your garment like a sweater's arms and cuffs.

You can make your garment look as new by removing the pilling, using a fabric comb or a pill/lint remover.

Still can't find the answer you need? Then scroll down and leave your question so one of our experts can try to help you. This will be done normally within 5 to 10 working days.
In the meantime, you can read the questions and answers that others have left to this pattern or join the DROPS Workshop on Facebook to get help from fellow knitters/crocheters!

You might also like...

Sjøbris

Heike Mitteregger, Germany

Sjøbris

Angelica Svanbro, Sweden

Sjöbris

Andrea Huisman, Netherlands

Post a comment to pattern DROPS 199-1

We would love to hear what you have to say about this pattern!

If you want to leave a question, please make sure you select the correct category in the form below, to speed up the answering process. Required fields are marked *.

Comments / Questions (122)

country flag Sonja wrote:

Liebes Drops Team, Danke für die Hilfe .. Das wird mein erster Pullover... jetzt heißt es erst mal rückwärts Stricken

07.03.2019 - 16:01

country flag Sonja wrote:

Aber das ich nach der 11 Raglanrunde drei Runden gestrickt habe, wie sonst auch ist schon richtig und dann die 8 zunahmen anfangen ?

07.03.2019 - 13:08

DROPS Design answered:

Liebe Sonja, nach der 11. Raglanzunahmenrunde stricken Sie noch 1 Runde, dann bei der nächsten Runde nehmen Sie 8 Maschen zu (wie beschrieben). Viel Spaß beim stricken!

07.03.2019 - 14:02

country flag Sonja wrote:

Sieht man nicht, weil es anders da steht

07.03.2019 - 13:00

country flag Sonja wrote:

11. runde LRL RLR URURLRLRLRLURU LRL RLR. Usw LRL RLR LRL RLRLRLRL RLR LRL RLR. Usw LRL RLR ULRLRLRLRLR LRU LRL RLR usw Runde mit 8 zunahmen Es tut mir leid, vielleicht sieht man hier mein Problem

07.03.2019 - 12:59

DROPS Design answered:

Liebe Sonja, die letzte Zunahmenrunde muss im Muster wie zuvor gestrickt sein, es wird einfach nur 1 Umschlag auf beiden Seiten von den 6 Raglanmaschen gestrickt sein, dann sind alle Zunahmen fertig und teilen Sie die Arbeit (im Muster wie zuvor weiterstricken). Viel Spaß beim stricken!

07.03.2019 - 14:16

country flag Sonja wrote:

Ich hab die 11 Raglanrunde gestrickt.. dann eine rechts eine Muster eine rechts (runde zu Ende) drei Maschen vor Markierung.. dann beginnt die Runde mit den 8 zunahmen ... 6 Maschen (r,l,r,l,r,l Umschlag r, l, r,l usw.) und dann stimmt diese Reihe bis zum nächsten Umschlag nicht mehr mit der Vorrunde... hab ich da nen Denkfehler?

07.03.2019 - 11:55

DROPS Design answered:

Liebe Sonja, nach der 11. Raglanrunde stricken Sie die Maschen im Muster wie zuvor (Umschläge werden rechts gestrickt). Dann bei der nächsten Runde nehmen Sie 8 Maschen zu: 1 M nach den 6 Maschen (Raglanlinie) nach beginn der Runde, dann bis nächsten Markierer stricken und 1 Umschlag vor den 6 Maschen (Raglanlinie), diese 6 M stricken, 1 Umschlag nach den 6 Maschen und so bis Ende der Runde wiederholen, um mit 1 Umschlag enden (= 8 M werden jetzt zugenommen, je beidseitig den 6 Maschen für die Raglanlinie). Viel Spaß beim stricken!

07.03.2019 - 12:25

country flag Sonja wrote:

Hallo, ich bin grad mit den 11 Raglanzunahmen fertig und muss jetzt noch 8 zunahmen für Größe S machen... so wie das in der Anleitung steht, funktioniert das mit dem Muster aber nicht mehr... bei mir verschiebt sich das dann um eins bei vorder und Rückseite.. nur zwischen den Ärmeln würde es dann stimmen ... was mach ich verkehrt?

07.03.2019 - 07:44

DROPS Design answered:

Liebe Sonja, die nächste Runde nach den 11 Raglanzunahmen beginnt vor den 6 Maschen im Muster (Anfang der Runde), und es wird 1 Masche beidseitig diese 6 Maschen (Raglanlinie) zugenommen = 8 Zunahme = 272 M. Viel Spaß beim stricken!

07.03.2019 - 09:52

country flag Pia Bendixen wrote:

Jeg strikker str. L. Jen kan ikke på 1. udtagning få det til at passe - de 6 m mellem udtagningerne - her kommer mærketråde ikke til at sidde midt i disse.

04.03.2019 - 04:29

DROPS Design answered:

Hej Pia, jo omgangen starter 3 masker før første mærketråd. Det vil sige at du har 6 masker med 1 mærketråd imellem. Udtagningerne skal laves på hver side af de 6 masker ifølge opskriften. God fornøjelse!

12.03.2019 - 14:37

country flag José wrote:

Ik kom nog steeds niet verder met mijn patroon !! Ik zit nog steeds met de raglan hoeveel gaatjes van de raglan zijn er ? Als ik het doe volgens patroon krijg ik gaatjes van de raglan midden over de mouw ?? Wie kan mij helpen???

26.02.2019 - 15:01

DROPS Design answered:

Dag José,

Je meerdert 4 steken in elke overgang tussen de mouw en het pand, dus 16 steken in totaal op de naald. Er komen aan elke kant van de raglanlijnen 2 gaatjes , dus ook 16 gaatjes in totaal. Als je net begint met het meerderen zitten de raglanlijnen bij de mouw nog dicht bij elkaar, maar als je verder breit zul je zien dat door het meerderen meer steken op de mouw komen en geen gaatjes.

28.02.2019 - 10:46

country flag Elke wrote:

Vielen Dank für die schnelle Antwort. Wo soll der Markierer angebracht werden? Meine erste Masche ist der Faden von der Maschenaufnahme. Also die erste Masche im Rippenmuster.

22.02.2019 - 12:29

DROPS Design answered:

Liebe Elke, der Markierer soll in der MItte von dem 6 Maschen im Muster sein (= 3 M vor dem Markierer + 3 M nach dem Markierer sollen im Muster gestrickt werden). Viel Spaß beim stricken!

22.02.2019 - 15:00

country flag Elke Stöckl wrote:

Ich bekomme nicht die Markierungsfäden mit 96 Maschen in Größe L eingeteielt. Nach 28 M Vorderteil habe ich nur noch 2 M vor den Markierungsfaden. Was ist mein Fehler?

21.02.2019 - 17:11

DROPS Design answered:

Liebe Frau Stöcki, zwischen den 6 Maschen Muster (Raglan) stricken Sie 30 M insgesamt für das Vorderteil (+ 4 Umschläge): 1 Umschlag, 1 Masche rechts, 1 Umschlag, 28 Maschen Muster (= Vorderteil), 1 Umschlag, 1 Masche rechts, 1 Umschlag, Beachten Sie daß der Anfang der Runde richtig ist. Viel Spaß beim stricken!

22.02.2019 - 08:56