
Popular categories
Looking for a yarn?


|
|||||||
Sjøbris |
|||||||
 |
 |
||||||
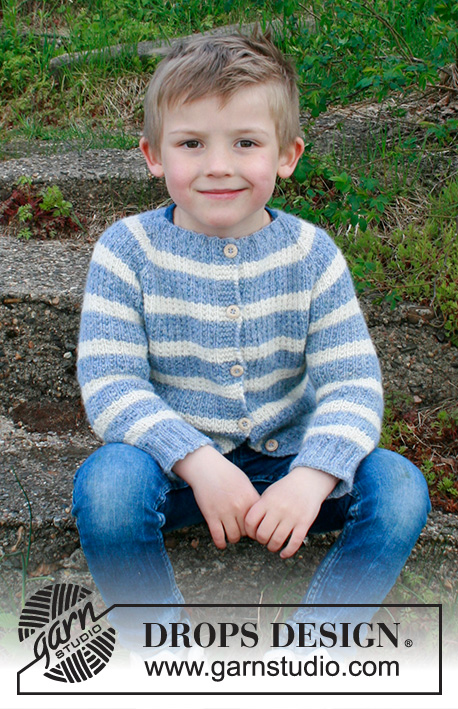
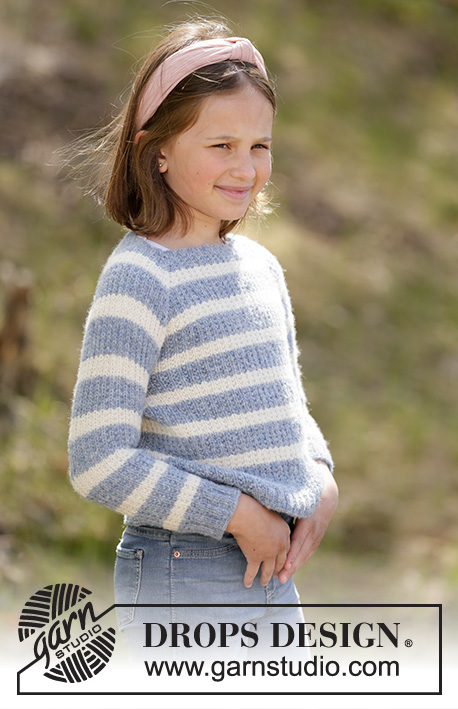
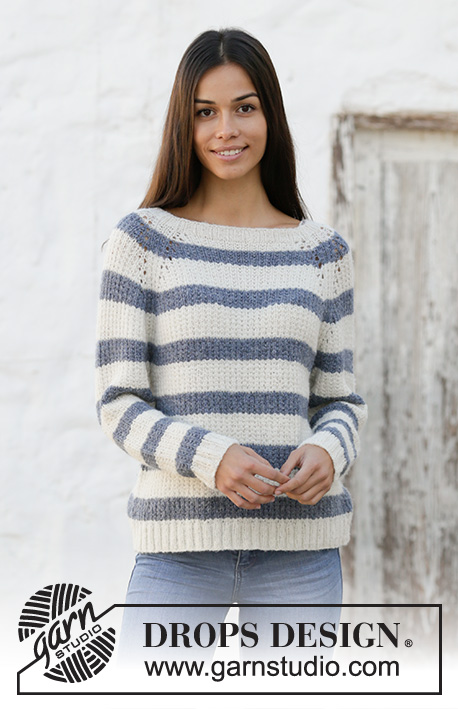
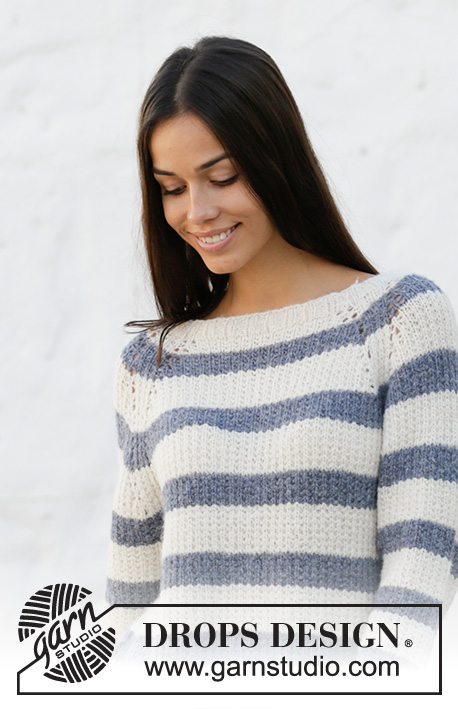
Knitted sweater with raglan and stripes in DROPS Sky. The piece is worked top down. Sizes S - XXXL.
DROPS 199-1 |
|||||||
|
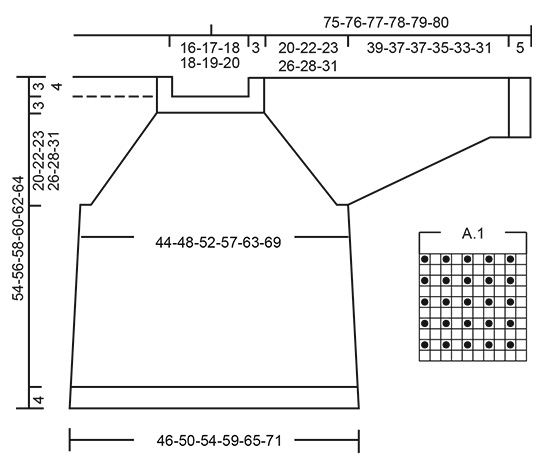
------------------------------------------------------- EXPLANATIONS FOR THE PATTERN: ------------------------------------------------------- DECREASE/INCREASE TIP (evenly spaced): To work out how to decrease/increase evenly, count the total number of stitches to be decreased/increased over (e.g. 96 stitches), and divide by the number of decreases/increases to be made (e.g. 8) = 12. In this example, decrease by knitting each 11th and 12th stitch together. When increasing make 1 yarn over after each 12th stitch. On the next round, knit the yarn overs twisted to avoid holes. RAGLAN: Increase 4 stitches in each transition between body and sleeves as follows: Work until there are 4 stitches left before the marker thread, 1 yarn over, knit 1, 1 yarn over, knit 6 (the marker thread sits in the middle of these 6 stitches), 1 yarn over, knit 1, 1 yarn over. On the next round knit the yarn overs to leave holes. Then work the new stitches in stripes and pattern. INCREASE TIP (for sides of body): Work until there are 2 stitches left before the marker thread, 1 yarn over, knit 4 (marker thread sits in the middle of these 4 stitches), 1 yarn over. On the next round knit the yarn overs twisted to avoid holes. Then work the new stitches in stripes and pattern. DECREASE TIP (for sleeves): Decrease 1 stitch on each side of the marker thread as follows: Work until there are 3 stitches left before the marker thread, knit 2 together, knit 2 (marker thread sits between these 2 stitches), slip 1 stitch as if to knit, knit 1 and pass the slipped stitch over the knitted stitch. STRIPES AND PATTERN: * Work 5 cm = 2" in white (including neck) and then 3 cm = 1⅛" jeans blue * – repeat these stripes at the same time as the whole piece is worked in pattern – see diagram A.1; when increasing to raglan work the new stitches into the pattern as you go. ------------------------------------------------------- START THE PIECE HERE: ------------------------------------------------------- SWEATER - SHORT OVERVIEW OF THE PIECE: The piece is worked in the round with circular needle, top down. After the yoke the body is continued in the round with circular needle. The sleeves are worked in the round with short circular needle/double pointed needles. NECK: Cast on 96-100-104-112-120-124 stitches with circular needle size 3.5 mm = US 4 and white. Knit 1 round. Then work rib (= knit 2 / purl 2) for 3 cm = 1⅛". Knit 1 round where you decrease 8-8-8-12-12-12 stitches evenly spaced – read DECREASE/INCREASE TIP = 88-92-96-100-108-112 stitches. Change to circular needle size 4.5 mm = US 7. Now continue with STRIPES AND PATTERN - see description above. YOKE: Insert 1 marker - THE PIECE IS NOW MEASURED FROM HERE! Insert 4 marker threads in the piece at the same time as you work stripes and pattern in the round as follows: Knit 3 stitches (= 3 stitches on back piece), insert 1 marker thread, work the next 12-12-14-14-16-16 stitches (= sleeve), insert 1 marker thread, work the next 32-34-34-36-38-40 stitches (= front piece), insert 1 marker thread, work 12-12-14-14-16-16 stitches (= sleeve), insert 1 marker thread, work the last 29-31-31-33-35-37 stitches (= back piece) after the last marker thread (there are 3 stitches left to the first marker thread). The next round is worked as follows: 6 stitches in pattern (marker thread sits in the middle of these 6 stitches), make 1 yarn over, knit 1, make 1 yarn over, 4-4-6-6-8-8 stitches in pattern (= sleeve), 1 yarn over, knit 1, make 1 yarn over, 6 stitches in pattern (marker thread sits in the middle of these 6 stitches), 1 yarn over, knit 1, make 1 yarn over, 24-26-26-28-30-32 stitches in pattern (= front piece), 1 yarn over, knit 1, make 1 yarn over, 6 stitches in pattern (marker thread sits in the middle of these 6 stitches), 1 yarn over, knit 1, make 1 yarn over, 4-4-6-6-8-8 stitches in pattern (= sleeve), 1 yarn over, knit 1, make 1 yarn over, 6 stitches pattern (marker thread sits in the middle of these 6 stitches), 1 yarn over, knit 1, make 1 yarn over, work 24-26-26-28-30-32 stitches in pattern (= back piece), 1 yarn over, knit 1, make 1 yarn over. The first increase to RAGLAN – read description above, is now finished (= 16 stitches increased on the round). Continue to increase to raglan every 4th round a total of 11-13-14-16-17-19 times (including the first increase described above) = 264-300-320-356-380-416 stitches on needle Size XL and XXL: The increase for raglan is complete. Size S, M, L and XXXL: The next round is worked as follows: 6 stitches in pattern (marker thread sits in the middle of these 6 stitches), make 1 yarn over, work pattern until 3 sts remain before the next marker thread (= sleeve), 1 yarn over, 6 stitches in pattern (marker thread sits in the middle of these 6 stitches), 1 yarn over, work pattern until 3 sts remain before the next marker thread (= front piece), 1 yarn over, 6 stitches in pattern (marker thread sits in the middle of these 6 stitches), 1 yarn over, work pattern until 3 sts remain before the next marker thread (= sleeve), 1 yarn over, 6 stitches in pattern (marker thread sits in the middle of these 6 stitches), 1 yarn over, work pattern until 3 sts remain before the next marker thread (= back piece), 1 yarn over = 8 stitches increased. All sizes: After the last increase to raglan there are 272-308-328-356-380-424 stitches on the needle. Continue with stripes and pattern without increasing until the piece measures 20-22-23-26-28-31 cm = 8"-8¾"-9"-10¼"-11"-12¼" from the marker at the beginning of the yoke. The next round is worked as follows: Work 4-3-4-5-7-7 stitches (= on back piece), place the next 56-66-70-74-76-86 stitches on 1 thread for sleeve, cast on 8-8-10-10-12-12 new stitches on needle (= in side under sleeve), work the next 80-88-94-104-114-126 stitches (= front piece), place the next 56-66-70-74-76-86 stitches on 1 thread for sleeve, cast on 8-8-10-10-12-12 new stitches on needle (= in side under sleeve) and work the last 76-85-90-99-107-119 stitches (= back piece). Body and sleeves are finished separately. THE PIECE IS NOW MEASURED FROM HERE! BODY: = 176-192-208-228-252-276 stitches. Insert 1 marker thread in the middle of the 8-8-10-10-12-12 new stitches cast on under each sleeve. Start the round by one of these marker threads and allow the marker threads to follow your work onwards; continue with stripes and pattern. When the piece measures 8 cm = 3⅛" from the division, increase 1 stitch on each side of both marker threads – read INCREASE TIP (= 4 stitches increased). Repeat this increase when the piece measures 17 cm = 6¾" from the division = 184-200-216-236-260-284 stitches. When the piece measures 27-27-28-26-26-25 cm = 10⅝"-10⅝"-11"-10¼"-10¼"-9¾" from the division (approx. 50-52-54-56-58-60 cm = 19¾"-20½"-21¼"-22"-22¾"-23⅝" from shoulder) knit 1 round where you increase 36-40-44-48-52-56 stitches evenly spaced = 220-240-260-284-312-340 stitches. Change to circular needle size 3.5 mm = US 4 and work rib (= knit 2 / purl 2) for 4 cm = 1½". Loosely bind off with knit over knit and purl over purl - to avoid the bind-off edge being tight you can bind off with needle size 4.5 mm = US 7. The sweater measures approx. 54-56-58-60-62-64 cm = 21¼"-22"-22¾"-23⅝"-24⅜"-25¼" from the shoulder. SLEEVE: Place the 56-66-70-74-76-86 stitches from the thread on the one side of the piece on short circular needle/double pointed needles size 4.5.mm = US 7 and knit up 1 stitch in each of the 8-8-10-10-12-12 stitches cast on under the sleeve = 64-74-80-84-88-98 stitches. Insert 1 marker thread in the middle of the 8-8-10-10-12-12 stitches. Work stripes and pattern in the round. When the piece measures 2 cm = ¾" from the division decrease 2 stitches mid under sleeve – read DECREASE TIP. Decrease like this every 7th-5th-4th-4th-3rd-3rd round a total of 13-17-19-20-21-25 times = 38-40-42-44-46-48 stitches. Continue working until the sleeve measures 39-37-37-35-33-31 cm = 15¼"-14½"-14½"-13¾"-13"-12¼" from the division (shorter measurements in larger sizes due to longer yoke). Knit 1 round where you increase 6-4-6-8-6-8 stitches evenly spaced = 44-44-48-52-52-56 stitches. Change to double pointed needles size 3.5 mm = US 4 and work rib (= knit 2 / purl 2) for 5 cm = 2". The sleeve measures approx. 44-42-42-40-38-36 cm = 17¼"-16½"-16½"-15¾"-15"-14¼" from the division. Loosely bind off with knit over knit and purl over purl - to avoid the bind-off edge being tight you can bind off with needle size 4.5 mm = US 7. Work the other sleeve in the same way. |
|||||||
Diagram explanations |
|||||||
|
|||||||
|
|||||||
|
Have you made this or any other of our designs? Tag your pictures in social media with #dropsdesign so we can see them! Do you need help with this pattern?You'll find tutorial videos, a Comments/Questions area and more by visiting the pattern on garnstudio.com. © 1982-2024 DROPS Design A/S. We reserve all rights. This document, including all its sub-sections, has copyrights. Read more about what you can do with our patterns at the bottom of each pattern on our site. |
|||||||


With over 40 years in knitting and crochet design, DROPS Design offers one of the most extensive collections of free patterns on the internet - translated to 17 languages. As of today we count 304 catalogs and 11422 patterns - 11417 of which are translated into English (US/in).
We work hard to bring you the best knitting and crochet have to offer, inspiration and advice as well as great quality yarns at incredible prices! Would you like to use our patterns for other than personal use? You can read what you are allowed to do in the Copyright text at the bottom of all our patterns. Happy crafting!
Comments / Questions (122)
Jak przerabiac narzuty przy reglanie. W pierwszym okrazeniu po narzucie - o.prawe. Ale w nastepnym lewe ? Czasem wychodza mi dwa oczka lewe kolo siebie 😒
15.08.2019 - 13:14DROPS Design answered:
Witaj Agato! W następnym okrążeniu przerabiasz ściegiem fantazyjnym. Nie powinno być 2 o.l. obok siebie. Jak odczytywać schematy w robótce na drutach znajdziesz TUTAJ. Powodzenia!
16.08.2019 - 09:03Får ikke mønsteret til å stemme når man begynner å legge ut nedover fra halskant 😩 forstår ikke hvordan man skal få dette til å stemme m mønster. Gir snart opp. Rekt opp flere ganger😩 mulig jeg som er dum her, selv om jeg har strikket en del gjennom årene. Riktignok ikke fra toppen av genser. Noen som kan gi meg en forllaring jeg forstår????😔
04.08.2019 - 11:31DROPS Design answered:
Hei Aina. Håper du ikke gir opp, dette er en veldig flott genser. Litt usikker på hva som du har problemer med, men det er veldig viktig å lese det som står under: FORKLARING TIL OPPSKRIFTEN, før man begynner å strikke. Er det raglan og/eller øketips du har problemer med? Ta gjerne en titt på hjelpevidoene som er lagt til oppskriften, kanskje de kan være til hjelp. Les også igjennom andre spørsmål/kommentarer. Eller skriv et mer konkret spørsmål på hva du ikke får til, skriv gjerne hvilken str du strikker. mvh Drops design
09.09.2019 - 14:13Die raglan Zunahmen sollen in jeder 4. Runde gearbeitet werden. Ist meine Zahlung so richtig: Zunahme in glatt rechter runde Runde mit Muster Glatt rechts Runde Zunahme in Runde mit Muster. Oder soll die Zunahme erst in der nächsten glatt rechten runde gestrickt werden? Danke!
28.07.2019 - 14:38DROPS Design answered:
Liebe Barbara, wenn Sie die erste Zunahme in einer Rechtsrunde machen, ist auch die nächste Zunahme in einer Rechtsrunde, also wie folgt (es sind immer 3 Runden ohne Zunahme zwischen den Zunahmerunden): 1 Runde rechts mit Zunahme, 1 Runde rechts-links, 1 Runde rechts, 1 Runde rechts-links, 1 Runde rechts mit Zunahme. Gutes Gelingen weiterhin!
29.07.2019 - 09:08Hei. Nydelig genser, som jeg gleder meg til å få ferdig. Ser at det er en rettelse, men siden den er kommet med i mønsteret, er det kanskje lurt å skrive det på rettelsen. Nå vet ikke jeg hva som var feil i det opprinnelige mønsteret så jeg ble litt forvirret og tok ikke med kastet på første omgang. Tolket det som at det kun skulle være en rett og kun ett kast, der rettelsen var😅Dvs det ble bare 14 og ikke 16 masker økning.
03.07.2019 - 12:56Ik brei maat M. Als ik klaar ben met meerderen voor de raglan heb ik 300 steken en moet ik nog 8 steken in totaal meerderen. Maar als ik dan in patroon verder wil breien, klopt de het patroon R/AV/R/AV niet meer, want ik heb vanaf het begin dan: R/AV/R, markeerdraad, AV/R/AV, omslag, R/AV/R/AV etc. Hoe moet ik die omslag dan breien op de volgende naald? R of AV?
11.06.2019 - 20:56DROPS Design answered:
Dag Andrea,
Als je nog een stukje moet breien voor de splitsing, dan kun je deze 8 steken extra recht breien, zodat het patroon niet verbreekt. Op het lijf wordt er opnieuw gemeerderd in de zijnaden en de gemeerderde steken brei je gaandeweg mee in patroon.
13.06.2019 - 08:56J'ai reussi le premier rang d'augmentations tel que vous l'avez explique, mais au rang 5 pour la 2e serie d'augmentation je debute avec 108 mailles tel que requis mais je termine avec 132 au lieu de 124. Je fais 1maille endroit, 1 jete, 2 m. end. devant le fil marqueur, 1 jete, 2 m. end. apres le fil marqueur, 1 jete, puis 2 m. end. et 1 jete, 1 m. end., 1 jete qui se trouve au-dessus de celui du premier rang, et ainsi de suite. Quelle est la partie que je n'ai pas comprise. Merci
21.05.2019 - 23:59DROPS Design answered:
Bonjour Louise, on va augmenter 4 mailles pour le raglan à chaque transition dos/devant et manches ainsi (cf RAGLAN): 1 jeté, 1 m end, 1 jeté, 6 m end = 6 m point fantaisie (le marqueur est au milieu de ces 6 m), 1 jeté, 1 m end, 1 jeté. Au début du tour, commencez par les 6 m point fantaisie, puis 1 jeté, 1m end, 1 jeté, les mailles de la manche jusqu'à ce qu'il reste 1 m avant les 6 m point fantaisie, augmentez 4 m pour le raglan, tricotez le devant, augmentez 4 m pour le raglan, tricotez la manche, augmentez 4 m pour le raglan, tricotez le dos et terminez par 1 jeté, 1 m end, 1 jeté (= avant les 6 m point fantaisie du début du tour). Bon tricot!
22.05.2019 - 09:21Je fais le modele en taille M, alors comment arrivez-vous a obtenir 16 augmentations au 2e tour d'augmentation si vous les faites avant et apres les fils marqueurs qui sont au nombre de 4. Moi, j'arrive a 8 (4 x 2 augm)??? Tres difficile a comprendre
19.05.2019 - 21:51DROPS Design answered:
Bonjour Louise, vous avez 16 jetés: 6 m point fantaisie (marqueur au milieu), 1 jeté, 1 m end, 1 jeté, 4 m point fantaisie, (= manche), 1 jeté, 1 m end, 1 jeté, 6 m point fantaisie (marqueur au milieu), 1 jeté, 1 m end, 1 jeté, 26 m point fantaisie (= devant), 1 jeté, 1 m end, 1 jeté, 6 m point fantaisie (marqueur au milieu), 1 jeté, 1 m end, 1 jeté, 4 m point fantaisie (= manche), 1 jeté, 1 m end, 1 jeté, 6 m point fantaisie (marqueur au milieu), 1 jeté, 1 m end, 1 jeté, 26 m point fantaisie (= dos), 1 jeté, 1 m end, 1 jeté. Bon tricot!
20.05.2019 - 12:47Jeg må spørge igen. Hvordan får man mønsteret til at passe, når man laver udtagninger til ryg/forstykke efter 8 cm? Skal de nye masker strikkes ret, så det i stedet for ret/vrang/ret/vrang bliver ret/ret/vrang osv?
02.05.2019 - 18:55DROPS Design answered:
Hei Lene. De økte maskene strikkes fortløpende inn i mønsteret, så det vil bli en liten forskyvning på mønsteret akkurat over de 4 maskene i siden av bolen. God fornøyelse
03.05.2019 - 08:01Hei! Hva blir forskjellen med rettelsen som er gjort? Har begynt å strikke denne, men har gjort som det står i opprinnelig oppskrift og det ser greit ut. Med vennlig hilsen Eva Hansen
01.05.2019 - 12:57DROPS Design answered:
hei Eva. Du skal øke 4 masker ved hver raglanlinje (= 16 masker totalt på hver økeomgang). Tidligere sto det under RAGLAN at man øker 2 masker ved hver raglanlinje (= 8 masker økt). Du må altså øke dobbelt så mange masker for at oppskriften skal gå opp. God fornøyelse
02.05.2019 - 14:50Hej. Jeg synes, jeg har samme problem som flere nævner omkring ret/vrang mønsteret efter 1. udtagning. Skal raglanlinjen strikkes ret hver runde, uanset hvor i mønsteret man er?
16.04.2019 - 13:13DROPS Design answered:
Hei Lene. Maskene i raglanlinjen strikkes i mønster. God fornøyelse
23.04.2019 - 11:54