DROPS Sky
DROPS Sky
74% Alpaca, 18% Polyamide, 8% Wool
from 7.20 $ /50g
Get the yarn to make this pattern from 43.20$.

The yarn cost is calculated from the pattern’s smallest size and the yarn’s cheapest product type. Looking for an even better price? You might find it on the DROPS Deals!

DROPS SS24

Daily Wonder

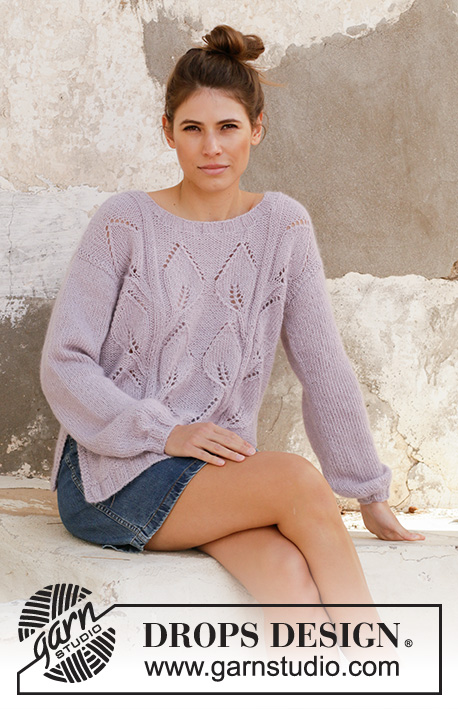
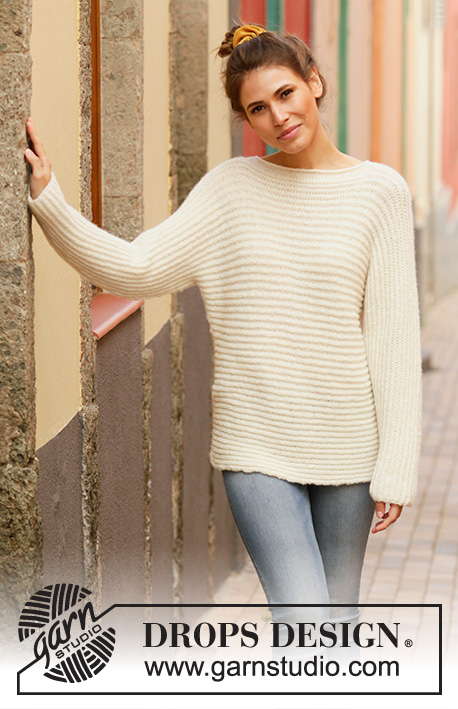
Sweater knitted sideways in DROPS Sky. The piece is worked in English rib. Sizes S - XXXL.

DROPS 201-7
DROPS Design: Pattern no sk-034
Yarn group B
-------------------------------------------------------

SIZES:
S - M - L - XL - XXL – XXXL

Finished measurements:
Chest measurements: 90-98-106-116-128-140 cm = 35½"-38½"-41¾"-45¾"-50⅜"-55"
Full length: 58-60-62-64-66-68 cm = 22¾"-23⅝"-24⅜"-25¼"-26"-26¾"

All measurements in charts are in cm.

MATERIALS:
DROPS SKY from Garnstudio (belongs to yarn group B)
250-350-350-400-450-500 g color 01, off white

KNITTING GAUGE:
15 stitches in width and 42 rows in height with English rib = 10 x 10 cm = 4" x 4".

NEEDLES:
DROPS CIRCULAR NEEDLE SIZE 4.5 MM = US 7: length 40 cm = 16" and 80 cm = 32".
Needle size is only a guide. If you get too many stitches on 10 cm = 4", change to a larger needle size. If you get too few stitches on 10 cm = 4", change to a smaller needle size.

-------------------------------------------------------

Alternative Yarn – See how to change yarns here
Yarn Groups A to F – Use the same pattern and change the yarn here
Yarn usage using an alternative yarn – Use our yarn converter here

-------------------------------------------------------

DROPS Sky
DROPS Sky
74% Alpaca, 18% Polyamide, 8% Wool
from 7.20 $ /50g
Get the yarn to make this pattern from 43.20$.

The yarn cost is calculated from the pattern’s smallest size and the yarn’s cheapest product type. Looking for an even better price? You might find it on the DROPS Deals!

Pattern instructions

NOTE: This pattern is written in American English. All measurements in charts are in cm. For conversion from inches to cm - click here. There are different terms for crocheting in American and British English. If this pattern includes crochet, click for "crochet terms" here. For this pattern in British English, please click here.
-------------------------------------------------------

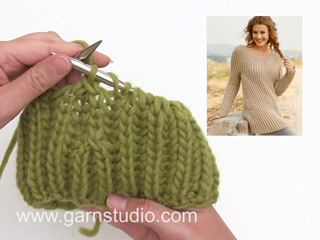
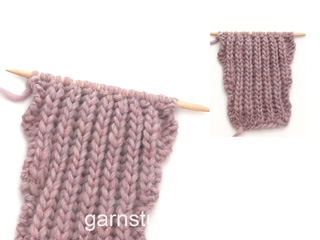
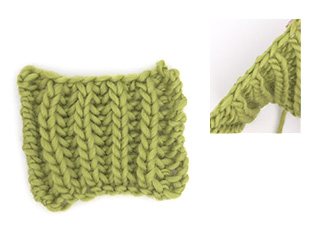
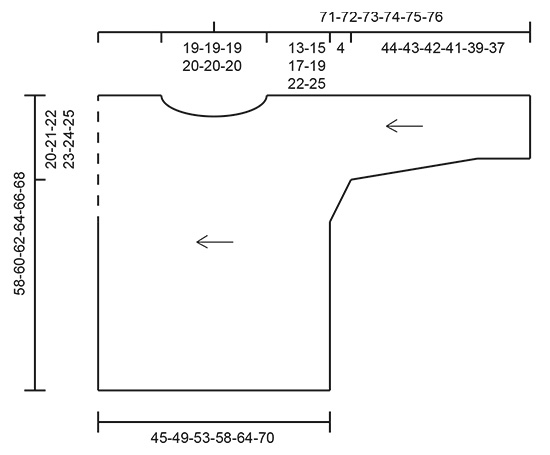
EXPLANATIONS FOR THE PATTERN:

-------------------------------------------------------

KNITTING TIP:
Make sure the garment lies flat when measuring. As this garment is worked sideways it is even more important than usual that the measurements are exact and taken on the suggested part of the garment. See sketch and Figure A.1. Figure A.1 has marks where the body should be and where the marker thread for the neck should be. All measurements for body and neck are taken in middle of garment and not by the neck, to avoid the neck/width of body being wrong.

ENGLISH RIB:

ROW 1 (= right side): 1 stitch in garter stitch, * knit 1, 1 yarn over, slip 1 stitch as if to purl *, work from *-* until there are 2 stitches left on the row and finish with knit 1 and 1 stitch in garter stitch.

ROW 2 (= wrong side): 1 stitch in garter stitch, * 1 yarn over, slip 1 stitch as if to purl, knit together next stitch and yarn over *, work from *-* until there are 2 stitches left on row and finish with 1 yarn over, slip 1 stitch as if to purl and 1 stitch in garter stitch.

ROW 3 (= right side): 1 stitch in garter stitch, * knit together next stitch and yarn over, 1 yarn over, slip 1 stitch as if to purl *, work from *-* until there are 2 stitches left on row, knit together next stitch and yarn over and 1 stitch in garter stitch.

Repeat ROWS 2-3 - NOTE: From ROW 2 the stitches with yarn overs are always knitted. The yarn over lies over the stitch and is knitted together with the stitch.


-------------------------------------------------------

START THE PIECE HERE:

-------------------------------------------------------

SWEATER - SHORT OVERVIEW OF THE PIECE:
The piece is worked back and forth with circular needle in one piece from the sleeve to the neck. It is then divided and front and back pieces are worked separately until the neck is finished. The piece is joined again and continued in one piece. It is very important to get the correct measurements as you work, read KNITTING TIP in description above.

SWEATER:
Cast on 39-41-43-43-45-45 stitches with circular needle size 4.5 mm = US 7 and Sky (= bottom of sleeve). Work ENGLISH RIB - see description above. When the piece measures 12 cm = 4¾" increase 1 stitch in each side inside the 1 stitch every 3-2½-2½-2-2-1½ cm = 1⅛"-1"-1"-¾"-¾"-½" a total of 10-11-11-13-13-15 times = 59-63-65-69-71-75 stitches - the increased stitches are worked into the English rib as you go. REMEMBER THE KNITTING GAUGE!
When the piece measures 44-43-42-41-39-37 cm = 17¼"-17"-16½"-16⅛"-15¼"-14½", loosely cast on stitches on both sides at the end of each row as follows: 2 stitches 2 times, 4 stitches 6 times and then 30-30-32-32-36-36 stitches 1 time. You have now cast on stitches for the body; insert a marker in the middle of the last stitches cast on - this is the side of the body and you now measure from here - read KNITTING TIP in description above and see Figure A.1 point A!
There are 175-179-185-189-199-203 stitches on the needle. Continue with English rib. When the piece measures 13-15-17-19-22-25 cm = 5⅛"-6"-6¾"-7½"-8¾"-9¾" from the marker in the side (from point A to point B in Figure A.1), work the next row as follows (make sure this row is worked from the wrong side): Work 87-89-92-94-99-101 stitches (= back piece) and then place these stitches on a thread, bind off 5 stitches for neck, work 83-85-88-90-95-97 stitches (= front piece). Insert a marker thread in the middle of the piece here; the neck is measured from here (position the marker thread so that it is directly over the marker in the side, see Figure A.1, there is 13-15-17-19-22-25 cm = 5⅛"-6"-6¾"-7½"-8¾"-9¾" between the marker (point A) and the marker thread (point B)). Now continue by working the front piece at the same time as you decrease for neck.

FRONT PIECE:
There are 83-85-88-90-95-97 stitches on the needle. Decrease to neck on every row from the neck as follows: 1 stitch 8 times = 75-77-80-82-87-89 stitches. Work until the piece measures 15-15-15-16-16-16 cm = 6"- 6"- 6"-6¼"-6¼"-6¼"- from the marker thread (point B) and 28-30-32-35-38-41 cm = 11"-11¾"-12½"-13¾"-15"-16⅛" from the marker in the side of body (point A). Loosely cast on for neck, at the end of each row towards the neck as follows: 1 stitch 8 times and 5 stitches 1 time = 88-90-93-95-100-102 stitches. The neck measures approx. 19-19-19-20-20-20 cm = 7½"-7½"-7½"-8"-8"-8" from the marker thread (from point B to point C). Then place all stitches on a thread and continue with the back piece. Cut the strand.

BACK PIECE:
Place the 87-89-92-94-99-101 stitches from the thread on the circular needle. Continue with the back piece until the neck measures 19-19-19-20-20-20 cm = 7½"-7½"-7½"-8"-8"-8" (see Figure A.1 point C) - adjust so that you have worked the same length as on the front piece. Both pieces can now be placed on the same needle and you continue working in one piece.

FRONT AND BACK PIECE:
Place the 88-90-93-95-100-102 stitches from the thread on the same circular needle as the back piece = 175-179-185-189-199-203 stitches. Continue working until the front/back pieces measures 45-49-53-58-64-70 cm = 17¾"-19¼"-21"-22¾"-25¼"-27½" from the marker in the side of the body (from point A to point D).
Now loosely bind off on each side, at the beginning of each row as follows: 30-30-32-32-36-36 stitches 1 time, 4 stitches 6 times and 2 stitches 2 times = 59-63-65-69-71-75 stitches. Insert 1 new marker here and now measure from here. Work the same length over the stitches as on the other sleeve after the last increase, then decrease 1 stitch on each side inside the 1 stitch every 3-2½-2½-2-2-1½ cm = 1⅛"-1"-1"-¾"-¾"-½" a total of 10-11-11-13-13-15 times = 39-41-43-43-45-45 stitches. Work until the piece measures 44-43-42-41-39-37 cm = 17¼"-17"-16½"-16⅛"-15¼"-14½" from the marker and loosely bind off. NOTE! When binding off, work the yarn overs together with their stitches below AT THE SAME TIME as you bind off.

ASSEMBLY:
Fold the piece, wrong side to wrong side. Start sewing outermost on sleeve. Sew in the outermost loop of the outermost stitch along the whole sleeve and then down the side of front/back piece. Repeat on other side.

NECK:
Knit up stitches around the whole neck inside the 1 edge stitch (make sure you knit up in purled stitches mid front and along the neck on the back piece). Knit up approx. 90-106 stitches from the right side with short circular needle size 4.5 mm = US 7 and Sky. Work 8 rounds of stockinette stitch and then loosely bind off. The edge should roll.

This pattern has been corrected.

Updated online: 21.09.2020
New yarn amount in size S.
DROPS SKY from Garnstudio
300-350-350-400-450-500 g colour 01, off white

Diagram

All measurements in charts are in cm.

symbols = knitting direction
symbols = marker inserted here; body measured from here
symbols = marker thread inserted here; neck width measured from here
diagram
diagram
Do you have a question? See a list of frequently asked questions (FAQ)

Knitting tension is what determines the final measurements of your work, and is usually measured per 10 x 10 cm. It is provided like so: number of stitches in width x number of rows in height - eg: 19 stitches x 26 rows = 10 x 10 cm.

The knitting tension is very individual; some people knit/crochet loosely while others work tightly. You adjust the knitting tension with the needle size, which is why the suggested needle size only serve as a guide! You need to adjust this (up or down) to ensure that YOUR knitting tension matches the knitting tension provided in the pattern. If you work with a different knitting tension than provided you will have a different yarn consumption, and your work will have different measurements than what the pattern suggests.

The knitting tension also determines which yarns can replace each other. As long as you achieve the same knitting tension you can replace one yarn with another.

See DROPS lesson: How to measure your tension/gauge

See DROPS video: How to make a gauge tension swatch

The required amount of yarn is provided in grams, eg: 450 g. To calculate how many balls you’ll need you first need to know how many grams are in 1 ball (25g, 50g or 100g). This information is available if you click on the individual yarn quality on our pages. Divide the amount required with the amount of each ball. For example, if each ball is 50g (the most common amount), the calculation will be as follows: 450 / 50 = 9 balls.

The important thing when changing from one yarn to another is that the knitting/crochet tension remains the same. This is so that the measurements of the finished piece will be the same as on the sketch provided. It is easier to achieve the same knitting tension using yarns from the same yarn group. It is also possible to work with multiple strands of a thinner yarn to achieve the knitting tension of a thicker one. Please try our yarn converter. We recommend you to always work a test swatch.

Please NOTE: when changing yarn the garment might have a different look and feel to the garment in the photo, due to individual properties and qualities of each yarn.

See DROPS lesson: Can I use a different yarn than the one mentioned in the pattern?

All our yarns are categorised into yarn groups (from A to F) according to thickness and knitting tension – group A contains the thinnest yarns and group F the thickest. This makes it easier for you to find alternative yarns to our patterns, should you wish to switch yarn. All yarns within the same group have a similar knitting tension and can easily replace each other. However, different yarn qualities have different structures and properties which will give the finished work a unique look and feel.

Click here for an overview of the yarns in each yarn group

At the top of all our patterns you’ll find a link to our yarn converter, which is a helpful tool should you wish to use a different yarn than suggested. By filling in the yarn quality you wish to replace, the amount (in your size) and number of strands, the converter will present good alternative yarns with the same knitting tension. Additionally it will tell you how much you’ll require in the new qualities and whether you’ll need to work with multiple strands. Most skeins are 50g (some are 25g or 100g).

If the pattern is worked with multiple colours, every colour will have to be converted separately. Similarly, if the pattern is worked with several strands of different yarns (for example 1 strand Alpaca and 1 strand Kid-Silk) you will have to find alternatives for each, individually.

Click here to see our yarn converter

Since different yarns have different qualities and textures we have chosen to keep the original yarn in our patterns. However, you can easily find options among our available qualities by using our yarn converter, or simply pick a yarn from the same yarn group.

It is possible that some retailers still have discontinued yarns in stock, or that someone has a few skeins at home that they would like to find patterns for.

The yarn converter will provide both alternative yarn as well as required amount in the new quality.

If you think it's hard to decide what size to make, it can be a good idea to measure a garment you own already and like the size of. Then you can pick the size by comparing those measures with the ones available in the pattern's size chart.

You'll find the size chart at the bottom of the pattern.

See DROPS lesson: How to read size chart

The needle size provided in the pattern serves only as a guide, the important thing is to follow the knitting tension. And since knitting tension is very individual, you will have to adjust the needle size to ensure that YOUR tension is the same as in the pattern – maybe you’ll have to adjust 1, or even 2 needle sizes, up or down to achieve the correct tension. For this, we recommend that you work test swatches.

Should you work with a different knitting tension than the one provided, the measurements of the finished garment might deviate from the measurement sketch.

See DROPS lesson: How to measure your tension/gauge

See DROPS video: How to make a gauge tension swatch

Working a garment top-down provides more flexibility and room for personal adjustment. For example it is easier to try the garment on while working, as well as making adjustments to length of yoke and shoulder caps.

The instructions are carefully explaining every step, in the correct order. Diagrams are adjusted to the knitting direction and are worked as usual.

The diagram depicts all rows/rounds, and every stitch seen from the right side. It is read from bottom to top, from right to left. 1 square = 1 stitch.

When working back and forth, every other row is worked from the right side and every other row is worked from the wrong side. When working from the wrong side, the diagram will have to be worked reversed: from left to right, knit stitches are purled, purl stitches are knit etc.

When working in the round every round is worked from the right side and the diagram are worked from right to left on all rounds.

See DROPS lesson: How to read knitting diagrams

The diagram depicts all rows/rounds, and every stitch seen from the right side. It is worked from bottom to top, from right to left.

When working back and forth every other row is worked from the right side: from right to left and every other row is worked from the wrong side: from left to right.

When working in the round, every row in the diagram are worked from the right side, from right to left.

When working a circular diagram you start in the middle and work your way outwards, counter clockwise, row by row.

The rows usually start with a given number of chain stitches (equivalent to the height of the following stitch), this will either be depicted in the diagram or explained in the pattern.

See DROPS lesson: How to read crochet diagrams

Instructions for working several diagrams after each other on the same row/round, will often be written like so: “work A.1, A.2, A.3 a total of 0-0-2-3-4 times". This means you work A.1 once, then A.2 is worked once, and A.3 is repeated (in width) the number of times provided for your size – in this case like so: S = 0 times, M = 0 times, L=2 times, XL= 3 times and XXL = 4 times.

The diagrams are worked as usual: begin with the first row in A.1, then work the first row in A.2 etc.

See DROPS lesson: How to read knitting diagrams

See DROPS lesson: How to read crochet diagrams

The total width of the garment (from wrist-to-wrist) will be larger in the larger sizes, despite the actual sleeves being shorter. The larger sizes have longer sleeve caps and wider shoulders, so there will be a good fit in all sizes.

The measurement sketch/schematic drawing provides information regarding the full length of the garment. If it’s a jumper or a jacket the length is measured from the highest point on the shoulder (usually closest to the neckline), and straight down to the bottom of the garment. It is NOT measured from the tip of shoulder. Similarly, the length of yoke is measured from the highest point on the shoulder and down to where yoke is split into body and sleeves.

See DROPS lesson: How to read a schematic drawing

Diagrams are often repeated on the round or in height. 1 repeat is the diagram the way it appears in the pattern. If it says to work 5 repeats of A.1 in the round, then you work A.1 a total of 5 times after/next to each other in the round. If it says to work 2 repeats of A.1 vertically/in height you work the entire diagram once, then begin again at the start and work the entire diagram one more time.

Chain stitches are slightly narrower than other stitches and to avoid working the cast-on edge too tight, we simply chain more stitches to begin with. The stitch count will be adjusted on the following row to fit the pattern and measurement sketch.

The rib edge is more elastic and will contract slightly compared to, for example, stocking stitch. By increasing before the rib edge, you avoid a visible difference in width between the rib edge and the rest of the body.

It’s very easy to cast off too tightly, and by making yarn overs while casting off (and simultaneously casting these off) you avoid a too tight cast off edge.

See DROPS video: How to bind off with yarn overs (yo)

To achieve an even increase (or decrease) you can increase on, for example: every 3rd and 4th row alternately, like so: work 2 rows and increase on the 3rd row, work 3 rows and increase on the 4th. Repeat this until the increase is complete.

See DROPS lesson: Increase or decrease 1 st on every 3rd and 4th row alternately

Should you prefer to work in the round instead of back and forth, you may of course adjust the pattern. You’ll need to add steeks mid-front (usually 5 stitches), and follow the instructions. When you would normally turn and work from the wrong side, simply work across the steek and continue in the round. At the end you’ll cut the piece open, pick up stitches to work bands, and cover the cut edges.

See DROPS video: How to knit steeks and cut open

Should you prefer to work back and forth instead of in the round, you may of course adjust the pattern so you work the pieces separately and then assemble them at the end. Divide the stitches for the body in 2, add 1 edge stitch in each side (for sewing) and work the front and back pieces separately.

See DROPS lesson: Can I adapt a pattern for circular needles into straight needles?

Pattern repeats can vary slightly in the different sizes, in order to get the correct proportions. If you’re not working the exact same size as the garment in the photo, yours might deviate slightly. This has been carefully developed and adjusted so that the complete impression of the garment is the same in all sizes.

Make sure to follow instructions and diagrams for your size!

If you have found a pattern you like which is available in women’s size it’s not very difficult to convert it to men’s size. The biggest difference will be the length of sleeves and body. Start working on the women size that you think would fit across the chest. The additional length will be worked right before you cast off for the armhole/sleeve cap. If the pattern is worked top-down you can add the length right after the armhole or before the first decrease on sleeve.

Regarding additional yarn amount, this will depend on how much length you add, but it is better with a skein too many than too few.

All yarns will have excess fibres (from production) that might come off as lint or shedding. Brushed yarns (ie hairier yarns) have more of these loose, excess fibres, causing more shedding.

Shedding also depends on what is worn under or over the garment, and whether this pulls at the yarn fibres. It’s therefore not possible to guarantee that there will be no shedding

Below are some tips on how to get the best result when working with hairier yarns:

1. When the garment is finished (before you wash it) shake it vigorously so the looser hairs come off. NOTE: do NOT use a lint roller, brush or any method that pulls at the yarn.

2. Place the garment in a plastic bag and put it in your freezer - the temperature will cause the fibres to become less attached to each other, and excess fibres will come off easier.

3. Leave in the freezer for a few hours before taking it out and shaking it again.

4. Wash the garment according to the instructions on the yarn label.

Pilling is a natural process that happens to even the most exclusive of fibers. It's a natural sign of wear and tear that is hard to avoid, and that is most visible in high friction areas of your garment like a sweater's arms and cuffs.

You can make your garment look as new by removing the pilling, using a fabric comb or a pill/lint remover.

Still can't find the answer you need? Then scroll down and leave your question so one of our experts can try to help you. This will be done normally within 5 to 10 working days.
In the meantime, you can read the questions and answers that others have left to this pattern or join the DROPS Workshop on Facebook to get help from fellow knitters/crocheters!

You might also like...

Post a comment to pattern DROPS 201-7

We would love to hear what you have to say about this pattern!

If you want to leave a question, please make sure you select the correct category in the form below, to speed up the answering process. Required fields are marked *.

Comments / Questions (81)

country flag Genevieve wrote:

Bonjour à vous Pourrai-je tricoter ce pull en côte anglaise bicolore et si oui quelle serait les quantités de laine qui seraient nécessaires. Merci

20.12.2023 - 21:56

DROPS Design answered:

Bonjour Geneviven, comme nous avons tricoté ce pull avec une seule couleur, nous ne pouvons malheureusement pas vous dire avec exactitude combien il faudrait en 2 couleurs. Votre magasin saura vous aider et vous conseiller, même par mail ou téléphone. Bon tricot!

21.12.2023 - 08:29

country flag Sonja wrote:

Schönen guten Abend, wenn ich 39 m anschlagen und die 1. Reihe im patentmuster stricke, hab ich schon 59 m auf der Nadel .Jetzt soll ich 12 cm stricken und dann jeweils 1m zunehmen = 59 Maschen. Die habe ich aber schon seit der 1.reihe. und dann ist mir das viel zu klein. Ich habe aber die sky wolle gekauft. Ich komm überhaupt nicht rein, ich finde den Fehler nicht . Bitte helfen Sie mir,würde den Pulli sehr gern stricken. Frdl. Grüße Sonja

14.12.2023 - 16:57

DROPS Design answered:

Liebe Sonja, die Umschläge im Patent werden nicht als Maschen gezählt, jeder Umschlag wird mit seiner abgehobenen Maschen zusammen als 1 Masche gezählt. Viel Spaß beim stricken!

15.12.2023 - 08:08

country flag Kim Simpkin wrote:

Unfortunately, this pattern and your comments are as clear as mud and NOT easy to follow as ‘Jeanette’ claims on on this pattern. It’s awful and difficult to follow and your reply to my last message does not explain clearly at all so I will search for another pattern to use the Drops Air wool that I purchased as I am unable to follow your pattern!!!!!!!!!

18.10.2023 - 15:42

country flag Kim Simpkin wrote:

Sk-034. Piece measures 39cm, 71 sts, pattern says loosely cast on 2 sts 2 times, 4 sts 4 times and 36 one time and according to your pattern there should be 199 sts! No matter which way you lol at this the is NOT 199 sts on the needle with this increase. Maybe you could tell me how you arrive at this number of sts because I have bought wool for this jumper and the pattern is garbage. I would appreciate you letting me know where the extra stitches come from please I would hate to waste the wool

27.09.2023 - 15:46

DROPS Design answered:

Dear Kim, you cast on at the end of each row from each side ("on both sides"). So, when it says 2 times it means twice from the right side and twice from the wrong side (so twice on each side, but in 4 rows in total). Therefore, you cast on 64 x2 stitches = 128 stitches. Which, when added to the 71 initial stitches, it gives you 199 stitches. Happy knitting!

30.09.2023 - 20:43

country flag Kim Simpkin wrote:

I am struggling BG TIME with this pattern and I have been knitting g for over 50 years and so is my sister in law. I have the 71 stitches on my needles after the increase rows and the work measures 39 cm, I do not understand the increase after that? 2 stitches 2 times and the four stitches 6 times I think I understand because you are increasing at the end of the row but the pattern then says 36 stitches one time??? If you are only casting on one side does this mean you you only knit the front?

19.09.2023 - 10:34

DROPS Design answered:

Dear Mrs Simpkin, you have now to cast on new stitches at the end of each row on each side as follows: cast on 2 sts at the end of next 4 rows (2 sts 2 times on each side), then 4 sts at the end of next 12 rows (4 sts 6 times on each side) and 36 sts at the end of next 2 rows (36 sts on each side). Happy knitting!

19.09.2023 - 15:54

country flag Liz wrote:

On row three of English rib there appears to be three stitches left at the end of the row - not two as in pattern

11.07.2023 - 18:39

DROPS Design answered:

Dear Liz, the yarn overs are not included in the stitch count; therefore you have 2 stitches and 1 yarn over. These yarn overs are not increases; they are worked together with their respective stitches to create the English rib effect. Happy knitting!

17.07.2023 - 10:16

country flag Konstanze Burger wrote:

Mein Daily Wonder ist mir gut gelungen, allerdings habe ich ein anderes Garn der Gruppe B gewählt mit kürzerer Lauflänge, was zur Folge hatte, dass ich gegen Ende fast 700 g an der Nadel hängen hatte, was das Stricken erschwerte und unhandlich werden ließ. Der Vorteil dieser Anleitung "an einem Stück" hat sich mir nicht erschlossen.

23.06.2022 - 16:13

country flag Tanja wrote:

Hallo,Ich habe nun für Gr. S 12 cm gestrickt und nun kommt die Zunahme bei den Ärmel. Es wird doch nur auf einer Seite zugenommen und die andere läuft gerade weiter. Ich verstehe die Anleitung nicht .

19.03.2022 - 21:00

DROPS Design answered:

Liebe Tania, die Zunahmen sollen Sie beidseitig stricken, dh nach der 1. Masche und vor der letzten Masche; dieses Video zeigt, wie am im Vollpatent beidseitig zunimmt und sollte Ihnen behilflich sein. Viel Spaß beim stricken!

21.03.2022 - 08:22

country flag Françoise wrote:

Bonjour, Pouvez vous m'aider à compter les mailles sur l'aiguille. Quand je ne compte pas les jetés, je n'ai pas assez de mailles mais quand je les compte j'en ai trop. Merci pour votre aide

10.03.2022 - 19:25

DROPS Design answered:

Bonjour Françoise, on ne compte pas les jetés dans le nombre de mailles, car ils appartiennent à la maille glissée, on compte 1 maille pour (1 jeté + 1 m glissée ). Peut-être que cette vidéo pourra vous aider?

11.03.2022 - 09:45

country flag Wenche Rummelhoff wrote:

Nå har jeg startet og rekt opp mange ganger. Min strikkefasthet stemmer overens med strikkefastheten på anbefalt garn SKY. Begynte på str. small og den blir ikke i nærheten av hvordan den er på modellen. Bildet må være av en størrelse som er mye større enn damen på bildet skulle tilsi å bruke. Har også byttet pinner og økt maskeantall., da blir ikke genseren seende ut som på bilde!

05.01.2022 - 09:47