
Popular categories
Looking for a yarn?


|
|||||||||||||||||||
White Pearl |
|||||||||||||||||||
 |
 |
||||||||||||||||||
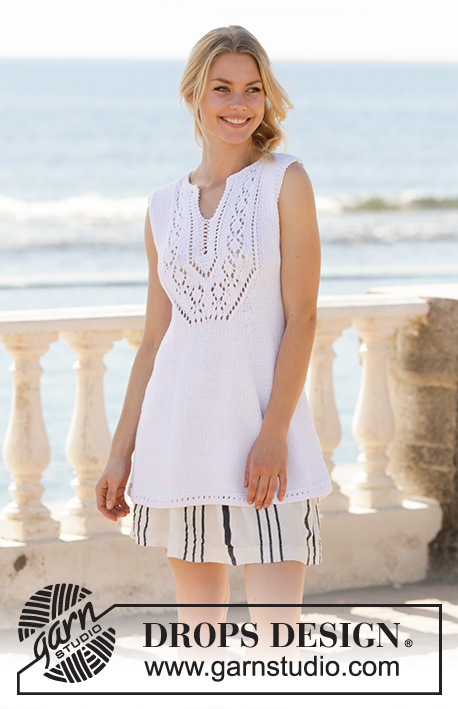
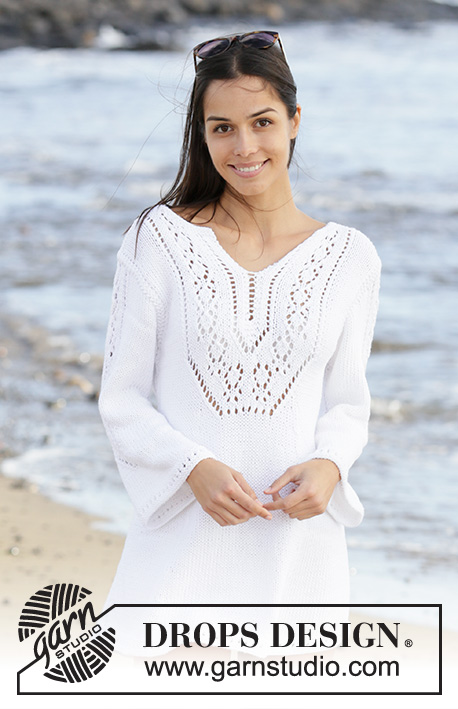
Knitted dress in DROPS Paris. The piece is worked with lace pattern, split in front of neck and ¾ length trumpet sleeves with lace pattern. Sizes S - XXXL.
DROPS 199-2 |
|||||||||||||||||||
|
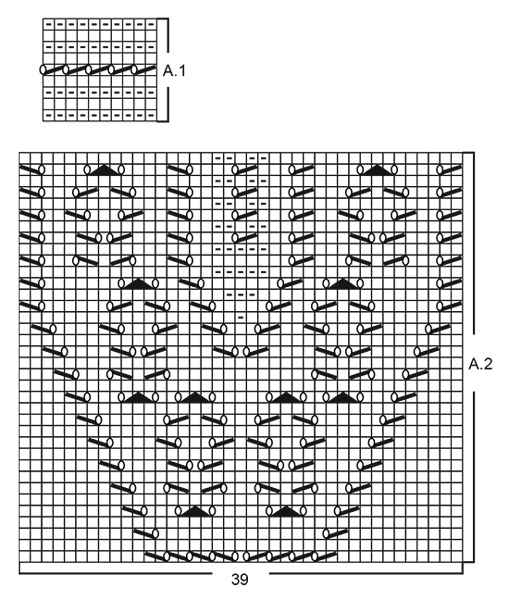
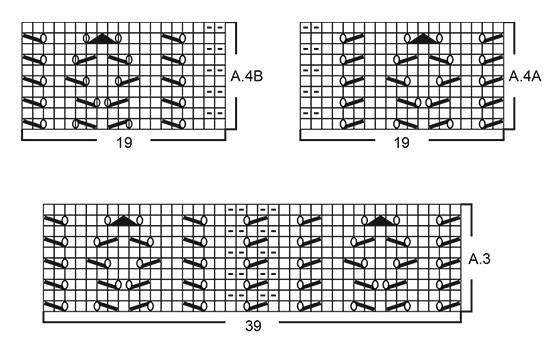
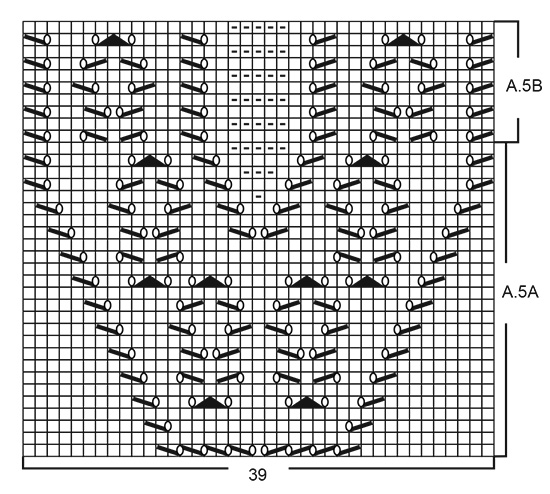
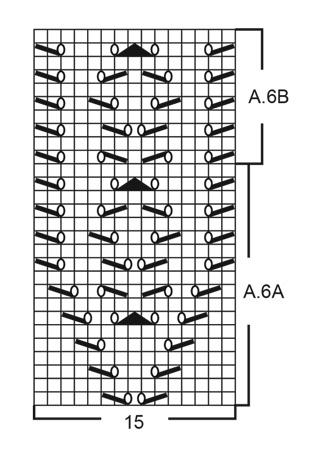
------------------------------------------------------- EXPLANATIONS FOR THE PATTERN: ------------------------------------------------------- RIDGE/GARTER STITCH (worked back and forth): Knit all rows. 1 ridge in height = Knit 2 rows. PATTERN: See diagrams A.1 to A.6. Diagrams show all rows in pattern seen from the right side. DECREASE TIP-1 (for skirt section of dress): All decreases are worked from the right side! Decrease as follows on each side of the marker thread: Start 2 stitches before marker thread, knit 2 together, marker thread, slip 1 stitch as if to knit, knit 1 and pass the slipped stitch over the knitted stitch (= 2 stitches decreased by marker thread and 4 stitches decreased on row). DECREASE TIP-2 (for armholes): Decrease on inside of the 3 edge stitches in garter stitch. All decreases worked from the right side! Decrease as follows after the 3 edge stitches: Slip 1 stitch as if to knit, knit 1 and pass the slipped stitch over the knitted stitch (= 1 stitch decreased). Decrease as follows before the 3 edge stitches: Start 2 stitches before the 3 edge stitches and knit 2 together (= 1 stitch decreased). DECREASE TIP-3 (for sides of sleeves): Decrease on inside of the 1 edge stitch in garter stitch. All decreases worked from the right side! Decrease as follows after the 1 edge stitch: Slip 1 stitch as if to knit, knit 1 and pass the slipped stitch over the knitted stitch (= 1 stitch decreased). Decrease as follows before the 1 edge stitch: Start 2 stitches before the 3 edge stitch and knit 2 together (= 1 stitch decreased). INCREASE TIP (for each side of body and sleeves): All increases worked from the right side! Increase on the inside of the 1 edge stitch in garter stitch towards the side by making 1 yarn over. On the next row (wrong side) purl the yarn over twisted to avoid a hole. Then work the new stitch in stocking stitch. ------------------------------------------------------- START THE PIECE HERE: ------------------------------------------------------- DRESS - SHORT OVERVIEW OF THE PIECE: The piece is worked back and forth with circular needle, bottom up and then sewn together to finish. Lace pattern is worked on the back piece in the same way as on the front piece but without the row of holes and split. If you do not want lace pattern on the back piece, you can work stocking stitch over these stitches. FRONT PIECE: Cast on 109-117-123-133-143-153 stitches with circular needle size 4 mm and Paris. Work A.1 back and forth over all stitches (row 1 is worked from the wrong side and when working row 5 in A.1 the symbol for ‘knit 2 together’ applies also from the wrong side. NOTE: Last stitch on row 5 is knitted). Change to circular needle size 5 mm when A.1 has been completed. Continue with stocking stitch and 1 edge stitch in GARTER STITCH on each side – read description above. REMEMBER THE KNITTING TENSION! When the piece measures 5-5-5-5-6-6 cm insert 2 marker threads in the piece as follows: Count 26-29-31-35-39-43 stitches, insert 1 marker thread, count 57-59-61-63-65-67 stitches, insert 1 marker thread (there are 26-29-31-35-39-43 stitches left on the row after the last marker thread). READ REST OF FRONT PIECE BEFORE CONTINUING! DECREASE BY MARKER THREADS: On the next row from the right side decrease 1 stitch on each side of both marker threads – read DECREASE TIP-1 (= 4 stitches decreased). Decrease like this every 4 cm a total of 12 times = 61-69-75-85-95-105 stitches. LACE PATTERN: At the same time when the piece measures 46-47-48-46-47-49 cm start the lace pattern mid front. The last decrease by the marker threads is still left in all sizes when you start A.2 and the row is worked as follows: Work 13-17-20-25-30-35 stitches in garter stitch and stocking stitch as before, work A.2 (= 39 stitches) and the remaining 13-17-20-25-30-35 stitches in stocking stitch and garter stitch as before. Continue this pattern (remember the last decrease by the marker threads). INCREASE IN SIDES: At the same time when the piece measures 55-55-55-55-56-56 cm, increase 1 stitch on each side – read INCREASE TIP. Increase like this every 3-3-3-4-4-4 cm a total of 3 times on each side = 67-75-81-91-101-111 stitches. ARMHOLE: At the same time when the piece measures 62-63-64-65-66-67 cm, work 2 ridges in height over the outermost 6-6-7-9-11-13 stitches on each side (the other stitches are worked in stocking stitch and lace pattern as before). After the 2 ridges on each side cast off 3-3-4-6-8-10 stitches at the beginning of the next 2 rows for armholes. On the next row from the right side decrease 1 stitch on each side for armholes – read DECREASE TIP-2. Decrease like this every 2nd row (i.e. each row from the right side) a total of 1-4-5-7-9-11 times. LACE PATTERN CONTINUES: At the same time when A.2 has been completed, work A.3 a total of 1-1-1-2-2-2 times in height over the same 39 stitches, but on the last row in the final repeat of A.3 (wrong side) cast off the middle stitch on the row for the split mid front and each section is finished separately. LEFT FRONT PIECE: Start from the right side and continue as before with 3 edge stitches in garter stitch towards the armhole; continue to decrease to the armhole if your decreases have not finished. Work stocking stitch and then A.4A over the outermost 19 stitches towards mid front. When the piece measures 77-78-79-81-82-84 cm (adjust so that the next row is worked from the wrong side), place the outermost 7-7-8-8-9-9 stitches towards mid front on 1 thread for neck; to avoid cutting the strand work the stitches before placing them on the thread. Continue working and cast off for the neck at the beginning of each row from the wrong side as follows: Cast off 2 stitches 2 times and then 1 stitch 3 times = 15-16-16-17-17-18 stitches left on shoulder. Continue working until there is 1 row left before the piece measures 82-84-86-88-90-92 cm. Knit 1 row from the wrong side and cast off with knit from the right side. The dress measures approx. 82-84-86-88-90-92 cm from the shoulder down. RIGHT FRONT PIECE: Start from the right side and continue as follows: Work A.4B over the first 19 stitches towards mid front, work stocking stitch as before, continue to decrease to the armhole if you have not finished and continue with 3 edge stitches in garter stitch towards the armhole. When the piece measures 77-78-79-81-82-84 cm (adjust so that the next row is worked from the right side), place the outermost 7-7-8-8-9-9 stitches towards mid front on 1 thread for neck; to avoid cutting the strand work the stitches before placing them on the thread. Continue working and cast off for the neck at the beginning of each row from the right side as follows: Cast off 2 stitches 2 times and then 1 stitch 3 times = 15-16-16-17-17-18 stitches left on shoulder. Continue working until there is 1 row left before the piece measures 82-84-86-88-90-92 cm. Knit 1 row from the wrong side and cast off with knit from the right side. BACK PIECE: Cast on 109-117-123-133-143-153 stitches with circular needle size 4 mm and Paris. Work A.1 back and forth over all stitches in the same way as the front piece. Change to circular needle size 5 mm when A.1 has been completed. Continue with stocking stitch and 1 edge stitch in garter stitch on each side. When the piece measures 5-5-5-5-6-6 cm insert 2 marker threads in the piece as follows: Count 26-29-31-35-39-43 stitches, insert 1 marker thread, count 57-59-61-63-65-67 stitches, insert 1 marker thread (there are 26-29-31-35-39-43 stitches left on the row after the last marker thread). READ REST OF BACK PIECE BEFORE CONTINUING! DECREASE BY MARKER THREADS: On the next row from the right side decrease 1 stitch on each side of both marker threads – read DECREASE TIP-1 (= 4 stitches decreased). Decrease like this every 4 cm a total of 12 times = 61-69-75-85-95-105 stitches. LACE PATTERN: At the same time when the piece measures 46-47-48-46-47-49 cm start the lace pattern mid back. The last decrease by the marker threads is still left in all sizes when A.5A begins and the row is worked as follows: Work 13-17-20-25-30-35 stitches in garter stitch and stocking stitch as before, A.5A (= 39 stitches), then the remaining 13-17-20-25-30-35 stitches in stocking stitch and garter stitch as before. Continue this pattern (remember the last decrease by the marker threads). INCREASE IN SIDES: At the same time when the piece measures 55-55-55-55-56-56 cm increase 1 stitch on each side – read INCREASE TIP. Increase like this every 3-3-3-4-4-4 cm a total of 3 times on each side = 67-75-81-91-101-111 stitches. ARMHOLE: At the same time when the piece measures 62-63-64-65-66-67 cm work 2 ridges in height over the outermost 6-6-7-9-11-13 stitches on each side (the other stitches are worked in stocking stitch and lace pattern as before). After the 2 ridges cast off 3-3-4-6-8-10 stitches at the beginning of the next 2 rows for the armholes. On the next row from the right side decrease 1 stitch on each side for the armhole - read DECREASE TIP-2. Decrease like this every 2nd row (i.e. every row from the right side) a total of 1-4-5-7-9-11 times. LACE PATTERN CONTINUES: At the same time when A.5A has been completed, repeat A.5B in height over the same 39 stitches to finished length. NECK: At the same time when the piece measures 80-82-84-86-88-90 cm cast off the middle 27-27-29-29-31-31 stitches for neck and each shoulder is finished separately. Continue the pattern as before, but the stitches which do not fit into the lace pattern when decreasing for neck are worked in stocking stitch. Cast off 1 stitch at the beginning of the next row from the neck = 15-16-16-17-17-18 stitches left on shoulder. Continue working until there is 1 row left before the piece measures 82-84-86-88-90-92 cm. Knit 1 row from the wrong side and cast off with knit from the right side. Work the other shoulder in the same way. SLEEVE: Is worked from bottom up. Cast on 69-71-73-73-75-77 stitches with circular needle size 4 mm and Paris. Work A.1 with 1 stitch in garter stitch on each side (row 1 is worked from the wrong side and on row 5 in A.1 the symbol for ‘knit 2 together’ also applies on the wrong side. NOTE: The last stitch on row 5 is knitted). Change to circular needle size 5 mm when A.1 has been completed. Continue with stocking stitch and 1 edge stitch in garter stitch on each side. DECREASE IN SIDES: When the piece measures 3 cm decrease 1 stitch on each side – read DECREASE TIP-3. Decrease like this every 2 cm a total of 11-11-11-9-9-9 times on each side = 47-49-51-55-57-59 stitches. LACE PATTERN: At the same time when the piece measures 10 cm work A.6A over the middle 15 stitches (the other stitches are continued in stocking stitch and garter stitch as before) – count out from the middle of the piece to find the beginning of the pattern. When A.6A has been completed, repeat A.6B in height over the same 15 stitches to finished length. INCREASE IN SIDES: At the same time when the piece measures 26-26-26-21-21-21 cm, increase 1 stitch on each side – read INCREASE TIP. Increase like this every 3-2-1½-1½-1½-1 cm a total of 4-5-6-7-8-10 times on each side = 55-59-63-69-73-79 stitches. Continue working until the piece measures 37-36-36-34-34-33 cm (A.6B continues in middle as before). Now cast off for sleeve cap at the beginning of each row on each side as follows: Cast off 3 stitches 1 time, 2 stitches 2 times and 1 stitch 3-3-3-4-5-7 times on each side. Then cast off 2 stitches on each side until the piece measures approx. 43-44-45-45-46-46 cm. Cast off 3 stitches 1 time on each side = 27 stitches left. Cast off. The sleeve measures approx. 44-45-46-46-47-47 cm from the top down. Work the other sleeve in the same way. ASSEMBLY: Sew shoulder seams inside the cast-off edge so that you have 2 purled rows towards each other on top of shoulders. Sew side seams from armholes down – sew edge to edge in outermost loop of outermost stitch so that the seam is flat. Sew sleeve seams in the same way. Position the sleeves under the garter stitch edge along the armholes. Fasten neatly so that the garter stitch edge shows along the armhole. NECK: Start from the right side mid front and knit up approx. 74 to 88 stitches around the neck (including the stitches on the threads in front), with circular needle size 4 mm and Paris. Knit 1 row from the wrong side, knit 1 row from the right side and knit 1 row from the wrong side. Loosely cast off with knit from the right side. Cut and fasten the strands. |
|||||||||||||||||||
Diagram explanations |
|||||||||||||||||||
|
|||||||||||||||||||
|
|||||||||||||||||||
|
|||||||||||||||||||
|
|||||||||||||||||||
|
|||||||||||||||||||

|
|||||||||||||||||||
|
Have you made this or any other of our designs? Tag your pictures in social media with #dropsdesign so we can see them! Do you need help with this pattern?You'll find tutorial videos, a Comments/Questions area and more by visiting the pattern on garnstudio.com. © 1982-2024 DROPS Design A/S. We reserve all rights. This document, including all its sub-sections, has copyrights. Read more about what you can do with our patterns at the bottom of each pattern on our site. |
|||||||||||||||||||


With over 40 years in knitting and crochet design, DROPS Design offers one of the most extensive collections of free patterns on the internet - translated to 17 languages. As of today we count 304 catalogues and 11422 patterns - 11422 of which are translated into English (UK/cm).
We work hard to bring you the best knitting and crochet have to offer, inspiration and advice as well as great quality yarns at incredible prices! Would you like to use our patterns for other than personal use? You can read what you are allowed to do in the Copyright text at the bottom of all our patterns. Happy crafting!
Comments / Questions (21)
Lieve DROps-mensen. Prachtige patronen, maar alles met rondbreinaalden. Is er een manier om het patroon om te zetten in 2 breinaalden?
21.01.2019 - 16:47DROPS Design answered:
Dag Hanny,
Veel patronen kun je inderdaad aanpassen om met rechte naalden te breien. In deze instructie vind je meer informatie daarover.
23.01.2019 - 10:06Har ni tagit bort möjligheten att favoritmarkera modeller? Hittar inte ”hjärtat” och mina sparade mönster.
18.01.2019 - 23:57DROPS Design answered:
Hei Ulrika. Vi driver for øyeblikket maintenance på denne funksjonen, men den vil være tilbake i løpet av uken. Alle dine favoritter vil da også være der akkurat slik de var. God fornøyelse
21.01.2019 - 10:17En sommardröm att se fram emot att göra
11.01.2019 - 14:59Ist ein Träumchen, warte sehnsüchtig auf die Anleitung
30.12.2018 - 09:15Todella kaunis !
25.12.2018 - 19:19Dieses Modell ist traumhaft, würde es gern nacharbeiten.
20.12.2018 - 13:26Très beau !!
19.12.2018 - 21:16Kiva koriste, helpohkon näköinen tehdä mutta hyvännäköinen.
17.12.2018 - 15:48CHIC ET ELEGANT TOUT SIMPLEMENT MERVEILLEUX
16.12.2018 - 17:17Heel mooi ontwerp! Die zou ik graag gaan maken.
12.12.2018 - 18:42