DROPS Nord
DROPS Nord
45% Alpaca, 30% Polyamide, 25% Wool
from 2.70 £ /50g
Get the yarn to make this pattern from 8.10£.

The yarn cost is calculated from the pattern’s smallest size and the yarn’s cheapest product type. Looking for an even better price? You might find it on the DROPS Deals!

DROPS SS24

Spring Brings

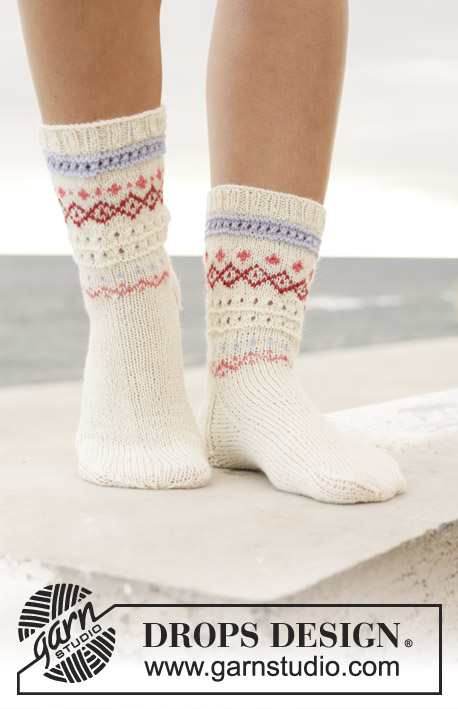
Knitted toe-up socks in DROPS Nord. The piece is worked with stripes and 2-coloured flowers in English rib on the leg. Sizes 35 - 43.

DROPS 198-15
DROPS Design: Pattern no-028
Yarn group A
-------------------------------------------------------

SIZES:
35/37 - 38/40 - 41/43
Foot length: approx. 22-24-27 cm. Leg height from heel up: approx. 19-19-21 cm.

MATERIALS:
DROPS NORD from Garnstudio (belongs to yarn group A)
100-100-100 g colour 13, old pink
50-50-50 g colour 01, off white

KNITTING TENSION:
26 stitches in width and 34 rows in height with stocking stitch = 10 x 10 cm.

NEEDLES:
DROPS DOUBLE POINTED NEEDLES SIZE 2.5 MM: for stocking stitch and English rib.
The needle size is only a guide. If you get too many stitches on 10 cm, change to a larger needle size. If you get too few stitches on 10 cm, change to a smaller needle size.

-------------------------------------------------------

-------------------------------------------------------

Alternative Yarn – See how to change yarns here
Yarn Groups A to F – Use the same pattern and change the yarn here
Yarn usage using an alternative yarn – Use our yarn converter here

-------------------------------------------------------

DROPS Nord
DROPS Nord
45% Alpaca, 30% Polyamide, 25% Wool
from 2.70 £ /50g
Get the yarn to make this pattern from 8.10£.

The yarn cost is calculated from the pattern’s smallest size and the yarn’s cheapest product type. Looking for an even better price? You might find it on the DROPS Deals!

Pattern instructions

NOTE: This pattern is written in British English. All measurements in charts are in cm. For conversion from cm to inches - click here. There are different terms for crocheting in British and American English. If this pattern includes crochet, click for "crochet terms" here. For this pattern in American English, please click here.
-------------------------------------------------------

EXPLANATIONS FOR THE PATTERN:

-------------------------------------------------------

PATTERN:
See diagram A.1. Choose diagram for your size (applies to A.1A, A.1C and A.1D).
The whole of A.1 measures approx. 10 cm in height.

INCREASE TIP-1 (for toe):
Start 2 stitches before the marker, make 1 yarn over, knit 4 (marker sits in middle of these 4 stitches), 1 yarn over. Repeat at the other marker = 4 stitches increased on round. On the next round knit the yarn overs twisted to avoid holes.

INCREASE TIP-2 (evenly spaced):
To work out how to increase evenly, count the total number of stitches on the needles (e.g. 52 stitches) and divide by the number of increases to be made (e.g. 4) = 13. In this example increase by making 1 yarn over after each 13th stitch. On the next round work the yarn overs twisted to avoid holes.

2-COLOURED FLOWER PATTERN IN ENGLISH RIB (in the round):
The flower pattern is worked in English rib as shown in diagram A.1B. The remaining stitches are worked in stocking stitch with the wrong side out, i.e. the stitches are purled as described in the text.
To obtain the 2-coloured effect, you work stripes with alternately 1 round off white and 1 round old pink. A.1 starts on a round with off white as described in the text. Each time you either increase or decrease in A.1 this occurs on a round with old pink.

KNITTING TIP-1:
To avoid holes in the corner of the heel when working the first round of the leg, lift the horizontal strand before the next stitch (in the transition between heel and the other stitches), onto the left needle and place it twisted on needle. Work this strand together with the next stitch on the left needle.

KNITTING TIP-2:
All the numbers of stitches given while working the flower pattern in English rib do not include the yarn overs, as the yarn overs belong to the knitted stitch. In other words, knitted stitch + yarn over count as 1 stitch.

-------------------------------------------------------

START THE PIECE HERE:

-------------------------------------------------------

SOCK - SHORT OVERVIEW OF THE PIECE:
The piece is worked in the round with double pointed needles from the toe upwards. Toe and heel are one-coloured, foot and leg are worked in stripes. In addition there is a 2-coloured flower pattern in English rib on leg.

TOE:
Cast on 8 stitches with double pointed needles size 2.5 mm and old pink. Divide the stitches to 2 stitches on each needle. Work 1 round where you knit 2 stitches in each stitch = 16 stitches. Insert 1 marker after the first 4 stitches on the round and 1 marker after the next 8 stitches. There are 4 stitches left on round after the last marker and the markers sit on each side of the toe. Beginning of round = mid under foot.
Work stocking stitch in the round. AT THE SAME TIME on the first round increase on each side of both markers – read INCREASE TIP-1 (= 4 stitches increased). Increase like this every round a total of 2-4-6 times and then every 2nd round a total of 7-6-5 times = 52-56-60 stitches. Continue with stocking stitch without further increases until the piece measures 5-5-6 cm from the cast-on edge. Now work the foot as described below.

FOOT:
Work stripes in the round in stocking stitch with the wrong side out, i.e. purl alternately 1 round with off white and 1 round with old pink. REMEMBER THE KNITTING TENSION!
When the piece measures 17-19-21 cm from the cast-on edge, divide the piece for the heel as follows: Leave the middle 20-22-24 stitches on the needles (i.e. divide the stitches with 10-11-12 stitches on needles 2 and 3). Divide the remaining 32-34-36 stitches onto needles 1 and 4 with 16-17-18 stitches on each needle. Cut the strand and work heel as described below.

HEEL:
Work stocking stitch back and forth with old pink as follows:
ROW 1 (= right side): Knit until there is 1 stitch left, turn the piece. 
ROW 2 (= wrong side): Slip the first stitch as if to purl, tighten strand and purl until there is 1 stitch left, turn the piece.
ROW 3 (= right side): Slip the first stitch as if to knit, tighten strand and knit until there are 2 stitches left, turn the piece.
ROW 4 (= wrong side): Slip the first stitch as if to purl, tighten strand and purl until there are 2 stitches left, turn the piece. 
Continue turning in the same way until there are 14-14-14 stitches left on the needle. 
Continue back and forth over the heel in the same way, but now work 1 more stitch on each row instead of 1 less (both on right and wrong side as before). To avoid holes in the transition when turning, lift the horizontal strand before the extra stitch onto the left needle and place it twisted on needle. Work this strand together with the next stitch on the left needle (from the right side knit the strand and stitch together, from the wrong side purl the strand and stitch together). Work like this until you have worked over all stitches on heel. Cut the strand, insert a marker in the piece and work the leg as described below. THE PIECE IS NOW MEASURED FROM HERE!

LEG:
= 52-56-60 stitches. Start mid back on the sock, i.e. between needles 1 and 4. Purl 1 round with the next colour in the stripes on the foot – read KNITTING TIP-1 and increase AT THE SAME TIME 4-0-2 stitches evenly on this round – read INCREASE TIP-2 = 56-56-62 stitches.
Continue in the round with stripes in stocking stitch with the wrong side out as before.
When the piece measures 3-3-4 cm from the marker on the heel, work the next round as follows (adjust so that the next round is worked with off white - stripes continue as before and the first round in A.1 is worked with off white): Work A.1A (= 6-6-7 purled stitches), * work A.1B (= 1 stitch), A.1C (= 10-10-11 purled stitches) *, work from *-* a total of 4 times, work A.1B (= 1 stitch) and finish with A.1D (= 5-5-6 stitches) = 5 repeats of flowers on the round. Continue this pattern – read 2-COLOURED FLOWER PATTERN IN ENGLISH RIB and KNITTING TIP-2.
When the first 6 rounds in A.1 have been worked there are 55-55-61 stitches on the needles. Continue this pattern. When A.1 has been completed there are still 55-55-61 stitches on the needles and the piece measures approx. 13-13-14 cm from the marker on the heel.
Continue with stripes and purl and increase AT THE SAME TIME 5-8-5 stitches evenly on the first round = 60-63-66 stitches. When you have worked approx. 3-3-4 cm of stripes after A.1, knit 1 round with old pink where you increase 9-9-9 stitches evenly spaced = 69-72-75 stitches. Work rib in the round (= knit 1 /purl 2) for approx. 2½ to 3 cm. Loosely cast off with knit, but to avoid the cast-off edge being tight you can make 1 yarn over after each 6th stitch (yarn overs cast off as normal stitches). The leg measures approx. 19-19-21 cm from the cast-off edge down to heel.

ASSEMBLY:
Sew hole at the tip of the toe.

Work the other sock the same way.

Diagram

symbols = purl
symbols = make 1 yarn over, slip 1 stitch onto the right needle as if to purl
symbols = knit yarn over and stitch together
symbols = purl yarn over and stitch together
symbols = work 5 stitches in knitted stitch and yarn over as follows: Knit yarn over and knitted stitch together, but wait with slipping the stitch from the needle, * make 1 yarn over the right needle and knit yarn over and stitch together without slipping the stitch from the needle *, work from *-* a total of 2 times = 5 stitches (i.e. 4 stitches increased)
symbols = purl 2 together
symbols = decrease 2 stitches towards the left as follows: slip the first stitch and yarn over onto the right needle as if to knit together, knit the next 2 stitches together (i.e. 1 purl + stitch and yarn over), then pass the slipped stitch and yarn over on the right needle over the knitted together stitches (= 2 stitches decreased)
symbols = decrease 2 stitches towards the right as follows: slip the first stitch and yarn over onto the right needle as if to knit together, purl 1, pass the slipped stitch and yarn over on right needle over the purled stitch, slip the stitch back onto the left needle, pass the stitch and yarn over on left needle over the stitch which was replaced there and finally slip the remaining stitch onto the right needle (= 2 stitches decreased)
symbols = decrease 4 stitches as follows: slip the first stitch and yarn over onto right needle as if to knit together, slip the purled stitch onto right needle as if to purl, place the next stitch and yarn over onto an extra needle/stitch holder in front of the piece, purl the next stitch on the left needle, pass the slipped purl stitch over the worked purl stitch, place this stitch back onto the left needle, pass the next stitch and yarn over on left needle over the stitch which was placed back on the left needle, then slip this stitch onto the right needle, pass the slipped stitch and yarn over on right needle over this stitch, place the stitch and yarn over from the extra needle back on the left needle, slip the stitch on the right needle back onto the left needle and finally pass the stitch and yarn over (that were on the extra needle) over the last stitch placed on left needle and slip the remaining stitch back onto the right needle (= 4 stitches decreased)
symbols = between 2 stitches make 1 yarn over, on the next round purl the yarn over twisted to avoid holes
diagram
diagram

Each of our patterns has specific tutorial videos to help you.

Do you have a question? See a list of frequently asked questions (FAQ)

Knitting tension is what determines the final measurements of your work, and is usually measured per 10 x 10 cm. It is provided like so: number of stitches in width x number of rows in height - eg: 19 stitches x 26 rows = 10 x 10 cm.

The knitting tension is very individual; some people knit/crochet loosely while others work tightly. You adjust the knitting tension with the needle size, which is why the suggested needle size is only meant as a guide! You need to adjust this (up or down) to ensure that YOUR knitting tension matches the knitting tension provided in the pattern. If you work with a different knitting tension than provided you will have a different yarn consumption, and your work will have different measurements than what the pattern suggests.

The knitting tension also determines which yarns can replace each other. As long as you achieve the same knitting tension you can replace one yarn with another.

See DROPS lesson: How to measure your tension/gauge

See DROPS video: How to make a gauge tension swatch

The required amount of yarn is provided in grams, eg: 450 g. To calculate how many balls you’ll need you first need to know how many grams are in 1 ball (25g, 50g or 100g). This information is available if you click on the individual yarn quality on our pages. Divide the amount required with the amount of each ball. For example, if each ball is 50g (the most common amount), the calculation will be as follows: 450 / 50 = 9 balls.

The important thing when changing from one yarn to another is that the knitting/crochet tension remains the same. This is so that the measurements of the finished piece will be the same as on the sketch provided. It is easier to achieve the same knitting tension using yarns from the same yarn group. It is also possible to work with multiple strands of a thinner yarn to achieve the knitting tension of a thicker one. Please try our yarn converter. We recommend you to always work a test swatch.

Please NOTE: when changing yarn the garment might have a different look and feel to the garment in the photo, due to individual properties and qualities of each yarn.

See DROPS lesson: Can I use a different yarn than the one mentioned in the pattern?

All our yarns are categorised into yarn groups (from A to F) according to thickness and knitting tension – group A contains the thinnest yarns and group F the thickest. This makes it easier for you to find alternative yarns to our patterns, should you wish to switch yarn. All yarns within the same group have a similar knitting tension and can easily replace each other. However, different yarn qualities have different structures and properties which will give the finished work a unique look and feel.

Click here for an overview of the yarns in each yarn group

At the top of all our patterns you’ll find a link to our yarn calculator, which is a helpful tool should you wish to use a different yarn than suggested. By filling in the yarn quality you wish to replace, the amount (in your size) and number of strands, the calculator will present good alternative yarns with the same knitting tension. Additionally it will tell you how much you’ll require in the new qualities and whether you’ll need to work with multiple strands. Most skeins are 50g (some are 25g or 100g).

If the pattern is worked with multiple colours, every colour will have to be calculated separately. Similarly, if the pattern is worked with several strands of different yarns (for example 1 strand Alpaca and 1 strand Kid-Silk) you will have to find alternatives for each, individually.

Click here to see our yarn calculator

Since different yarns have different qualities and textures we have chosen to keep the original yarn in our patterns. However, you can easily find options among our available qualities by using our yarn calculator, or simply pick a yarn from the same yarn group.

It is possible that some retailers still have discontinued yarns in stock, or that someone has a few skeins at home that they would like to find patterns for.

The yarn calculator will provide both alternative yarn as well as required amount in the new quality.

If you think it's hard to decide what size to make, it can be a good idea to measure a garment you own already and like the size of. Then you can pick the size by comparing those measures with the ones available in the pattern's size chart.

You'll find the size chart at the bottom of the pattern.

See DROPS lesson: How to read size chart

The needle size provided in the pattern serves only as a guide, the important thing is to follow the knitting tension. And since knitting tension is very individual, you will have to adjust the needle size to ensure that YOUR tension is the same as in the pattern – maybe you’ll have to adjust 1, or even 2 needle sizes, up or down to achieve the correct tension. For this, we recommend that you work test swatches.

Should you work with a different knitting tension than the one provided, the measurements of the finished garment might deviate from the measurement sketch.

See DROPS lesson: How to measure your tension/gauge

See DROPS video: How to make a tension/gauge swatch

Working a garment top-down provides more flexibility and room for personal adjustment. For example it is easier to try the garment on while working, as well as making adjustments to length of yoke and shoulder caps.

The instructions are carefully explaining every step, in the correct order. Diagrams are adjusted to the knitting direction and are worked as usual.

The diagram depicts all rows/rounds, and every stitch seen from the right side. It is read from bottom to top, from right to left. 1 square = 1 stitch.

When working back and forth, every other row is worked from the right side and every other row is worked from the wrong side. When working from the wrong side, the diagram will have to be worked reversed: from left to right, knit stitches are purled, purl stitches are knit etc.

When working in the round every round is worked from the right side and the diagram are worked from right to left on all rounds.

See DROPS lesson: How to read knitting diagrams

The diagram depicts all rows/rounds, and every stitch seen from the right side. It is worked from bottom to top, from right to left.

When working back and forth every other row is worked from the right side: from right to left and every other row is worked from the wrong side: from left to right.

When working in the round, every row in the diagram are worked from the right side, from right to left.

When working a circular diagram you start in the middle and work your way outwards, counter clockwise, row by row.

The rows usually start with a given number of chain stitches (equivalent to the height of the following stitch), this will either be depicted in the diagram or explained in the pattern.

See DROPS lesson: How to read crochet diagrams

Instructions for working several diagrams after each other on the same row/round, will often be written like so: “work A.1, A.2, A.3 a total of 0-0-2-3-4 times". This means you work A.1 once, then A.2 is worked once, and A.3 is repeated (in width) the number of times provided for your size – in this case like so: S = 0 times, M = 0 times, L=2 times, XL= 3 times and XXL = 4 times.

The diagrams are worked as usual: begin with the first row in A.1, then work the first row in A.2 etc.

See DROPS lesson: How to read knitting diagrams

See DROPS lesson: How to read crochet diagrams

The total width of the garment (from wrist-to-wrist) will be larger in the larger sizes, despite the actual sleeves being shorter. The larger sizes have longer sleeve caps and wider shoulders, so there will be a good fit in all sizes.

The measurement sketch/schematic drawing provides information regarding the full length of the garment. If it’s a jumper or a jacket the length is measured from the highest point on the shoulder closest to the neckline, and straight down to the bottom of the garment. It is NOT measured from the tip of shoulder. Similarly, the length of yoke is measured from the highest point on the shoulder and down to where yoke is split into body and sleeves.

On a jacket measures are never taken along bands, unless specifically stated. Always measure inside band stitches when measuring the length.

See DROPS lesson: How to read a schematic drawing

Diagrams are often repeated on the round or in height. 1 repeat is the diagram the way it appears in the pattern. If it says to work 5 repeats of A.1 in the round, then you work A.1 a total of 5 times after/next to each other in the round. If it says to work 2 repeats of A.1 vertically/in height you work the entire diagram once, then begin again at the start and work the entire diagram one more time.

Chain stitches are slightly narrower than other stitches and to avoid working the cast-on edge too tight, we simply chain more stitches to begin with. The stitch count will be adjusted on the following row to fit the pattern and measurement sketch.

The rib edge is more elastic and will contract slightly compared to, for example, stocking stitch. By increasing before the rib edge, you avoid a visible difference in width between the rib edge and the rest of the body.

It’s very easy to cast off too tightly, and by making yarn overs while casting off (and simultaneously casting these off) you avoid a too tight cast off edge.

See DROPS video: How to bind off with yarn overs (yo)

To achieve an even increase (or decrease) you can increase on, for example: every 3rd and 4th row alternately, like so: work 2 rows and increase on the 3rd row, work 3 rows and increase on the 4th. Repeat this until the increase is complete.

See DROPS lesson: Increase or decrease 1 st on every 3rd and 4th row alternately

Should you prefer to work in the round instead of back and forth, you may of course adjust the pattern. You’ll need to add steeks mid-front (usually 5 stitches), and follow the instructions. When you would normally turn and work from the wrong side, simply work across the steek and continue in the round. At the end you’ll cut the piece open, pick up stitches to work bands, and cover the cut edges.

See DROPS video: How to knit steeks and cut open

Should you prefer to work back and forth instead of in the round, you may of course adjust the pattern so you work the pieces separately and then assemble them at the end. Divide the stitches for the body in 2, add 1 edge stitch in each side (for sewing) and work the front and back pieces separately.

See DROPS lesson: Can I adapt a pattern for circular needles into straight needles?

Pattern repeats can vary slightly in the different sizes, in order to get the correct proportions. If you’re not working the exact same size as the garment in the photo, yours might deviate slightly. This has been carefully developed and adjusted so that the complete impression of the garment is the same in all sizes.

Make sure to follow instructions and diagrams for your size!

If you have found a pattern you like which is available in women’s size it’s not very difficult to convert it to men’s size. The biggest difference will be the length of sleeves and body. Start working on the women size that you think would fit across the chest. The additional length will be worked right before you cast off for the armhole/sleeve cap. If the pattern is worked top-down you can add the length right after the armhole or before the first decrease on sleeve.

Regarding additional yarn amount, this will depend on how much length you add, but it is better with a skein too many than too few.

All yarns will have excess fibres (from production) that might come off as lint or shedding. Brushed yarns (ie hairier yarns) have more of these loose, excess fibres, causing more shedding.

Shedding also depends on what is worn under or over the garment, and whether this pulls at the yarn fibres. It’s therefore not possible to guarantee that there will be no shedding

Below are some tips on how to get the best result when working with hairier yarns:

1. When the garment is finished (before you wash it) shake it vigorously so the looser hairs come off. NOTE: do NOT use a lint roller, brush or any method that pulls at the yarn.

2. Place the garment in a plastic bag and put it in your freezer - the temperature will cause the fibres to become less attached to each other, and excess fibres will come off easier.

3. Leave in the freezer for a few hours before taking it out and shaking it again.

4. Wash the garment according to the instructions on the yarn label.

Pilling is a natural process that happens to even the most exclusive of fibers. It's a natural sign of wear and tear that is hard to avoid, and that is most visible in high friction areas of your garment like a sweater's arms and cuffs.

You can make your garment look as new by removing the pilling, using a fabric comb or a pill/lint remover.

Still can't find the answer you need? Then scroll down and leave your question so one of our experts can try to help you. This will be done normally within 5 to 10 working days.
In the meantime, you can read the questions and answers that others have left to this pattern or join the DROPS Workshop on Facebook to get help from fellow knitters/crocheters!

You might also like...

Post a comment to pattern DROPS 198-15

We would love to hear what you have to say about this pattern!

If you want to leave a question, please make sure you select the correct category in the form below, to speed up the answering process. Required fields are marked *.

Comments / Questions (4)

country flag Mariete wrote:

Bij de pijp staat 1st: brei van *-* (bloempatroon) 4x. Daarna moet ik met 5 herh. van het patroon eindigen. Klopt dit wel? Worden naalden en toeren niet met elkaar verwisseld?

28.07.2022 - 09:53

DROPS Design answered:

Dag Mariete,

Met een naald breien wordt inderdaad een toer breien bedoeld.

07.08.2022 - 13:56

country flag Val wrote:

There is something wrong with the chart diagram explanations. On the chart, there is no white square contains a black square - you have charted it as a white square with a black circle. I also found the heel turning instructions to be too vague - it is not clear enough whether you are supposed to work the short rows on the 24 stitches or the 36. An inexperienced knitter would not be able to work this pattern!

14.02.2021 - 07:36

country flag María wrote:

Desde luego si seleccionáis el jersey v55 estos calcetines son un must para tener todo el conjunto. Me parecen encantadores

18.12.2018 - 08:06

country flag Rita Reimann wrote:

Dieses Modell möchte ich nacharbeiten. S it SHR schön.

16.12.2018 - 15:32