
Popular categories
Looking for a yarn?


|
||||||||||
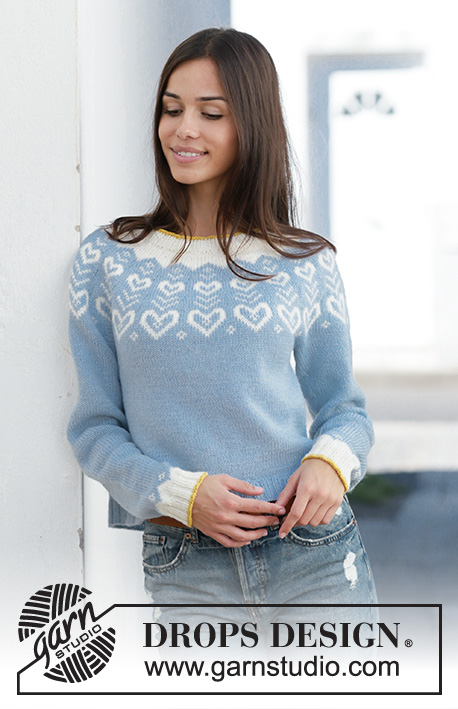
Dear to my Heart Sweater |
||||||||||
 |
 |
|||||||||
Knitted jumper in DROPS Merino Extra Fine. The piece is worked top down with round yoke and Nordic pattern. Sizes S - XXXL.
DROPS 199-7 |
||||||||||
|
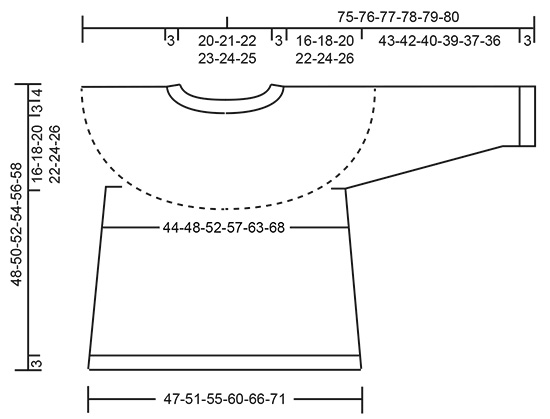
------------------------------------------------------- EXPLANATIONS FOR THE PATTERN: ------------------------------------------------------- ELEVATION (back of neck): To make the jumper slightly higher at the back of the neck when working the yoke, work an elevation as described below. Skip this section if you do not want an elevation. Insert 1 marker at the beginning of the round (= mid back). Start from the right side with off white and knit 14-15-16-16-17-18 stitches, turn, tighten strand and purl 28-30-32-32-34-36 stitches. Turn, tighten strand and knit 42-45-48-48-51-54 stitches, turn, tighten strand and purl 56-60-64-64-68-72 stitches. Turn, tighten strand and knit 70-75-80-80-85-90 stitches, turn, tighten strand and purl to mid back. Then work YOKE as described in text. PATTERN: See diagrams A.1 and A.2. Choose diagram for your size (applies to A.1). INCREASE TIP-1 (evenly spaced): To work out how to increase evenly, count the total number of stitches on the needle (e.g. 108 stitches) and divide by the number of increases to be made (e.g. 18) = 6. In this example, increase by making 1 yarn over after each 6th stitch. On the next round knit the yarn overs twisted to avoid holes. INCREASE TIP-2 (for sides of body): Start 3 stitches before the marker thread, make 1 yarn over, knit 6 (marker thread sits in the middle of these 6 stitches), make 1 yarn over (= 2 stitches increased). Increase the same way at the second marker thread. On the next round knit the yarn overs twisted to avoid holes. Then work the new stitches in stocking stitch. DECREASE TIP (for mid under sleeves): Start 3 stitches before the marker thread, knit 2 together, knit 2 (marker thread sits between these 2 stitches), slip 1 stitch as if to knit, knit 1 and pass the slipped stitch over the knitted stitch (= 2 stitches decreased). KNITTING TIP: To avoid the knitting tension becoming tighter when working pattern, it is important not to have tight strands at the back. You can increase the needle size when working pattern if this is a problem. CASTING-OFF TIP: To avoid the cast-off edge being tight, you can cast off with a larger needle size. Or make 1 yarn over after approx. each 8th stitch at the same time as you cast off (yarn overs cast off as normal stitches). ------------------------------------------------------- START THE PIECE HERE: ------------------------------------------------------- JUMPER - SHORT OVERVIEW OF THE PIECE: Neck and yoke are worked in the round with circular needle, top down. The yoke is divided for body and sleeves. The body is continued in the round with circular needle, top down. The sleeves are worked in the round with short circular needle/double pointed needles, top down. NECK: Cast on 108-112-116-120-124-128 stitches with short circular needle size 3 mm and mustard. Knit 1 round. Change to off white and work rib in the round (= knit 2 / purl 2) for 3 cm. Change to short circular needle size 4 mm. Knit 1 round where you increase 18-21-31-18-26-28 stitches evenly spaced – read INCREASE TIP-1 = 126-133-147-138-150-156 stitches. Knit 1 round. Now you can work an ELEVATION in the back of the neck – read description above. If you do not want an elevation, go straight to YOKE. YOKE: Read KNITTING TIP and work A.1 in the round (= 18-19-21-23-25-26 repeats of 7-7-7-6-6-6 stitches). Continue this pattern and increase as shown in the diagram. REMEMBER THE KNITTING TENSION! When A.1 has been completed there are 288-304-336-368-400-416 stitches on the needle. Continue with stocking stitch and grey blue until the piece measures 19-21-23-25-27-29 cm from the cast-on edge mid front. The next round is worked as follows: Knit 42-45-49-54-60-63 stitches (= ½ back piece), place the next 59-61-69-75-79-81 stitches on 1 thread for sleeve, cast on 8-10-10-10-12-16 new stitches on the needle (= in side under sleeve), knit 85-91-99-109-121-127 stitches (= front piece), place the next 59-61-69-75-79-81 stitches on 1 thread for sleeve, cast on 8-10-10-10-12-16 new stitches on the needle (= in side under sleeve) and knit the remaining 43-46-50-55-61-64 stitches (= ½ back piece). Cut the strand. Body and sleeves are continued separately. THE PIECE IS NOW MEASURED FROM HERE! BODY: = 186-202-218-238-266-286 stitches. Insert 1 marker thread in each side of the body, in the middle of the 8-10-10-10-12-16 stitches under the sleeves. Allow the marker threads to follow your work onwards; they will be used when increasing in the sides. Start the round by one of the marker threads and work in the round with grey blue. When the piece measures 4 cm from the division in all sizes, increase 1 stitch on each side of both marker threads – read INCREASE TIP-2 (= 4 stitches increased). Increase like this every 8 cm a total of 3 times in each side = 198-214-230-250-278-298 stitches. Continue working until the piece measures 22 cm from the division in all sizes (or to desired length; there is 3 cm left to finished length). Knit 1 round where you increase 38-38-46-46-54-58 stitches evenly spaced = 236-252-276-296-332-356 stitches. This is done to avoid the rib being tight. Change to circular needle size 3 mm and work rib in the round (= knit 2 / purl 2) for 3 cm. Loosely cast off with knit over knit and purl over purl – read CASTING-OFF TIP! The jumper measures approx. 48-50-52-54-56-58 cm from the shoulder down. SLEEVE: Place the 59-61-69-75-79-81 stitches from the thread on the one side of the piece on circular needle/double pointed needles size 4 mm and knit up 1 stitch in each of the 8-10-10-10-12-16 stitches cast on under the sleeve = 67-71-79-85-91-97 stitches. Insert 1 marker thread in the middle of the 8-10-10-10-12-16 stitches under the sleeve. Allow the marker thread to follow your work onwards; it will be used when decreasing mid under sleeve. Start the round by the marker thread and work stocking stitch in the round with grey blue. When the piece measures 2 cm from the division in all sizes, decrease 2 stitches mid under sleeve – read DECREASE TIP! Decrease like this every 4½-3½-2½-2½-2-1½ cm a total of 9-11-14-14-17-20 times = 49-49-51-57-57-57 stitches. Continue working until the piece measures 40-39-37-36-34-33 cm from the division (or to desired length; there is 6 cm left to finished length, decreases are finished mid under sleeve and there are shorter measurements in larger sizes due to wider neck and longer yoke). Knit 1 round with grey blue where you decrease 1-1-3-1-1-1 stitches evenly spaced = 48-48-48-56-56-56 stitches. Work A.2 in the round (= 6-6-6-7-7-7 repeats of 8 stitches). When A.2 is finished knit 1 round with off white where you decrease 0-0-0-4-4-0 stitches evenly spaced = 48-48-48-52-52-56 stitches. There is now 3 cm left to finished length; if you want a longer sleeve continue with off white to desired length. Change to double pointed needles size 3 mm. Work rib in the round (= knit 2 / purl 2) for 3 cm. Change to mustard and work 1 round of rib. Then loosely cast off with mustard and knit over knit and purl over purl – read CASTING-OFF TIP! The sleeve measures approx. 46-45-43-42-40-39 cm from the division. Work the other sleeve in the same way. |
||||||||||
Diagram explanations |
||||||||||
|
||||||||||

|
||||||||||
|
||||||||||
|
Have you made this or any other of our designs? Tag your pictures in social media with #dropsdesign so we can see them! Do you need help with this pattern?You'll find tutorial videos, a Comments/Questions area and more by visiting the pattern on garnstudio.com. © 1982-2024 DROPS Design A/S. We reserve all rights. This document, including all its sub-sections, has copyrights. Read more about what you can do with our patterns at the bottom of each pattern on our site. |
||||||||||


With over 40 years in knitting and crochet design, DROPS Design offers one of the most extensive collections of free patterns on the internet - translated to 17 languages. As of today we count 304 catalogues and 11422 patterns - 11422 of which are translated into English (UK/cm).
We work hard to bring you the best knitting and crochet have to offer, inspiration and advice as well as great quality yarns at incredible prices! Would you like to use our patterns for other than personal use? You can read what you are allowed to do in the Copyright text at the bottom of all our patterns. Happy crafting!
Comments / Questions (35)
C’est le blanc qui est bleuté.
08.01.2024 - 21:12Bonjour J’ai lavé le pull en cycle laine 30 degrés et le pull est ressorti bleuté. Il y a eu un transfert de couleur. Je souhaiterais avoir vos conseils pour rattraper ce problème plutôt que celui du revendeur qui connaît certainement moins les laines que vous. J’ai essayé un trempage dans du vinaigre blanc de 30 minutes puis lavage à 30 degrés sans succès . Merci beaucoup pour votre aide . Je dois trouver une solution car là c’est vraiment dommage.
08.01.2024 - 21:11DROPS Design answered:
Bonjour Mme Chopin, retrouvez toutes les instructions de lavage sous le nuancier + d'autres astuces complémentaires ici, pour toute réclamation complémentaire (et même tout conseil supplémentaire), merci de bien vouloir vous adresser à votre magasin, même par mail ou téléphone on pourra vous aider et vous renseigner. Bon tricot!
09.01.2024 - 07:52Bonjour J’ai lavé le pull en cycle laine à 30 degrés Mais le blanc a pris une teinte bleutée. J’en suis extrêmement contrariée que puis-je faire ? Merci pour votre aide et espérant qu’une solution existe
08.01.2024 - 08:37DROPS Design answered:
Bonjour Mme Chopin, merci de bien vouloir transmettre votre commentaire auprès du magasin où vous avez acheté votre laine, ils pourront ainsi vous aider et le prendre en charge. Merci pour votre compréhension.
08.01.2024 - 11:11Gostaria de video como calcular a quantia de pontos
10.05.2023 - 13:48Good afternoon Before I buy the yarn for the above sweater, I just wanted to know if someone could help when I get stuck with the pattern ie following the diagram etc Thank you Mrs Shah
22.03.2022 - 15:03DROPS Design answered:
Dear Mrs Shah, sure, you will find a list of relevant lessons at the very bottom of the pattern (just above this sections) as well as related videos to that pattern here - these might already help you. And then feel free to ask any question using this section. Happy knitting!
22.03.2022 - 16:02Hvordan er det mulig å få 3 økninger hver 8 cm, om første er etter 4 cm, og lengden skal være ca 22 cm? 22- 4 er 18, 3x8 er 24...... 24- 18 er 6....... Så skal den være 22 eller 28 cm fra deling?
12.05.2021 - 01:25Hei, jeg er svært skuffet. Jeg ønsket akkurat denne fargen, men da garnet kom var det mye mørkere enn på modellen dere viser bilde på. Bestilte på nytt - da i lys gråblå. Det viste seg at også den var for mørk. Sitter igjen med 16 nøster for mørkt garn. Hvordan kan dere komme med så feil farger - helt ubegripelig og svært frustrerende.
23.04.2021 - 20:15Een prachtige trui. Het patroon klopt. Alleen hebben wij 500 gr van blauw nodig. Om de maat M te kunnen breien. Dus 10 bollen ipv 400 gr. = 8 bollen.
29.03.2021 - 17:09Ich würde gerne diesen Pulli in Baby Merino stricken-also Garngruppe A anstatt B. Wie muss ich da vorgehen?
15.02.2021 - 21:18DROPS Design answered:
Liebe Frau Hebbering, auf individuellen Wunsch hin umrechnen. Wenn sie Hilfe damit brauchen, wenden Sie sich bitte an dem Laden wo Sie die Wolle gekauft haben, dort hilft man Ihnen gerne weiter. Viel Spaß beim stricken!
16.02.2021 - 09:38Strikket ferdig. Ble veldig liten. Er det mulig å "vaske" den større? Noen sier det går an...pga merinoull..
09.02.2021 - 14:09DROPS Design answered:
Hei Hilde Irene. Merino Extra Fine skal vaskes på 40 grader finvask for å holde fassongen. Har opplevd at noen har vasket feil / ved ullvask slik at plagget har blitt større, men dette er noe vi ikke kan garantere. Kommer an på det er strikket fast eller løst, strikkefastheten overholdt osv. Er det strikket for løst er sjangsen større for at plagget vil bli større ved feilvask. mvh DROPS design
12.02.2021 - 15:24