DROPS Air
DROPS Air
65% Alpaca, 28% Polyamide, 7% Wool
from 4.80 £ /50g
Get the yarn to make this pattern from 28.80£.

The yarn cost is calculated from the pattern’s smallest size and the yarn’s cheapest product type. Looking for an even better price? You might find it on the DROPS Deals!

DROPS SS24

Benedicte

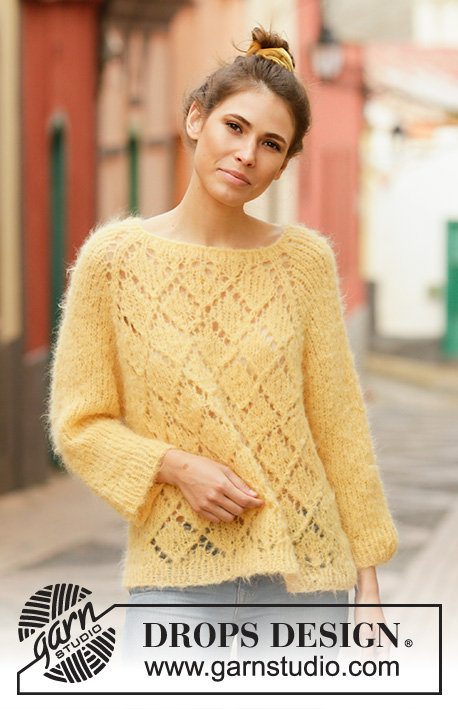
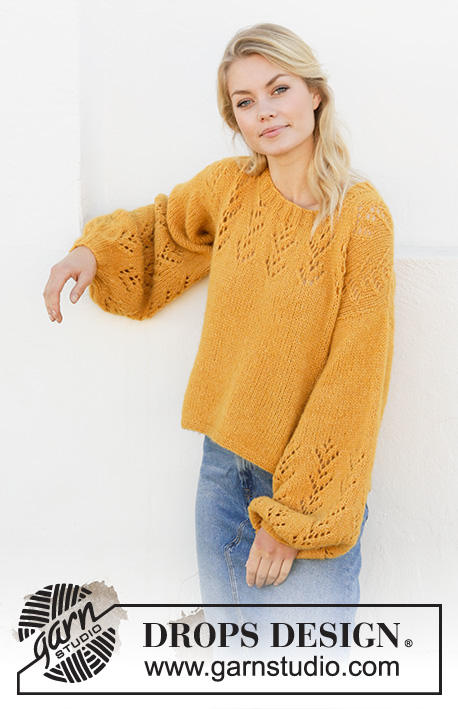
Knitted jumper with balloon sleeves, lace pattern and split in sides. The piece is worked in DROPS Air. Sizes S - XXXL.

DROPS 200-13
DROPS Design: Pattern no ai-185
Yarn group C or A + A
-------------------------------------------------------

SIZES:
S - M - L - XL - XXL - XXXL

MATERIALS:
DROPS AIR from Garnstudio (belongs to yarn group C)
300-350-350-400-450-450 g colour 22, yellow

KNITTING TENSION:
16 stitches in width and 20 rows in height with stocking stitch = 10 x 10 cm.

NEEDLES:
DROPS CIRCULAR NEEDLE SIZE 5.5 MM: length 60 cm or 80 cm for stocking stitch.
DROPS CIRCULAR NEEDLE SIZE 4.5 MM: length 40 cm and 80 cm for rib and garter stitch edges.
The needle size is only a guide. If you get too many stitches on 10 cm, change to a larger needle size. If you get too few stitches on 10 cm, change to a smaller needle size.

-------------------------------------------------------

-------------------------------------------------------

Alternative Yarn – See how to change yarns here
Yarn Groups A to F – Use the same pattern and change the yarn here
Yarn usage using an alternative yarn – Use our yarn converter here

-------------------------------------------------------

DROPS Air
DROPS Air
65% Alpaca, 28% Polyamide, 7% Wool
from 4.80 £ /50g
Get the yarn to make this pattern from 28.80£.

The yarn cost is calculated from the pattern’s smallest size and the yarn’s cheapest product type. Looking for an even better price? You might find it on the DROPS Deals!

Pattern instructions

NOTE: This pattern is written in British English. All measurements in charts are in cm. For conversion from cm to inches - click here. There are different terms for crocheting in British and American English. If this pattern includes crochet, click for "crochet terms" here. For this pattern in American English, please click here.
EXPLANATIONS FOR THE PATTERN:

-------------------------------------------------------

RIDGE/GARTER STITCH (worked back and forth):
Knit all rows.
1 ridge in height = Knit 2 rows.

PATTERN: 
See diagram A.1. The diagram shows all the rows in the pattern seen from the right side.

DECREASE TIP-1 (for neckline):
All decreases are worked from the right side and decrease for neck inside the 1 edge stitch in garter stitch towards the neck.
Decrease as follows after 1 edge stitch in garter stitch: Slip 1 stitch as if to knit, knit 1 and pass the slipped stitch over the knitted stitch (= 1 stitch decreased).
Decrease as follows before the 1 edge stitch in garter stitch: Work until there are 3 stitches left on row, knit 2 together and finish with 1 edge stitch in garter stitch (= 1 stitch decreased).

DECREASE TIP-2 (for decreases in middle of sleeves).
When decreasing 3-3-3-4-4-4 stitches evenly, it is neatest if the decreases are divided so that you decrease 1 stitch over each of the middle 3-3-3-4-4-4 repeats of A.1. Decrease 1 stitch by knitting 2 together.

DECREASE TIP-3 (for sleeves): 
All decreases are worked from the right side and decrease inside the 1 edge stitch in garter stitch in each side:
Decrease as follows after the1 edge stitch in garter stitch: Slip 1 stitch as if to knit, knit 1 and pass the slipped stitch over the knitted stitch (= 1 stitch decreased).
Decrease as follows before the 1 edge stitch in garter stitch: Work until there are 3 stitches left on the row, knit 2 together and finish with 1 edge stitch in garter stitch (= 1 stitch decreased).

INCREASE TIP-1 (for bottom of sleeves):
Work 2 stitches in same stitch by knitting 1 stitch in the front and back loops of same stitch (= 1 stitch increased).

INCREASE TIP-2 (evenly spaced at bottom of sleeves):
To work out how to increase evenly, count the total number of stitches on needle (e.g. 62 stitches), minus edge stitches (e.g. 2 stitches) and divide the remaining stitches by the number of increases to be made (e.g. 17) = 3.5. 
In this example, increase by making 1 yarn over after alternately each 3rd and 4th stitch. On the next row (right side) knit the yarn overs twisted to avoid holes.

------------------------------------------------------

START THE PIECE HERE:

-------------------------------------------------------

JUMPER - SHORT OVERVIEW OF THE PIECE:
The whole piece is worked back and forth in sections with circular needle, bottom up. The garment is sewn together and the neck worked in the round to finish.

FRONT PIECE:
Cast on 81-87-93-102-113-121 stitches with circular needle size 4.5 mm and Air. Work 3 RIDGES – read description above. Change to circular needle size 5.5 mm and work stocking stitch with 3 edge stitches in garter stitch in each side for the split. REMEMBER THE KNITTING TENSION! When the piece measures 10 cm finish the split. Continue with stocking stitch and 1 edge stitch in garter stitch in each side.
When the piece measures 30-32-34-31-33-35 cm start the lace pattern and the next row is worked as follows from the right side: 1 edge stitch in garter stitch 1-4-7-6-6-10 stitches in stocking stitch, work A.1 until there are 2-5-8-7-7-11 stitches left on row (= 7-7-7-8-9-9 repeats of 11 stitches), work 1-4-7-6-6-10 stitches in stocking stitch and 1 edge stitch in garter stitch. Continue this pattern.
AT THE SAME TIME when the piece measures 32-34-35-36-37-38 cm cast off 1-2-4-4-6-6 stitches for the armholes at the beginning of the next 2 rows = 79-83-85-94-101-109 stitches left on needle. Continue the pattern with 1 edge stitch in garter stitch and 0-2-3-2-0-4 stitches in stocking stitch in each side.
When the piece measures 40-42-43-45-46-48 cm place the middle 25-25-25-28-31-31 stitches on 1 thread for neck = 27-29-30-33-35-39 stitches left on each shoulder. The shoulders are finished separately.
Continue the pattern as before. AT THE SAME TIME on the next row from the right side decrease 1 stitch for neck – read DECREASE TIP-1. Decrease like this every 2nd row (i.e. every row from the right side) a total of 4 times = 23-25-26-29-31-35 stitches left – NOTE: The stitches which do not fit into the pattern when decreasing are worked in stocking stitch (applies to XL, XXL and XXXL).
Continue the pattern as before until the piece measures approx. 50-52-54-56-58-60 cm. Loosely cast off with knit from the right side. Work the other shoulder in the same way.

BACK PIECE:
Cast on 81-87-93-102-113-121 stitches with circular needle size 4.5 mm and Air. Work 3 RIDGES – read description above. Change to circular needle size 5.5 mm. Then work stocking stitch with 3 edge stitches in garter stitch in each side for split. When the piece measures 10 cm finish the split. Continue with stocking stitch and 1 edge stitch in garter stitch in each side.
When the piece measures 30-32-34-31-33-35 cm start the lace pattern and the next row is worked as follows from the right side: 1 edge stitch in garter stitch, 1-4-7-6-6-10 stitches in stocking stitch, work A.1 until there are 2-5-8-7-7-11 stitches left on the row (= 7-7-7-8-9-9 repeats of 11 stitches), 1-4-7-6-6-10 stitches in stocking stitch and finish with 1 edge stitch in garter stitch. Continue this pattern.
AT THE SAME TIME when the piece measures 32-34-35-36-37-38 cm cast off 1-2-4-4-6-6 stitches for the armholes at the beginning of the next 2 rows = 79-83-85-94-101-109 stitches left on needle. Continue the pattern with 1 edge stitch in garter stitch and 0-2-3-2-0-4 stitches in stocking stitch in each side.
When the piece measures 48-50-52-54-56-58 cm cast off the middle 31-31-31-34-37-37 stitches for neck = 24-26-27-30-32-36 stitches left on each shoulder. The shoulders are finished separately.
Continue the pattern as before. AT THE SAME TIME on the next row from the right side decrease 1 stitch for the neck – read DECREASE TIP-1 = 23-25-26-29-31-35 stitches left – NOTE: The stitches which do not fit into the pattern when decreasing are worked in stocking stitch (applies to XL, XXL and XXXL). Continue the pattern as before until the piece measures approx. 50-52-54-56-58-60 cm. Loosely cast off with knit from the right side. Work the other shoulder in the same way.

SLEEVE:
Cast on 32-32-36-36-40-40 stitches with circular needle size 4.5 mm and Air. Purl 1 row (= wrong side). The next row is worked as follows from the right side: 1 edge stitch in garter stitch, * knit 2, purl 2 *, work from *-* until there are 3 stitches left on row, knit 2 and finish with 1 edge stitch in garter stitch. Continue this rib for 4 cm. Change to circular needle size 5.5 mm. On the next 2 rows increase as described below.
First row worked as follows from the right side: 1 edge stitch in garter stitch, work 2 stitches in each stitch until there is 1 stitch left on row – read INCREASE TIP-1, finish with 1 edge stitch in garter stitch = 62-62-70-70-78-78 stitches.
Next row is worked as follows from the wrong side: 1 edge stitch in garter stitch, purl until there is 1 stitch left on row and AT THE SAME TIME increase 17-17-9-20-12-12 stitches evenly over these stitches – read INCREASE TIP-2, finish with 1 edge stitch in garter stitch = 79-79-79-90-90-90 stitches.
Work 2 rows stocking stitch without increasing, with 1 edge stitch in garter stitch in each side.
Then work as follows from the right side: 1 edge stitch in garter stitch, work A.1 until there is 1 stitch left on row (= 7-7-7-8-8-8 repeats of 11 stitches), finish with 1 edge stitch in garter stitch. Continue this pattern until A.1 has been worked a total of 5 times in height. The piece measures approx. 31 cm from the cast-on edge in all sizes and there is approx. 23-23-23-21-20-18 cm left to finished length.
Continue with stocking stitch and 1 edge stitch in garter stitch in each side.
AT THE SAME TIME when the piece measures 32 cm in all sizes, decrease 3-3-3-4-4-4 stitches evenly – read DECREASE TIP-2. Decrease like this every 4th row a total of 3 times = 70-70-70-78-78-78 stitches on needle. Continue with stocking stitch without further decreases.
When the piece measure 41 cm in all sizes, decrease 1 stitch in each side - read DECREASE TIP-3. Decrease like this every 1½-2-2-1-1-1 cm a total of 7-6-5-7-5-4 times = 56-58-60-64-68-70 stitches. Continue with stocking stitch without decreasing until the piece measures 53-53-51-49-47-45 cm (shorter measurements in larger sizes due to wider shoulders and longer sleeve cap). Insert 1 marker in each side; these show where the sleeves will be sewn to the armhole. Continue working until the piece measures 54-54-54-52-51-49 cm. Then loosely cast off with knit from the right side. Work the other sleeve in the same way.

ASSEMBLY:
Sew shoulder seams inside the cast-off edge. Sew side seams from the armhole and down to split – sew in the outermost loop of the outermost stitch so that the seam is flat.
Sew sleeve seams from the bottom up to the markers – sew in the outermost loop of the outermost stitch so that the seam is flat.
Sew in sleeves inside the 1 edge stitch in each side on front and back pieces. The markers on the sleeves should match the bottom of the armhole.

NECK:
Knit up from the right side approx. 104 to 116 stitches around the neck (including the stitches from the thread in front) with short circular needle size 4.5 mm and Air – the number of stitches must be divisible by 4.
Work rib in the round (= knit 2 / purl 2) for approx. 3-3½ cm. Loosely cast off with knit over knit and purl over purl.

Diagram

symbols = knit from right side, purl from wrong side
symbols = between 2 stitches make 1 yarn over
symbols = knit 2 together
symbols = slip 1 stitch as if to knit, knit 1 and pass the slipped stitch over the knitted stitch
diagram

Each of our patterns has specific tutorial videos to help you.

Do you have a question? See a list of frequently asked questions (FAQ)

Knitting tension is what determines the final measurements of your work, and is usually measured per 10 x 10 cm. It is provided like so: number of stitches in width x number of rows in height - eg: 19 stitches x 26 rows = 10 x 10 cm.

The knitting tension is very individual; some people knit/crochet loosely while others work tightly. You adjust the knitting tension with the needle size, which is why the suggested needle size is only meant as a guide! You need to adjust this (up or down) to ensure that YOUR knitting tension matches the knitting tension provided in the pattern. If you work with a different knitting tension than provided you will have a different yarn consumption, and your work will have different measurements than what the pattern suggests.

The knitting tension also determines which yarns can replace each other. As long as you achieve the same knitting tension you can replace one yarn with another.

See DROPS lesson: How to measure your tension/gauge

See DROPS video: How to make a gauge tension swatch

The required amount of yarn is provided in grams, eg: 450 g. To calculate how many balls you’ll need you first need to know how many grams are in 1 ball (25g, 50g or 100g). This information is available if you click on the individual yarn quality on our pages. Divide the amount required with the amount of each ball. For example, if each ball is 50g (the most common amount), the calculation will be as follows: 450 / 50 = 9 balls.

The important thing when changing from one yarn to another is that the knitting/crochet tension remains the same. This is so that the measurements of the finished piece will be the same as on the sketch provided. It is easier to achieve the same knitting tension using yarns from the same yarn group. It is also possible to work with multiple strands of a thinner yarn to achieve the knitting tension of a thicker one. Please try our yarn converter. We recommend you to always work a test swatch.

Please NOTE: when changing yarn the garment might have a different look and feel to the garment in the photo, due to individual properties and qualities of each yarn.

See DROPS lesson: Can I use a different yarn than the one mentioned in the pattern?

All our yarns are categorised into yarn groups (from A to F) according to thickness and knitting tension – group A contains the thinnest yarns and group F the thickest. This makes it easier for you to find alternative yarns to our patterns, should you wish to switch yarn. All yarns within the same group have a similar knitting tension and can easily replace each other. However, different yarn qualities have different structures and properties which will give the finished work a unique look and feel.

Click here for an overview of the yarns in each yarn group

At the top of all our patterns you’ll find a link to our yarn calculator, which is a helpful tool should you wish to use a different yarn than suggested. By filling in the yarn quality you wish to replace, the amount (in your size) and number of strands, the calculator will present good alternative yarns with the same knitting tension. Additionally it will tell you how much you’ll require in the new qualities and whether you’ll need to work with multiple strands. Most skeins are 50g (some are 25g or 100g).

If the pattern is worked with multiple colours, every colour will have to be calculated separately. Similarly, if the pattern is worked with several strands of different yarns (for example 1 strand Alpaca and 1 strand Kid-Silk) you will have to find alternatives for each, individually.

Click here to see our yarn calculator

Since different yarns have different qualities and textures we have chosen to keep the original yarn in our patterns. However, you can easily find options among our available qualities by using our yarn calculator, or simply pick a yarn from the same yarn group.

It is possible that some retailers still have discontinued yarns in stock, or that someone has a few skeins at home that they would like to find patterns for.

The yarn calculator will provide both alternative yarn as well as required amount in the new quality.

If you think it's hard to decide what size to make, it can be a good idea to measure a garment you own already and like the size of. Then you can pick the size by comparing those measures with the ones available in the pattern's size chart.

You'll find the size chart at the bottom of the pattern.

See DROPS lesson: How to read size chart

The needle size provided in the pattern serves only as a guide, the important thing is to follow the knitting tension. And since knitting tension is very individual, you will have to adjust the needle size to ensure that YOUR tension is the same as in the pattern – maybe you’ll have to adjust 1, or even 2 needle sizes, up or down to achieve the correct tension. For this, we recommend that you work test swatches.

Should you work with a different knitting tension than the one provided, the measurements of the finished garment might deviate from the measurement sketch.

See DROPS lesson: How to measure your tension/gauge

See DROPS video: How to make a tension/gauge swatch

Working a garment top-down provides more flexibility and room for personal adjustment. For example it is easier to try the garment on while working, as well as making adjustments to length of yoke and shoulder caps.

The instructions are carefully explaining every step, in the correct order. Diagrams are adjusted to the knitting direction and are worked as usual.

The diagram depicts all rows/rounds, and every stitch seen from the right side. It is read from bottom to top, from right to left. 1 square = 1 stitch.

When working back and forth, every other row is worked from the right side and every other row is worked from the wrong side. When working from the wrong side, the diagram will have to be worked reversed: from left to right, knit stitches are purled, purl stitches are knit etc.

When working in the round every round is worked from the right side and the diagram are worked from right to left on all rounds.

See DROPS lesson: How to read knitting diagrams

The diagram depicts all rows/rounds, and every stitch seen from the right side. It is worked from bottom to top, from right to left.

When working back and forth every other row is worked from the right side: from right to left and every other row is worked from the wrong side: from left to right.

When working in the round, every row in the diagram are worked from the right side, from right to left.

When working a circular diagram you start in the middle and work your way outwards, counter clockwise, row by row.

The rows usually start with a given number of chain stitches (equivalent to the height of the following stitch), this will either be depicted in the diagram or explained in the pattern.

See DROPS lesson: How to read crochet diagrams

Instructions for working several diagrams after each other on the same row/round, will often be written like so: “work A.1, A.2, A.3 a total of 0-0-2-3-4 times". This means you work A.1 once, then A.2 is worked once, and A.3 is repeated (in width) the number of times provided for your size – in this case like so: S = 0 times, M = 0 times, L=2 times, XL= 3 times and XXL = 4 times.

The diagrams are worked as usual: begin with the first row in A.1, then work the first row in A.2 etc.

See DROPS lesson: How to read knitting diagrams

See DROPS lesson: How to read crochet diagrams

The total width of the garment (from wrist-to-wrist) will be larger in the larger sizes, despite the actual sleeves being shorter. The larger sizes have longer sleeve caps and wider shoulders, so there will be a good fit in all sizes.

The measurement sketch/schematic drawing provides information regarding the full length of the garment. If it’s a jumper or a jacket the length is measured from the highest point on the shoulder closest to the neckline, and straight down to the bottom of the garment. It is NOT measured from the tip of shoulder. Similarly, the length of yoke is measured from the highest point on the shoulder and down to where yoke is split into body and sleeves.

On a jacket measures are never taken along bands, unless specifically stated. Always measure inside band stitches when measuring the length.

See DROPS lesson: How to read a schematic drawing

Diagrams are often repeated on the round or in height. 1 repeat is the diagram the way it appears in the pattern. If it says to work 5 repeats of A.1 in the round, then you work A.1 a total of 5 times after/next to each other in the round. If it says to work 2 repeats of A.1 vertically/in height you work the entire diagram once, then begin again at the start and work the entire diagram one more time.

Chain stitches are slightly narrower than other stitches and to avoid working the cast-on edge too tight, we simply chain more stitches to begin with. The stitch count will be adjusted on the following row to fit the pattern and measurement sketch.

The rib edge is more elastic and will contract slightly compared to, for example, stocking stitch. By increasing before the rib edge, you avoid a visible difference in width between the rib edge and the rest of the body.

It’s very easy to cast off too tightly, and by making yarn overs while casting off (and simultaneously casting these off) you avoid a too tight cast off edge.

See DROPS video: How to bind off with yarn overs (yo)

To achieve an even increase (or decrease) you can increase on, for example: every 3rd and 4th row alternately, like so: work 2 rows and increase on the 3rd row, work 3 rows and increase on the 4th. Repeat this until the increase is complete.

See DROPS lesson: Increase or decrease 1 st on every 3rd and 4th row alternately

Should you prefer to work in the round instead of back and forth, you may of course adjust the pattern. You’ll need to add steeks mid-front (usually 5 stitches), and follow the instructions. When you would normally turn and work from the wrong side, simply work across the steek and continue in the round. At the end you’ll cut the piece open, pick up stitches to work bands, and cover the cut edges.

See DROPS video: How to knit steeks and cut open

Should you prefer to work back and forth instead of in the round, you may of course adjust the pattern so you work the pieces separately and then assemble them at the end. Divide the stitches for the body in 2, add 1 edge stitch in each side (for sewing) and work the front and back pieces separately.

See DROPS lesson: Can I adapt a pattern for circular needles into straight needles?

Pattern repeats can vary slightly in the different sizes, in order to get the correct proportions. If you’re not working the exact same size as the garment in the photo, yours might deviate slightly. This has been carefully developed and adjusted so that the complete impression of the garment is the same in all sizes.

Make sure to follow instructions and diagrams for your size!

If you have found a pattern you like which is available in women’s size it’s not very difficult to convert it to men’s size. The biggest difference will be the length of sleeves and body. Start working on the women size that you think would fit across the chest. The additional length will be worked right before you cast off for the armhole/sleeve cap. If the pattern is worked top-down you can add the length right after the armhole or before the first decrease on sleeve.

Regarding additional yarn amount, this will depend on how much length you add, but it is better with a skein too many than too few.

All yarns will have excess fibres (from production) that might come off as lint or shedding. Brushed yarns (ie hairier yarns) have more of these loose, excess fibres, causing more shedding.

Shedding also depends on what is worn under or over the garment, and whether this pulls at the yarn fibres. It’s therefore not possible to guarantee that there will be no shedding

Below are some tips on how to get the best result when working with hairier yarns:

1. When the garment is finished (before you wash it) shake it vigorously so the looser hairs come off. NOTE: do NOT use a lint roller, brush or any method that pulls at the yarn.

2. Place the garment in a plastic bag and put it in your freezer - the temperature will cause the fibres to become less attached to each other, and excess fibres will come off easier.

3. Leave in the freezer for a few hours before taking it out and shaking it again.

4. Wash the garment according to the instructions on the yarn label.

Pilling is a natural process that happens to even the most exclusive of fibers. It's a natural sign of wear and tear that is hard to avoid, and that is most visible in high friction areas of your garment like a sweater's arms and cuffs.

You can make your garment look as new by removing the pilling, using a fabric comb or a pill/lint remover.

Still can't find the answer you need? Then scroll down and leave your question so one of our experts can try to help you. This will be done normally within 5 to 10 working days.
In the meantime, you can read the questions and answers that others have left to this pattern or join the DROPS Workshop on Facebook to get help from fellow knitters/crocheters!

You might also like...

Benedicte in DROPS Air

Alexandra, Canada

Benedicte

Zoë Crouse, United Kingdom

Benedicte

Dorka, Hungary

Benedicte

Elly'sKnittingDays, Bulgaria

My Benedicte

Katja, United States

Benedicte

Joe, France

Post a comment to pattern DROPS 200-13

We would love to hear what you have to say about this pattern!

If you want to leave a question, please make sure you select the correct category in the form below, to speed up the answering process. Required fields are marked *.

Comments / Questions (33)

country flag Stella Willmott wrote:

I am wondering if this jumper can be knitted on straight needles ( apart from the neck) as it is not knitted in the round . Is this possible?

09.10.2023 - 18:24

DROPS Design answered:

Hi Stella, We recommend using circular needles because of the number of stitches. However, if you wish to use straight needles, of course this is possible. Happy knitting!

10.10.2023 - 06:48

country flag Myriam Gaubert wrote:

Bonjour, Je ne comprends pas à quoi correspond de faire 1 maille jersey? Est ce une maille a l'endroit ou maille a l'envers ?

21.11.2022 - 01:44

DROPS Design answered:

Bonjour Mme Gaubert, 1 maille jersey va se tricoter à l'endroit sur l'endroit et à l'envers sur l'envers, comme par ex dans cette vidéo. Bon tricot!

21.11.2022 - 10:29

country flag Greetje Bekker wrote:

Ik kom niet uit met t patroon.Moet je in de eerste pen ,tussen de 2 omslagen,1 steek recht doen.? Bij voorbaat mijn dank.

25.02.2021 - 16:52

DROPS Design answered:

Dag Greetje,

Ja, dat klopt. Er zit 1 steek recht tussen de 2 omslagen in de eerste naald van het patroon.

26.02.2021 - 11:43

country flag Glenys wrote:

I dont know how to read diagram for pattern , A1 to make holes in jumper

27.08.2020 - 10:57

DROPS Design answered:

Dear Glenys, this lesson explains how to read knitting diagrams - you will find diagram key for each symbol used in the diagram just above the chart. Happy knitting!

27.08.2020 - 13:16

country flag Louise wrote:

Jeg har problemer med at få de 4 indtagninger til at gå op med maskeantallet- indtagningerne kommer til at “gå ind” i mønsteret...efter 2. pind med mønster...Gir det mening..?

29.04.2020 - 09:01

country flag Louise wrote:

Hej, jeg strikker str M. jeg har problemer med at få indtagning til halsen til at passe med diagrammet? Når skuldrene skal strikkes hver for sig.(De 4 masker, der skal tages ind efter at have sat masker af på tråd) Er der evt rettelser til str M? Det er en supersød model, så håber at kunne få hjælp til at knække koden 😊

29.04.2020 - 06:16

DROPS Design answered:

Hej Louise, nej der er ikke nogle rettelser til denne, hvad er det du ikke får til at stemme?

29.04.2020 - 08:34

country flag Kaja wrote:

Hei, Hvordan kan man gjøre det dersom man ønsker å ha kortere?

21.04.2020 - 19:45

DROPS Design answered:

Hej Kaja, da må du kort af inden du starter på selve mønsteret. Følg evt en mindre størrelse i højden. God fornøjelse! :)

22.04.2020 - 11:22

country flag Michèle Leijten wrote:

Ik heb een vraag. Kan deze trui gebreid worden met alle garens van categorie C? Ik heb namelijk een mooie kleur gezien van drops brushed alpaca silk, maar daar zit maar 25 gram op een bol ipv 50 gram. Echter is de looplengte bijna gelijk (150m t.o.v. 140 meter). Dus moet je dan het dubbel aantal bollen hebben of gewoon een paar bollen extra?

12.01.2020 - 14:19

DROPS Design answered:

Dag Michèlle,

Als je kijkt naar de stekenverhouding kan je inderdaad met alle garens uit categorie C breien. (Katoen zou ik overigens niet adviseren, omdat het model dan wat meer gaat hangen.) Voor de benodigde hoeveelheid garen, kijk je naar de totale looplengte die je nodig hebt. Voor Brushed Alpaca Silk heb je dus dan inderdaad hetzelfde aantal bollen nodig.

14.01.2020 - 20:52

country flag Laura wrote:

Non capisco le istruzioni per le diminuzioni delle maniche, dopo aver lavorato il diagramma 5 volte in verticale il lavoro dovrebbe misurare 31 cm, e dai 32 cm si deve diminuire (per la taglia la S) di 3 maglie ogni 4 ferri per 3 volte, e i suggerimenti per le diminuzioni dicono di diminuire 1 maglia in ognuna delle 3 ripetizioni del diagramma... ma il diagramma è finito... quindi non capisco, dove devo diminuire? Nella maglia rasata o nel diagramma? (E come si fa a diminuire nel diagramma?)

27.11.2019 - 15:13

DROPS Design answered:

Buongiorno Laura. Abbiamo modificato leggermente il testo nelle diminuzioni. Deve diminuire nella parte a maglia rasata, lavorando due maglie insieme a diritto. Il suggerimento consiglia di individuare le ripetizioni centrali del diagramma (anche se ha già finito di lavorarlo) e di diminuire le maglie sopra a queste ripetizioni. Buon lavoro!

27.11.2019 - 15:46

country flag Nichole wrote:

I found this pattern on pinterest and someone is selling this pattern on their own website in case you wanted to know: ht_tps://w_ww.strikkemekka.no/prod.php?id=5182

05.09.2019 - 14:28