
Popular categories
Looking for a yarn?


|
||||||||||||||||||||||||||||||||||
Green Tea |
||||||||||||||||||||||||||||||||||
 |
 |
|||||||||||||||||||||||||||||||||
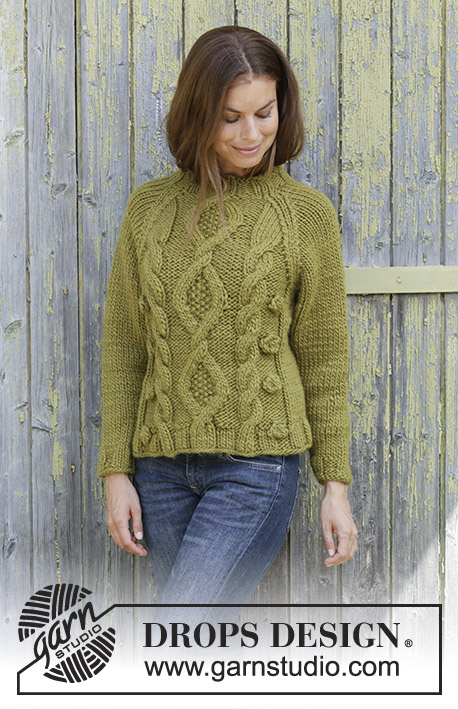
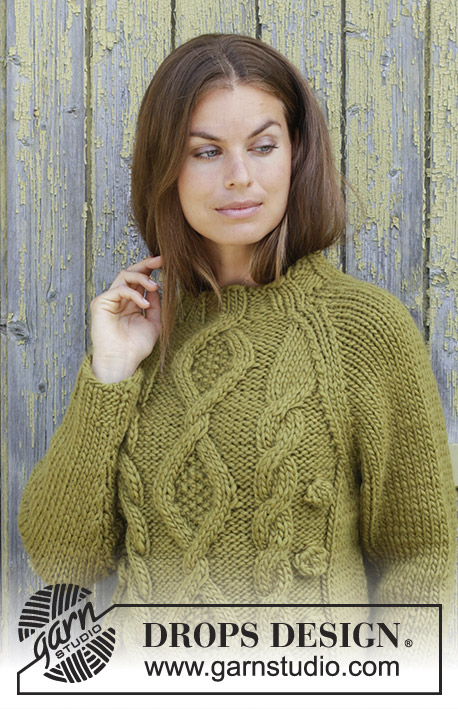
Knitted jumper with raglan in DROPS Snow. Piece is knitted bottom up with cables and bobbles. Size: S - XXXL
DROPS 196-32 |
||||||||||||||||||||||||||||||||||
|
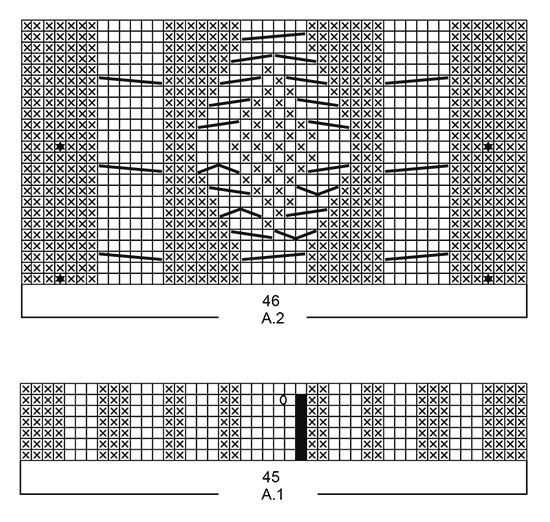
EXPLANATION FOR THE PATTERN: ---------------------------------------------------------- PATTERN: See diagrams A.1 and A.2. DECREASE/INCREASE TIP (evenly): To calculate how to decrease/increase evenly, use the number of stitches decreases are done over (e.g. 45 stitches) and divide by number of decreases to be done (e.g. 9) = 5. In this example knit approx. every 4th and 5th stitch together. When increasing evenly make 1 yarn over (in this example) after every 5th stitch. On next round knit yarn over twisted to avoid holes. DECREASE TIP-1 (applies to sides of body): Decrease 1 stitch on each side of marker thread as follows: Work until 3 stitches remain before marker thread and knit 2 together, knit 2 (marker thread is between these stitches), slip 1 stitch knitwise, knit 1, pass slipped stitch over stitch worked. DECREASE TIP-2 (applies to last round before neck edge): To make the decrease look nice before neck edge decrease by knitting 2 stitches together when knitting and decrease by purling 2 stitches together when purling. INCREASE TIP (applies to sides on body and under sleeves): Work until 2 stitches remain before marker thread, 1 yarn over, knit 4 (marker thread is in the middle of these stitches), 1 yarn over. On next round knit yarn over twisted to avoid holes. Then work the new stitches in stocking stitch. RAGLAN: Decrease first 1 stitch on each side of marker threads (= 8 stitches decreased on round) as follows: Decrease 1 stitch after marker thread on front/back piece as follows: Knit 1, slip 1 stitch knitwise, knit 1, pass slipped stitch over stitch worked (= 1 stitch decreased) Decrease 1 stitch before marker thread on front/back piece as follows: Work until 3 stitches remain before marker thread, knit 2 together (= 1 stitch decreased), knit 1. Decrease 1 stitch after marker thread on sleeve as follows: Slip 1 stitch knitwise, knit 1, pass slipped stitch over stitch worked (= 1 stitch decreased). Decrease 1 stitch before marker thread on sleeve as follows: Work until 2 stitches remain before marker thread, knit 2 together (= 1 stitch decreased). When decrease has been done 10-12-13-14-17-19 times, continue decrease as before on sleeves and on back piece but now decrease 2 stitches in each side of front piece (= 10 stitches decreased on round) as follows: Decrease 2 stitches after marker thread on front piece as follows: Knit 1, slip 1 stitch knitwise, knit 2 together, pass slipped stitch over stitches worked (= 2 stitches decreased). Decrease 2 stitches before marker thread on front piece as follows: Work until 4 stitches remain before marker thread, knit 3 together (= 2 stitches decreased), knit 1. ---------------------------------------------------------- START THE PIECE HERE: ---------------------------------------------------------- JUMPER - SHORT OVERVIEW OF THE PIECE: Work piece in the round on circular needle, bottom up. Work sleeves in the round on double pointed needles/a short circular needle. BODY: Cast on 132-144-150-162-174-186 stitches on circular needle size 8 mm with Snow. Knit 1 round. Now work rib as follows: Work (knit 3/purl 3) over the first 45-51-57-63-69-75 stitches, work A.1 (= 45 stitches), work (knit 3/purl 3) over the remaining 42-48-48-54-60-66 stitches. Continue in the round like this until 1 round remains in A.1. Work next round as follows: Knit the first 45-51-57-63-69-75 stitches and decrease 9-11-12-13-14-14 stitches evenly over these stitches – read DECREASE/INCREASE TIP, work last round in A.1, knit the remaining 42-48-48-54-60-66 stitches and decrease 7-9-6-9-8-8 stitches evenly over these stitches = 117-125-133-141-153-165 stitches. Switch to circular needle size 9 mm. Now work A.2 (= 46 stitches) over A.1 and work in stocking stitch over the remaining stitches on round. REMEMBER THE KNITTING TENSION! When piece measures 9 cm, insert 1 marker thread 9-11-13-15-18-21 stitches before A.2 and 9-11-13-15-18-21 stitches after A.2 (= in each side). There are now 64-68-72-76-82-88 stitches on front piece and 53-57-61-65-71-77 stitches on back piece. Move the marker threads upwards when working. On next round decrease 1 stitch on each side of marker thread in each side – read DECREASE TIP-1. Decrease like this every 4th-4th-4th-5th-5th-5th round 3-3-3-2-2-2 times in total = 105-113-121-133-145-157 stitches. When piece measures 21 cm, increase 1 stitch on each side of marker threads in each side - read INCREASE TIP = 109-117-125-137-149-161 stitches. Continue until piece measures approx. 27 cm in all sizes. On next round cast off 3 stitches on each side of marker thread in each side for armhole (= 6 stitches under each sleeve). There are now 54-58-62-68-74-80 stitches on front piece and 43-47-51-57-63-69 stitches on back piece. Put piece aside and work the sleeves. SLEEVE: Cast on 24-24-24-30-30-30 stitches on double pointed needles size 8 mm with Snow. Knit 1 round. Then work rib (= knit 3/purl 3) for 5 cm. Knit 1 round while decreasing 2-2-0-2-2-0 stitches evenly = 22-22-24-28-28-30 stitches. Insert a marker thread at beginning of round (= mid under sleeve). Switch to double pointed needles size 9 mm. Work in stocking stitch in the round. When piece measures 8-10-9-10-10-7 cm, increase 1 stitch on each side of marker thread under sleeves - remember INCREASE TIP. Increase like this every 8th-5th-5th-5th-3rd-3rd round 6-8-8-7-10-11 times in total = 34-38-40-42-48-52 stitches. When piece measures 37-35-34-32-30-29 cm, increase 1 stitch on each side of marker thread every other round 4 times in total = 42-46-48-50-56-60 stitches. On next round cast off 6 stitches mid under sleeve (= 3 stitches on each side of marker thread) = 36-40-42-44-50-54 stitches. Sleeve measures 43-41-40-38-36-35 cm. Put piece aside and knit the other sleeve. YOKE: Slip sleeves on to same circular needle as body where armholes were cast off = 169-185-197-213-237-257 stitches. Insert a marker thread in all transitions between sleeves and body (= 4 marker threads in piece). Begin round in transition between left sleeve and back piece. Continue with pattern on front piece as before and work in stocking stitch over the remaining stitches on round. When 4-2-2-4-2-1 round has been worked, begin decrease for RAGLAN – read explanation above. Decrease like this every other round 10-12-13-14-17-19 times in total = 89-89-93-101-101-105 stitches. Then continue decrease for raglan as before on sleeves and back piece and now decrease 2 stitches in each side for raglan on front piece. Decrease like this every other round 4 times in total = 49-49-53-61-61-65 stitches. When there is not enough stitches to work cables in A.2 on front piece, continue with knit over knit and purl over purl over these stitches. When all decreases for raglan are done, work next round as follows: Knit over stitches on back piece and decrease 1-0-1-3-2-3 stitches evenly over these stitches, knit over the 8 stitches on sleeve, knit over knit and purl over purl over stitches on front piece and decrease 4-3-4-6-5-6 stitches evenly over these stitches – read DECREASE TIP-2 and remember DECREASE/INCREASE TIP, knit over the 8 stitches on sleeve = 44-46-48-52-54-56 stitches. Jumper measures approx. 54-56-58-60-62-64 cm from neck mid front and down. NECK EDGE: Switch to a short circular needle size 8 mm. Knit 1 round while increasing 4-2-6-2-6-4 stitches evenly - remember DECREASE/INCREASE TIP = 48-48-54-54-60-60 stitches. Work rib (knit 3/purl 3) for 5 cm. Cast off stitches with knit over knit and purl over purl. |
||||||||||||||||||||||||||||||||||
Diagram explanations |
||||||||||||||||||||||||||||||||||
|
||||||||||||||||||||||||||||||||||
|
||||||||||||||||||||||||||||||||||

|
||||||||||||||||||||||||||||||||||
|
Have you made this or any other of our designs? Tag your pictures in social media with #dropsdesign so we can see them! Do you need help with this pattern?You'll find tutorial videos, a Comments/Questions area and more by visiting the pattern on garnstudio.com. © 1982-2024 DROPS Design A/S. We reserve all rights. This document, including all its sub-sections, has copyrights. Read more about what you can do with our patterns at the bottom of each pattern on our site. |
||||||||||||||||||||||||||||||||||


With over 40 years in knitting and crochet design, DROPS Design offers one of the most extensive collections of free patterns on the internet - translated to 17 languages. As of today we count 304 catalogues and 11422 patterns - 11422 of which are translated into English (UK/cm).
We work hard to bring you the best knitting and crochet have to offer, inspiration and advice as well as great quality yarns at incredible prices! Would you like to use our patterns for other than personal use? You can read what you are allowed to do in the Copyright text at the bottom of all our patterns. Happy crafting!
Comments / Questions (30)
Bonjour, je viens à nouveau vous demander un renseignement. J'ai pris la taille M, vous dîtes après le diagramme A1 de diminuer de 11 m sur les 51 premières mailles et 9 m sur les 48 dernières. Ce qui fait un total de 11+9=20. Comme j'ai monté 144m il devrait m'en rester 124 et non pas 125 comme vous mentionnez? Merci pour votre aide. Cordialement
07.10.2019 - 22:43DROPS Design answered:
Bonjour Hélène, sur le même rang, on diminue 11 m + 9 m dans les côtes mais au 6ème rang de A.1, on a augmenté 1 maille dans A.1 (cf jeté au milieu du diagramme), on a donc 144 +1 m augmentée dans A.1 - 11 - 9 = 125 m. Bon tricot!
08.10.2019 - 10:56Bonjour. J'adore ce modèle mais je voudrais le tricoter avec des aiguilles traditionnelles, et non circulaires. Est ce possible ? Comment faire ?
29.09.2019 - 11:32DROPS Design answered:
Bonjour! Verrez la lecon DROPS: ICI. Bon tricot!
30.09.2019 - 08:59Bonjour et déjà merci pour avoir répondu rapidement à ma première quastion. Deuxième question: est-ce que le pull est uni sur le dos ou il y a aussi les torsades? Merci pour votre réponse Bien cordialement
24.09.2019 - 20:30DROPS Design answered:
Bonjour Hélène, les torsades sont seulement sur le devant, pas sur le dos, ce qui explique que le nombre de mailles est différent entre les marqueurs (on n'a besoin de plus de mailles pour le devant que pour le dos). Bon tricot!
25.09.2019 - 08:19Bonjour, je ne comprends pas ce que veut dire "au dessus " des 45-51-57-63-69-75 premières mailles, et " au-dessus" des 42-48-48-54-60-66 dernières mailles. Merci pour l'information
11.09.2019 - 20:09DROPS Design answered:
Bonjour Hélène, vous tricotez simplement les 45-51-57-63-69-75 premières mailles et les 42-48-48-54-60-66 dernières mailles en côtes 3 mailles endroit/3 mailles envers. Bon tricot!
12.09.2019 - 08:50Ola. Muito obrigada por mais um lindo modelo. Gostaria de saber se realmente a gola será feita por ultimo? Seguindo a ordem da receita? Muito obrigada :*
16.04.2019 - 04:07DROPS Design answered:
Boa tarde, Sim, a gola é feito por último. Começa pela parte de baixo do pulôver (ao contrário do que estava indicado e que já foi corrigido). Assim, a gola é a ultima parte do pulôver a ser tricotada. Bom tricô!
23.04.2019 - 15:59Jeg er slet ikke i tvivl om hvor målskitsen er, men mener stadig, der er en fejl i opskriften. Som I kan se på billedet i opskriften, så er der 4 bobler på trøjen, inden der lukkes af til ærme, og hvis man overholder strikkefastheden (som jeg gør), og strikker mønsteret indtil man har 4 bobler, så er det noget mere end 27 cm. Men helt OK, som sagt, så laver jeg jo bare den ønskede længde :-)
13.02.2019 - 19:44DROPS Design answered:
Hei Helle. Du har ikke strikket alle 4 boblene før du feller av til ermhull. På 27 cm har du strikket ca 38 omganger totalt. Det vil si at du har strikket A.2 1 hel gang i høyden og er ca midt mellom boble 3 og 4 når du feller av til ermhull. Etter at ermene er satt inn på samme pinne som bolen fortsettes med mønster på forstykket. Om du ser på bildet 2 (nærbilde) kan du se raglanlinen forsvinne nedover til under boble 4. Så det er ingen feil i oppskriften. Men som du selv sier så kan du jo gjerne strikke den lenger før du feller av til ermhull om du ønsker det. God fornøyelse
14.02.2019 - 08:25Hej, kan godt se, at der er spurgt om dette før, men nu har jeg målt min korteste strik, som går lige til taljen, og der er 32 cm inden der lukkes til ærmer, og jeg er 175 cm høj. Modellen må næsten være under 150 cm høj, hvis man ser hvor langt trøjen går ned. Er I stadig sikre på, at det ikke er en fejl med kun 27 cm inden der lukkes? Selvfølgelig strikker jeg bare selv længere 😄
09.02.2019 - 20:25DROPS Design answered:
Hej Helle, selve bærestykket er noget længere i denne model end i andre. Du ser total længde i måleskitsen nederst i opskriften. God fornøjelse!
13.02.2019 - 12:13Bonjour, je ne vois pas d'indication concernant le nombre de pelote de laine nécessaire pour la confection d'un pull, en fonction de chaque taille? Merci de bien vouloir de donner cette précision.
06.02.2019 - 15:38DROPS Design answered:
Bonjour Mme Darif, vous trouverez la quantité nécessaire pour chaque taille, au poids, dans l'en-tête du modèle, ainsi, en taille S par ex, il faut 600 g Eskimo/50 g la pelote = il vous faudra 12 pelotes DROPS Eskimo. Bon tricot!
06.02.2019 - 16:35Hi, I have a problem with the increase by yarn over on the neck. While this works fine on the knit, on the purl it leaves a really conspicuous hole. What can I do differently to avoid this?
14.01.2019 - 10:57DROPS Design answered:
Dear Liz, make sure the yarn overs are not too loose towards the purl stitches, try to tighten the yarn somewhat more. Happy knitting!
14.01.2019 - 13:01Jeg tenker å lage den med høyere hals, kan skje 10 -12 cm. Tror dere det skal gå an?
04.01.2019 - 11:52DROPS Design answered:
Hei Natalia. Det skal nok gå helt fint å strikke høy hals om du ønsker det. God fornøyelse
09.01.2019 - 08:02