DROPS Snow
DROPS Snow
100% Wool
from 2.00 £ /50g
Get the yarn to make this pattern from 24.00£.

The yarn cost is calculated from the pattern’s smallest size and the yarn’s cheapest product type. Looking for an even better price? You might find it on the DROPS Deals!

DROPS SS24

Green Tea

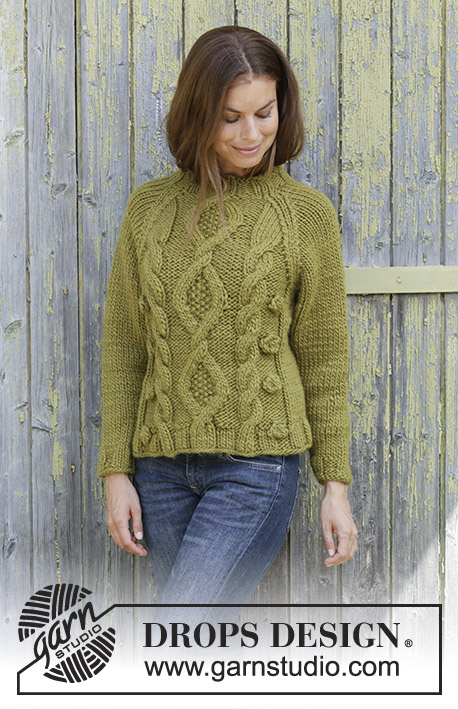
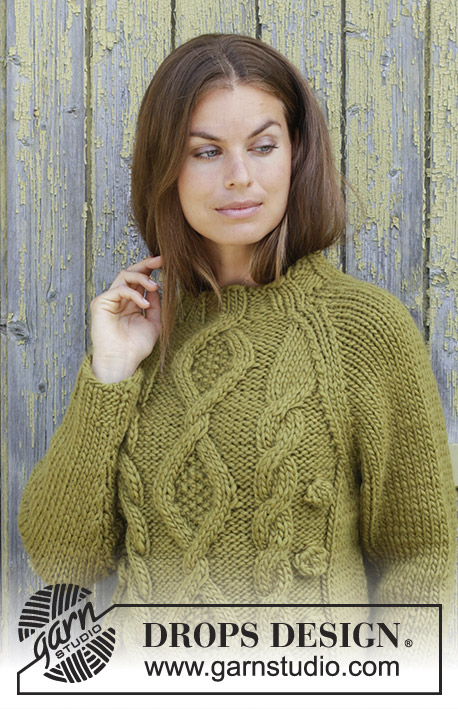
Knitted jumper with raglan in DROPS Snow. Piece is knitted bottom up with cables and bobbles. Size: S - XXXL

DROPS 196-32
DROPS design: Pattern ee-637
Yarn group E or C + C
----------------------------------------------------------

Size: S - M - L - XL - XXL - XXXL
Materials:
DROPS SNOW from Garnstudio (belongs to yarn group E)
600-650-700-750-850-950 g colour 06, olive

----------------------------------------------------------
ACCESSORIES FOR THE PIECE:

KNITTING TENSION:
10 stitches in width and 14 rows vertically in stocking stitch = 10 x 10 cm.

NEEDLES:
DROPS DOUBLE POINTED NEEDLES SIZE 9 mm: for stocking stitch/pattern.
DROPS CIRCULAR NEEDLE SIZE 9 mm: length 60 and 80 cm for stocking stitch/pattern.
DROPS DOUBLE POINTED NEEDLES SIZE 8 mm: for rib
DROPS CIRCULAR NEEDLE SIZE 8 mm: length 40 and 80 cm for rib.
DROPS CABLE NEEDLE - for cables.
Needle size is only a suggestion! If you have too many stitches on 10 cm switch to larger needles. If you have too few stitches on 10 cm switch to smaller needles.

----------------------------------------------------------

-------------------------------------------------------

Alternative Yarn – See how to change yarns here
Yarn Groups A to F – Use the same pattern and change the yarn here
Yarn usage using an alternative yarn – Use our yarn converter here

-------------------------------------------------------

DROPS Snow
DROPS Snow
100% Wool
from 2.00 £ /50g
Get the yarn to make this pattern from 24.00£.

The yarn cost is calculated from the pattern’s smallest size and the yarn’s cheapest product type. Looking for an even better price? You might find it on the DROPS Deals!

Pattern instructions

NOTE: This pattern is written in British English. All measurements in charts are in cm. For conversion from cm to inches - click here. There are different terms for crocheting in British and American English. If this pattern includes crochet, click for "crochet terms" here. For this pattern in American English, please click here.
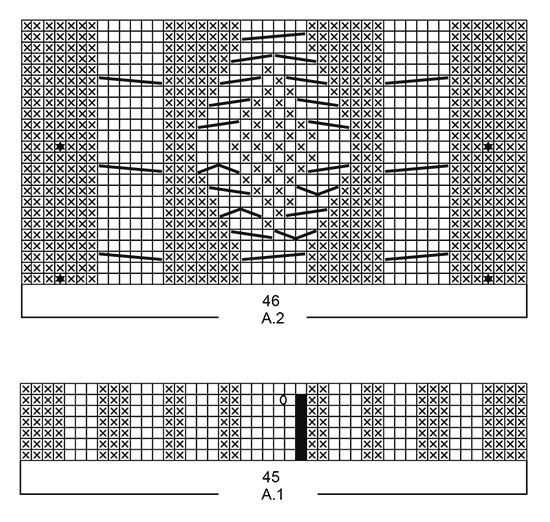
EXPLANATION FOR THE PATTERN:

----------------------------------------------------------

PATTERN: 
See diagrams A.1 and A.2.

DECREASE/INCREASE TIP (evenly):
To calculate how to decrease/increase evenly, use the number of stitches decreases are done over (e.g. 45 stitches) and divide by number of decreases to be done (e.g. 9) = 5. In this example knit approx. every 4th and 5th stitch together.
When increasing evenly make 1 yarn over (in this example) after every 5th stitch. On next round knit yarn over twisted to avoid holes.

DECREASE TIP-1 (applies to sides of body): 
Decrease 1 stitch on each side of marker thread as follows: Work until 3 stitches remain before marker thread and knit 2 together, knit 2 (marker thread is between these stitches), slip 1 stitch knitwise, knit 1, pass slipped stitch over stitch worked.

DECREASE TIP-2 (applies to last round before neck edge):
To make the decrease look nice before neck edge decrease by knitting 2 stitches together when knitting and decrease by purling 2 stitches together when purling.

INCREASE TIP (applies to sides on body and under sleeves):
Work until 2 stitches remain before marker thread, 1 yarn over, knit 4 (marker thread is in the middle of these stitches), 1 yarn over. On next round knit yarn over twisted to avoid holes. Then work the new stitches in stocking stitch

RAGLAN:
Decrease first 1 stitch on each side of marker threads (= 8 stitches decreased on round) as follows:
Decrease 1 stitch after marker thread on front/back piece as follows: Knit 1, slip 1 stitch knitwise, knit 1, pass slipped stitch over stitch worked (= 1 stitch decreased)
Decrease 1 stitch before marker thread on front/back piece as follows: Work until 3 stitches remain before marker thread, knit 2 together (= 1 stitch decreased), knit 1.
Decrease 1 stitch after marker thread on sleeve as follows: Slip 1 stitch knitwise, knit 1, pass slipped stitch over stitch worked (= 1 stitch decreased).
Decrease 1 stitch before marker thread on sleeve as follows: Work until 2 stitches remain before marker thread, knit 2 together (= 1 stitch decreased).

When decrease has been done 10-12-13-14-17-19 times, continue decrease as before on sleeves and on back piece but now decrease 2 stitches in each side of front piece (= 10 stitches decreased on round) as follows:
Decrease 2 stitches after marker thread on front piece as follows: Knit 1, slip 1 stitch knitwise, knit 2 together, pass slipped stitch over stitches worked (= 2 stitches decreased).
Decrease 2 stitches before marker thread on front piece as follows: Work until 4 stitches remain before marker thread, knit 3 together (= 2 stitches decreased), knit 1.

----------------------------------------------------------

START THE PIECE HERE:

----------------------------------------------------------

JUMPER - SHORT OVERVIEW OF THE PIECE:
Work piece in the round on circular needle, bottom up. Work sleeves in the round on double pointed needles/a short circular needle.

BODY:
Cast on 132-144-150-162-174-186 stitches on circular needle size 8 mm with Snow. Knit 1 round. Now work rib as follows: Work (knit 3/purl 3) over the first 45-51-57-63-69-75 stitches, work A.1 (= 45 stitches), work (knit 3/purl 3) over the remaining 42-48-48-54-60-66 stitches. Continue in the round like this until 1 round remains in A.1. Work next round as follows: Knit the first 45-51-57-63-69-75 stitches and decrease 9-11-12-13-14-14 stitches evenly over these stitches – read DECREASE/INCREASE TIP, work last round in A.1, knit the remaining 42-48-48-54-60-66 stitches and decrease 7-9-6-9-8-8 stitches evenly over these stitches = 117-125-133-141-153-165 stitches. Switch to circular needle size 9 mm. Now work A.2 (= 46 stitches) over A.1 and work in stocking stitch over the remaining stitches on round. REMEMBER THE KNITTING TENSION! When piece measures 9 cm, insert 1 marker thread 9-11-13-15-18-21 stitches before A.2 and 9-11-13-15-18-21 stitches after A.2 (= in each side). There are now 64-68-72-76-82-88 stitches on front piece and 53-57-61-65-71-77 stitches on back piece. Move the marker threads upwards when working. On next round decrease 1 stitch on each side of marker thread in each side – read DECREASE TIP-1. Decrease like this every 4th-4th-4th-5th-5th-5th round 3-3-3-2-2-2 times in total = 105-113-121-133-145-157 stitches. When piece measures 21 cm, increase 1 stitch on each side of marker threads in each side - read INCREASE TIP = 109-117-125-137-149-161 stitches. Continue until piece measures approx. 27 cm in all sizes. On next round cast off 3 stitches on each side of marker thread in each side for armhole (= 6 stitches under each sleeve). There are now 54-58-62-68-74-80 stitches on front piece and 43-47-51-57-63-69 stitches on back piece. Put piece aside and work the sleeves.

SLEEVE:
Cast on 24-24-24-30-30-30 stitches on double pointed needles size 8 mm with Snow. Knit 1 round. Then work rib (= knit 3/purl 3) for 5 cm. Knit 1 round while decreasing 2-2-0-2-2-0 stitches evenly = 22-22-24-28-28-30 stitches. Insert a marker thread at beginning of round (= mid under sleeve). Switch to double pointed needles size 9 mm. Work in stocking stitch in the round. When piece measures 8-10-9-10-10-7 cm, increase 1 stitch on each side of marker thread under sleeves - remember INCREASE TIP. Increase like this every 8th-5th-5th-5th-3rd-3rd round 6-8-8-7-10-11 times in total = 34-38-40-42-48-52 stitches. When piece measures 37-35-34-32-30-29 cm, increase 1 stitch on each side of marker thread every other round 4 times in total = 42-46-48-50-56-60 stitches. On next round cast off 6 stitches mid under sleeve (= 3 stitches on each side of marker thread) = 36-40-42-44-50-54 stitches. Sleeve measures 43-41-40-38-36-35 cm. Put piece aside and knit the other sleeve.

YOKE:
Slip sleeves on to same circular needle as body where armholes were cast off = 169-185-197-213-237-257 stitches. Insert a marker thread in all transitions between sleeves and body (= 4 marker threads in piece). Begin round in transition between left sleeve and back piece. Continue with pattern on front piece as before and work in stocking stitch over the remaining stitches on round. When 4-2-2-4-2-1 round has been worked, begin decrease for RAGLAN – read explanation above. Decrease like this every other round 10-12-13-14-17-19 times in total = 89-89-93-101-101-105 stitches. Then continue decrease for raglan as before on sleeves and back piece and now decrease 2 stitches in each side for raglan on front piece. Decrease like this every other round 4 times in total = 49-49-53-61-61-65 stitches. When there is not enough stitches to work cables in A.2 on front piece, continue with knit over knit and purl over purl over these stitches.
When all decreases for raglan are done, work next round as follows: Knit over stitches on back piece and decrease 1-0-1-3-2-3 stitches evenly over these stitches, knit over the 8 stitches on sleeve, knit over knit and purl over purl over stitches on front piece and decrease 4-3-4-6-5-6 stitches evenly over these stitches – read DECREASE TIP-2 and remember DECREASE/INCREASE TIP, knit over the 8 stitches on sleeve = 44-46-48-52-54-56 stitches. Jumper measures approx. 54-56-58-60-62-64 cm from neck mid front and down.

NECK EDGE:
Switch to a short circular needle size 8 mm. Knit 1 round while increasing 4-2-6-2-6-4 stitches evenly - remember DECREASE/INCREASE TIP = 48-48-54-54-60-60 stitches. Work rib (knit 3/purl 3) for 5 cm. Cast off stitches with knit over knit and purl over purl.

Diagram

symbols = knit
symbols = purl
symbols = slip 3 stitches on cable needle behind piece, knit 3, knit 3 from cable needle
symbols = slip 3 stitches on cable needle in front of piece, knit 3, knit 3 from cable needle
symbols = slip 1 stitch on cable needle behind piece, knit 3, knit 1 from cable needle
symbols = slip 3 stitches on cable needle in front of piece, knit 1, knit 3 from cable needle
symbols = slip 1 stitch on cable needle behind piece, knit 3, purl 1 from cable needle
symbols = slip 3 stitches on cable needle in front of piece, purl 1, knit 3 from cable needle
symbols = Bobble - work as follows: Knit 1, 1 yarn-over, knit 1, 1 yarn-over, knit 1 in same stitch (= 5 stitches), turn piece. Work 4 rows in stocking stitch over these 5 stitches Then pass 2nd stitch on right needle over 1st stitch and 3rd stitch over 1st stitch, then 4th stitch over 1st stitch and finally 5th stitch over 1st stitch (= 1 stitch remains)
symbols = between 2 stitches make 1 yarn over. On next round knit yarn over twisted to avoid holes.
symbols = this square is not a stitch, go directly to next symbol in diagram
diagram
diagram

Each of our patterns has specific tutorial videos to help you.

Do you have a question? See a list of frequently asked questions (FAQ)

Knitting tension is what determines the final measurements of your work, and is usually measured per 10 x 10 cm. It is provided like so: number of stitches in width x number of rows in height - eg: 19 stitches x 26 rows = 10 x 10 cm.

The knitting tension is very individual; some people knit/crochet loosely while others work tightly. You adjust the knitting tension with the needle size, which is why the suggested needle size is only meant as a guide! You need to adjust this (up or down) to ensure that YOUR knitting tension matches the knitting tension provided in the pattern. If you work with a different knitting tension than provided you will have a different yarn consumption, and your work will have different measurements than what the pattern suggests.

The knitting tension also determines which yarns can replace each other. As long as you achieve the same knitting tension you can replace one yarn with another.

See DROPS lesson: How to measure your tension/gauge

See DROPS video: How to make a gauge tension swatch

The required amount of yarn is provided in grams, eg: 450 g. To calculate how many balls you’ll need you first need to know how many grams are in 1 ball (25g, 50g or 100g). This information is available if you click on the individual yarn quality on our pages. Divide the amount required with the amount of each ball. For example, if each ball is 50g (the most common amount), the calculation will be as follows: 450 / 50 = 9 balls.

The important thing when changing from one yarn to another is that the knitting/crochet tension remains the same. This is so that the measurements of the finished piece will be the same as on the sketch provided. It is easier to achieve the same knitting tension using yarns from the same yarn group. It is also possible to work with multiple strands of a thinner yarn to achieve the knitting tension of a thicker one. Please try our yarn converter. We recommend you to always work a test swatch.

Please NOTE: when changing yarn the garment might have a different look and feel to the garment in the photo, due to individual properties and qualities of each yarn.

See DROPS lesson: Can I use a different yarn than the one mentioned in the pattern?

All our yarns are categorised into yarn groups (from A to F) according to thickness and knitting tension – group A contains the thinnest yarns and group F the thickest. This makes it easier for you to find alternative yarns to our patterns, should you wish to switch yarn. All yarns within the same group have a similar knitting tension and can easily replace each other. However, different yarn qualities have different structures and properties which will give the finished work a unique look and feel.

Click here for an overview of the yarns in each yarn group

At the top of all our patterns you’ll find a link to our yarn calculator, which is a helpful tool should you wish to use a different yarn than suggested. By filling in the yarn quality you wish to replace, the amount (in your size) and number of strands, the calculator will present good alternative yarns with the same knitting tension. Additionally it will tell you how much you’ll require in the new qualities and whether you’ll need to work with multiple strands. Most skeins are 50g (some are 25g or 100g).

If the pattern is worked with multiple colours, every colour will have to be calculated separately. Similarly, if the pattern is worked with several strands of different yarns (for example 1 strand Alpaca and 1 strand Kid-Silk) you will have to find alternatives for each, individually.

Click here to see our yarn calculator

Since different yarns have different qualities and textures we have chosen to keep the original yarn in our patterns. However, you can easily find options among our available qualities by using our yarn calculator, or simply pick a yarn from the same yarn group.

It is possible that some retailers still have discontinued yarns in stock, or that someone has a few skeins at home that they would like to find patterns for.

The yarn calculator will provide both alternative yarn as well as required amount in the new quality.

If you think it's hard to decide what size to make, it can be a good idea to measure a garment you own already and like the size of. Then you can pick the size by comparing those measures with the ones available in the pattern's size chart.

You'll find the size chart at the bottom of the pattern.

See DROPS lesson: How to read size chart

The needle size provided in the pattern serves only as a guide, the important thing is to follow the knitting tension. And since knitting tension is very individual, you will have to adjust the needle size to ensure that YOUR tension is the same as in the pattern – maybe you’ll have to adjust 1, or even 2 needle sizes, up or down to achieve the correct tension. For this, we recommend that you work test swatches.

Should you work with a different knitting tension than the one provided, the measurements of the finished garment might deviate from the measurement sketch.

See DROPS lesson: How to measure your tension/gauge

See DROPS video: How to make a tension/gauge swatch

Working a garment top-down provides more flexibility and room for personal adjustment. For example it is easier to try the garment on while working, as well as making adjustments to length of yoke and shoulder caps.

The instructions are carefully explaining every step, in the correct order. Diagrams are adjusted to the knitting direction and are worked as usual.

The diagram depicts all rows/rounds, and every stitch seen from the right side. It is read from bottom to top, from right to left. 1 square = 1 stitch.

When working back and forth, every other row is worked from the right side and every other row is worked from the wrong side. When working from the wrong side, the diagram will have to be worked reversed: from left to right, knit stitches are purled, purl stitches are knit etc.

When working in the round every round is worked from the right side and the diagram are worked from right to left on all rounds.

See DROPS lesson: How to read knitting diagrams

The diagram depicts all rows/rounds, and every stitch seen from the right side. It is worked from bottom to top, from right to left.

When working back and forth every other row is worked from the right side: from right to left and every other row is worked from the wrong side: from left to right.

When working in the round, every row in the diagram are worked from the right side, from right to left.

When working a circular diagram you start in the middle and work your way outwards, counter clockwise, row by row.

The rows usually start with a given number of chain stitches (equivalent to the height of the following stitch), this will either be depicted in the diagram or explained in the pattern.

See DROPS lesson: How to read crochet diagrams

Instructions for working several diagrams after each other on the same row/round, will often be written like so: “work A.1, A.2, A.3 a total of 0-0-2-3-4 times". This means you work A.1 once, then A.2 is worked once, and A.3 is repeated (in width) the number of times provided for your size – in this case like so: S = 0 times, M = 0 times, L=2 times, XL= 3 times and XXL = 4 times.

The diagrams are worked as usual: begin with the first row in A.1, then work the first row in A.2 etc.

See DROPS lesson: How to read knitting diagrams

See DROPS lesson: How to read crochet diagrams

The total width of the garment (from wrist-to-wrist) will be larger in the larger sizes, despite the actual sleeves being shorter. The larger sizes have longer sleeve caps and wider shoulders, so there will be a good fit in all sizes.

The measurement sketch/schematic drawing provides information regarding the full length of the garment. If it’s a jumper or a jacket the length is measured from the highest point on the shoulder closest to the neckline, and straight down to the bottom of the garment. It is NOT measured from the tip of shoulder. Similarly, the length of yoke is measured from the highest point on the shoulder and down to where yoke is split into body and sleeves.

On a jacket measures are never taken along bands, unless specifically stated. Always measure inside band stitches when measuring the length.

See DROPS lesson: How to read a schematic drawing

Diagrams are often repeated on the round or in height. 1 repeat is the diagram the way it appears in the pattern. If it says to work 5 repeats of A.1 in the round, then you work A.1 a total of 5 times after/next to each other in the round. If it says to work 2 repeats of A.1 vertically/in height you work the entire diagram once, then begin again at the start and work the entire diagram one more time.

Chain stitches are slightly narrower than other stitches and to avoid working the cast-on edge too tight, we simply chain more stitches to begin with. The stitch count will be adjusted on the following row to fit the pattern and measurement sketch.

The rib edge is more elastic and will contract slightly compared to, for example, stocking stitch. By increasing before the rib edge, you avoid a visible difference in width between the rib edge and the rest of the body.

It’s very easy to cast off too tightly, and by making yarn overs while casting off (and simultaneously casting these off) you avoid a too tight cast off edge.

See DROPS video: How to bind off with yarn overs (yo)

To achieve an even increase (or decrease) you can increase on, for example: every 3rd and 4th row alternately, like so: work 2 rows and increase on the 3rd row, work 3 rows and increase on the 4th. Repeat this until the increase is complete.

See DROPS lesson: Increase or decrease 1 st on every 3rd and 4th row alternately

Should you prefer to work in the round instead of back and forth, you may of course adjust the pattern. You’ll need to add steeks mid-front (usually 5 stitches), and follow the instructions. When you would normally turn and work from the wrong side, simply work across the steek and continue in the round. At the end you’ll cut the piece open, pick up stitches to work bands, and cover the cut edges.

See DROPS video: How to knit steeks and cut open

Should you prefer to work back and forth instead of in the round, you may of course adjust the pattern so you work the pieces separately and then assemble them at the end. Divide the stitches for the body in 2, add 1 edge stitch in each side (for sewing) and work the front and back pieces separately.

See DROPS lesson: Can I adapt a pattern for circular needles into straight needles?

Pattern repeats can vary slightly in the different sizes, in order to get the correct proportions. If you’re not working the exact same size as the garment in the photo, yours might deviate slightly. This has been carefully developed and adjusted so that the complete impression of the garment is the same in all sizes.

Make sure to follow instructions and diagrams for your size!

If you have found a pattern you like which is available in women’s size it’s not very difficult to convert it to men’s size. The biggest difference will be the length of sleeves and body. Start working on the women size that you think would fit across the chest. The additional length will be worked right before you cast off for the armhole/sleeve cap. If the pattern is worked top-down you can add the length right after the armhole or before the first decrease on sleeve.

Regarding additional yarn amount, this will depend on how much length you add, but it is better with a skein too many than too few.

All yarns will have excess fibres (from production) that might come off as lint or shedding. Brushed yarns (ie hairier yarns) have more of these loose, excess fibres, causing more shedding.

Shedding also depends on what is worn under or over the garment, and whether this pulls at the yarn fibres. It’s therefore not possible to guarantee that there will be no shedding

Below are some tips on how to get the best result when working with hairier yarns:

1. When the garment is finished (before you wash it) shake it vigorously so the looser hairs come off. NOTE: do NOT use a lint roller, brush or any method that pulls at the yarn.

2. Place the garment in a plastic bag and put it in your freezer - the temperature will cause the fibres to become less attached to each other, and excess fibres will come off easier.

3. Leave in the freezer for a few hours before taking it out and shaking it again.

4. Wash the garment according to the instructions on the yarn label.

Pilling is a natural process that happens to even the most exclusive of fibers. It's a natural sign of wear and tear that is hard to avoid, and that is most visible in high friction areas of your garment like a sweater's arms and cuffs.

You can make your garment look as new by removing the pilling, using a fabric comb or a pill/lint remover.

Still can't find the answer you need? Then scroll down and leave your question so one of our experts can try to help you. This will be done normally within 5 to 10 working days.
In the meantime, you can read the questions and answers that others have left to this pattern or join the DROPS Workshop on Facebook to get help from fellow knitters/crocheters!

You might also like...

Green Tea

Frau Strick Strickt, Germany

Green Tea

Simoneet, France

Post a comment to pattern DROPS 196-32

We would love to hear what you have to say about this pattern!

If you want to leave a question, please make sure you select the correct category in the form below, to speed up the answering process. Required fields are marked *.

Comments / Questions (30)

country flag Astrid Nyman wrote:

Jag stickar tröjan Green Tea och funderar på längden på ärmen, är det så att storlek S har längst ärm, 43 cm. Tycker att det inte kan stämma. Kan måtten vara omkastade?

15.11.2022 - 16:49

DROPS Design answered:

7) Varför är ärmarna kortare i större storlekar? I de större storlekarna kommer den totala vidden (från handled till handled) att vara större än i de mindre storlekarna, även om själva ärmen är kortare. De större storlekarna har längre ärmkupa samt bredare axelvidd. Detta resulterar i en bra passform i alla storlekar.

16.11.2022 - 12:17

country flag Ann-charlott wrote:

Hej! Jag skulle gärna vilja sticka denna med vanliga stickor och inte rundstickor. Går det att få mönstret översatt till ett gammeldags traditionellt mönster ?

01.09.2021 - 22:01

DROPS Design answered:

Hej Ann-Charlott, vi kan ikke skrive opskriften om, men du finder flere videoer om hvordan man følger den her opskrift. Så prøv :)

02.09.2021 - 15:57

country flag Anniina wrote:

Ohjeen kohdasta Etu-ja takakappale on kysyttävää: Kun piirroksen A.1 mallineuletta on jäljellä 1 kerros, seuraavan kerroksen kavennusohje on hämmentävä. Mitä tarkoittaa \"kavenna tasavälein näiden silmukoiden kohdalla 9-11-12-13-14-14 silmukkaa\" ja \"kavenna tasavälein näiden silmukoiden kohdalla 7-9-6-9-8-8 silmukkaa\" lopputuloksena pitäisi olla 117-125-133-141-153-165 silmukkaa. Kuuluuko puseron puolista tulla keskenään epäsymmetriset?

08.11.2020 - 10:07

country flag Susanne Bang Poulsen wrote:

Hej, jeg vil gerne strikke denne model, men i air og brushed alpaca, hvordan omregner jeg, hvor meget jeg skal bruge af hver? desuden vil jeg gerne kombinere modellen med mønstret cozy weekend sweateren (altså den store snoning midt for samt halsen fra denne, kan jeg ikke bare gøre det, uden at det ødelægger opskriften (altså antal masker og mål)?

13.10.2020 - 23:29

DROPS Design answered:

Hei Susanne. Du kan fint bytte ut DROPS Eskimo med DROPS Air + DROPS Brushed AlpacaSilk, bare sjekk at du får den strikkefastheten som er oppgitt i oppskriften. Du kan regne ut garnmengden ved å bruke vår garnkalkulator, den finner du under hver oppskrift (grønn link). Design avd. har dessverre ikke muligheten til å regne ut mål og masker ved å forandre fletten. mvh DROPS design

19.10.2020 - 10:50

country flag MARTINA wrote:

Au début pour le dos/devant, après avoir fait une première fois A1, vous dites "Continuer en rond ainsi jusqu'à ce qu’il reste 1 tour de A.1 à faire" ?? Combien de fois doit-on faire A1 avant de faire A2 ? Merci beaucoup pour votre aide

08.05.2020 - 17:25

DROPS Design answered:

Bonjour Martina, vous tricotez ainsi tous les rangs de A.1 autrement dit 7 rangs au total (en augmentant au 6ème tour dans A.1 et au 7ème tour = en augmentant comme indiqué dans les autres mailles en côtes). Vous tricotez ensuite les 46 mailles de A.2 au-dessus des 46 mailles de A.1. Bon tricot!

11.05.2020 - 08:13

country flag MARTINA wrote:

J'ai monté 150m, Pour les premiers rangs après les côtes 3/3, vous dites de supprimer 12m, tricoter A1 soit 45m, puis diminuer 6m = 132m et non 133m comme vous l'indiquez ?

08.05.2020 - 10:30

DROPS Design answered:

Bonjour Martina, à l'avant-dernier rang de A.1, on augmente 1 maille (cf jeté au milieu du diagramme environ), on va donc avoir 46 m dans A.1 et 133 m au total. Bon tricot!

08.05.2020 - 11:03

country flag Emily wrote:

Worried about length to arm only 27cm, too short? I am quite petite. how many repeat diamond cables should i do before arm cast off? I want it to look like the picture. Thank you!

26.02.2020 - 15:49

DROPS Design answered:

Dear Emily, thi is a rather short sweater, but if you are worried about the length, please take a sweater that is comfortable, and compare its measuremnst to the numbers given on the schematic drawings at the bottom of the patternm and adjust the number of rows accordingly. Happy Knitting!

27.02.2020 - 05:07

country flag Mette wrote:

Jeg er gået igang med at strikke denne opskrift og der er altså fejl i opskriften. I målskemaet er målet nederst (str. M) = 57 cm (=114 cm hele vejen rundt). Strikkefastheden er 10 cm for 10 masker og den overholder jeg. Når jeg så slår 144 masker op (som anvist i opskriften for str. M) ender jeg jo med en bredde på 144 cm. Jeg kan godt selv "blot" ændre antallet, så jeg slår 114 masker op - men hvordan påvirkes ind- og udtagninger samt raglan-anvisninger af ændringen i antal?

07.02.2020 - 11:43

DROPS Design answered:

Hej Mette, Vi slår flere masker op for at ribben i kanten ikke skal blive for stram, der tages masker ind inden du starter på A.2 og hver snoning i A.2 vil trække arbejdet sammen til halvdelen over hver snoning. Hvis du overholder strikkefastheden vil bredden blive som den du ser i måleskitsen nederst i opskriften. God fornøjelse!

11.02.2020 - 11:37

country flag Elisabeth Petruskie wrote:

Hello! I was wondering if you can give us complete written directions for this sweater? I would love to make up but find charts overwhelming. Thank you.

13.12.2019 - 02:07

DROPS Design answered:

Dear Mrs Petruskie, there are only diagrams to this pattern, but you will find here how to read diagrams. Happy knitting!

13.12.2019 - 09:00

country flag Bianca wrote:

Ik ben aan de halsboord, maat M. Ben net een nieuwe bol begonnen, en heb er nog drie over. Heb zoals aangegeven 13 bollen gekocht. Hoe kan dat?

02.11.2019 - 09:54