
Popular categories
Looking for a yarn?


|
|||||||||||||||||||||||||||||||
Green Wood |
|||||||||||||||||||||||||||||||
 |
 |
||||||||||||||||||||||||||||||
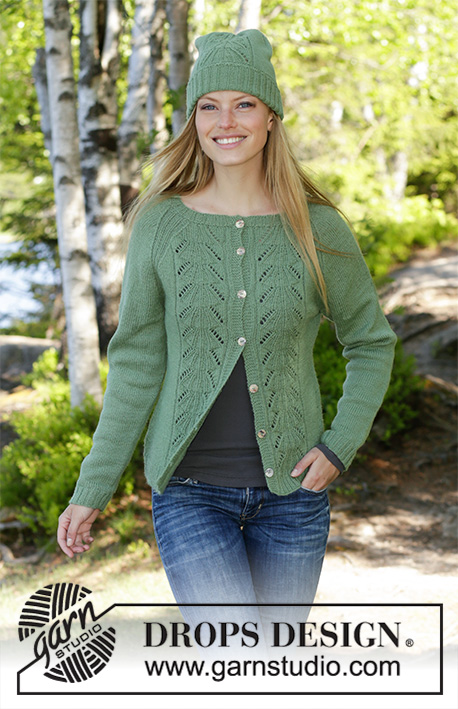
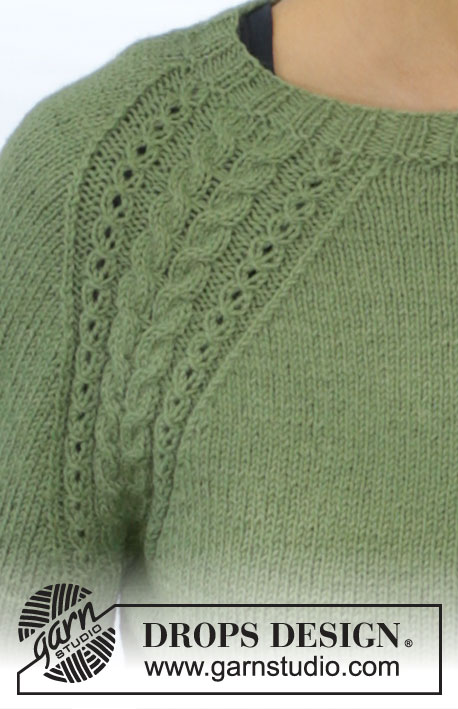
Knitted fitted jumper in DROPS BabyAlpaca Silk. The piece is worked in stocking stitch with raglan and cables. Sizes S - XXXL.
DROPS 196-29 |
|||||||||||||||||||||||||||||||
|
EXPLANATIONS FOR THE PATTERN: ------------------------------------------------------- PATTERN: See diagrams A.1 and A.2. Choose diagram for your size. DECREASE TIP-1 (evenly spaced): To work out how to decrease evenly, count the total number of stitches on the needle (e.g. 264 stitches) and divide by the number of decreases to be made (e.g. 64) = 4.1. In this example, decrease by knitting together approx. every 3rd and 4th stitch. DECREASE TIP-2 (for sides of body): Start 5 stitches before the marker thread, knit 2 together, knit 6 (the marker thread sits in the middle of these 6 stitches), slip 1 stitch as if to knit, knit 1, pass the slipped stitch over the knitted stitch (= 2 stitches decreased). INCREASE TIP (for sides of body and mid under sleeve): Work until there are 3 stitches left before the marker thread, make 1 yarn over, knit 6 (the marker thread sits in the middle of these 6 stitches), make 1 yarn over (= 2 stitches increased). On the next round knit the yarn overs twisted to avoid holes. RAGLAN: Decrease to raglan in each transition between body and sleeves (i.e. decrease on each side of A.2) = 8 stitches decreased each time. Decrease as follows before A.2: Work until there are 2 stitches left before A.2, knit 2 together (= 1 stitch decreased). Decrease as follows after A.2: slip 1 stitch as if to knit, knit 1, pass the slipped stitch over the knitted stitch (= 1 stitch decreased). ------------------------------------------------------- START THE PIECE HERE: ------------------------------------------------------- JUMPER - SHORT SUMMARY OF THE PIECE: The piece is worked in the round with circular needle as far as the armholes. The sleeves are worked in the round with double pointed needles/short circular needle. Then the body and sleeves are placed on the same circular needle and the yoke is worked in the round to finished length. BODY: Cast on 264-292-320-352-388-424 stitches with circular needle size 2.5 mm and BabyAlpaca Silk. Knit 1 round. Then work rib in the round (= knit 2 / purl 2) for 4 cm. Knit 1 round where you decrease 64-72-80-88-96-104 stitches evenly on round – read DECREASE TIP-1 = 200-220-240-264-292-320 stitches. Change to circular needle size 3 mm and work stocking stitch. REMEMBER THE KNITTING TENSION! When the piece measures 6 cm in all sizes, insert 1 marker thread at the beginning of the round and 1 marker thread after 100-110-120-132-146-160 stitches (= in the sides). On the next round decrease 1 stitch on each side of both marker threads - read DECREASE TIP-2 = 4 stitches decreased. Decrease like this every 2 cm a total of 5 times in each side = 180-200-220-244-272-300 stitches on the needle. When the piece measures 20 cm increase 1 stitch on each side of both marker threads - read INCREASE TIP = 4 stitches increased. Increase like this every 2 cm a total of 5 times in each side = 200-220-240-264-292-320 stitches. Continue working until the piece measures 30 cm in all sizes. On the next round cast off 10-10-12-12-14-16 stitches in each side for the armholes (i.e. cast off 5-5-6-6-7-8 stitches on each side of both marker threads). There are now 90-100-108-120-132-144 stitches left on front and back pieces. Lay the piece to one side and work sleeves as described below. SLEEVE: The sleeve is worked in the round with double pointed needles, change to short circular needle when necessary. Cast on 56-60-60-64-68-68 stitches with double pointed needles size 2.5 mm and BabyAlpaca Silk. Knit 1 round. Then work rib in the round (= knit 2 / purl 2) for 4 cm. Knit 1 round where you decrease 10-12-10-12-12-10 stitches evenly on round = 46-48-50-52-56-58 stitches. Change to double pointed needles size 3 mm and work stocking stitch in the round. When the piece measures 8 cm in all sizes, insert 1 marker thread at the beginning of the round (= mid under sleeve). On the next round increase 2 stitches mid under sleeve - read INCREASE TIP. Increase like this every 3½-3-2-2-1½-1½ cm a total of 9-9-11-10-11-7 times and then every 1 cm a total of 5-9-11-13-13-18 times = 74-84-94-98-104-108 stitches. Continue working until the sleeve measures 45-44-42-41-39-37 cm (shorter measurements in larger sizes due to longer yoke). On the next round cast off 10-10-12-12-14-16 stitches mid under sleeve for the armhole (i.e. cast off 5-5-6-6-7-8 stitches on each side of the marker thread) = 64-74-82-86-90-92 stitches left on needle. Lay the piece to one side and work the other sleeve in the same way. YOKE: Place the sleeves on same circular needle as the body, where you cast off stitches for the armholes (do this without working the stitches) = 308-348-380-412-444-472 stitches on the needle. Insert 1 marker in each transition between body and sleeves = 4 markers. Imagine that the garment is on the body and start the round by the marker in the transition between back piece and left arm, i.e. start 9-9-9-10-10-10 stitches before this marker and work the first round as follows: Work A.1 (= 17-17-17-19-19-19 stitches which increase to 23-23-23-27-27-27 stitches), work stocking stitch over the sleeve until there are 8-8-8-9-9-9 stitches left before the next marker, work A.1 (= 17-17-17-19-19-19 stitches which increase to 23-23-23-27-27-27 stitches), stocking stitch over the front piece until there are 9-9-9-10-10-10 stitches left before the next marker. Work A.1 (= 17-17-17-19-19-19 stitches which increase to 23-23-23-25-25-25 stitches), stocking stitch over the sleeve until there are 8-8-8-9-9-9 stitches left before the next marker, work A.1 (= 17-17-17-19-19-19 stitches which increase to 23-23-23-27-27-27 stitches) and stocking stitch over the back piece to the end of the round = 332-372-404-444-476-504 stitches on the needle. Continue the pattern like this, but when A.1 has been completed work A.2 over the 23-23-23-27-27-27 stitches in each raglan line (due to the pattern the number of stitches in A.2 will vary between 23 and 21 stitches in sizes S, M and L and between 27 and 25 stitches in XL, XXL and XXXL). AT THE SAME TIME on the round where you start A.2 begin to decrease to RAGLAN in each transition between body and sleeves – read description above. Continue to decrease to raglan every 4th round a total of 9-8-8-8-8-9 times and then every 2nd round a total of 11-16-19-22-25-26 times. After the last decrease there are 172-180-188-204-212-224 stitches left on the needle and the piece measures approx. 48-50-52-54-56-58 cm from the cast-on edge mid front. On the next round knit over knit and purl over purl AT THE SAME TIME as you decrease 6-6-6-8-8-8 stitches evenly over A.2 in each raglan line = 148-156-164-172-180-192 stitches left on needle. Knit 1 round where you decrease 24-28-32-32-36-40 evenly on round – remember DECREASE TIP-1 = 124-128-132-140-144-152 stitches. Then work neck as described below. NECK: Change to circular needle size 2.5 mm. Purl 1 round and knit 1 round. Then work rib in the round (= knit 2 / purl 2) for 2 cm. Cast off with knit over knit and purl over purl. The jumper measures approx. 54-56-58-60-62-64 cm from shoulder down. ASSEMBLY: Sew openings under the sleeves. |
|||||||||||||||||||||||||||||||
Diagram explanations |
|||||||||||||||||||||||||||||||
|
|||||||||||||||||||||||||||||||

|
|||||||||||||||||||||||||||||||

|
|||||||||||||||||||||||||||||||

|
|||||||||||||||||||||||||||||||
|
Have you made this or any other of our designs? Tag your pictures in social media with #dropsdesign so we can see them! Do you need help with this pattern?You'll find tutorial videos, a Comments/Questions area and more by visiting the pattern on garnstudio.com. © 1982-2024 DROPS Design A/S. We reserve all rights. This document, including all its sub-sections, has copyrights. Read more about what you can do with our patterns at the bottom of each pattern on our site. |
|||||||||||||||||||||||||||||||


With over 40 years in knitting and crochet design, DROPS Design offers one of the most extensive collections of free patterns on the internet - translated to 17 languages. As of today we count 304 catalogues and 11422 patterns - 11422 of which are translated into English (UK/cm).
We work hard to bring you the best knitting and crochet have to offer, inspiration and advice as well as great quality yarns at incredible prices! Would you like to use our patterns for other than personal use? You can read what you are allowed to do in the Copyright text at the bottom of all our patterns. Happy crafting!
Comments / Questions (32)
Jeg la inn et spørsmål den 13.1, men har ikke fått svar??
20.01.2020 - 20:07DROPS Design answered:
Hei Bjørg. Vi beklager så mye at du ikke har fått svar. Bolen på genseren er 30 cm i alle størrelser, mens bærestykket varierer i lengde i de forskjellige størrelsene. I størrelse L er bærestykket 28 cm langt og bolen er 30 cm, dette utgjør en total lengde på 58 cm. Om du er usikker på lengden anbefaler vi å måle et plagg du vet passer deg godt for å dobbelsjekke målene. Lykke til!
22.01.2020 - 15:26Strikker genseren Green Wood! Står i oppskriften (for alle str!!!) at når arbeidet måler 30 cm skal det felles til ermhull?? Stemmer dette! Blir ikke genseren da litt kort? Jeg strikker L! Mvh Bjørg
13.01.2020 - 11:08DROPS Design answered:
Hei Bjørg. På denne modellen er det 30 cm, ønsker du den lengre (og har nok garn), kan du strikke den lengre før du deler til ermhull. Et tips er å ta en titt på målskissen og mål på deg selv. God Fornøyelse!
03.02.2020 - 15:00Hallo, sind in A1 und A2 nur die Hinreihen oder auch die Rückreihen angegeben? HG Elke
01.01.2020 - 19:48DROPS Design answered:
Liebe Elke, die Diagramme zeigen alle Reihen, die Diagramme sind hier in der Runde gestrickt, dh alle Reihen rechts nach links stricken. hier lesen Sie mehr über Diagramme. Viel Spaß beim stricken!
02.01.2020 - 15:33Geachte hier ben ik nogmaals met een vraag. Na de mindering en voor de raglan in patroon A2 moet men nogmaals 6 steken minderen in de raglan lijn van A2. Wat bedoelen ze daarmee? Vriendelijke groet en bedankt. Alice
25.12.2019 - 19:10DROPS Design answered:
Dag Alice,
Het is de bedoeling dat je boven elke A.2 6 steken mindert (dus 24 steken geminderd in totaal op de naald). Dit wordt gedaan omdat de raglanlijn een kabel is. Een kabel neemt meer steken in de breedte en door te minderen voordat je de boord breit, blijft het mooi in vorm.
26.12.2019 - 16:28Hallo hier ben ik weer, sorry voor de vele vragen. Maar is het normaal na het bijzetten van de mouwen op de rondbreinaald de eerste toeren zeer moeilijk te breien zijn of doe ik iets verkeerd en zoja hoe kan ik dit oplossen. Vriendelijke groeten en dank bij voorbaat. Groetjes Alice
14.12.2019 - 19:14DROPS Design answered:
Dag Alice,
Bij de overgang van de mouw het pand kan het inderdaad lastig breien zijn als je net alles bij elkaar hebt gezet. Het handigst is om een langere rondbreinaald te gebruiken en dan steeds de rechter naald er uit te trekken, een lus maken met de draad en dan opnieuw insteken. Dit wordt ook wel de magic loop genoemd en uitgelegd in deze video.
16.12.2019 - 16:40Äntligen en modell som stickas nerifrån och upp! Går det att översätta beskrivningen till Puna, garngrupp B?
05.12.2019 - 19:53DROPS Design answered:
Hej Christel, garngruppe B er tykkere end A og hvis du strikker blusen i Puna med 21 m på 10 cm, så vil blusen blive 14% større. Vi kan desværre ikke hjælpe dig med at regne opskriften om, men du kan jo evt vælge en størrelse mindre... :)
06.12.2019 - 08:02Hallo ik begrijp iets niet goed (denk ik) in verband met de mindering van de armsgaten van de mouwen, doe ik deze mindering bij het breien van de mouw of tijdens het plaatsen van de mouw op de rondbreinaald van voor en achterpand, daar er staat in het patroon voor het maken van de PAS : plaats de mouwen op dezelfde rondbreinaald als het lijf, terwijl u steken afkanten voor de armsgaten, doe dit zonder de steken te breien? Ik brei de M maat. Vriendelijke groet en dank bij voorbaat. Alice
03.12.2019 - 18:51DROPS Design answered:
Dag Alice,
Er stond een vertaalfoutje in. Er moet staan waar steken zijn afgekant, in plaats van terwijl u steken afkant. Waarschijnlijk zorgde dit voor de verwarring, het is nu aangepast!
05.12.2019 - 20:05Kan ik deze trui ook verdraaid rechte tricot breien in plaats van rechte tricot. Vriendelijke groeten en dank bij voorbaat. Alice Dingemans
23.11.2019 - 14:05DROPS Design answered:
Dag Alice,
Jazeker, dat kan. Maak evt. even een proeflapje om te kijken of de stekenverhouding dan nog klopt.
25.11.2019 - 09:28Hej igen og mange tak for svaret. Mht. forhøjning bag henviser du til andre af jeres modeller. Umiddelbart kan jeg ikke finde nogen. Kan du give mig et eksempel, hvor blusen er strikket nedefra?
28.10.2019 - 16:44DROPS Design answered:
Hej igen Inge, se gerne vores video og eller DROPS 165-14
How to knit an elevation mid back from Garnstudio Drops design on Vimeo.
29.10.2019 - 12:11Det ser ikke ud som om blusen er strikket højere bagpå? Kan det lade sig gøre at strikke den højere bagpå og hvordan?
27.10.2019 - 11:48DROPS Design answered:
Hej Inge, nej det stemmer, denne bluse er ikke strikket med forhøjning bagpå. Hvis du vil ændre på modellen, kan du jo evt sætte et mærke i midterste maske bagpå og så følge en forhøjning fra en af vores andre modeller.... God fornøjelse
28.10.2019 - 12:41