
Popular categories
Looking for a yarn?


|
|
Catch a Wink |
|
 |
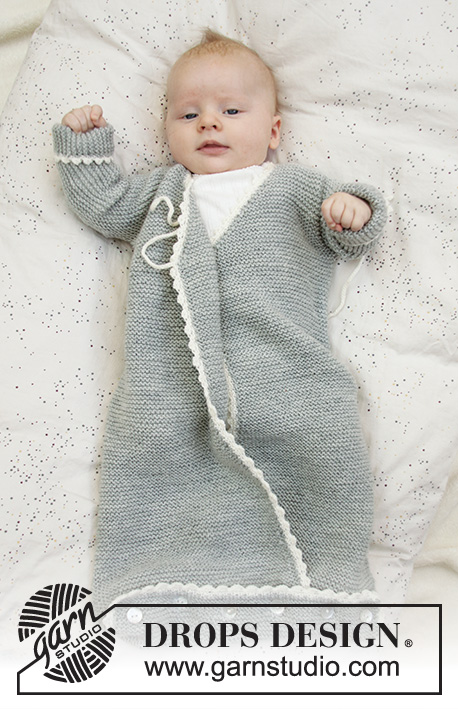 |
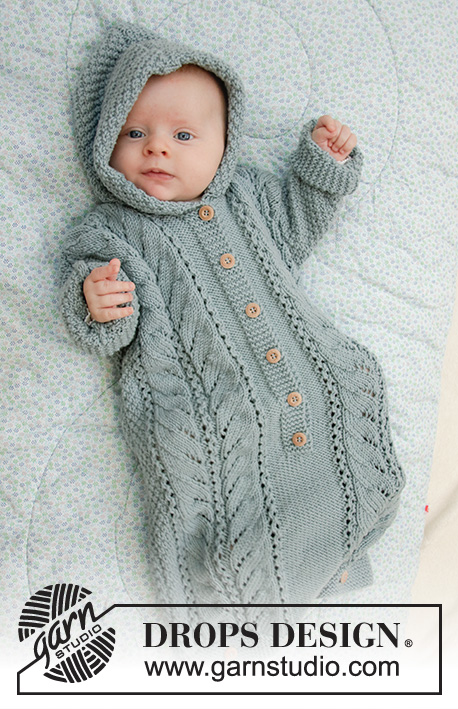
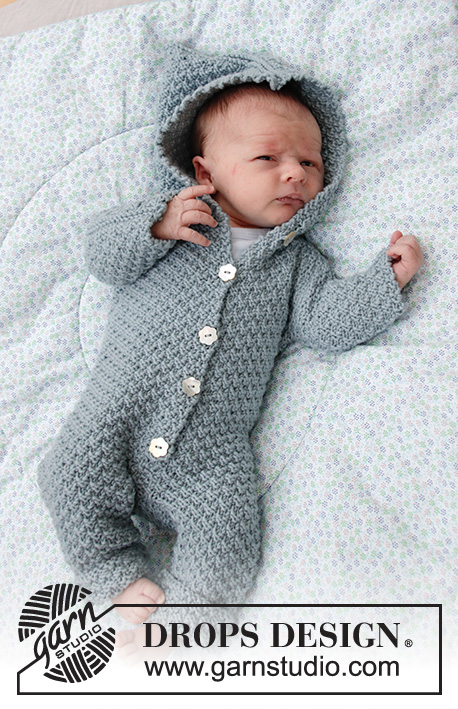
Knitted bag for babies in DROPS BabyMerino. The piece is worked in garter stitch with wrap-around, crocheted edges and ties. Sizes premature - 4 years.
DROPS Baby 33-6 |
|
|
EXPLANATIONS FOR THE PATTERN: ------------------------------------------------------- RIDGE/GARTER STITCH (worked back and forth): 1 ridge = Knit 2 rows. DECREASE TIP (for sides of front piece and along neckline): All decreases are made from the right side! Decrease on the inside of the 1 edge stitch in garter stitch. Decrease as follows after the 1 edge stitch: Slip 1 stitch as if to knit, knit 1 and pass the slipped stitch over. Decrease as follows before the 1 edge stitch: Start 2 stitches before the 1 edge stitch and knit 2 together. INCREASE TIP (for sides of back piece): All increases are made from the right side! Increase on the inside of the 1 edge stitch in garter stitch. Increase 1 stitch by making 1 yarn over; on the next row knit the yarn over twisted to avoid a hole. KNITTING TIP: There are 10 extra stitches cast on at the bottom of each sleeve for turn up. If you do not want these turn ups, cast on only (9) 9-12-12-10 (13) stitches at the bottom of each sleeve instead of (19) 19-22-22-20 (23) stitches. Remember that you will then have 10 fewer stitches on each side when counting the total number of stitches. BUTTONHOLES (for fold at bottom of bag): 1 buttonhole = cast off 2 stitches, on the next row cast on 2 new stitches over the cast-off stitches. The outermost buttonholes are worked approx. 2 cm in from each side. Then work the other buttonholes with approx. (7) 6-5½-6-7 (8) cm between each one. ------------------------------------------------------- START THE PIECE HERE: ------------------------------------------------------- BAG – SHORT OVERVIEW OF THE PIECE: The piece is worked back and forth with circular needle. You start with one of the front pieces, cast on stitches for sleeve and continue to the shoulder. Then work the other front piece in the same way, but reversed. The 2 front pieces are worked together and then work down the back piece to finished length. The back piece is longer than the front pieces and is folded over them – see photo. Extra stitches are cast on for the turn up at the bottom of each sleeve. If you do not want a turn up, take these stitches away from the total number of stitches cast on for the sleeves – read KNITTING TIP! RIGHT FRONT PIECE: Cast on (44) 49-52-60-67 (71) stitches (including 1 edge stitch in the side) with circular needle size 3 mm and light grey. Work GARTER STITCH – read description above (first row = right side and is worked from mid front). When the piece measures (6) 6-6-8-8 (8) cm decrease 1 stitch in the side (i.e. at the end of the row from the right side) – read DECREASE TIP. Decrease like this every (5) 5½-7-7-5½ (5½) cm a total of (5) 6-6-7-10 (12) times = (39) 43-46-53-57-59 stitches. NECKLINE: When the piece measures (29) 36-43-52-61 (70) cm decrease 1 stitch for the neck at the beginning of the row from the right side – read DECREASE TIP. Decrease like this every 2nd row (i.e. each row from the right side) a total of (20) 20-22-26-28 (29) times and then every 4th row (i.e. every other row from the right side) a total of 2 times in all sizes. SLEEVE: AT THE SAME TIME when the piece measures (32) 39-47-56-65 (74) cm cast on new stitches for the sleeve at the end of the row from the right side as follows: Cast on (4) 6-7-8-7 (8) stitches a total of (4) 4-4-4-6 (6) times and then (19) 19-22-22-20 (23) stitches 1 time. After all decreases and increases there are (52) 64-72-79-89 (99) stitches on the row for shoulder/sleeve. Continue back and forth with garter stitch until the piece measures (40) 48-56-66-76 (86) cm. Insert 1 marker at the beginning of the row from the right side (i.e. towards neck). The marker marks mid top of shoulder and the piece will later be folded here. The marker will also be used to measure from. Continue with garter stitch and cast on 2 new stitches at the end of the next 2 rows from the wrong side (i.e. towards the neck) = (56) 68-76-83-93 (103) stitches on the needle and the last row is worked from the wrong side. Place all stitches on a thread or leave them on the needle. Work the left front piece as described below. LEFT FRONT PIECE: Cast on (44) 49-52-60-67 (71) stitches (including 1 edge stitch in the side) with circular needle size 3 mm and light grey. Work garter stitch (first row = right side and is worked from the side). When the piece measures (6) 6-6-8-8 (8) cm decrease 1 stitch in the side (i.e. at the beginning of each row from the right side) – read DECREASE TIP. Decrease like this every (5) 5½-7-7-5½ (5½) cm a total of (5) 6-6-7-10 (12) times = (39) 43-46-53-57-59 stitches. NECKLINE: When the piece measures (29) 36-43-52-61 (70) cm decrease 1 stitch for the neck at the end of each row from the right side – read DECREASE TIP. Decrease like this every 2nd row (i.e. every row from the right side) a total of (20) 20-22-26-28 (29) times and then every 4th row (i.e. every other row from the right side) a total of 2 times in all sizes. SLEEVE: AT THE SAME TIME when the piece measures (32) 39-47-56-65 (74) cm cast on new stitches for the sleeve at the end of the row from the wrong side as follows: Cast on (4) 6-7-8-7 (8) stitches a total of (4) 4-4-4-6 (6) times and then (19) 19-22-22-20 (23) stitches 1 time. After all decreases and increases there are (52) 64-72-79-89 (99) stitches on the needle for shoulder/sleeve. Continue back and forth with garter stitch until the piece measures (40) 48-56-66-76 (86) cm. Insert 1 marker at the end of the row from the right side (i.e. towards neck). The marker marks mid top of shoulder and the piece will later be folded here. The marker will also be used to measure from. Continue with garter stitch and cast on 2 new stitches at the end of the next 2 rows from the right side (i.e. towards neck) = (56) 68-76-83-93 (103) stitches on needle. Knit 1 row from the wrong side. Now work the back piece as described below. BACK PIECE: From the right side knit over all the (56) 68-76-83-93 (103) stitches on the left front piece, cast on (8) 8-12-12-12 (14) new stitches on the needle for the neck at the back and then knit from the right side over all the (56) 68-76-83-93 (103) stitches from the right front piece = (120) 144-164-178-198 (220) stitches. THE PIECE S NOW MEASURED FROM THE MARKERS ON SHOULDERS! Continue back and forth with garter stitch over all stitches. When the piece measures (6) 7-7-8-8 (9) cm from the markers cast off the sleeve stitches as follows: Cast off at the beginning of each row on each side (19) 19-22-22-20 (23) stitches 1 time and then (4) 6-7-8-7 (8) stitches a total of (4) 4-4-4-6 (6) times on each side = (50) 58-64-70-74 (78) stitches left on needle. Continue working until the piece measures (14) 14-15-16-18 (17) cm from the markers. Now increase 1 stitch on each side - read INCREASE TIP (= 2 stitches increased). Increase like this every (5) 5½-7-7-5½ (5½) cm a total of (5) 6-6-7-10 (12) times on each side = (60) 70-76-84-94 (102) stitches. Continue working until the piece measures (40) 48-56-66-76 (86) cm from the markers. Now insert 1 new marker in each side of the back piece. These markers mark the folding edge at the bottom of the bag; the piece is now measured from the new markers. Continue with garter stitch until the piece measures (4) 4-4-6-6 (6) cm from the new markers. On the next row from the right side, work (4) 5-6-6-6 (6) BUTTONHOLES evenly spaced – read description above. Continue working until the piece measures (6) 6-6-8-8 (8) cm from the new markers (the whole bag measures approx. (46) 54-62-74-84 (94) cm from the markers on the shoulders). Loosely cast off with knit from the right side. ASSEMBLY: Fold the piece double at the markers on the shoulders. Sew the under-sleeve seams and side seams in one go, inside the 1 edge stitch. CROCHET EDGE ALONG OPENING OF BAG: Start from the wrong side at the bottom left corner of the left front piece and crochet with hook size 2.5 mm and off white along the opening of the bag as follows: ROW 1 (= wrong side): 1 double crochet in first stitch, * 1 chain stitch, skip approx. 1-2 stitches (try this out; the edge should lie flat), work 1 double crochet in next stitch *, work from *-* up the whole of the left front piece, but at the corner where the decreases for the neck start, work a tie as follows: Work 1 double crochet in the corner, then work chain stitches for approx. 20-25 cm, turn and work back with 1 slip stitch in each chain stitch, then work 1 double crochet in the corner of the front piece again. Continue the crochet edge around the neck as far as the corner after the decreases for neck on the other front piece. Work a tie in the same way as on the left front piece and then continue down the whole right front piece and finish with 1 slip stitch in the corner, turn the piece. ROW 2 (= right side): Work 2 chain stitches, 1 double crochet around the first chain stitch, * 4 chain stitches, 1 treble crochet in the 4th chain stitch from the hook, skip 1 double crochet + 1 chain stitch + 1 double crochet, work 1 double crochet around the next chain stitch *, work from *-* to end of row (make sure that you work over the ties so that they lie underneath) and finish with 1 slip stitch in the first double crochet at the beginning of the previous row. Cut and fasten the strands. Work a similar edge along the bottom of the front pieces as follows: Lay the right front piece over the left front piece. Start from the wrong side and crochet along the bottom edge, but where the front pieces overlap work through both layers. Cut and fasten the strands. CROCHET EDGE ALONG THE TURN-UP AT BOTTOM OF BAG: Start from the wrong side and work a similar edge along the turn up in the same way as described above. Fold the edge up at the markers. Sew buttons onto front piece. CROCHET EDGE AROUND SLEEVES: Start from the wrong side and work as follows: ROUND 1: Work 1 double crochet in first stitch, * 1 chain stitch, skip approx. 1 ridge, work 1 double crochet in next stitch *, work from*-* around the whole sleeve and finish with 1 slip stitch in the first double crochet at the beginning of the round. ROUND 2: Work 2 chain stitches, 1 double crochet around the first chain stitch, * 4 chain stitches, 1 treble crochet in the 4th chain stitch from the hook, skip 1 double crochet + 1 chain stitch + 1 double crochet, work 1 double crochet around the next chain stitch *, work from *-* to end of round and finish with 1 slip stitch in the 2nd chain stitch at the beginning of the round. Cut and fasten strands. Work a similar edge around the other sleeve. Turn up the sleeves. TIES: Work 1 tie on each side of the bag equivalent to each corner on the front pieces. The tie on the right side is worked inside the seam (i.e. on wrong side of the piece) and the tie on the left side is worked on the outside of the seam (i.e. on the right side of the piece) – make sure that these ties are at the same height as the other two. |
|

|
|
|
Have you made this or any other of our designs? Tag your pictures in social media with #dropsdesign so we can see them! Do you need help with this pattern?You'll find tutorial videos, a Comments/Questions area and more by visiting the pattern on garnstudio.com. © 1982-2024 DROPS Design A/S. We reserve all rights. This document, including all its sub-sections, has copyrights. Read more about what you can do with our patterns at the bottom of each pattern on our site. |
|


With over 40 years in knitting and crochet design, DROPS Design offers one of the most extensive collections of free patterns on the internet - translated to 17 languages. As of today we count 304 catalogues and 11422 patterns - 11422 of which are translated into English (UK/cm).
We work hard to bring you the best knitting and crochet have to offer, inspiration and advice as well as great quality yarns at incredible prices! Would you like to use our patterns for other than personal use? You can read what you are allowed to do in the Copyright text at the bottom of all our patterns. Happy crafting!
Comments / Questions (40)
Guten Tag, ich habe das rechte Vorderteil für Größe 68/74 mit Rundnadel 4.0 gestrickt, nachdem ich ein 10x10cm Strickmuster 10x10cm erstellt hatte mit 24 Maschen x 48 Reihen. Das rechte Vorderteil stimmt nun nur teilweise mit Ihrer Maßskizze überein. Schultermaß 33cm und Ärmel 8cm stimmen überein, der untere Rand und die Mittellinie scheinen zu schmal zu sein. Bitte senden Sie mir das Maß NUR für die Breite des rechten Vorderteils - Unten und Mitte. Vielen Dank und Grüße Hana Hacunda
09.09.2021 - 08:26DROPS Design answered:
Liebe Frau Hacunda, mit 24 M = 10 cm sollen die 60 M beim Vorderteil ca 25 cm messen, nach den Abnahmen sind es noch 53 Maschen übrig = ca 22 cm. Sollte Ihre Maschenprobe stimmen, dann werden die Maßen von den Vorderteilen auch stimmen. Viel Spaß beim stricken!
09.09.2021 - 09:06Is an edge stitch counted as part of the total number of stitches cast on (in this case 52 for the size I want to make), or do I cast on an additional stitch for a total of 53?
14.08.2021 - 06:10DROPS Design answered:
Hi Susan, an edge stitch is counted as part of the total number of stitches. So you need to cast on 52 sts. Happy knitting!
15.08.2021 - 20:55Bonjour D'après les explications mon rendu pour la bordure au crochet sur ke 2 ele rang Ne fait pas apparaître comme sur photos une bordure picot dentelé Pouvez-vous m'aider Merci d'avance Iu he fait le 2 ème rang en picot simple pour avoir le rendu Merci beaucoup cordialement Jacqueline
30.03.2021 - 20:49DROPS Design answered:
Bonjour Mme Marchandet, le 2ème rang de la bordure se crochète comme le montre cette vidéo; en espérant qu'elle puisse vous aider. Bonne continuation!
06.04.2021 - 10:07"erst Reihe = Hin-Reihe, sie wird ab der Seite gestrickt" Also ich weiß das ich die linke Seite gegelgleich zur rechten stricke aber wie soll ich diesen satz verstehen?
05.03.2021 - 15:27DROPS Design answered:
Liebe Jacqueline, beim rechten Vorderteil werden die Hinreihen ab dem vorderen Rand in Richtung Seite gestrickt, beim linken Vorderteil werden die Hinreihen ab der Seite in Richtung vorderem Rand gestrickt. Hoffentlich kann es Ihnen helfen. Viel Spaß beim stricken!
05.03.2021 - 15:36Hallo, können Sie mir sagen was dies bedeutet? Habe keine Ahnung was ich da stricken soll. Danke im Voraus. "Der Markierer kennzeichnet die Schultermitte und damit die ”Grenze” zwischen den Vorderteilen und dem Rückenteil, später wird die Arbeit am Markierer daher doppelt gelegt. Ab dem Markierer wird nachfolgend gemessen. Weiter Krausrippen stricken und dabei 2 neue Maschen am Ende der nächsten 2 Rück-Reihen anschlagen (d.h. in Richtung Halsausschnitt) = (56) 68-76-83-93 (103)
22.02.2021 - 18:12DROPS Design answered:
Liebe Petra, diese Markierer wird später für die Länge benutzt, der liegt ganz oben bei der Schulter und hier wird die Arbeit dann gefaltet. Jetzt haben Sie die Hälfte der Arbeit gestrickt, und die Arbeit wird dann von diesem Markierer gemessen. Viel Spaß beim stricken!
23.02.2021 - 09:24Buenas tardes, tienen un tutorial sobre como hacer el reborde de crochet? Muchas gracias Sacri
20.02.2021 - 16:17DROPS Design answered:
Hola Sacramento Moreno Garrido, mira el video tutorial sobre la fila 2 del reborde – picot AQUI. Para la fila 1 lee las instrucciones. Buen trabajo!
23.02.2021 - 19:12Die Anleitung ist leider total unverständlich, obwohl ich eine geübte Strickerin bin. Erst heißt es von oben stricken, dann lese ich jetzt von untern stricken. Wird die Arbeit von unten nach oben gestrickt oder wie? Gibt es irgendwo eine verständlichere Anleitung?
18.02.2021 - 09:59DROPS Design answered:
Liebe Petra, die Vorderteile werden separat von unten nach oben gestrickt - Maschen werden für die Ärmel angeschlagen, dann wird das Rückenteil von oben nach unten gestrickt, dh von den beiden Vorderteile - die Maschen von den Ärmeln werden dann abgekettet. Kann es Ihnen helfen?
18.02.2021 - 10:16Guten Tag, ich habe eine Frage zur Strickanleitung. Ich stricke in Größe 56/62 und bin beim rechten Vorderteil an der Stelle, an der nach allen Zu- und Abnahmen 72 Maschen für Schulter/Ärmel vorhanden sind. Stricke ich nun bis die Arbeit 56cm lang ist, setze dann einen Markierer und stricke 4 weitere Reihen (unter Zunahme von je 2x2 Maschen)? Oder setze ich den Markierer bereits nach Erreichen der 72 Maschen, nehme wie angegeben Maschen auf und stricke dann bis 56cm? Vielen Dank
26.10.2020 - 13:59DROPS Design answered:
Liebe Frau Möller, Markierer setzen Sie ein, wenn die Arbeit 56 cm misst => Mitte von Schulter, dann stricken Sie ein paar Reihen (= 4 Reihen mit jeweils 2 neuen Maschen für Halsausschnitt am Rückenteil) und legen die Maschen Still. Die Markierung soll die höchste Stelle = Schulter zeigen, später folgen Sie die Arbeit an der Markierung, die extra Reihen sind schon die ersten vom Rückenteil. Viel Spaß beim stricken!
27.10.2020 - 11:32Warum kann ich in der Anleitung keine Abbildungen und keine bemaßten Zeichnungen sehen? Danke, Gesine.
19.10.2020 - 12:29DROPS Design answered:
Liebe Frau Eschenburg, aktualisieren die Seite, die Maßskizze ist wieder da :) Viel Spaß beim stricken!
19.10.2020 - 13:09Hej! Jag köpte garn och läste inte mönser först. Blev besviken då jag trodde påsen stickades i ett stycke. Denna ska sys ihop. Till min fråga: Ska kantmaskan vara i slätstickning så man lättare kan sy ihop sidorna och ärmarna ? och vilket varv räknar Ni som första varvet, är det uppläggningsvarvet eller första stickade varvet (jag räknar alltid första stickade som baksidan, är det fel tänkt?)
17.06.2020 - 16:53DROPS Design answered:
Hej Birgitta. Kantmaskan ska vara i rätstickning (vi har en video på hur man syr ihop rätstickade stycken). Det första stickade varvet blir enligt mönstret rätsidan. Lycka till!
18.06.2020 - 09:14