DROPS Nepal
DROPS Nepal
65% Wool, 35% Alpaca
from 3.30 $ /50g
Get the yarn to make this pattern from 46.20$.

The yarn cost is calculated from the pattern’s smallest size and the yarn’s cheapest product type. Looking for an even better price? You might find it on the DROPS Deals!

DROPS SS24

Serena

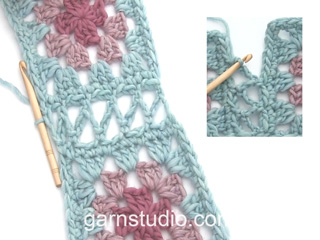
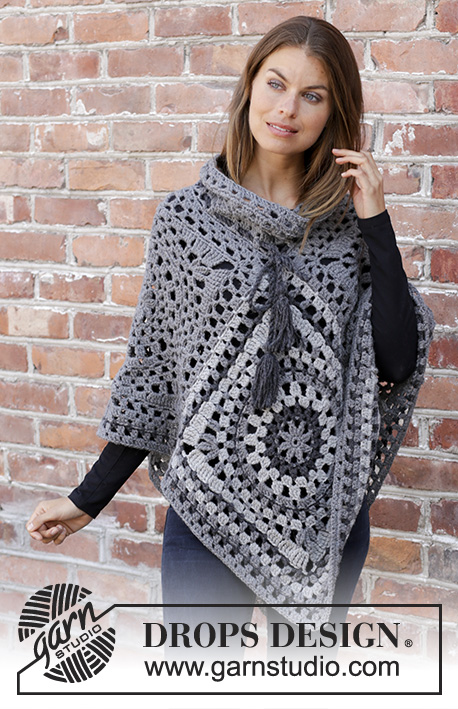
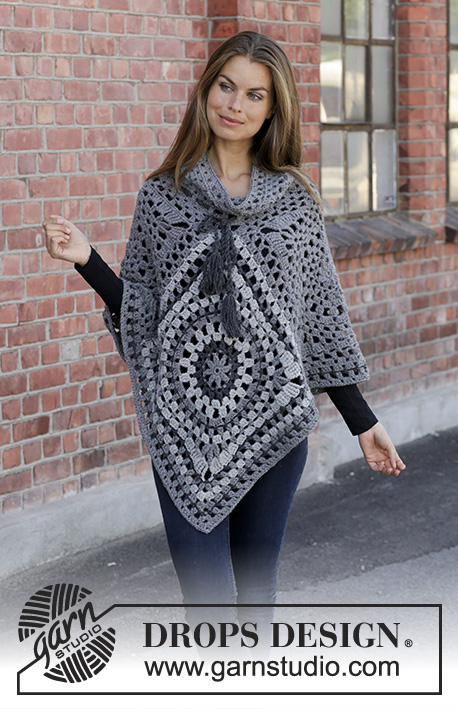
Crocheted poncho in DROPS Nepal. The piece is worked with crochet squares, lace pattern and stripes. Sizes S - XXXL.

DROPS 195-35
DROPS Design: Pattern no ne-281
Yarn group C or A + A
-------------------------------------------------------

SIZES:
S/M – L/XL – XXL/XXXL

MATERIALS:
DROPS NEPAL from Garnstudio (belongs to yarn group C)
450-500-550 g color 517, medium grey
150-150-150 g color 501, grey
100-100-100 g color 506, dark grey

CROCHET GAUGE:
13 double crochets in width and 8 rows in height = 10 x 10 cm = 4" x 4".
1 crochet square measures approx. 40-44-48 x 40-44-48 cm = 15¾"-17¼"-19" x 15¾"-17¼"-19".

CROCHET HOOK:
DROPS CROCHET HOOK SIZE 5.5 MM = US I/9.
Hook size is only a guide. If you have too many stitches on 10 cm = 4", change to a larger hook size. If you have too few stitches on 10 cm = 4", change to a smaller hook size.

-------------------------------------------------------

Alternative Yarn – See how to change yarns here
Yarn Groups A to F – Use the same pattern and change the yarn here
Yarn usage using an alternative yarn – Use our yarn converter here

-------------------------------------------------------

DROPS Nepal
DROPS Nepal
65% Wool, 35% Alpaca
from 3.30 $ /50g
Get the yarn to make this pattern from 46.20$.

The yarn cost is calculated from the pattern’s smallest size and the yarn’s cheapest product type. Looking for an even better price? You might find it on the DROPS Deals!

Pattern instructions

NOTE: This pattern is written in American English. All measurements in charts are in cm. For conversion from inches to cm - click here. There are different terms for crocheting in American and British English. If this pattern includes crochet, click for "crochet terms" here. For this pattern in British English, please click here.
-------------------------------------------------------

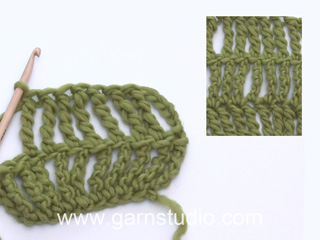
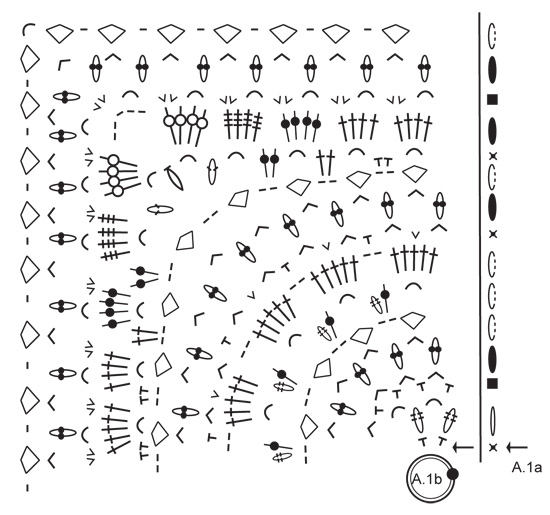
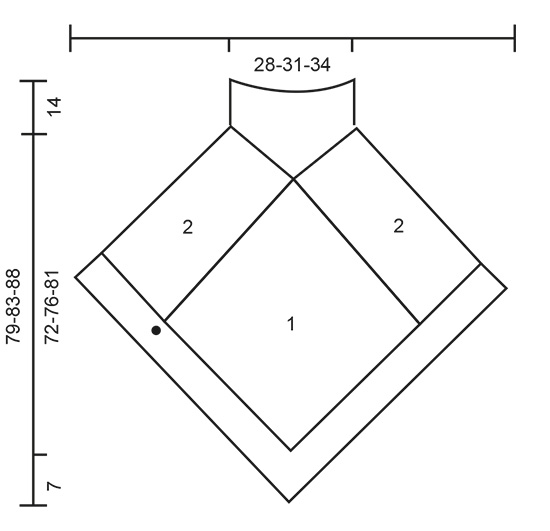
EXPLANATIONS FOR THE PATTERN:

-------------------------------------------------------


PATTERN:
See diagrams A.1 to A.3.

STRIPES-1 (for crochet squares back and front):
Chain-stitch ring at beginning of square + ROUNDS 1-2: medium grey.
ROUNDS 3-4: dark grey
ROUNDS 5-6: grey
ROUND 7: medium grey
ROUND 8: dark grey
ROUND 9: medium grey
ROUND 10: grey
ROUND 11: medium grey
ROUND 12: grey
ROUND 13: dark grey
ROUND 14: medium grey
ROUND 15: grey
Size S/M is now finished, for sizes L/XL and XXL/XXXL continue with medium grey.

STRIPES-2 (for bottom edge):
ROUND 1: medium grey
ROUND 2: dark grey
ROUND 3: medium grey
ROUND 4: medium grey

-------------------------------------------------------

START THE PIECE HERE:

-------------------------------------------------------

PONCHO - SHORT OVERVIEW OF THE PIECE:
4 crochet squares are worked and sewn together: 2 single-colored squares and 2 striped squares. An edge is worked at the bottom of the poncho and a neck at the top.

CROCHET SQUARE:
Work 4 chain stitches with hook size 5.5 mm = US I/9 and medium grey. Form them into a ring with 1 slip stitch in the first chain stitch. Work STRIPES-1- read description above and pattern in the round as follows: Work A.1a – start at arrow - (shows how the rounds start and finish), A.1b a total of 4 times on the round. REMEMBER THE CROCHET GAUGE! When the crochet square has been completed, it measures approx. 40 x 40 cm = 15¾" x 15¾". Size S/M is now finished. For sizes L/XL and XXL/XXXL continue as follows: Work A.2a (shows how the rounds start and finish), * A.2b until there is 1 chain stitch left before the corner. A.2c (= corner) *, work from *-* a total of 4 times on the round, then work A.2b to the end of the round. When you have worked 1 round, size L/XL is finished and the square measures approx. 44 x 44 cm = 17¼" x 17¼". For size XXL/XXXL work the last round in the diagrams. When the last round has been worked the square measures approx. 48 x 48 cm ? 19" x 19".

Work 1 more square in the same way = 2 crochet squares.
Now work 2 single-colored squares in the same way using medium grey. You have now worked a total of 4 crochet squares.

ASSEMBLY:
Lay the crochet squares out as shown in the illustration – see below beside the diagrams and sketch.
1 = crochet square with stripes; 2 = single-colored square.
Work the squares together through both layers from the wrong side as follows: 1 single crochet around chain-space in corner, * work 3 chain stitches, skip 3 double crochets, 1 single crochet around the next chain stitch *, work from *-* along the whole side and finish with 1 single crochet in the next corner. Work the other squares together in the same way. Then finally work together the side marked with a star in the illustration.

BOTTOM EDGE:
Now work the bottom edge as follows:
Start with medium grey in the transition between a single-colored and a striped square – see black spot on sketch, work STRIPES-2 and pattern in the round as follows: Work A.3a (shows how the rounds start and finish), work A.3b as far as the corner mid front, A.3c around the chain-space in the corner, work A.3b as far as the next corner mid back, A.3c and A.3b to the start of the round. Continue in the round like this until A.3a - A.3c have been completed in height. Cut and fasten the strand.

NECK:
The whole neck is worked with medium grey.
Start with medium grey in the chain-space in the corner of the middle crochet square (= mid back), work A.3a (shows how the rounds start and finish), work A.3b around the same chain-space in the corner, * skip the chain-space in the corner of the next square, work A.3b as far as the next corner, skip the chain-space in the corner, work A.3b around the chain-space in the crochet square mid front *, work from *-* 1 more time on the round, but finish as shown in A.3a. When A.3a and A.3b have been completed in height, repeat the last 4 rounds 2 more times (= a total of 3 times in height). Cut and fasten the strand
Make a twisted cord as follows:


TWISTED CORD AND TASSELS
Cut 4 strands dark grey, 5 metres = 200" in length. Twist them together until they begin to resist, fold them double and they will continue to twist. Tie a knot in each end so that the cord stays twisted. Thread the cord up and down through Round 3 on the neck; start and finish mid front.
Make 1 tassel in each end of the cord:
1 tassel = Cut 11 strands dark grey, 24 cm = 9½" in length. Thread them through the end of the cord and fold them so that all the ends are together (= 24 strand-ends). Cut one more strand, 20 cm = 8" in length and wind it around the strands, approx. 1 cm = ⅜" down from the fold and tie a knot. Trim the strands so that they are even at the bottom. Make 1 more tassel in the same way for the other end of the cord.

This pattern has been corrected.

Updated online: 26.01.2021
New chart icon in A.1a, round 6.

Diagram

All measurements in charts are in cm.

symbols = start here - this chain-stitch ring is described in the text. Continue with symbol over point on circle and work towards the left
symbols = 1 chain stitch
symbols = 3 chain stitches
symbols = 4 chain stitches
symbols = 1 sinle crochet around chain-stitch ring/chain-space
symbols = 1 single crochet in stitch
symbols = 1 double crochet around chain-space
symbols = 1 treble crochet around chain-space
symbols = 1 double treble crochet around chain-space
symbols = 1 triple treble crochet around chain-space: Make 4 yarn overs, insert hook around chain-space, pick up strand, * make 1 yarn over and pull it through the first 2 loops on hook *, repeat from *-* 4 more times (= a total of 5 times)
symbols = 3 double crochets around chain-space
symbols = work 2 double crochets together as follows: * Make 1 yarn over, insert hook around chain-space, pick up strand, make 1 yarn over and pull it through the first 2 loops on hook *, work from *-* 1 more time, make 1 yarn over 1 and pull it through all 3 loops on hook
symbols = work 2 treble crochets together as follows: * Make 2 yarn overs, insert hook in stitch, pick up strand, make 1 yarn over and pull it through the first 2 loops on hook, make 1 yarn over and pull it through the next 2 loops on hook *, repeat from *-* 1 more time, make 1 yarn over and pull it through all 3 loops on hook
symbols = work 2 double treble crochets together as follows: * Make 3 yarn overs, insert hook around chain-space, pick up strand, make 1 yarn over and pull it through the first 2 loops on hook, make 1 yarn over and pull it through the next 2 loops on hook, make a yarn over and pull it through the next 2 loops on hook *, work from *-* one more time, make 1 yarn over and pull it through all 3 loops on hook
symbols = work 2 triple treble crochets together as follows: * Make 4 yarn overs, insert hook around chain-space, pick up strand, make 1 yarn over and pull it through the first 2 loops on hook, make 1 yarn over and pull it through the next 2 loops on hook, make 1 yarn over and pull it through the next 2 loops on hook, make 1 yarn over and pull it through the next 2 loops on hook *, work from *-* one more time, make 1 yarn over and pull it through all 3 loops on hook
symbols = at beginning of round work 1 chain stitch. This chain stitch does not replace the first double crochet on the round. Finish the round with 1 slip stitch in first chain stitch at beginning of round, then work slip stitches to middle of first chain-space
symbols = at beginning of round work 1 chain stitch; finish round with 1 slip stitch in first chain stitch
symbols = at beginning of round, replace the first double crochet with 3 chain stitches. Finish round with 1 slip stitch in third chain stitch at beginning of round, then work slip stitches to middle of first chain-space
symbols = at beginning of round replace the first double crochet with 3 chain stitches. Finish round with 1 slip stitch in third chain stitch at beginning of round
symbols = at beginning of round replace first treble crochet with 4 chain stitches. Finish round with 1 slip stitch in fourth chain stitch at beginning of round, then work slip stitches as far as the first chain-space
symbols = at beginning of round work 3 chain stitches, finish round with 1 slip stitch in third chain stitch at beginning of round
symbols = start in the transition between these 2 squares when the bottom edge is worked
symbols = start here! First round already worked and is only here to show how the next round is worked
diagram
diagram
diagram
diagram
Do you have a question? See a list of frequently asked questions (FAQ)

Knitting tension is what determines the final measurements of your work, and is usually measured per 10 x 10 cm. It is provided like so: number of stitches in width x number of rows in height - eg: 19 stitches x 26 rows = 10 x 10 cm.

The knitting tension is very individual; some people knit/crochet loosely while others work tightly. You adjust the knitting tension with the needle size, which is why the suggested needle size only serve as a guide! You need to adjust this (up or down) to ensure that YOUR knitting tension matches the knitting tension provided in the pattern. If you work with a different knitting tension than provided you will have a different yarn consumption, and your work will have different measurements than what the pattern suggests.

The knitting tension also determines which yarns can replace each other. As long as you achieve the same knitting tension you can replace one yarn with another.

See DROPS lesson: How to measure your tension/gauge

See DROPS video: How to make a gauge tension swatch

The required amount of yarn is provided in grams, eg: 450 g. To calculate how many balls you’ll need you first need to know how many grams are in 1 ball (25g, 50g or 100g). This information is available if you click on the individual yarn quality on our pages. Divide the amount required with the amount of each ball. For example, if each ball is 50g (the most common amount), the calculation will be as follows: 450 / 50 = 9 balls.

The important thing when changing from one yarn to another is that the knitting/crochet tension remains the same. This is so that the measurements of the finished piece will be the same as on the sketch provided. It is easier to achieve the same knitting tension using yarns from the same yarn group. It is also possible to work with multiple strands of a thinner yarn to achieve the knitting tension of a thicker one. Please try our yarn converter. We recommend you to always work a test swatch.

Please NOTE: when changing yarn the garment might have a different look and feel to the garment in the photo, due to individual properties and qualities of each yarn.

See DROPS lesson: Can I use a different yarn than the one mentioned in the pattern?

All our yarns are categorised into yarn groups (from A to F) according to thickness and knitting tension – group A contains the thinnest yarns and group F the thickest. This makes it easier for you to find alternative yarns to our patterns, should you wish to switch yarn. All yarns within the same group have a similar knitting tension and can easily replace each other. However, different yarn qualities have different structures and properties which will give the finished work a unique look and feel.

Click here for an overview of the yarns in each yarn group

At the top of all our patterns you’ll find a link to our yarn converter, which is a helpful tool should you wish to use a different yarn than suggested. By filling in the yarn quality you wish to replace, the amount (in your size) and number of strands, the converter will present good alternative yarns with the same knitting tension. Additionally it will tell you how much you’ll require in the new qualities and whether you’ll need to work with multiple strands. Most skeins are 50g (some are 25g or 100g).

If the pattern is worked with multiple colours, every colour will have to be converted separately. Similarly, if the pattern is worked with several strands of different yarns (for example 1 strand Alpaca and 1 strand Kid-Silk) you will have to find alternatives for each, individually.

Click here to see our yarn converter

Since different yarns have different qualities and textures we have chosen to keep the original yarn in our patterns. However, you can easily find options among our available qualities by using our yarn converter, or simply pick a yarn from the same yarn group.

It is possible that some retailers still have discontinued yarns in stock, or that someone has a few skeins at home that they would like to find patterns for.

The yarn converter will provide both alternative yarn as well as required amount in the new quality.

If you think it's hard to decide what size to make, it can be a good idea to measure a garment you own already and like the size of. Then you can pick the size by comparing those measures with the ones available in the pattern's size chart.

You'll find the size chart at the bottom of the pattern.

See DROPS lesson: How to read size chart

The needle size provided in the pattern serves only as a guide, the important thing is to follow the knitting tension. And since knitting tension is very individual, you will have to adjust the needle size to ensure that YOUR tension is the same as in the pattern – maybe you’ll have to adjust 1, or even 2 needle sizes, up or down to achieve the correct tension. For this, we recommend that you work test swatches.

Should you work with a different knitting tension than the one provided, the measurements of the finished garment might deviate from the measurement sketch.

See DROPS lesson: How to measure your tension/gauge

See DROPS video: How to make a gauge tension swatch

Working a garment top-down provides more flexibility and room for personal adjustment. For example it is easier to try the garment on while working, as well as making adjustments to length of yoke and shoulder caps.

The instructions are carefully explaining every step, in the correct order. Diagrams are adjusted to the knitting direction and are worked as usual.

The diagram depicts all rows/rounds, and every stitch seen from the right side. It is read from bottom to top, from right to left. 1 square = 1 stitch.

When working back and forth, every other row is worked from the right side and every other row is worked from the wrong side. When working from the wrong side, the diagram will have to be worked reversed: from left to right, knit stitches are purled, purl stitches are knit etc.

When working in the round every round is worked from the right side and the diagram are worked from right to left on all rounds.

See DROPS lesson: How to read knitting diagrams

The diagram depicts all rows/rounds, and every stitch seen from the right side. It is worked from bottom to top, from right to left.

When working back and forth every other row is worked from the right side: from right to left and every other row is worked from the wrong side: from left to right.

When working in the round, every row in the diagram are worked from the right side, from right to left.

When working a circular diagram you start in the middle and work your way outwards, counter clockwise, row by row.

The rows usually start with a given number of chain stitches (equivalent to the height of the following stitch), this will either be depicted in the diagram or explained in the pattern.

See DROPS lesson: How to read crochet diagrams

Instructions for working several diagrams after each other on the same row/round, will often be written like so: “work A.1, A.2, A.3 a total of 0-0-2-3-4 times". This means you work A.1 once, then A.2 is worked once, and A.3 is repeated (in width) the number of times provided for your size – in this case like so: S = 0 times, M = 0 times, L=2 times, XL= 3 times and XXL = 4 times.

The diagrams are worked as usual: begin with the first row in A.1, then work the first row in A.2 etc.

See DROPS lesson: How to read knitting diagrams

See DROPS lesson: How to read crochet diagrams

The total width of the garment (from wrist-to-wrist) will be larger in the larger sizes, despite the actual sleeves being shorter. The larger sizes have longer sleeve caps and wider shoulders, so there will be a good fit in all sizes.

The measurement sketch/schematic drawing provides information regarding the full length of the garment. If it’s a jumper or a jacket the length is measured from the highest point on the shoulder (usually closest to the neckline), and straight down to the bottom of the garment. It is NOT measured from the tip of shoulder. Similarly, the length of yoke is measured from the highest point on the shoulder and down to where yoke is split into body and sleeves.

See DROPS lesson: How to read a schematic drawing

Diagrams are often repeated on the round or in height. 1 repeat is the diagram the way it appears in the pattern. If it says to work 5 repeats of A.1 in the round, then you work A.1 a total of 5 times after/next to each other in the round. If it says to work 2 repeats of A.1 vertically/in height you work the entire diagram once, then begin again at the start and work the entire diagram one more time.

Chain stitches are slightly narrower than other stitches and to avoid working the cast-on edge too tight, we simply chain more stitches to begin with. The stitch count will be adjusted on the following row to fit the pattern and measurement sketch.

The rib edge is more elastic and will contract slightly compared to, for example, stocking stitch. By increasing before the rib edge, you avoid a visible difference in width between the rib edge and the rest of the body.

It’s very easy to cast off too tightly, and by making yarn overs while casting off (and simultaneously casting these off) you avoid a too tight cast off edge.

See DROPS video: How to bind off with yarn overs (yo)

To achieve an even increase (or decrease) you can increase on, for example: every 3rd and 4th row alternately, like so: work 2 rows and increase on the 3rd row, work 3 rows and increase on the 4th. Repeat this until the increase is complete.

See DROPS lesson: Increase or decrease 1 st on every 3rd and 4th row alternately

Should you prefer to work in the round instead of back and forth, you may of course adjust the pattern. You’ll need to add steeks mid-front (usually 5 stitches), and follow the instructions. When you would normally turn and work from the wrong side, simply work across the steek and continue in the round. At the end you’ll cut the piece open, pick up stitches to work bands, and cover the cut edges.

See DROPS video: How to knit steeks and cut open

Should you prefer to work back and forth instead of in the round, you may of course adjust the pattern so you work the pieces separately and then assemble them at the end. Divide the stitches for the body in 2, add 1 edge stitch in each side (for sewing) and work the front and back pieces separately.

See DROPS lesson: Can I adapt a pattern for circular needles into straight needles?

Pattern repeats can vary slightly in the different sizes, in order to get the correct proportions. If you’re not working the exact same size as the garment in the photo, yours might deviate slightly. This has been carefully developed and adjusted so that the complete impression of the garment is the same in all sizes.

Make sure to follow instructions and diagrams for your size!

If you have found a pattern you like which is available in women’s size it’s not very difficult to convert it to men’s size. The biggest difference will be the length of sleeves and body. Start working on the women size that you think would fit across the chest. The additional length will be worked right before you cast off for the armhole/sleeve cap. If the pattern is worked top-down you can add the length right after the armhole or before the first decrease on sleeve.

Regarding additional yarn amount, this will depend on how much length you add, but it is better with a skein too many than too few.

All yarns will have excess fibres (from production) that might come off as lint or shedding. Brushed yarns (ie hairier yarns) have more of these loose, excess fibres, causing more shedding.

Shedding also depends on what is worn under or over the garment, and whether this pulls at the yarn fibres. It’s therefore not possible to guarantee that there will be no shedding

Below are some tips on how to get the best result when working with hairier yarns:

1. When the garment is finished (before you wash it) shake it vigorously so the looser hairs come off. NOTE: do NOT use a lint roller, brush or any method that pulls at the yarn.

2. Place the garment in a plastic bag and put it in your freezer - the temperature will cause the fibres to become less attached to each other, and excess fibres will come off easier.

3. Leave in the freezer for a few hours before taking it out and shaking it again.

4. Wash the garment according to the instructions on the yarn label.

Pilling is a natural process that happens to even the most exclusive of fibers. It's a natural sign of wear and tear that is hard to avoid, and that is most visible in high friction areas of your garment like a sweater's arms and cuffs.

You can make your garment look as new by removing the pilling, using a fabric comb or a pill/lint remover.

Still can't find the answer you need? Then scroll down and leave your question so one of our experts can try to help you. This will be done normally within 5 to 10 working days.
In the meantime, you can read the questions and answers that others have left to this pattern or join the DROPS Workshop on Facebook to get help from fellow knitters/crocheters!

You might also like...

Post a comment to pattern DROPS 195-35

We would love to hear what you have to say about this pattern!

If you want to leave a question, please make sure you select the correct category in the form below, to speed up the answering process. Required fields are marked *.

Comments / Questions (36)

country flag Cécile wrote:

Bonjour. J ai réuni tous les carrés ensemble. Maintenant je compte crocheter le col en gris moyen. Je ne comprends pas bien les consignes. La derniere phrase dit "lorsque A.3a et A.3c ont été crochetés une fois en hauteur..etc" mais il n'est jamais question de A3c avant dans ce paragraphe...que faire ? Merci pour votre aide. Bien cordialement.

17.01.2021 - 16:51

DROPS Design answered:

Bonjour Cécile, effectivement, pour le col, on crochète A.3a et A.3b - on doit crocheter 12 rangs ainsi au total (= 3 fois les 4 rangs des diagrammes A.3a et A.3b). En revanche, pour la bordure du bas, on doit crocheter A.3a, puis A.3b et A.3c dans les arceaux des coins. Et on ne crochète qu'une fois les diagrammes en hauteur pour la bordure du bas. Bon crochet!

18.01.2021 - 10:00

country flag Birgit Albrecht wrote:

Hallo. Komme hier, Runde 6 A.1a und A.1b nicht weiter. Ich komme doch mit 1 Luftmasche x nicht auf die Höhe der weiteren Doppelmaschen in der 6.Runde und am Ende der Runde soll ich die Kettmasche wieder in die 1.Luftmasche häkeln. Verstehe ich gerade überhaupt nicht. Liebe Grüße und Danke schon im vorraus

09.01.2021 - 23:27

DROPS Design answered:

Liebe Frau Albrecht, ich denke, Diagram A.1a sollte hier korrigiert werden, am Anfang der 6. Runde würde ich lieber 4 Luftmaschen häkeln (als bei der 1. Runde). Danke für den Hinweis, unser Designteam wird das noch mal prüfen und korrigieren. Viel Spaß beim häkeln!

11.01.2021 - 09:01

country flag Heather wrote:

I finally figured out the squares and got all of them seamed together. However, the neck directions are completely impossible to understand. Any chance someone can write something that is more clear or publish a video? Or maybe someone can suggest an alternative so I can at least wear it?

30.09.2020 - 15:43

DROPS Design answered:

Dear Heather, can you please be a little bit more specific? What exactly you don't understand about the neck? Also, do not forget, that you can always ask for help (in person, or over the phone) in the store, where you bought your DROPS yarn. Happy Crafting!

01.10.2020 - 00:18

country flag Heather wrote:

This pattern is gorgeous but makes absolutely no sense to me. I’ve been crocheting 8 years and have never seen anything like this. It’s all over the place and doesn’t simply tell you how to make one of the squares. Any chance you could simplify this?

23.09.2020 - 01:39

DROPS Design answered:

Dear Heather, read thoroughly the pattern and find how to read crochet diagrams here - the way the pattern is written might be different than you are used to, but just follow the pattern step by step and it should work. Happy crocheting!

23.09.2020 - 08:27

country flag B Van Lang wrote:

Ik ben bezig met de hals, moet ik nu midden voor en achter blijven meerderen in alle ronden? Er komt zo'n raar tuitje aan??

30.08.2020 - 22:27

DROPS Design answered:

Dag B Van Lang,

Je haakt de hals volgens A.3b waarbij A.3a het begin en einde van de toer laten zien. Volgens mij staat er een foutje in de tekst bij de hals en wordt er bedoeld. 'Als A.3a en A.3b (ipv A.3c) klaar zijn in de hoogte'

31.08.2020 - 08:53

country flag Zaida Sousa wrote:

Hei, hvor mange lave poeng legger jeg på de 4 kjederingen? Jeg brukte en oversetter fordi jeg ikke kan skrive eller lese på norsk Takk

21.07.2020 - 01:46

DROPS Design answered:

Hi Zaida, You can choose amongst a large number of languages for each pattern if you click on the box below the photograph. Happy crafting!

21.07.2020 - 07:24

country flag Alessandra Visca wrote:

Vorrei sapere le misure dei quadrati in base alle taglie grazie

02.07.2020 - 23:34

DROPS Design answered:

Buongiorno Alessandra. Per la taglia S/M il quadrato misura 40 x 40 cm; per la taglia L/XL 44 x 44 cm; per la taglia XXL/XXXL 48 x 48 cm. Buon lavoro!

03.07.2020 - 01:27

country flag Alessandra wrote:

Ciao, non ho capito le misure dei quadrati in base alle diverse taglie.grazie

02.07.2020 - 23:32

country flag Ina Tolbøll wrote:

Er ved Hals. Der står jeg skal bruge A3a start og slut og A3b i lufmaskehjørne og A3b videre rundt Igen A3b i hjørne . Hvornår skal jeg bruge A3c Højden er det kun første omgang i diagram A3 der gentages 2 gange Første gang brug for hjælp, ellers brugt mange af jeres gode opskrifter. Vh Ina

20.05.2020 - 13:52

DROPS Design answered:

Hej Ina, i halsen hækler du kun A.3a og A.3b for her har du ikke noget hjørne. God fornøjelse!

29.05.2020 - 08:58

country flag Amenia wrote:

Ahhh, ich hab gerade gesehen, dass man A.2 a-c ja für die größere Variante benötigt, deswegen mein Vorkommentar bitte ignorieren :) Ich versuch es nochmal zu verstehen!

14.04.2020 - 18:52