DROPS Nepal
DROPS Nepal
65% Wool, 35% Alpaca
from 3.30 $ /50g
Get the yarn to make this pattern from 42.90$.

The yarn cost is calculated from the pattern’s smallest size and the yarn’s cheapest product type. Looking for an even better price? You might find it on the DROPS Deals!

DROPS SS24

Insolence

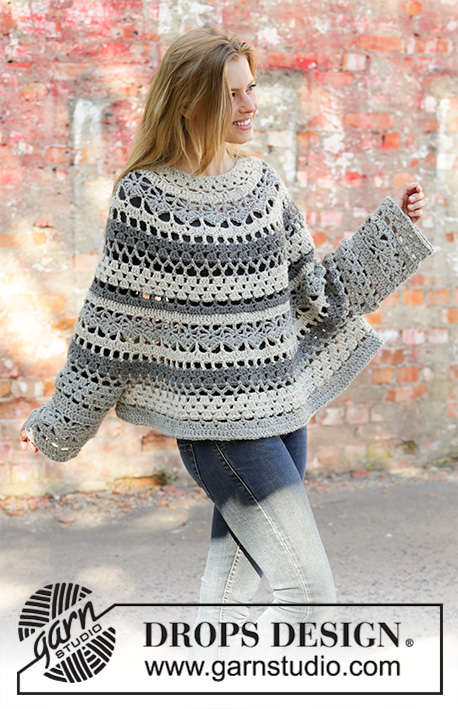
Crocheted poncho-sweater in DROPS Nepal. The piece is worked top down with lace pattern and stripes. Sizes S – XXXL.

DROPS 195-27
DROPS Design: Pattern no ne-283
Yarn group C or A + A
-------------------------------------------------------

Sizes: S/M – L/XL – XXL/XXXL
Materials:
DROPS NEPAL from Garnstudio (belongs to yarn group C)
300-350-400 g color 0501, grey
250-250-300 g color 0500, light grey
100-150-150 g color 0517, medium grey

-------------------------------------------------------
ACCESSORIES FOR THE PIECE:

CROCHET GAUGE:
13 double crochets in width and 8 rows in height = 10 x 10 cm = 4” x 4”.

CROCHET HOOK:
DROPS CROCHET HOOK SIZE 5.5 MM = US I/9.
Hook size is only a guide. If you have too many stitches on 10 cm = 4”, change to a larger hook size. If you have too few stitches on 10 cm = 4”, change to a smaller hook size.

-------------------------------------------------------

Alternative Yarn – See how to change yarns here
Yarn Groups A to F – Use the same pattern and change the yarn here
Yarn usage using an alternative yarn – Use our yarn converter here

-------------------------------------------------------

DROPS Nepal
DROPS Nepal
65% Wool, 35% Alpaca
from 3.30 $ /50g
Get the yarn to make this pattern from 42.90$.

The yarn cost is calculated from the pattern’s smallest size and the yarn’s cheapest product type. Looking for an even better price? You might find it on the DROPS Deals!

Pattern instructions

NOTE: This pattern is written in American English. All measurements in charts are in cm. For conversion from inches to cm - click here. There are different terms for crocheting in American and British English. If this pattern includes crochet, click for "crochet terms" here. For this pattern in British English, please click here.
-------------------------------------------------------

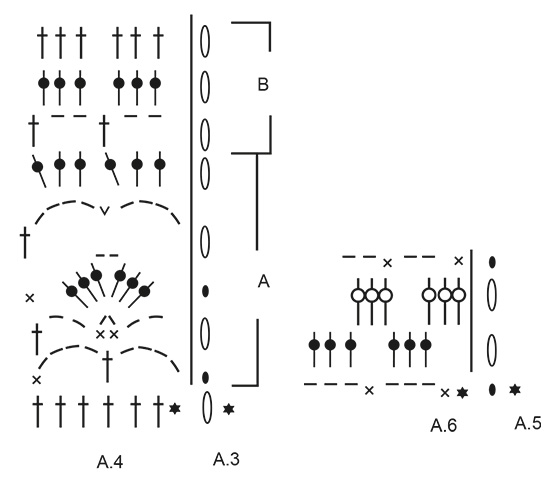
EXPLANATIONS FOR THE PATTERN:

-------------------------------------------------------

PATTERN:
See diagrams A.1 to A.6.

CROCHET INFORMATION:
Diagram A.1 shows how the rounds start and finish and is worked in addition to A.2.
Diagram A.3 shows how the rounds start and finish and is worked in addition to A.4.
Diagram A.5 shows how the rounds start and finish and is worked in addition to A.6.

STRIPES:
The piece is worked in stripes, see numbers 1-3 in the diagrams.
1 = light grey
2 = grey
3 = medium grey

INCREASE TIP:
To work out how to increase evenly, count the total number of stitches (e.g. 96 stitches) and divide by the number of increases to be made (e.g. 48) = 2. In this example, increase by working 2 double crochets around the same stitch after every 2nd double crochet.
-------------------------------------------------------

START THE PIECE HERE:

-------------------------------------------------------

PONCHO-SWEATER - SHORT OVERVIEW OF THE PIECE:
The piece is worked in the round, top down. The sleeves are worked in the round. The neck is worked in the round to finish.

YOKE:
Work 112-119-126 chain stitches with hook size 5.5 mm = US I/9 and light grey and form them into a ring with 1 slip stitch in the first chain stitch. Work 3 chain stitches, 1 double crochet in each of the first 6 chain stitches, * skip 1 chain stitch, work 1 double crochet in each of the next 6 chain stitches *, work from *-* a total of 15-16-17 times and finish with 1 slip stitch in the 3rd chain stitch at the beginning of the round = 96-102-108 double crochets + 3 chain stitches.
Then work pattern in STRIPES – read description above, as follows:
Read CROCHET INFORMATION, work A.2A a total of 16-17-18 times on the round – on the round marked with an arrow increase 48-54-60 double crochets evenly – read INCREASE TIP = 144-156-168 double crochets. REMEMBER THE CROCHET GAUGE!
A.2A is now repeated 24-26-28 times in width.
When A.2A has been completed, work A.2B over A.2A – on the round marked with an arrow increase 48-54-60 double crochets evenly = 192-210-228 double crochets.
A.2B is now repeated 32-35-38 times in width.
When A.2B has been completed, work A.2A over A.2B – on the round marked with an arrow increase 48-54-60 double crochets evenly = 240-264-288 double crochets.
A.2A is now repeated 40-44-48 times in width. Continue until A.2A has been worked in height = 80-88-96 chain-spaces. The piece measures approx. 36 cm = 14 1/4”.
Now divide for the body and sleeves by inserting 4 markers in the piece as follows:
Insert 1 marker after the first 13-15-16 chain-spaces (= half back piece), insert 1 marker after the next 14-14-16 chain-spaces (= sleeve), insert 1 marker after the next 26-30-32 chain-spaces (= front piece), insert 1 marker after the next 14-14-16 chain-spaces (= sleeve) and there are now 13-15-16 chain-spaces left on the round (= half back piece).Body and sleeves are divided at the markers.

BODY:
= 52-60-64 chain-spaces. Work A.2B over these stitches AT THE SAME TIME on the first round increase 24 double crochets evenly (A.2B is now repeated 30-34-36 times in width) = 180-204-216 double crochets – and on the round marked with an arrow increase 36-42-48 double crochets evenly = 216-246-264 double crochets (A.2B is now repeated 36-41-44 times in width). When A.2B has been completed, work with grey to finished length. Then work A.2C over A.2B a total of 0-1-2 times in height. Cut and fasten the strand. The body measures approx. 8-12-16 cm = 3 1/8”-4 3/4”-6 1/4” from the division.

SLEEVE:
= 14-14-16 chain-spaces. The sleeve is worked in grey to finished length. Start mid under the sleeve and continue as follows: Remember CROCHET INFORMATION, work A.2B a total of 7-7-8 times on the round, but without increasing. When A.2B is finished, work A.4A over A.2B. Then work A.4B over A.4A a total of 1-1-2 times in height. Cut and fasten the strand. The sleeve measures approx. 21-21-25 cm = 8 1/4”-8 1/4”-9 3/4” from the division.
Work the other sleeve in the same way.

NECK:
The neck is worked in light grey. Work around the neck as follows – NOTE: You work in the chain stitches where there are double crochets, but do not work in the chain stitches which were missed out: Start mid back, fasten the strand with 1 slip stitch in a double crochet, work 1 chain stitch, 1 single crochet in the next double crochet, 3 chain stitches, skip 3-1-3 double crochets, 1 single crochet in the next double crochet, * 3 chain stitches, skip 3 double crochets, 1 single crochet in the next double crochet *, work from *-* a total of 22-24-25 times, work 3 chain stitches, skip 3 double crochets and finish with 1 slip stitch in the first chain stitch at the beginning of the round = 24-26-27 chain-spaces. Then work A.6 in the round – remember the CROCHET INFORMATION. When A.6 has been finished cut and fasten the strand.

Diagram

All measurements in charts are in cm.

symbols = round already worked. Start on next round!
symbols = chain stitch
symbols = single crochet in stitch
symbols = single crochet between 2 double crochet groups
symbols = single crochet around chain-space
symbols = double crochet in stitch
symbols = double crochet around chain stitch/chain-space
symbols = double crochet between 2 double crochet groups
symbols = round begins with 1 chain stitch and finishes with 1 slip stitch in first chain stitch at beginning of round
symbols = round begins with 3 chain stitches and finishes with 1 slip stitch in 3rd chain stitch at beginning of round
symbols = increase round
diagram
diagram
diagram
Do you have a question? See a list of frequently asked questions (FAQ)

Knitting tension is what determines the final measurements of your work, and is usually measured per 10 x 10 cm. It is provided like so: number of stitches in width x number of rows in height - eg: 19 stitches x 26 rows = 10 x 10 cm.

The knitting tension is very individual; some people knit/crochet loosely while others work tightly. You adjust the knitting tension with the needle size, which is why the suggested needle size only serve as a guide! You need to adjust this (up or down) to ensure that YOUR knitting tension matches the knitting tension provided in the pattern. If you work with a different knitting tension than provided you will have a different yarn consumption, and your work will have different measurements than what the pattern suggests.

The knitting tension also determines which yarns can replace each other. As long as you achieve the same knitting tension you can replace one yarn with another.

See DROPS lesson: How to measure your tension/gauge

See DROPS video: How to make a gauge tension swatch

The required amount of yarn is provided in grams, eg: 450 g. To calculate how many balls you’ll need you first need to know how many grams are in 1 ball (25g, 50g or 100g). This information is available if you click on the individual yarn quality on our pages. Divide the amount required with the amount of each ball. For example, if each ball is 50g (the most common amount), the calculation will be as follows: 450 / 50 = 9 balls.

The important thing when changing from one yarn to another is that the knitting/crochet tension remains the same. This is so that the measurements of the finished piece will be the same as on the sketch provided. It is easier to achieve the same knitting tension using yarns from the same yarn group. It is also possible to work with multiple strands of a thinner yarn to achieve the knitting tension of a thicker one. Please try our yarn converter. We recommend you to always work a test swatch.

Please NOTE: when changing yarn the garment might have a different look and feel to the garment in the photo, due to individual properties and qualities of each yarn.

See DROPS lesson: Can I use a different yarn than the one mentioned in the pattern?

All our yarns are categorised into yarn groups (from A to F) according to thickness and knitting tension – group A contains the thinnest yarns and group F the thickest. This makes it easier for you to find alternative yarns to our patterns, should you wish to switch yarn. All yarns within the same group have a similar knitting tension and can easily replace each other. However, different yarn qualities have different structures and properties which will give the finished work a unique look and feel.

Click here for an overview of the yarns in each yarn group

At the top of all our patterns you’ll find a link to our yarn converter, which is a helpful tool should you wish to use a different yarn than suggested. By filling in the yarn quality you wish to replace, the amount (in your size) and number of strands, the converter will present good alternative yarns with the same knitting tension. Additionally it will tell you how much you’ll require in the new qualities and whether you’ll need to work with multiple strands. Most skeins are 50g (some are 25g or 100g).

If the pattern is worked with multiple colours, every colour will have to be converted separately. Similarly, if the pattern is worked with several strands of different yarns (for example 1 strand Alpaca and 1 strand Kid-Silk) you will have to find alternatives for each, individually.

Click here to see our yarn converter

Since different yarns have different qualities and textures we have chosen to keep the original yarn in our patterns. However, you can easily find options among our available qualities by using our yarn converter, or simply pick a yarn from the same yarn group.

It is possible that some retailers still have discontinued yarns in stock, or that someone has a few skeins at home that they would like to find patterns for.

The yarn converter will provide both alternative yarn as well as required amount in the new quality.

If you think it's hard to decide what size to make, it can be a good idea to measure a garment you own already and like the size of. Then you can pick the size by comparing those measures with the ones available in the pattern's size chart.

You'll find the size chart at the bottom of the pattern.

See DROPS lesson: How to read size chart

The needle size provided in the pattern serves only as a guide, the important thing is to follow the knitting tension. And since knitting tension is very individual, you will have to adjust the needle size to ensure that YOUR tension is the same as in the pattern – maybe you’ll have to adjust 1, or even 2 needle sizes, up or down to achieve the correct tension. For this, we recommend that you work test swatches.

Should you work with a different knitting tension than the one provided, the measurements of the finished garment might deviate from the measurement sketch.

See DROPS lesson: How to measure your tension/gauge

See DROPS video: How to make a gauge tension swatch

Working a garment top-down provides more flexibility and room for personal adjustment. For example it is easier to try the garment on while working, as well as making adjustments to length of yoke and shoulder caps.

The instructions are carefully explaining every step, in the correct order. Diagrams are adjusted to the knitting direction and are worked as usual.

The diagram depicts all rows/rounds, and every stitch seen from the right side. It is read from bottom to top, from right to left. 1 square = 1 stitch.

When working back and forth, every other row is worked from the right side and every other row is worked from the wrong side. When working from the wrong side, the diagram will have to be worked reversed: from left to right, knit stitches are purled, purl stitches are knit etc.

When working in the round every round is worked from the right side and the diagram are worked from right to left on all rounds.

See DROPS lesson: How to read knitting diagrams

The diagram depicts all rows/rounds, and every stitch seen from the right side. It is worked from bottom to top, from right to left.

When working back and forth every other row is worked from the right side: from right to left and every other row is worked from the wrong side: from left to right.

When working in the round, every row in the diagram are worked from the right side, from right to left.

When working a circular diagram you start in the middle and work your way outwards, counter clockwise, row by row.

The rows usually start with a given number of chain stitches (equivalent to the height of the following stitch), this will either be depicted in the diagram or explained in the pattern.

See DROPS lesson: How to read crochet diagrams

Instructions for working several diagrams after each other on the same row/round, will often be written like so: “work A.1, A.2, A.3 a total of 0-0-2-3-4 times". This means you work A.1 once, then A.2 is worked once, and A.3 is repeated (in width) the number of times provided for your size – in this case like so: S = 0 times, M = 0 times, L=2 times, XL= 3 times and XXL = 4 times.

The diagrams are worked as usual: begin with the first row in A.1, then work the first row in A.2 etc.

See DROPS lesson: How to read knitting diagrams

See DROPS lesson: How to read crochet diagrams

The total width of the garment (from wrist-to-wrist) will be larger in the larger sizes, despite the actual sleeves being shorter. The larger sizes have longer sleeve caps and wider shoulders, so there will be a good fit in all sizes.

The measurement sketch/schematic drawing provides information regarding the full length of the garment. If it’s a jumper or a jacket the length is measured from the highest point on the shoulder (usually closest to the neckline), and straight down to the bottom of the garment. It is NOT measured from the tip of shoulder. Similarly, the length of yoke is measured from the highest point on the shoulder and down to where yoke is split into body and sleeves.

See DROPS lesson: How to read a schematic drawing

Diagrams are often repeated on the round or in height. 1 repeat is the diagram the way it appears in the pattern. If it says to work 5 repeats of A.1 in the round, then you work A.1 a total of 5 times after/next to each other in the round. If it says to work 2 repeats of A.1 vertically/in height you work the entire diagram once, then begin again at the start and work the entire diagram one more time.

Chain stitches are slightly narrower than other stitches and to avoid working the cast-on edge too tight, we simply chain more stitches to begin with. The stitch count will be adjusted on the following row to fit the pattern and measurement sketch.

The rib edge is more elastic and will contract slightly compared to, for example, stocking stitch. By increasing before the rib edge, you avoid a visible difference in width between the rib edge and the rest of the body.

It’s very easy to cast off too tightly, and by making yarn overs while casting off (and simultaneously casting these off) you avoid a too tight cast off edge.

See DROPS video: How to bind off with yarn overs (yo)

To achieve an even increase (or decrease) you can increase on, for example: every 3rd and 4th row alternately, like so: work 2 rows and increase on the 3rd row, work 3 rows and increase on the 4th. Repeat this until the increase is complete.

See DROPS lesson: Increase or decrease 1 st on every 3rd and 4th row alternately

Should you prefer to work in the round instead of back and forth, you may of course adjust the pattern. You’ll need to add steeks mid-front (usually 5 stitches), and follow the instructions. When you would normally turn and work from the wrong side, simply work across the steek and continue in the round. At the end you’ll cut the piece open, pick up stitches to work bands, and cover the cut edges.

See DROPS video: How to knit steeks and cut open

Should you prefer to work back and forth instead of in the round, you may of course adjust the pattern so you work the pieces separately and then assemble them at the end. Divide the stitches for the body in 2, add 1 edge stitch in each side (for sewing) and work the front and back pieces separately.

See DROPS lesson: Can I adapt a pattern for circular needles into straight needles?

Pattern repeats can vary slightly in the different sizes, in order to get the correct proportions. If you’re not working the exact same size as the garment in the photo, yours might deviate slightly. This has been carefully developed and adjusted so that the complete impression of the garment is the same in all sizes.

Make sure to follow instructions and diagrams for your size!

If you have found a pattern you like which is available in women’s size it’s not very difficult to convert it to men’s size. The biggest difference will be the length of sleeves and body. Start working on the women size that you think would fit across the chest. The additional length will be worked right before you cast off for the armhole/sleeve cap. If the pattern is worked top-down you can add the length right after the armhole or before the first decrease on sleeve.

Regarding additional yarn amount, this will depend on how much length you add, but it is better with a skein too many than too few.

All yarns will have excess fibres (from production) that might come off as lint or shedding. Brushed yarns (ie hairier yarns) have more of these loose, excess fibres, causing more shedding.

Shedding also depends on what is worn under or over the garment, and whether this pulls at the yarn fibres. It’s therefore not possible to guarantee that there will be no shedding

Below are some tips on how to get the best result when working with hairier yarns:

1. When the garment is finished (before you wash it) shake it vigorously so the looser hairs come off. NOTE: do NOT use a lint roller, brush or any method that pulls at the yarn.

2. Place the garment in a plastic bag and put it in your freezer - the temperature will cause the fibres to become less attached to each other, and excess fibres will come off easier.

3. Leave in the freezer for a few hours before taking it out and shaking it again.

4. Wash the garment according to the instructions on the yarn label.

Pilling is a natural process that happens to even the most exclusive of fibers. It's a natural sign of wear and tear that is hard to avoid, and that is most visible in high friction areas of your garment like a sweater's arms and cuffs.

You can make your garment look as new by removing the pilling, using a fabric comb or a pill/lint remover.

Still can't find the answer you need? Then scroll down and leave your question so one of our experts can try to help you. This will be done normally within 5 to 10 working days.
In the meantime, you can read the questions and answers that others have left to this pattern or join the DROPS Workshop on Facebook to get help from fellow knitters/crocheters!

You might also like...

Post a comment to pattern DROPS 195-27

We would love to hear what you have to say about this pattern!

If you want to leave a question, please make sure you select the correct category in the form below, to speed up the answering process. Required fields are marked *.

Comments / Questions (31)

country flag JAULIN Nadia wrote:

Bonsoir, pouvez-vous me dire ou commence A2a, A2b et A2c. Je suis un peu perdu. Merci et bonne soirée.

11.01.2022 - 20:59

DROPS Design answered:

Bonjour Mme Jaulin, retrouvez les délimitations des différentes parties du diagramme A.2 à droite de A.1, soit: A.2 A = 10 rangs; A.2B = 6 rangs et A.2C = 3 rangs. Bon crochet!

12.01.2022 - 07:20

country flag Blair wrote:

How many skeins are needed to complete this pattern in a medium size?

18.12.2021 - 18:44

DROPS Design answered:

Dear Blair, you need 13 skeins in total to work this sweater: 6 in grey, 5 in light grey and 2 in medium grey. Happy crochetting!

18.12.2021 - 20:50

country flag Silvia Cominetti wrote:

Ho acquistato filato Nepal per fare il maglione poncho negli schemi quando c’è uno spazio bianco tra un simbolo e l’altro non devo fare nessun punto? Così però mi sembra di perdere punti e quindi la larghezza del lavoro; nello schema A.2 ad esempio quando devo usare per la seconda volta il filato n.1 Grazie

19.04.2021 - 10:17

DROPS Design answered:

Buonasera Silvia, ad ogni simbolo corrisponde una maglia. Buon lavoro!

19.04.2021 - 22:26

country flag Ana wrote:

Hola! Como se hacen los aumentos en la prenda? O en el diagrama Ya están incluidos los aumentos? Como es que se hacen si los puntos altos van alrededor de un arco? Gracias

20.06.2020 - 18:59

DROPS Design answered:

Hola Ana, las filas en las que hay que trabajar aumentos están marcadas con flechas en el diagrama A.1. El número de puntos que hay que aumentar está indicado en el texto del patrón. Estos aumentos se trabajan como se explica en el TIP PARA AUMENTAR, es decir, para aumentar 1 punto alto, trabajar 2 puntos altos en el mismo punto/arco.

21.11.2020 - 23:20

country flag Bianca Heizmann wrote:

Ich bin mit dem Poncho fast fertig. Im Diagramm der Anleitung steht eine Länge von 48 cm. Das ist knapp unterm Bauchnabel. Auf den Bildern wirkt der Poncho deutlich länger. Hab ich da was falsch verstanden? Auch die Ärmel sind kürzer wie auf den Bildern. Zieht sich das noch? Am Rumpf fehlen gut noch 10cm. Weiß nicht wie ich jetzt weiter machen soll. Noch einen Mustersatz unten dran? Mit oder ohne Zunahme??? Hiiilfeeeeee

14.06.2020 - 08:05

DROPS Design answered:

Liebe Frau Heizmann, stimmte Ihre Maschenprobe in der Höhe? dh 8 Reihen Stäbchen = 10 cm. Gerne können Sie Ihr strickstück Ihr Laden zeigen, gerne kann man Ihnen dort am besten helfen (auch telefonisch oder per Email). Viel Spaß beim häkeln!

15.06.2020 - 09:43

country flag Chantelle wrote:

Hi, I would like to know how to end the row? I'm not sure if I must slip stitch and where. Please help.

10.09.2019 - 18:20

DROPS Design answered:

Dear Chantelle, diagrams A.1, A.3 and A.5 shows how to start and how to finish each round in A.2, A.4 and A.6: you will either work 1 chain or 3 chains (see 9th and 10th symbol) and finish each round with 1 sl st in the first or 3rd ch from the beg of the round. Happy crocheting!

11.09.2019 - 07:44

country flag Marian wrote:

Me parece excelente el trabajo y muy clara la explicación.Me encantó. Felicitaciones

07.05.2019 - 19:59

country flag Elizabeth Burton wrote:

Is this pattern written out anywhere? Not use to using the diagrams. I would really like to make th I s poncho. Thanks!

10.04.2019 - 18:58

DROPS Design answered:

Dear Elizabeth, we are sorry, but we do not have a written out pattern for the lace of this piece. There is the chart, and detailed explanation of the symbols, and you can always ask the help of the store you bought your DROPS yarn from for presonal help to make sense of it. Just follow the diagram, and it will be fine. Happy Knitting!

11.04.2019 - 09:00

country flag Petra wrote:

Vanaf het punt waar de mouwen starten moet je bij het lijf meteen in de eerste toer 24 stokjes meerderen in de lussen. De volgende toer haak je setjes van 3 stokjes tussen de setjes van de vorige toer (bij mij setjes van 4 en 3 stokjes). Dan ga je toch weer terug naar het aantal stokjes dat je had voordat je meerderde? Of doe ik iets verkeerd?

29.03.2019 - 17:12

DROPS Design answered:

Dag Petra,

Op de eerste toer van A.2b meerder je 24 stokjes,dus A.2b wordt dan 30-34-36 keer herhaald, dus 180-204-216 stokjes (hier zijn de meerderingen al in verwerkt. Als je daarna nog eens 36-42-48 stokjes meerdert in de 4e toer (toer met pijl) kom je op 216-246-264 stokjes.

10.04.2019 - 09:25

country flag Mivian wrote:

Est ce que l on peut faire les manches plus haut ? Merci cordialement

16.03.2019 - 08:43

DROPS Design answered:

Bonjour Mivian, vous pouvez naturellement modifier le modèle à votre guise, nous ne sommes malheureusement pas en mesure de pouvoir adapter chaque modèle à chaque demande, mais contactez le magasin où vous avez acheté votre laine - même par mail ou téléphone - pour toute assistance complémentaire. Bon crochet!

18.03.2019 - 12:31