DROPS BabyAlpaca Silk
70% Alpaca, 30% Silk
Discontinued
find alternatives
DROPS SS24

Horizon Highlights

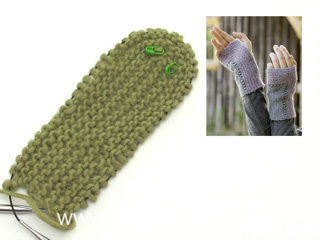
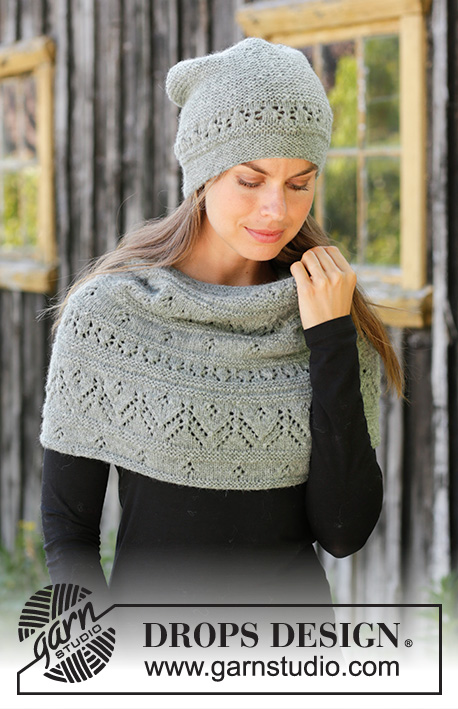
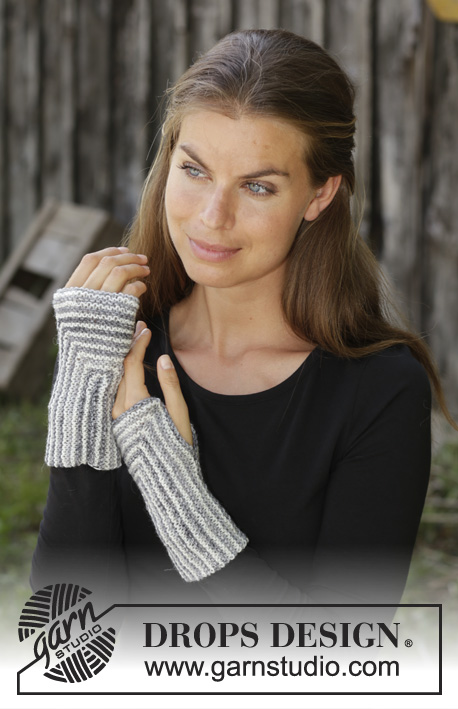
Knitted hat in DROPS BabyAlpaca Silk. Piece is knitted with lace pattern, stripes and garter stitch. Knitted wrist warmers in DROPS BabyAlpaca Silk. Piece is knitted with lace pattern, stripes and garter stitch.

DROPS 192-18
DROPS design: Pattern bs-145
Yarn group A
----------------------------------------------------------

YARN FOR THE ENTIRE SET:
Size: S/M – L/XL
Materials:
DROPS BABYALPACA SILK from Garnstudio (belongs to yarn group A)
100-100 g colour 8465, medium grey
100-100 g colour 3250, light old pink

YARN FOR HAT:
Size: S/M – L/XL
Head circumference: approx. 54/56 - 58/60 cm
Materials:
DROPS BABYALPACA SILK from Garnstudio (belongs to yarn group A)
100-100 g colour 8465, medium grey
50-50 g colour 3250, light old pink

YARN FOR WRIST WARMERS:
Size: S/M – L/XL
Measurements length: approx. 18-20 cm. Circumference: approx. 17-19 cm
Materials:
DROPS BABYALPACA SILK from Garnstudio (belongs to yarn group A)
50-50 g colour 8465, medium grey
50-50 g colour 3250, light old pink

----------------------------------------------------------
ACCESSORIES FOR THE PIECE:

HAT:

KNITTING TENSION:
24 stitches in width and 48 rows vertically in garter stitch = 10 x 10 cm.

NEEDLES:
DROPS NEEDLES SIZE 3 mm
DROPS NEEDLES SIZE 2.5 mm for rib
Needle size is only a suggestion! If you have too many stitches on 10 cm switch to larger needles. If you have too few stitches on 10 cm switch to smaller needles.

WRIST WARMERS:

KNITTING TENSION:
24 stitches in width and 48 rows vertically in garter stitch = 10 x 10 cm.

DROPS CIRCULAR NEEDLE SIZE 3 mm, length 60 or 80 cm.
Needle size is only a suggestion! If you have too many stitches on 10 cm switch to larger needles. If you have too few stitches on 10 cm switch to smaller needles.

----------------------------------------------------------

-------------------------------------------------------

Alternative Yarn – See how to change yarns here
Yarn Groups A to F – Use the same pattern and change the yarn here
Yarn usage using an alternative yarn – Use our yarn converter here

-------------------------------------------------------

DROPS BabyAlpaca Silk
70% Alpaca, 30% Silk
Discontinued
find alternatives

Pattern instructions

NOTE: This pattern is written in British English. All measurements in charts are in cm. For conversion from cm to inches - click here. There are different terms for crocheting in British and American English. If this pattern includes crochet, click for "crochet terms" here. For this pattern in American English, please click here.
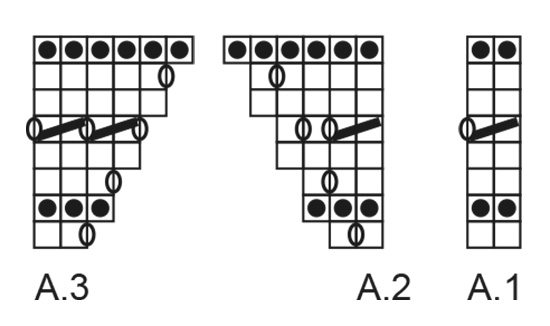
EXPLANATION FOR THE PATTERN:

----------------------------------------------------------

GARTER STITCH (back and forth):
1 ridge = knit 2 rows.

STRIPES (applies to hat):
Work * 1 ridge with light old pink, work 1 ridge with medium grey *, work from *-* 5 times in total. Then work piece in medium grey until finished measurements.

INCREASE TIP (applies to hat):
All increases are done from the right side!
Increase 1 stitch by making 1 yarn over, on next row knit yarn over twisted to avoid holes.

DECREASE TIP (applies to hat):
All decreases are done from the right side!
Decrease 1 stitch after marker thread as follows: Knit 2 together. 

PATTERN:
Hat: See diagram A.1.
Wrist warmers: See diagrams A.1 to A.3.

----------------------------------------------------------

START THE PIECE HERE:

----------------------------------------------------------

HAT - SHORT OVERVIEW OF THE PIECE:
Worked back and forth on needle, bottom up. Then sew hat together mid back. 

HAT:
Loosely cast on 122-143 stitches (including 1 edge stitch in each side) on needle size 2.5 mm with medium grey. Purl 1 row from wrong side, then work rib (= knit 1/purl 2) with 1 edge stitch in GARTER STITCH - read explanation above, in each side. 
When piece measures 5 cm, adjust so that next row is from right side, switch to needle size 3 mm and work 1 ridge. Then switch to light old pink and work as follows: Work 1 edge stitch in garter stitch, A.1 (= 2 stitches) until 1 stitch remains and finish with 1 edge stitch in garter stitch. When A.1 has been worked 1 time vertically, hat measures approx. 7 cm. Now work in STRIPES - read explanation above, and insert 5 marker threads in piece from the right side as follows: Insert 1 marker thread after 1 stitch, insert the next 4 24-28 stitches apart, 25-30 stitches remain after last marker thread. On next row from right side, increase 1 stitch after every marker thread (= 5 stitches increased) – read INCREASE TIP! REMEMBER THE KNITTING TENSION! Increase like this every other row 3 more times and then every 4th row 7 times in total = 177-198 stitches. When piece measures 11-12 cm from rib, decrease 1 stitch after every marker thread on next row from right side (= 5 stitches decreased) - read DECREASE TIP. Decrease like this every other row 17-19 times in total = 92-103 stitches.
Work all stitches together 2 by 2 on every row from right side 3 times in total = 12-13 stitches. Hat measures approx. 25-26 cm.
Pull 1 yarn through the remaining stitches and tighten together. Sew hat together mid back inside 1 edge stitch in each side. 

----------------------------------------------------------

WRIST WARMERS - SHORT OVERVIEW OF THE PIECE:
Work piece back and forth on circular needle. Sew the wrist warmers together when finished.

WRIST WARMERS:
Cast on 22-24 stitches on circular needle size 3 mm with medium grey. Work 1 ridge in GARTER STITCH - read explanation above.
ROW 1 (= right side): Knit until 1 stitch remains on needle, knit 2 stitches in next stitch (i.e. knit in front and back loop of stitch), knit up 1 stitch in the outermost stitch of the ridge that was worked on the previous row, then knit up stitches down along the cast-on edge as follows: Knit 2 stitches in first stitch, knit 1 stitch in each of the next 21-23 stitches = 47-51 stitches.
ROW 2: Knit all stitches. Insert a marker thread in 23rd-25th stitch and 25th-27th stitch. Then increase on each side of these 2 stitches.

1ST SECTION (with ridges in medium grey):
ROW 1 (= right side): Knit stitches, at the same time make 1 yarn over on each side of stitches with marker thread (= 4 stitches increased).
ROW 2: Knit all stitches, always knit yarn overs twisted to avoid holes.
Repeat rows 1 and 2. For every increase there will be 2 stitches more between the 2 stitches with marker thread and 4 stitches in total more on needle.
When approx. 3 cm from cast-on edge have been worked (i.e. 6 cm in total) – adjust so that next row is worked from right side, work lace pattern as follows:

2ND SECTION (with lace pattern in medium grey):
Work 2 edge stitches in garter stitch, work A.1 (= 2 stitches) until 1 stitch remains before stitch with marker, A.2 (= 2 stitches), A.3 (= 2 stitches), work A.1 (= 2 stitches) until 2 stitches remain, finish with 2 edge stitches in garter stitch. When A.1 to A.3 have been worked 1 time vertically, piece measures approx. 5 cm from cast-on edge (i.e. 10 cm in total).

3RD SECTION (stripes and garter stitch):
Work 1st and 2nd row in garter stitch and increase as on 1st section, but work stripes as follows:
Work 1 ridge with light old pink, work 1 ridge with medium grey.
Continue like this until piece measures 8½-9½ cm from cast-on edge (i.e. 17-19 cm in total). Cast off knitting from right side.

Fold piece in 2 so that fold is along cast-on edge. Sew together in the side from bottom of wrist warmer and 11-12 cm upwards. Sew one and one stitch in cast-off edge. Fasten off. Skip approx. 6-7 cm (1½ cm remain at the top of wrist warmer) sew one and one stitch together in the side along the last 1½ cm. Fasten off.
Work the other wrist warmer the same way.

Diagram

symbols = knit from the right side, purl from the wrong side
symbols = knit from wrong side
symbols = knit 2 together
symbols = slip 1 stitch knitwise, knit 1, pass slipped stitch over stitch worked
symbols = between 2 stitches make 1 yarn over
diagram

Each of our patterns has specific tutorial videos to help you.

Do you have a question? See a list of frequently asked questions (FAQ)

Knitting tension is what determines the final measurements of your work, and is usually measured per 10 x 10 cm. It is provided like so: number of stitches in width x number of rows in height - eg: 19 stitches x 26 rows = 10 x 10 cm.

The knitting tension is very individual; some people knit/crochet loosely while others work tightly. You adjust the knitting tension with the needle size, which is why the suggested needle size is only meant as a guide! You need to adjust this (up or down) to ensure that YOUR knitting tension matches the knitting tension provided in the pattern. If you work with a different knitting tension than provided you will have a different yarn consumption, and your work will have different measurements than what the pattern suggests.

The knitting tension also determines which yarns can replace each other. As long as you achieve the same knitting tension you can replace one yarn with another.

See DROPS lesson: How to measure your tension/gauge

See DROPS video: How to make a gauge tension swatch

The required amount of yarn is provided in grams, eg: 450 g. To calculate how many balls you’ll need you first need to know how many grams are in 1 ball (25g, 50g or 100g). This information is available if you click on the individual yarn quality on our pages. Divide the amount required with the amount of each ball. For example, if each ball is 50g (the most common amount), the calculation will be as follows: 450 / 50 = 9 balls.

The important thing when changing from one yarn to another is that the knitting/crochet tension remains the same. This is so that the measurements of the finished piece will be the same as on the sketch provided. It is easier to achieve the same knitting tension using yarns from the same yarn group. It is also possible to work with multiple strands of a thinner yarn to achieve the knitting tension of a thicker one. Please try our yarn converter. We recommend you to always work a test swatch.

Please NOTE: when changing yarn the garment might have a different look and feel to the garment in the photo, due to individual properties and qualities of each yarn.

See DROPS lesson: Can I use a different yarn than the one mentioned in the pattern?

All our yarns are categorised into yarn groups (from A to F) according to thickness and knitting tension – group A contains the thinnest yarns and group F the thickest. This makes it easier for you to find alternative yarns to our patterns, should you wish to switch yarn. All yarns within the same group have a similar knitting tension and can easily replace each other. However, different yarn qualities have different structures and properties which will give the finished work a unique look and feel.

Click here for an overview of the yarns in each yarn group

At the top of all our patterns you’ll find a link to our yarn calculator, which is a helpful tool should you wish to use a different yarn than suggested. By filling in the yarn quality you wish to replace, the amount (in your size) and number of strands, the calculator will present good alternative yarns with the same knitting tension. Additionally it will tell you how much you’ll require in the new qualities and whether you’ll need to work with multiple strands. Most skeins are 50g (some are 25g or 100g).

If the pattern is worked with multiple colours, every colour will have to be calculated separately. Similarly, if the pattern is worked with several strands of different yarns (for example 1 strand Alpaca and 1 strand Kid-Silk) you will have to find alternatives for each, individually.

Click here to see our yarn calculator

Since different yarns have different qualities and textures we have chosen to keep the original yarn in our patterns. However, you can easily find options among our available qualities by using our yarn calculator, or simply pick a yarn from the same yarn group.

It is possible that some retailers still have discontinued yarns in stock, or that someone has a few skeins at home that they would like to find patterns for.

The yarn calculator will provide both alternative yarn as well as required amount in the new quality.

If you think it's hard to decide what size to make, it can be a good idea to measure a garment you own already and like the size of. Then you can pick the size by comparing those measures with the ones available in the pattern's size chart.

You'll find the size chart at the bottom of the pattern.

See DROPS lesson: How to read size chart

The needle size provided in the pattern serves only as a guide, the important thing is to follow the knitting tension. And since knitting tension is very individual, you will have to adjust the needle size to ensure that YOUR tension is the same as in the pattern – maybe you’ll have to adjust 1, or even 2 needle sizes, up or down to achieve the correct tension. For this, we recommend that you work test swatches.

Should you work with a different knitting tension than the one provided, the measurements of the finished garment might deviate from the measurement sketch.

See DROPS lesson: How to measure your tension/gauge

See DROPS video: How to make a tension/gauge swatch

Working a garment top-down provides more flexibility and room for personal adjustment. For example it is easier to try the garment on while working, as well as making adjustments to length of yoke and shoulder caps.

The instructions are carefully explaining every step, in the correct order. Diagrams are adjusted to the knitting direction and are worked as usual.

The diagram depicts all rows/rounds, and every stitch seen from the right side. It is read from bottom to top, from right to left. 1 square = 1 stitch.

When working back and forth, every other row is worked from the right side and every other row is worked from the wrong side. When working from the wrong side, the diagram will have to be worked reversed: from left to right, knit stitches are purled, purl stitches are knit etc.

When working in the round every round is worked from the right side and the diagram are worked from right to left on all rounds.

See DROPS lesson: How to read knitting diagrams

The diagram depicts all rows/rounds, and every stitch seen from the right side. It is worked from bottom to top, from right to left.

When working back and forth every other row is worked from the right side: from right to left and every other row is worked from the wrong side: from left to right.

When working in the round, every row in the diagram are worked from the right side, from right to left.

When working a circular diagram you start in the middle and work your way outwards, counter clockwise, row by row.

The rows usually start with a given number of chain stitches (equivalent to the height of the following stitch), this will either be depicted in the diagram or explained in the pattern.

See DROPS lesson: How to read crochet diagrams

Instructions for working several diagrams after each other on the same row/round, will often be written like so: “work A.1, A.2, A.3 a total of 0-0-2-3-4 times". This means you work A.1 once, then A.2 is worked once, and A.3 is repeated (in width) the number of times provided for your size – in this case like so: S = 0 times, M = 0 times, L=2 times, XL= 3 times and XXL = 4 times.

The diagrams are worked as usual: begin with the first row in A.1, then work the first row in A.2 etc.

See DROPS lesson: How to read knitting diagrams

See DROPS lesson: How to read crochet diagrams

The total width of the garment (from wrist-to-wrist) will be larger in the larger sizes, despite the actual sleeves being shorter. The larger sizes have longer sleeve caps and wider shoulders, so there will be a good fit in all sizes.

The measurement sketch/schematic drawing provides information regarding the full length of the garment. If it’s a jumper or a jacket the length is measured from the highest point on the shoulder closest to the neckline, and straight down to the bottom of the garment. It is NOT measured from the tip of shoulder. Similarly, the length of yoke is measured from the highest point on the shoulder and down to where yoke is split into body and sleeves.

On a jacket measures are never taken along bands, unless specifically stated. Always measure inside band stitches when measuring the length.

See DROPS lesson: How to read a schematic drawing

Diagrams are often repeated on the round or in height. 1 repeat is the diagram the way it appears in the pattern. If it says to work 5 repeats of A.1 in the round, then you work A.1 a total of 5 times after/next to each other in the round. If it says to work 2 repeats of A.1 vertically/in height you work the entire diagram once, then begin again at the start and work the entire diagram one more time.

Chain stitches are slightly narrower than other stitches and to avoid working the cast-on edge too tight, we simply chain more stitches to begin with. The stitch count will be adjusted on the following row to fit the pattern and measurement sketch.

The rib edge is more elastic and will contract slightly compared to, for example, stocking stitch. By increasing before the rib edge, you avoid a visible difference in width between the rib edge and the rest of the body.

It’s very easy to cast off too tightly, and by making yarn overs while casting off (and simultaneously casting these off) you avoid a too tight cast off edge.

See DROPS video: How to bind off with yarn overs (yo)

To achieve an even increase (or decrease) you can increase on, for example: every 3rd and 4th row alternately, like so: work 2 rows and increase on the 3rd row, work 3 rows and increase on the 4th. Repeat this until the increase is complete.

See DROPS lesson: Increase or decrease 1 st on every 3rd and 4th row alternately

Should you prefer to work in the round instead of back and forth, you may of course adjust the pattern. You’ll need to add steeks mid-front (usually 5 stitches), and follow the instructions. When you would normally turn and work from the wrong side, simply work across the steek and continue in the round. At the end you’ll cut the piece open, pick up stitches to work bands, and cover the cut edges.

See DROPS video: How to knit steeks and cut open

Should you prefer to work back and forth instead of in the round, you may of course adjust the pattern so you work the pieces separately and then assemble them at the end. Divide the stitches for the body in 2, add 1 edge stitch in each side (for sewing) and work the front and back pieces separately.

See DROPS lesson: Can I adapt a pattern for circular needles into straight needles?

Pattern repeats can vary slightly in the different sizes, in order to get the correct proportions. If you’re not working the exact same size as the garment in the photo, yours might deviate slightly. This has been carefully developed and adjusted so that the complete impression of the garment is the same in all sizes.

Make sure to follow instructions and diagrams for your size!

If you have found a pattern you like which is available in women’s size it’s not very difficult to convert it to men’s size. The biggest difference will be the length of sleeves and body. Start working on the women size that you think would fit across the chest. The additional length will be worked right before you cast off for the armhole/sleeve cap. If the pattern is worked top-down you can add the length right after the armhole or before the first decrease on sleeve.

Regarding additional yarn amount, this will depend on how much length you add, but it is better with a skein too many than too few.

All yarns will have excess fibres (from production) that might come off as lint or shedding. Brushed yarns (ie hairier yarns) have more of these loose, excess fibres, causing more shedding.

Shedding also depends on what is worn under or over the garment, and whether this pulls at the yarn fibres. It’s therefore not possible to guarantee that there will be no shedding

Below are some tips on how to get the best result when working with hairier yarns:

1. When the garment is finished (before you wash it) shake it vigorously so the looser hairs come off. NOTE: do NOT use a lint roller, brush or any method that pulls at the yarn.

2. Place the garment in a plastic bag and put it in your freezer - the temperature will cause the fibres to become less attached to each other, and excess fibres will come off easier.

3. Leave in the freezer for a few hours before taking it out and shaking it again.

4. Wash the garment according to the instructions on the yarn label.

Pilling is a natural process that happens to even the most exclusive of fibers. It's a natural sign of wear and tear that is hard to avoid, and that is most visible in high friction areas of your garment like a sweater's arms and cuffs.

You can make your garment look as new by removing the pilling, using a fabric comb or a pill/lint remover.

Still can't find the answer you need? Then scroll down and leave your question so one of our experts can try to help you. This will be done normally within 5 to 10 working days.
In the meantime, you can read the questions and answers that others have left to this pattern or join the DROPS Workshop on Facebook to get help from fellow knitters/crocheters!

You might also like...

Post a comment to pattern DROPS 192-18

We would love to hear what you have to say about this pattern!

If you want to leave a question, please make sure you select the correct category in the form below, to speed up the answering process. Required fields are marked *.

Comments / Questions (16)

country flag Mica wrote:

Buongiorno. Per favore, potreste rispondere alla mia domanda? Ho il progetto in sospeso

15.03.2024 - 10:27

DROPS Design answered:

Buongiorno Mica, abbiamo inoltrato la sua richiesta al settore design: può finire lavorando 1 maglia diritto. Buon lavoro!

19.03.2024 - 16:06

country flag Mica wrote:

Buongiorno, Se non ci sono errori nella seconda sezione, per favore, potreste spiegarmi dove sto sbagliando? Come posso lavorare A1, A2 e A3 su un numero dispari di maglie?

27.02.2024 - 10:53

DROPS Design answered:

Buongiorno Mica, abbiamo inoltrato la sua richiesta al settore design: può finire lavorando 1 maglia diritto. Buon lavoro!

19.03.2024 - 16:06

country flag Mica wrote:

Ciao, per favore potete rispondere? Non riesco a proseguire con il lavoro.

24.02.2024 - 18:28

country flag Mica wrote:

Buongiorno, non riesco a proseguire con la 2' sezione. Mi ritrovo con un numero dispari di m.: partendo da 47 maglie ne aggiungo 4 ad ogni ferro diritto, quindi le m. totali resteranno sempre dispari. Se poi lavoro:2 dir+A1 (2 m) per x volte, +A2 (2m) + A3 (2m) + A1 (2 m) finché nn restano le due maglie del bordo...vuol dire che nn dovrò lavorare l' ultima A1 intero? Dove sto sbagliando? Grazie per chiarire

08.02.2024 - 11:55

DROPS Design answered:

Buonasera Mica, non sono stati riportati errori nella seconda sezione. Buon lavoro!

25.02.2024 - 21:37

country flag Bar wrote:

Hi. I wanted to knit with "Baby alpaca silk". It was a fantastic yarn. It is GONE. WHEN WILL IT BE BACK? .. No!! I am not interested in "fuzzling yarns" (like this new one). .. next year? thank you

22.11.2022 - 11:34

DROPS Design answered:

Dear Mrs Bar, please use our yarn converter to see all suggested alternatives. Your DROPS store will also help you finding the best matching yarns if you need help (eve per mail or telephone). Happy knitting!

22.11.2022 - 15:56

country flag Ingegerd Wallin wrote:

Jag förstår inte ökningen från 21 till 47 maskor? Jag har lyckats få 33 maskor.- "sticka 1 maska i var och en av de nästa 21-23 maskorna = 47-51 maskor. VARV 2: Sticka rätmaskor tillbaka.."

14.01.2021 - 00:54

DROPS Design answered:

Hej Ingegerd. Se videon vi har gjort till pulsvärmarna: Pulsvärmarna DROPS 192-18

20.01.2021 - 08:42

country flag Rigmor wrote:

Hej, inte heller jag kommer förbi rad 3 av pulsvärmarna. När jag följer instruktionen hamnar nålarna på var sin sida och pekar åt var sitt håll om det lilla 2radiga arbetet; det hela sitter fast! Hur får jag upp de 21-23 nya maskorna från uppläggningskanten på samma sticka som rad 2 redan sitter på?

10.01.2020 - 21:27

DROPS Design answered:

Hej Rigmor, du stickar runt om de førsta 2 varven, alltså i varje maska av uppläggningskanten. När du har kommit varvet runt, vänder du och stickar tillbaka varvet runt.

How to begin working the wrist warmers in DROPS 192-18 from Garnstudio Drops design on Vimeo.

Lycka till :)

10.02.2020 - 15:53

country flag Marion wrote:

Bonjour. Pour le rang 1 des mitaines, une fois qu'on a tricoté 2 fois l'avant dernière maille et relevé 1 maille dans la cote de mousse dessous, comment relever les mailles du rang de montage alors que toutes les mailles sont sur l'aiguilles? J'avoue que je suis perdue... Merci pour votre aide.

15.11.2019 - 14:33

DROPS Design answered:

Bonjour Marion, vous tournez l'ouvrage (car vous tricotez en rangs) et vous tricotez le rang suivant (= sur l'envers) à l'endroit. Vous continuez ensuite en allers et retours en suivant les sections, vous allez augmenter le nombre de mailles de chaque côté des marqueurs. Bon tricot!

15.11.2019 - 14:46

country flag Bodil wrote:

Hei! Forstår oppskriften slik at i 2. parti (med hullmønster i mellomgrå) på pulsvantene skal diagram A2 og A3 kun skal strikkes en gang, stemmer det?

30.10.2019 - 12:14

DROPS Design answered:

Hei Bodil, Ja det er riktig. A.2 og A.3 skal strikkes 1 gang i høyden. God fornøyelse!

31.10.2019 - 07:50

country flag Vibe Dahlmoes wrote:

Jeg er færdig med Hue. Jeg kan simpelthen ikke finde ud af pulsvarmere, hverken det med at slå op, eller de tre partier, håber jeg kan få hjælp

19.08.2019 - 12:55

DROPS Design answered:

Hei Vibe. Når du har lagt opp og strikket 2 pinner, skal du øke i siste maske på 2. pinne ved å strikke 2 masker i 1 maske. Se evnt video under oppskriften: Udtagning - strik 2 m i 1 m. Deretter vri du arbeidet litt (ikke snu som vanlig), men strikk i ytterste maske/rille i den 2. pinne du strikket (kortsiden av arbeidet ditt), vri arbeidet litt mer (nå skal du strikke i oppleggskanten). Strikk slik: strikk 2 masker i første maske, strikk 1 maske i hver av de neste 21-23 maskene = 47-51 masker. God Fornøyelse!

20.08.2019 - 13:51