DROPS Puna
DROPS Puna
100% Alpaca
from 3.45 £ /50g
Get the yarn to make this pattern from 17.25£.

The yarn cost is calculated from the pattern’s smallest size and the yarn’s cheapest product type. Looking for an even better price? You might find it on the DROPS Deals!

DROPS SS24

Winter Dunes

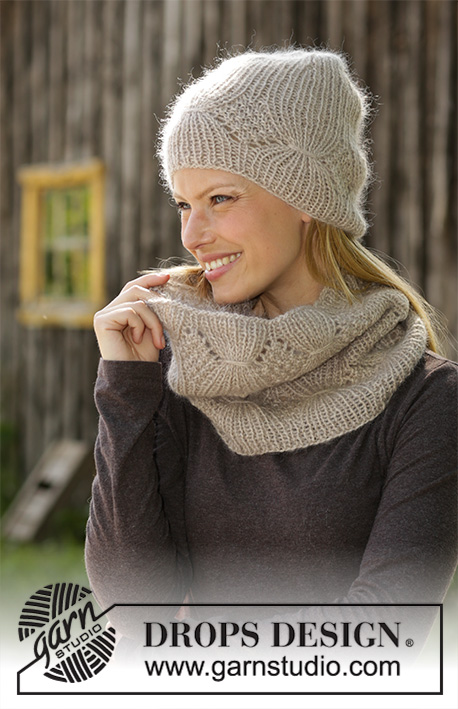
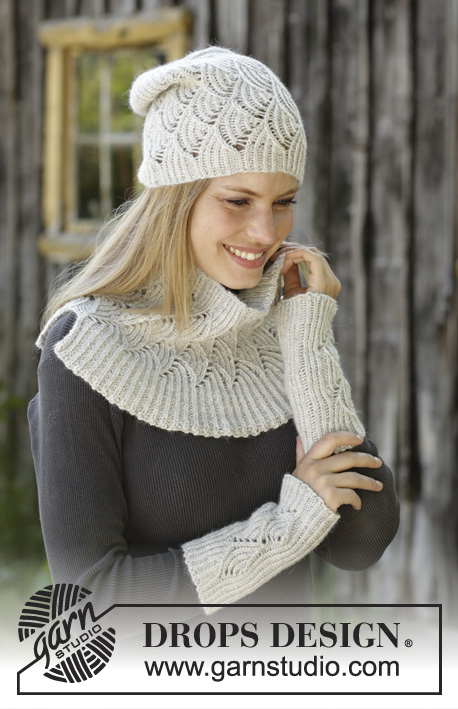
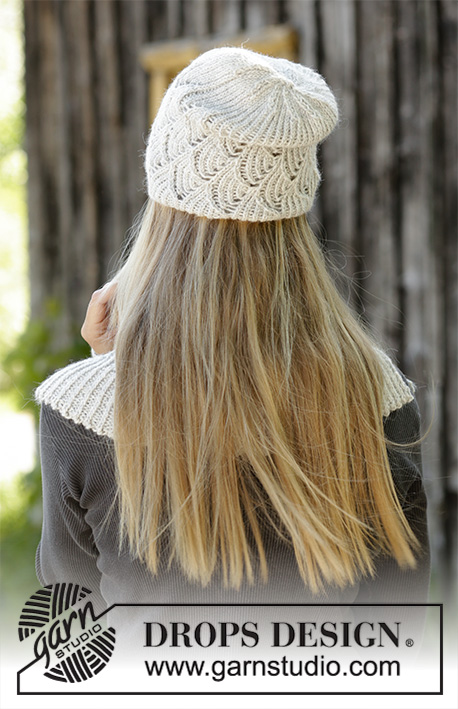
Knitted hat, neck warmer and wrist warmers in DROPS Puna. Set is knitted in rib with fan pattern.

DROPS 192-21
DROPS design: Pattern pu-032
Yarn group B
----------------------------------------------------------

YARN FOR THE ENTIRE SET:
Size: S/M - M/L
Head circumference: 54/56 - 56/58 cm
Materials:
DROPS PUNA from Garnstudio (belongs to yarn group B)
250-300 g colour 07, light grey

YARN FOR HAT:
Size: S/M - M/L
Head circumference: approx. 54/56 - 56/58 cm
Materials:
DROPS PUNA from Garnstudio (belongs to yarn group B)
100-100 g colour 07, light grey

YARN FOR NECK WARMER:
Size: S/M - M/L
Measurements: Circumference at the top: approx. 60-68 cm Height: approx. 22-24 cm
Materials:
DROPS PUNA from Garnstudio (belongs to yarn group B)
100-150 g colour 07, light grey

YARN FOR WRIST WARMERS:
Size: S/M - M/L
Measurements: Circumference: approx. 18-20 cm Length: approx. 18-19 cm
Materials:
DROPS PUNA from Garnstudio (belongs to yarn group B)
50-100 g colour 07, light grey

----------------------------------------------------------
ACCESSORIES FOR THE PIECE:

HAT:

KNITTING TENSION:
21 stitches in width and 28 rows vertically in stocking stitch = 10 x 10 cm. 1 repetition of A.2 measures approx. 4 cm in width.

NEEDLES:
DROPS DOUBLE POINTED NEEDLES SIZE 4 mm
DROPS CIRCULAR NEEDLE SIZE 4 mm, length 40 cm.
DROPS CIRCULAR NEEDLE SIZE 3 mm, length 40 cm for edge.
Needle size is only a suggestion! If you have too many stitches on 10 cm switch to larger needles. If you have too few stitches on 10 cm switch to smaller needles.

NECK WARMER:

KNITTING TENSION:
21 stitches in width and 28 rows vertically in stocking stitch = 10 x 10 cm. 1 repetition of A.2 measures approx. 4 cm in width.

NEEDLES:
DROPS CIRCULAR NEEDLE SIZE 4 mm, length 60 cm.
DROPS CIRCULAR NEEDLE SIZE 3 mm, length 60 cm for edges.
Needle size is only a suggestion! If you have too many stitches on 10 cm switch to larger needles. If you have too few stitches on 10 cm switch to smaller needles.

WRIST WARMERS:

KNITTING TENSION:
21 stitches in width and 28 rows vertically in stocking stitch = 10 x 10 cm. 1 repetition of A.2/A.5 measures approx. 4 cm in width.

NEEDLES:
DROPS DOUBLE POINTED NEEDLES SIZE 4 mm
DROPS DOUBLE POINTED NEEDLES SIZE 3 mm - for edges.
Needle size is only a suggestion! If you have too many stitches on 10 cm switch to larger needles. If you have too few stitches on 10 cm switch to smaller needles.

----------------------------------------------------------

-------------------------------------------------------

Alternative Yarn – See how to change yarns here
Yarn Groups A to F – Use the same pattern and change the yarn here
Yarn usage using an alternative yarn – Use our yarn converter here

-------------------------------------------------------

DROPS Puna
DROPS Puna
100% Alpaca
from 3.45 £ /50g
Get the yarn to make this pattern from 17.25£.

The yarn cost is calculated from the pattern’s smallest size and the yarn’s cheapest product type. Looking for an even better price? You might find it on the DROPS Deals!

Pattern instructions

NOTE: This pattern is written in British English. All measurements in charts are in cm. For conversion from cm to inches - click here. There are different terms for crocheting in British and American English. If this pattern includes crochet, click for "crochet terms" here. For this pattern in American English, please click here.
EXPLANATION FOR THE PATTERN:

----------------------------------------------------------

PATTERN:
Hat: See diagrams A.1 to A.4.
Neck warmer: See diagrams A.1 to A.3.
Wrist warmers: See diagrams A.1, A.2 and A.5.
Diagrams show all rows in pattern seen from the right side.

GARTER STITCH (back and forth):
1 edge stitch in garter stitch = knit stitch from right side and knit stitch from wrong side.

INCREASE TIP (applies to neck warmer):
All increase are done from the right side. Increase 1 stitch before every twisted knitted stitch by making 1 yarn over. On next row (wrong side) knit yarn overs twisted to avoid hole.

----------------------------------------------------------

START THE PIECE HERE:

----------------------------------------------------------

HAT - SHORT OVERVIEW OF THE PIECE:
Worked in the round on a short circular needle, bottom up. Switch to double pointed needles when needed.

HAT:
Cast on 120-130 stitches on a short circular needle size 3 mm with Puna. Knit 1 round. Then work A.1 in the round (= 12-13 repetitions of 10 stitches). Continue rib like this but note that the knitted stitches are worked twisted. When piece measures 3 cm in both sizes, switch to a short circular needle size 4 mm. Insert 1 marker thread at the beginning of round and move the marker upwards so that you know where the beginning of round is.
Then work A.2 in the round (= 12-13 repetitions of 10 stitches – note that pattern is worked on every round). When A.2 has been worked 1 time vertically, work A.2 one more time vertically, but now displace beginning of round 1 stitch to the left, i.e. pass first stitch on left needle on to right needle without working the stitch, move at the same time the marker thread so that round begins here now. Work A.2 in the round as before, work the stitch moved on to right needle as last stitch in last repetition with A.2. When A.2 has been worked, work A.3 in the round (= 12-13 repetitions of 10 stitches). Continue with twisted knit over twisted knit and purl over purl until hat measures 22-24 cm. Work A.4 in the round (= 12-13 repetitions of 10 stitches). When A.4 has been worked, there are 12-13 stitches on needles. Work 1 round where all stitches are knitted twisted together 2 by 2 = 6-7 stitches remain. Cut the yarn and pull it through the remaining stitches, tighten together and fasten. Piece measures approx. 25-27 cm from top and down.

----------------------------------------------------------

NECK WARMER - SHORT SUMMARY OF PIECE:
Worked in the round on circular needle, top down.

NECK WARMER:
Cast on 150-170 stitches on a short circular needle size 3 mm with Puna. Knit 1 round. Then work A.1 in the round (= 15-17 repetitions of 10 stitches). Continue rib like this but note that the knitted stitches are worked twisted. When piece measures 3-4 cm, switch to circular needle size 4 mm. Insert 1 marker thread at the beginning of round and move the marker upwards so that you know where the beginning of round is.
Then work A.2 in the round (= 15-17 repetitions of 10 stitches – note that pattern is worked on every round). When A.2 has been worked 1 time vertically, work A.2 one more time vertically, but now displace beginning of round 1 stitch to the left, i.e. pass first stitch on left needle on to right needle without working the stitch, move at the same time the marker thread so that round begins here now. Work A.2 in the round as before, work the stitch moved on to right needle as last stitch in last repetition with A.2. When A.2 has been worked, work A.3 in the round (= 15-17 repetitions of 10 stitches), but after 2 rounds with A.3 divide the piece at the marker thread, cast AT THE SAME TIME on 1 stitches at the end of last round = 151-171 stitches. Then work rib back and forth on row with 1 edge stitch in GARTER STITCH in each side – read explanation above (stitches knitted twisted from right side are now worked twisted purl from wrong side and stitches purled from right side are now knitted from the wrong side). AT THE SAME TIME on next row from right side, increase all 1 purl stitches to 2 purl stitches - read INCREASE TIP = 225-255 stitches.
Continue rib back and forth like this for 6-7 cm. Then loosely cast off by knitting but to avoid at tight cast-off edge make 1 yarn over after approx. every 6th stitch at the same time as casting off (cast off yarn overs as stitches). Neck warmer measures approx. 22-24 cm from cast-on edge and down.

----------------------------------------------------------

WRIST WARMERS - SHORT OVERVIEW OF THE PIECE:
Work piece in the round on double pointed needles, bottom up.

WRIST WARMER:
Cast on 47-51 stitches on double pointed needles size 3 mm with Puna. Knit 1 round. Work next round as follows: * Knit 1 twisted, purl 1 *, work from *-* over the first 18-20 stitches, work A.1 (= 10 stitches), * purl 1, knit 1 twisted *, work from *-* over the next 18-20 stitches and finish with purl 1. Continue rib like this. When piece measures 2½-3 cm, switch to double pointed needles size 4 mm. Work next round as follows: Continue rib as before over the first 18-20 stitches, insert 1 marker, work A.2 (= 10 stitches), insert 1 marker (stitches in A.2 are now marked to make it easier to work the pattern), continue rib as before over the last 19-21 stitches. Continue pattern like this. When A.2 has been worked 1 time vertically, work next round as follows: * Knit 1 twisted, purl 1 *, work from *-* over the first 18-20 stitches as before, knit 1 twisted, move the first marker here, work A.5 (= 10 stitches), move the other marker here, * knit 1 twisted, purl 1 *, work from *-* over the next 18-20 stitches. Continue rib like this until A.5 has been worked.
Switch back to double pointed needles size 3 mm. Then work rib in the round with twisted knit over twisted knit and purl over purl for approx. 2½-3 cm. Switch back to double pointed needles size 4 mm and cast off with twisted knit over twisted knit and purl over purl (cast off on larger needles to avoid a tight cast-off edge). Wrist warmer measures approx. 18-19 cm from top and down. Work the other wrist warmer the same way.

Diagram

symbols = twisted knit, i.e. knit in back loop of stitch
symbols = purl
symbols = between 2 stitches make 1 yarn over, on next round work yarn over twisted purl or twisted knit according to diagram
symbols = knit 2 twisted together
diagram
diagram

Each of our patterns has specific tutorial videos to help you.

Do you have a question? See a list of frequently asked questions (FAQ)

Knitting tension is what determines the final measurements of your work, and is usually measured per 10 x 10 cm. It is provided like so: number of stitches in width x number of rows in height - eg: 19 stitches x 26 rows = 10 x 10 cm.

The knitting tension is very individual; some people knit/crochet loosely while others work tightly. You adjust the knitting tension with the needle size, which is why the suggested needle size is only meant as a guide! You need to adjust this (up or down) to ensure that YOUR knitting tension matches the knitting tension provided in the pattern. If you work with a different knitting tension than provided you will have a different yarn consumption, and your work will have different measurements than what the pattern suggests.

The knitting tension also determines which yarns can replace each other. As long as you achieve the same knitting tension you can replace one yarn with another.

See DROPS lesson: How to measure your tension/gauge

See DROPS video: How to make a gauge tension swatch

The required amount of yarn is provided in grams, eg: 450 g. To calculate how many balls you’ll need you first need to know how many grams are in 1 ball (25g, 50g or 100g). This information is available if you click on the individual yarn quality on our pages. Divide the amount required with the amount of each ball. For example, if each ball is 50g (the most common amount), the calculation will be as follows: 450 / 50 = 9 balls.

The important thing when changing from one yarn to another is that the knitting/crochet tension remains the same. This is so that the measurements of the finished piece will be the same as on the sketch provided. It is easier to achieve the same knitting tension using yarns from the same yarn group. It is also possible to work with multiple strands of a thinner yarn to achieve the knitting tension of a thicker one. Please try our yarn converter. We recommend you to always work a test swatch.

Please NOTE: when changing yarn the garment might have a different look and feel to the garment in the photo, due to individual properties and qualities of each yarn.

See DROPS lesson: Can I use a different yarn than the one mentioned in the pattern?

All our yarns are categorised into yarn groups (from A to F) according to thickness and knitting tension – group A contains the thinnest yarns and group F the thickest. This makes it easier for you to find alternative yarns to our patterns, should you wish to switch yarn. All yarns within the same group have a similar knitting tension and can easily replace each other. However, different yarn qualities have different structures and properties which will give the finished work a unique look and feel.

Click here for an overview of the yarns in each yarn group

At the top of all our patterns you’ll find a link to our yarn calculator, which is a helpful tool should you wish to use a different yarn than suggested. By filling in the yarn quality you wish to replace, the amount (in your size) and number of strands, the calculator will present good alternative yarns with the same knitting tension. Additionally it will tell you how much you’ll require in the new qualities and whether you’ll need to work with multiple strands. Most skeins are 50g (some are 25g or 100g).

If the pattern is worked with multiple colours, every colour will have to be calculated separately. Similarly, if the pattern is worked with several strands of different yarns (for example 1 strand Alpaca and 1 strand Kid-Silk) you will have to find alternatives for each, individually.

Click here to see our yarn calculator

Since different yarns have different qualities and textures we have chosen to keep the original yarn in our patterns. However, you can easily find options among our available qualities by using our yarn calculator, or simply pick a yarn from the same yarn group.

It is possible that some retailers still have discontinued yarns in stock, or that someone has a few skeins at home that they would like to find patterns for.

The yarn calculator will provide both alternative yarn as well as required amount in the new quality.

If you think it's hard to decide what size to make, it can be a good idea to measure a garment you own already and like the size of. Then you can pick the size by comparing those measures with the ones available in the pattern's size chart.

You'll find the size chart at the bottom of the pattern.

See DROPS lesson: How to read size chart

The needle size provided in the pattern serves only as a guide, the important thing is to follow the knitting tension. And since knitting tension is very individual, you will have to adjust the needle size to ensure that YOUR tension is the same as in the pattern – maybe you’ll have to adjust 1, or even 2 needle sizes, up or down to achieve the correct tension. For this, we recommend that you work test swatches.

Should you work with a different knitting tension than the one provided, the measurements of the finished garment might deviate from the measurement sketch.

See DROPS lesson: How to measure your tension/gauge

See DROPS video: How to make a tension/gauge swatch

Working a garment top-down provides more flexibility and room for personal adjustment. For example it is easier to try the garment on while working, as well as making adjustments to length of yoke and shoulder caps.

The instructions are carefully explaining every step, in the correct order. Diagrams are adjusted to the knitting direction and are worked as usual.

The diagram depicts all rows/rounds, and every stitch seen from the right side. It is read from bottom to top, from right to left. 1 square = 1 stitch.

When working back and forth, every other row is worked from the right side and every other row is worked from the wrong side. When working from the wrong side, the diagram will have to be worked reversed: from left to right, knit stitches are purled, purl stitches are knit etc.

When working in the round every round is worked from the right side and the diagram are worked from right to left on all rounds.

See DROPS lesson: How to read knitting diagrams

The diagram depicts all rows/rounds, and every stitch seen from the right side. It is worked from bottom to top, from right to left.

When working back and forth every other row is worked from the right side: from right to left and every other row is worked from the wrong side: from left to right.

When working in the round, every row in the diagram are worked from the right side, from right to left.

When working a circular diagram you start in the middle and work your way outwards, counter clockwise, row by row.

The rows usually start with a given number of chain stitches (equivalent to the height of the following stitch), this will either be depicted in the diagram or explained in the pattern.

See DROPS lesson: How to read crochet diagrams

Instructions for working several diagrams after each other on the same row/round, will often be written like so: “work A.1, A.2, A.3 a total of 0-0-2-3-4 times". This means you work A.1 once, then A.2 is worked once, and A.3 is repeated (in width) the number of times provided for your size – in this case like so: S = 0 times, M = 0 times, L=2 times, XL= 3 times and XXL = 4 times.

The diagrams are worked as usual: begin with the first row in A.1, then work the first row in A.2 etc.

See DROPS lesson: How to read knitting diagrams

See DROPS lesson: How to read crochet diagrams

The total width of the garment (from wrist-to-wrist) will be larger in the larger sizes, despite the actual sleeves being shorter. The larger sizes have longer sleeve caps and wider shoulders, so there will be a good fit in all sizes.

The measurement sketch/schematic drawing provides information regarding the full length of the garment. If it’s a jumper or a jacket the length is measured from the highest point on the shoulder closest to the neckline, and straight down to the bottom of the garment. It is NOT measured from the tip of shoulder. Similarly, the length of yoke is measured from the highest point on the shoulder and down to where yoke is split into body and sleeves.

On a jacket measures are never taken along bands, unless specifically stated. Always measure inside band stitches when measuring the length.

See DROPS lesson: How to read a schematic drawing

Diagrams are often repeated on the round or in height. 1 repeat is the diagram the way it appears in the pattern. If it says to work 5 repeats of A.1 in the round, then you work A.1 a total of 5 times after/next to each other in the round. If it says to work 2 repeats of A.1 vertically/in height you work the entire diagram once, then begin again at the start and work the entire diagram one more time.

Chain stitches are slightly narrower than other stitches and to avoid working the cast-on edge too tight, we simply chain more stitches to begin with. The stitch count will be adjusted on the following row to fit the pattern and measurement sketch.

The rib edge is more elastic and will contract slightly compared to, for example, stocking stitch. By increasing before the rib edge, you avoid a visible difference in width between the rib edge and the rest of the body.

It’s very easy to cast off too tightly, and by making yarn overs while casting off (and simultaneously casting these off) you avoid a too tight cast off edge.

See DROPS video: How to bind off with yarn overs (yo)

To achieve an even increase (or decrease) you can increase on, for example: every 3rd and 4th row alternately, like so: work 2 rows and increase on the 3rd row, work 3 rows and increase on the 4th. Repeat this until the increase is complete.

See DROPS lesson: Increase or decrease 1 st on every 3rd and 4th row alternately

Should you prefer to work in the round instead of back and forth, you may of course adjust the pattern. You’ll need to add steeks mid-front (usually 5 stitches), and follow the instructions. When you would normally turn and work from the wrong side, simply work across the steek and continue in the round. At the end you’ll cut the piece open, pick up stitches to work bands, and cover the cut edges.

See DROPS video: How to knit steeks and cut open

Should you prefer to work back and forth instead of in the round, you may of course adjust the pattern so you work the pieces separately and then assemble them at the end. Divide the stitches for the body in 2, add 1 edge stitch in each side (for sewing) and work the front and back pieces separately.

See DROPS lesson: Can I adapt a pattern for circular needles into straight needles?

Pattern repeats can vary slightly in the different sizes, in order to get the correct proportions. If you’re not working the exact same size as the garment in the photo, yours might deviate slightly. This has been carefully developed and adjusted so that the complete impression of the garment is the same in all sizes.

Make sure to follow instructions and diagrams for your size!

If you have found a pattern you like which is available in women’s size it’s not very difficult to convert it to men’s size. The biggest difference will be the length of sleeves and body. Start working on the women size that you think would fit across the chest. The additional length will be worked right before you cast off for the armhole/sleeve cap. If the pattern is worked top-down you can add the length right after the armhole or before the first decrease on sleeve.

Regarding additional yarn amount, this will depend on how much length you add, but it is better with a skein too many than too few.

All yarns will have excess fibres (from production) that might come off as lint or shedding. Brushed yarns (ie hairier yarns) have more of these loose, excess fibres, causing more shedding.

Shedding also depends on what is worn under or over the garment, and whether this pulls at the yarn fibres. It’s therefore not possible to guarantee that there will be no shedding

Below are some tips on how to get the best result when working with hairier yarns:

1. When the garment is finished (before you wash it) shake it vigorously so the looser hairs come off. NOTE: do NOT use a lint roller, brush or any method that pulls at the yarn.

2. Place the garment in a plastic bag and put it in your freezer - the temperature will cause the fibres to become less attached to each other, and excess fibres will come off easier.

3. Leave in the freezer for a few hours before taking it out and shaking it again.

4. Wash the garment according to the instructions on the yarn label.

Pilling is a natural process that happens to even the most exclusive of fibers. It's a natural sign of wear and tear that is hard to avoid, and that is most visible in high friction areas of your garment like a sweater's arms and cuffs.

You can make your garment look as new by removing the pilling, using a fabric comb or a pill/lint remover.

Still can't find the answer you need? Then scroll down and leave your question so one of our experts can try to help you. This will be done normally within 5 to 10 working days.
In the meantime, you can read the questions and answers that others have left to this pattern or join the DROPS Workshop on Facebook to get help from fellow knitters/crocheters!

You might also like...

Post a comment to pattern DROPS 192-21

We would love to hear what you have to say about this pattern!

If you want to leave a question, please make sure you select the correct category in the form below, to speed up the answering process. Required fields are marked *.

Comments / Questions (14)

country flag Christine wrote:

Guten Tag, ich habe folgende Fragen zum Kragenschal, wo man die Arbeit teilt: Ist es richtig, dass die angeschlagene Masche am Ende der letzten Runde dann die erste Masche (Rand-Masche) wird beim Hin- und Zurückstricken? Wann verdoppelt man die Linksmaschen? Ebenfalls dann, wenn man die Arbeit teilt und eine Masche aufnimmt, oder strickt man hin und zurück mit 151/171 Maschen und nimmt die Linksmaschen erst dann in der 2. Hinrunde auf? Besten Dank und liebe Grüsse, Christine

06.08.2023 - 21:56

DROPS Design answered:

Liebe Christine, am Ende der 2. Reihe A.3 wird eine Randmasche extra angeschlagen, dann stricken Sie in Hin- und Rückreihen mit 1 Randmasche krausrechts beidseitig (die neue Masche ist jetzt die 1. Masche der Rückreihe). Bei der nächsten Hin-Reihe verdoppelten Sie die linken Maschen und so stricken Sie weiter mit Bündchen 1 M rechts, 2 M links (von der Vorderseite gesehen). Viel Spaß beim stricken!

07.08.2023 - 11:04

country flag Lola Gouffé wrote:

Bonjour, Merci pour le modèle. Dans A2, la moitié des jetés sont tricotés au tour suivant avec des mailles endroit torses. Cela réduit forcément le jour. Ça ne crée pas de déséquilibre par la suite (seulement au niveau esthétique, en nombre de maille aucun pb)?

01.07.2023 - 09:36

DROPS Design answered:

Bonjour Mme Gouffé, tous les jetés se tricotent torse, pas seulement la moitié, vous devez les tricotez torse à l'endroit ou torse à l'envers en fonction du tour suivant, mais torse quoi qu'il en soit. Bon tricot!

03.07.2023 - 09:41

country flag Louise Smith wrote:

What is a virtual Printer? I am not very computer savvy. I know how to click on a download PDF highlighted rectangle and then it saves it to my download file. Then I can read it whenever I need to see it. Our computer server is not fast and we live in a rural area that seems to be affected by weather interruptions so I get on and then off the internet, I do not stay on the internet connection. Thank-you, Louise

10.05.2023 - 01:40

DROPS Design answered:

Dear Mrs Smith, when printing a pattern the browser/ computer will ask you to choose the printer you like to use; and at this place, you can generally choose to "save or print it as a pdf" instead - choose this option to save it on your computer. For any further assistance, feel free to ask your DROPS Store in/to Canada, they can help you even per mail or telephone. Happy knitting!

10.05.2023 - 08:26

country flag Louise Smith wrote:

Is there a way to get a PDF instead of printing off pages of instructions? Thank-you

03.05.2023 - 23:17

DROPS Design answered:

Dear Mrs Smith, sure, just choose a virtual printer instead of a "real" printer to save the pattern as a .PDF. Happy knitting!

04.05.2023 - 08:09

country flag Martina Dietz wrote:

Stricke ich den ersten Umschlag in der zweiten Reihe von A2 dann li ab und in der 3. Reihe dann re ab? Vielen Dank für Ihre Hilfe!

14.03.2023 - 20:48

DROPS Design answered:

Liebe Frau Dietz, also bei der 2. Reihe A.2 beginnen Sie mit 1 Umschlag, dann stricken Sie die nächste Maschen links usw... bei der 3. Reihe A.2 beginnen Sie mit 1 Umschlag, dann stricken Sie die nächste Masche rechts (Umschlag von 2. R) und die nächste Masche links (Umschlag von 1. R), so haben Sie immer noch Rippenmuster, bei dem Diagram ist es schwierig, so was zu zeigen, aber beim stricken, wird es so aussehen, das Rippenmuster wird wegen Zunahmen und Abnahmen verschoben. Viel Spaß beim stricken!

15.03.2023 - 09:50

country flag Martina Deitz wrote:

Inder 1. Runde von Strickschrift A2 sind re und li M nicht mehr übereinander. Ist das richtig?

13.03.2023 - 18:43

DROPS Design answered:

Liebe Frau Deitz, die 1. Reihe A.2 soll genau über die 1. Reihe A.1 stimmen, über die ersten 4 Maschen A.1 z.B. hatten Sie: 1 M re, 2 M li, 1 M re, diese stricken Sie jetzt in A.2 so: 1 Umschlag, 2 M rechts zs verschränkt, 1 M li, 1 M re, usw. Viel Spaß beim stricken!

14.03.2023 - 09:27

country flag Ann Pascale Grünberg wrote:

Hej! Findes dette hulmønster også i en cardigan eller sweater? Venligst Ann Grünberg

20.07.2020 - 16:27

DROPS Design answered:

Hej Ann, ikke lige dette viftemønster, men prøv at klikke på viftemønster øverst i opskriften under "Tags" God fornøjelse!

28.07.2020 - 12:11

country flag Mila wrote:

Da ich dieses Muster in Hin- und Rückreihen stricken möchte, sind auch die Rückreihen im Diagramm gezeigt oder nicht? Falls ja, soll ich dann auch in Rückreihen die 2 Maschen rechts verschränkt zusammenstricken? Danke für Ihre nette Antwort!

13.07.2020 - 06:57

DROPS Design answered:

Liebe Mila, ja genau alle Reihen sind im Diagram gezeichnet, dh die Hin- sowie die Rückreihen - lesen Sie rechts nach links bei den Hinreihen und links nach rechts bein den Rückreihen - die rechts verschränkte Maschen (Hinreihen) sollen dann bei den Rückreihen links verschränkt gestrickt werden. Viel Spaß beim stricken!

13.07.2020 - 09:23

country flag Astrid Gryting Skauen wrote:

På bildet ser det ut som det er vrangbord i viftene, men mønsteret viser vel perlestrikk? mvh astrid

07.10.2019 - 19:54

DROPS Design answered:

Hej Astrid, da maskerne bliver forskudt i vifterne (ifølge diagrammerne), så vil det se ud som vrangbord, prøv gerne at strikke en mønsterrapport, så du kan se hvordan det bliver :)

08.10.2019 - 08:37

country flag Celine wrote:

Je souhaiterais savoir svp comment je fais le 2ème tours car je comprend pas très bien et comme je débute tout n'est pas clair pour moi. Merci

16.04.2019 - 16:57

DROPS Design answered:

Bonjour Celine, vous faites exactement la meme chose que dans le tour precedent, en suivant le diagramme A.1: répétez 9 fois *1 m torse à l'end, 1 m env* (= 18 m), puis tricotez A.1 (= 10 m) et terminez en répétant 9 fois *1 m env, 1 m torse à l'end) (= 18 m). Comment lire les diagrammes en rond vous troverez ICI. Bon tricot!

16.04.2019 - 17:22