
Popular categories
Looking for a yarn?


|
||||||||||||||||||||||
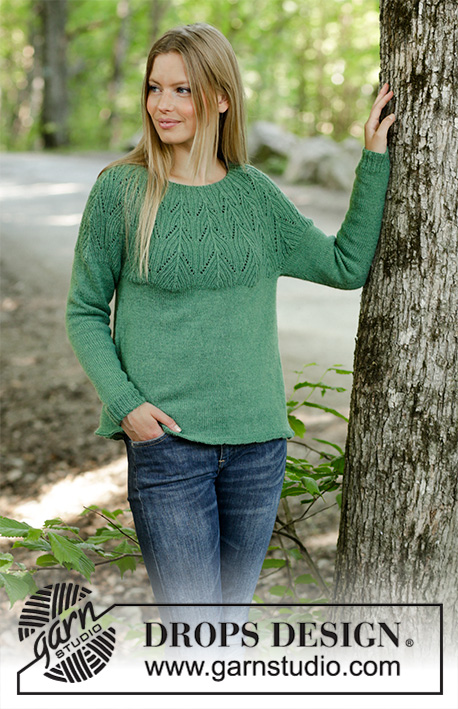
Green Echo |
||||||||||||||||||||||
 |
 |
|||||||||||||||||||||
Knitted jumper with round yoke in DROPS Nord. The piece is worked with lace pattern and textured pattern. Sizes S – XXXL.
DROPS 196-26 |
||||||||||||||||||||||
|
EXPLANATIONS FOR THE PATTERN: ------------------------------------------------------- RIDGE/GARTER STITCH (worked in the round): 1 ridge = 2 rounds. Knit 1 round and purl 1 round. PATTERN: See diagram A.1. Choose diagram for your size. DECREASE TIP (for body): Decrease 1 stitch on each side of each marker thread as follows: Work until there are 3 stitches left before the marker thread, knit 2 together, knit 2 (the marker thread sits in the middle of these 2 stitches), slip 1 stitch as if to knit, knit 1 and pass the slipped stitch over the knitted stitch (= 2 stitches decreased at each marker thread = a total of 4 stitches decreased on the round). INCREASE TIP (for sleeves): Work until there are 2 stitches left before the marker, 1 yarn over (= 1 stitch increased), knit 4 (the marker thread sits in the middle of these 4 stitches), 1 yarn over (= 1 stitch increased). The yarn overs are knitted twisted on the next round to avoid holes. ------------------------------------------------------- START THE PIECE HERE: ------------------------------------------------------- JUMPER - SHORT OVERVIEW OF THE PIECE: The piece is worked bottom up. First the body is worked in the round with circular needle. Then the sleeves are worked in the round with double pointed needles. The sleeves and body are placed on the same circular needle and the yoke is worked in the round with textured pattern. BODY: Cast on 254-272-284-315-336-372 stitches with circular needle size 2.5 mm and Nord. Work 3 RIDGES – read description above. Change to circular needle size 3 mm and continue with stocking stitch. The round starts mid back. Knit 63-68-71-78-84-93 stitches (= half back piece), insert 1 marker thread, knit 127-136-142-158-168-186 stitches (= front piece), insert 1 marker thread and knit the last 64-68-71-79-84-93 stitches (= half back piece). REMEMBER THE KNITTING TENSION! When the piece measures 8 cm decrease 1 stitch on each side of each marker thread – read DECREASE TIP! Decrease like this every 2½ cm a total of 10 times = 214-232-244-275-296-332 stitches. When the piece measures 33-33-34-34-34-34 cm cast off for armholes on the next round as follows: Knit 49-54-56-63-68-77 stitches, cast off the next 8-8-10-10-12-12 stitches, knit 99-108-112-128-136-154, cast off the next 8-8-10-10-12-12 stitches and knit 50-54-56-64-68-77 = 198-216-224-255-272-308 stitches. Lay the piece to one side and work the sleeves. SLEEVE: Cast on 57-60-63-66-66-69 stitches with double pointed needles size 2.5 mm and work rib (= knit 1 / purl 2) over all stitches. When the piece measures 5 cm, change to double pointed needles size 3 mm and continue with stocking stitch. On the first round decrease 12-11-13-13-10-11 stitches evenly on round = 45-49-50-53-56-58 stitches. Insert 1 marker at the beginning of the round. When the sleeve measures 8-10-6-12-12-9 cm, increase 1 stitch on each side of the marker – read INCREASE TIP! Increase like this every 2-1½-1½-1-1-1 cm a total of 16-19-23-24-25-26 times = 77-87-96-101-106-110 stitches. When the piece measures 43-42-41-39-38-36 cm, cast off the first 4-4-5-5-6-6 stitches and the last 4-4-5-5-6-6 stitches for the armhole = 69-79-86-91-94-98 stitches. Lay the piece to one side and work the other sleeve in the same way. YOKE: Place the sleeves on the same circular needle size 3 mm as the body, where you cast off stitches for the armholes = 336-374-396-437-460-504 stitches. Work stocking stitch for 0-0-1-0-2-0 cm. Change to circular needle size 2.5 mm. Work A.1a (= 21-22-22-23-23-24 stitches) over all stitches (= 16-17-18-19-20-21 times in width). Continue this pattern. When A.1a has been worked 1 time in height there are 304-340-360-399-420-504 stitches on the needle. Now work A.1b over A.1a. When A.1b has been worked 1 time in height there are 112-119-126-133-140-147 stitches on the needle. Cast off with knit over knit and purl over purl. The yoke measures approx. 22-24-25-27-29-31 cm. ASSEMBLY: Sew underarm seam edge to edge in the outermost loop of the outermost stitch |
||||||||||||||||||||||
Diagram explanations |
||||||||||||||||||||||
|
||||||||||||||||||||||

|
||||||||||||||||||||||

|
||||||||||||||||||||||

|
||||||||||||||||||||||

|
||||||||||||||||||||||

|
||||||||||||||||||||||
|
Have you made this or any other of our designs? Tag your pictures in social media with #dropsdesign so we can see them! Do you need help with this pattern?You'll find tutorial videos, a Comments/Questions area and more by visiting the pattern on garnstudio.com. © 1982-2024 DROPS Design A/S. We reserve all rights. This document, including all its sub-sections, has copyrights. Read more about what you can do with our patterns at the bottom of each pattern on our site. |
||||||||||||||||||||||


With over 40 years in knitting and crochet design, DROPS Design offers one of the most extensive collections of free patterns on the internet - translated to 17 languages. As of today we count 304 catalogues and 11422 patterns - 11422 of which are translated into English (UK/cm).
We work hard to bring you the best knitting and crochet have to offer, inspiration and advice as well as great quality yarns at incredible prices! Would you like to use our patterns for other than personal use? You can read what you are allowed to do in the Copyright text at the bottom of all our patterns. Happy crafting!
Comments / Questions (21)
Har ,strikket ryg og forstykke. Har nu 437 m pinden. Strikker størrelse XL. Mit spørgsmål er hvor starter jeg i diagrammet til bærestykket i størrelse XL. Har prøvet mange gange og kan ikke få mønsteret til at passe. Det er første gang jeg strikker efter en DROPS opskrift.
18.04.2024 - 16:41DROPS Design answered:
Hej Birte, hvis du deler bærestykket ind, så du har 23 masker mellem hvert mærke, da vil du få 19 rapporter med 23 masker = 437 masker :)
19.04.2024 - 15:01Hej! Jag ställde en fråga igår angående mönster A1a storlek M. Fick svar att jag bara ska följa mönstret på varv 6, men det fungerar inte. Om jag avslutar varv 5 med 2 aviga maskor och den fösta maskan på varv 6 är en avig maska så sker ingen förändring i mönstret. Det blir aviga på aviga och räta på räta maskor. I mitten av rapporten ska man sticka en avig en rät, en avig. Det är exakt samma som på varv 5. Tacksam för bättre förklaring än att bara följa mönstret.
03.10.2023 - 20:15DROPS Design answered:
Hej Anne-Charlotte, jo men det ska bli aviga på aviga och räta på räta, de 5 mittersta räta blir till 3 räta (med am på varje sida). Du kan även titta på bilden med mönstret. Är du osäker så sticka upp rapporten över de 28 maskorna, så du ser hur det ser ut :)
17.10.2023 - 11:45Hej! Jag ska sticka enligt mönster A1a men när jag stickar varv 6 får jag inte ihop mönstret. Enligt mönstrets varv 5 minskar man 2 maskor i mitten av rapporten , men på varv 6 är det en maska mindre i början och slutet av rapporten. Jag kan inte sticka avig, rät, avig över den maska som på varv 5 blivit en av tre maskor (i mitten av rapporten). Kan ni snälla förklara hur jag ska sticka? Vänliga hälsningar Anne-Charlotte
02.10.2023 - 14:42DROPS Design answered:
Hej Anne-Charlotte. Börja bara med att sticka första maskan enligt diagram på varv 6 och följ diagrammet så blir mönstret riktigt. Mvh DROPS Design
03.10.2023 - 14:09Hej ! Drops 196-26: Jag följer diagram A 1a i storlek xxxl, jag vet att man följer diagrammet nerifrån o från höger till vänster. Jag har både stickat och virkat många av Drops mönster tidigare och aldrig haft problem med dem men denna gång lyckas jag inte få det att stämma😥 Isabella
26.10.2022 - 14:54DROPS Design answered:
Hej Isabelle, På pind 8 i A.1a har du 30 masker, sæt et mærke på hver side af de 30 masker i diagrammet (gør det hele vejen rundt), så strikker du varv 8: 1am, 1r, 1am, 1r, 2am, 1r osv over de 30 masker og starter forfra ved næste mærke :)
27.10.2022 - 10:05Detta gäller Drops 196-2 Jag håller på med oket och får inte diagrammet att stämma , stickar storlek xxxl. Är på varav 8 och de blir inte rätt, första maskan avig sedan två räta om jag stickar omslaget rätstickat blir det ju tre rätmaskor om det ska bli förskjutning mot mitten. Förstår inte heller om det ska bli fler maskor under tiden, en maska mindre eftersom man ska ta in en vid mitten men det borde ju bli två fler i samband med omslagen ( två stycken) mvh Isabella
25.10.2022 - 16:58DROPS Design answered:
Hej Isabella, du ved at du starter nederst i diagrammet og tager ind ifølge diagrammet? Hvilket diagram er det du ikke får til at stemme?
26.10.2022 - 09:18I knitted the blouse in size S and the upper part , the yoke, came out shorter than I expected, shorter than is in the pattern . What I did wrong?
27.11.2020 - 19:42DROPS Design answered:
Dear Iona, is your knitting tension matching in height? You should have 32 rows in stocking stitch and in pattern A.1 = 10 cm with the larger needles - read more about tension here. Hope this can help. Happy knitting!
30.11.2020 - 08:10Hej Jeg strikker opskriften i str. XXXL, men kan ikke få mønster A.1a til at passe. Jeg er kommet til pind 6, altså efter 1 udtagning. Pind 5 passer, men ikke pind 6. Hjælp, så jeg kan komme videre tak
23.11.2020 - 05:53DROPS Design answered:
Hei Pernille. Hva er det som ikke stemmer? Husk å strikke diagrammet som tilhører din størelse. Om du ser på diagrammet så forskyver rett og vrangmaskene seg et hakk inn mot senter av diagrammet. mvh DROPS design
24.11.2020 - 12:26Bonjour,je fais la taille XL. Pour les manches, je commence par 53 mailles après les côtes et j’ajoute 2 mailles à chaque rang. A la fin, je dois avoir 106 mailles. Comment peut-on avoir un nombre pair en partan par un nombre impair, y ajoutant 2 mailles chaque fois?
10.01.2020 - 16:38Hej Drops, jeg har strikket mønstre, men dette giver mig problemer. Jeg strikker en small, men A1 ser ud til at være op til 25 masker fra højre mod.venstre. er det det?. Der står nemlig 21 over alle masker i opskriften. Eller skal man kun strikke de 21 og så slutte med en ret og begynde med en ret på pind 3-5 f.eks.? Gør jeg det, passer mønstret dog ikke. jeg har brug for at vide, hvor pinden begynder og sluttter? .Tak på forhånd
02.10.2019 - 21:07DROPS Design answered:
Hej Hanne-Merete, Du skal vælge det diagram der står A.1a = 21 masker S (for small). Og det skal du gentage, sæt gerne et lille mærke imellem hver rapport, så du er sikker på at få alle udtagninger og indtagninger med ifølge diagrammet. God fornøjelse!
03.10.2019 - 11:44Cześć ! Wydziergałam ten sweterek.Na początku wydawał się trudny.Ale udało się.Mam go dzięki Wam.
26.02.2019 - 18:19