
Popular categories
Looking for a yarn?


|
|||||||||||||||||||||||||||||||
Empress |
|||||||||||||||||||||||||||||||
 |
 |
||||||||||||||||||||||||||||||
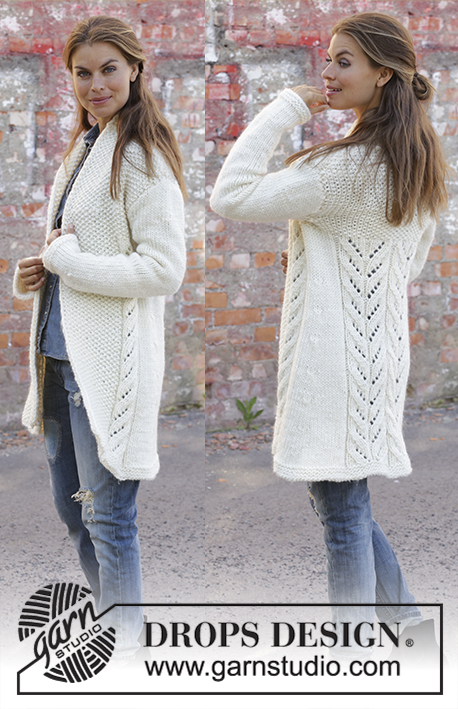
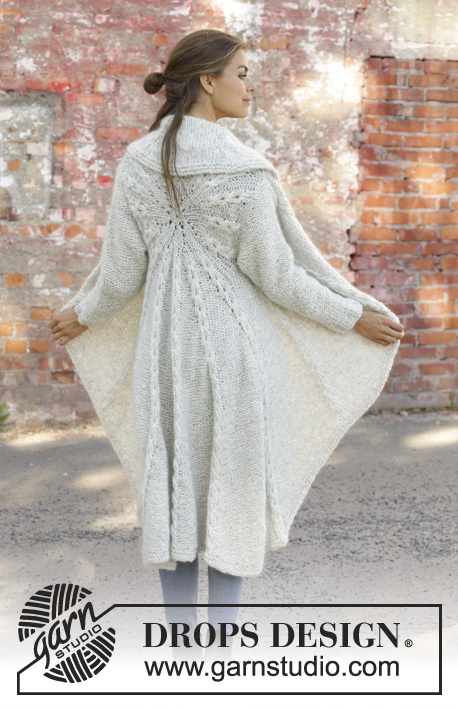
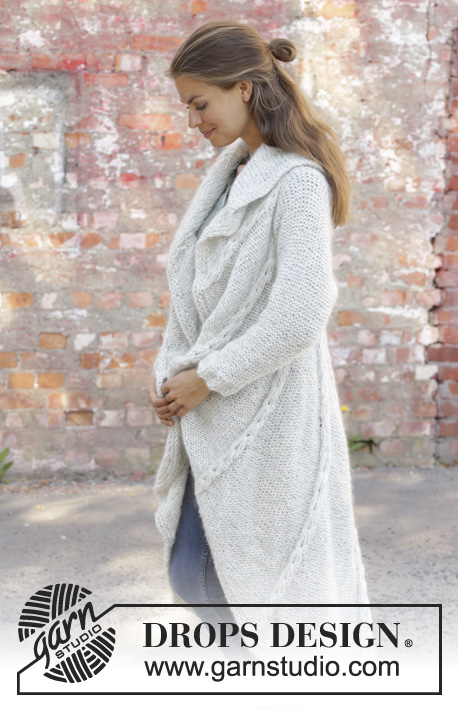
Knitted long circle jacket in 1 strand DROPS Air and 1 strand DROPS Brushed Alpaca Silk. The piece is worked in the round in a circle with texture. Sizes S - XXXL.
DROPS 194-17 |
|||||||||||||||||||||||||||||||
|
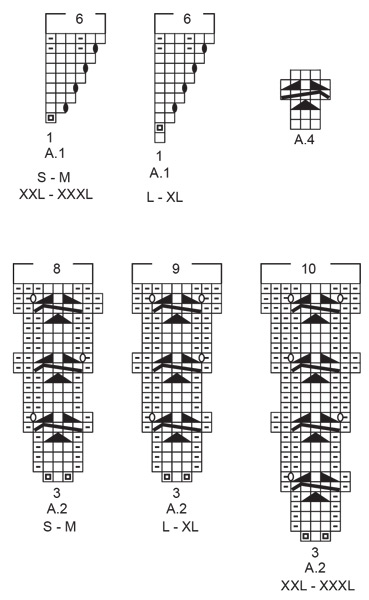
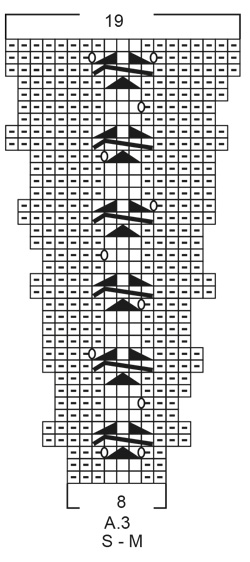
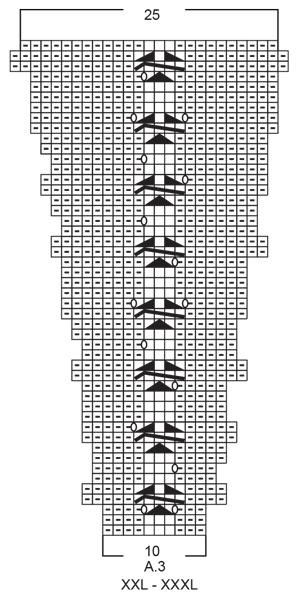
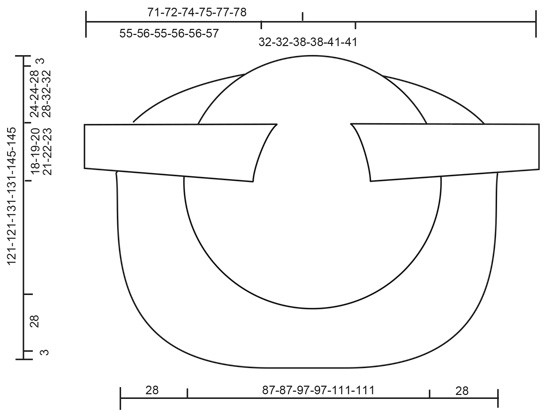
------------------------------------------------------- EXPLANATIONS FOR THE PATTERN: ------------------------------------------------------- RIDGE/GARTER STITCH (worked in the round): 1 ridge = 2 rounds. Knit 1 round and purl 1 round. RIDGE/GARTER STITCH (worked back and forth): 1 ridge = knit 2 rows. PATTERN: See diagrams A.1 to A.4. Choose diagram for your size. The diagrams show all the rows in the pattern seen from the right side! DECREASE TIP (for sleeves): All decreases are made from the side in purl! Decrease 1 stitch by purling 2 stitches together ------------------------------------------------------- START THE PIECE HERE: ------------------------------------------------------- CIRCLE JACKET - SHORT OVERVIEW OF THE PIECE: The piece is worked in the round in a circle from the middle of the back outwards. Change to circular needle(s) when necessary. Then work back and forth with short rows for the front pieces and down the back. The sleeves are worked top down in stockinette stitch with the wrong side out. Because of the weight of the yarn, the garment will stretch somewhat after use. CIRCLE JACKET: CIRCLE: Cast on 8 stitches with double pointed needles size 8 mm = US 11 and 1 strand Air and 1 strand Brushed Alpaca Silk (= 2 strands). Divide the stitches between 4 needles so that there are 2 stitches on each. Insert a marker thread at the beginning of the round. Allow the marker thread to follow your work onwards. Work pattern in the round according to A.1 – choose diagram for your size, a total of 8 times on the round. REMEMBER THE KNITTING GAUGE! When A.1 is finished, there are 48 stitches on the round. Now work pattern as follows: Work A.2 – choose diagram for your size, a total of 16 times on the round. After the next-to-last round in A.2 there are 128-128-144-144-160-160 stitches on the round. The last round in A.2 is worked as follows: Work the first 39-39-45-45-49-49 stitches (there is now 1-1-0-0-1-1 stitch left in the last repeat of A.2 worked), insert a new marker thread here (follows your work onwards and is later used when you work short rows from the front pieces and down the body on the back piece), bind off the next 20-21-22-23-24-25 stitches (= armhole), work the next 49-47-55-53-63-61 stitches, bind off the last 20-21-22-23-24-25 stitches (= armhole). The piece measures approx. 39-39-41-41-47-47 cm = 15¼"-15¼"-16⅛"-16⅛"-18½"-18½" in diameter. The next round is worked as follows: Work A.3 – choose diagram for your size (= 8-8-9-9-10-10 stitches on the first round in the diagram) a total of 16 times on the round and at the same time cast on 20-21-22-23-24-25 new stitches on the needle where the stitches were bind off for the armholes = 128-128-144-144-160-160 stitches. Continue in the round with A.3 until the whole diagram has been completed in height. There are now 304-304-352-352-400-400 stitches on the round. The piece measures approx. 87-87-97-97-111-111 cm = 34¼"-34¼"-38¼"-38¼"-43¾"-43¾" in diameter. Cut the strand. Place the first 94-94-110-110-124-124 stitches on the round (= stitches between the 2 marker threads) on a thread. FRONT PIECES AND DOWN THE BODY: There are now 210-210-242-242-276-276 stitches for the front pieces and down the body on the back piece. Start from the right side after the second marker thread and work short rows back and forth for the front pieces and down the body on the back piece as follows: ROW 1 (right side): Purl over purl and work A.4 (= 3 stitches) over each cable until there are 3 stitches left before the next marker thread (i.e. start of round), turn. ROW 2 (wrong side): Work back until there are 3 stitches left before the marker thread, turn. ROW 3: Purl over purl and work A.4 over each of the cables until there are 6 stitches left before the marker thread, AT THE SAME TIME increase 1 purled stitch after each cable/A.4, turn. ROW 4: Work back until there are 6 stitches left before the marker thread, turn. Continue back and forth like this by working 3 fewer stitches than the previous row and increase 1 stitch after each cable/A.4 every 4th row until you have worked 7 repeats of A.4 in height (= 42 rows). The piece measures approx. 72-72-77-77-84-84 cm = 28⅜"-28⅜"-30⅜"-30⅜"-33"-33" from the middle of the circle and down mid back. The last row is worked from the wrong side. Do not cut the strand. Insert a marker thread in the middle cable/A.4 mid back of jacket. Continue back and forth with pattern as before over the bottom of the left front piece as follows: ROW 1 (right side): Work until there are 4 stitches left before the cable/A.4 with the marker thread mid back, turn. ROW 2 (wrong side): Work until there are 3 more stitches left before the marker thread than the previous row (start of round), AT THE SAME TIME increase 1 purled stitch after each cable/A.4, turn. ROW 3 (right side): Work until there are 4 more stitches than last time left before the cable/A.4 with the marker thread mid back, turn. ROW 4 (wrong side): Work until there are 3 more stitches before the marker thread than the previous row, turn. Continue back and forth with pattern and increase after each cable/A.4 every 4th row until you have worked 3 repeats of A.4 in height (= 18 rows). Cut the strand. Start from the right side and after A.4/mid back and work short rows back and forth over the bottom of the right front piece in the same way, but reversed, i.e. each row from the wrong side is turned when there are 4 more stitches before the cable/A.4 with the marker thread mid back than the previous time and on each row from the right side is turned when there are 3 more stitches left than the previous time. EDGE: Place all stitches on the circle back on circular needle and work 2 RIDGES – read description above, around the whole circle. Bind off, but to avoid the bind-off edge being tight you can make 1 yarn over after approx. each 5th stitch - the yarn overs are bind off as normal stitches. SLEEVE: The sleeve is worked in stockinette stitch with the wrong side out (reversed stockinette stitch). Cast on 11-11-12-12-14-14 stitches with circular needle size 8 mm = US 11 and 1 strand Air and 1 strand Brushed Alpaca Silk (= 2 strands). Work stockinette stitch back and forth, AT THE SAME TIME cast on new stitches at the end of each row in each side as follows: Cast on 2 stitches 2 times, 1 stitch 3-4-5-6-6-7 times, 2 stitches 1 time and 4 stitches 1 time = 37-39-42-44-46-48 stitches. THE PIECE IS NOW MEASURED FROM HERE. Continue back and forth with stockinette stitch and 1 edge stitch in GARTER STITCH – read description above, in each side. When the piece measures 4 cm decrease 1 stitch inside the 1 edge stitch in garter stitch in each side – read DECREASE TIP. Decrease like this every 7-6-6-5-5-4 cm = 2¾"-2⅜"-2⅜"-2"-2"-1½" a total of 6-7-7-8-8-9 times = 25-25-28-28-30-30 stitches. When the piece measures 42-42-40-40-39-39 cm = 16½"-16½"-15¾"-15¾"-15¼"-15¼" increase 7-7-4-9-7-7 stitches evenly on row = 32-32-32-37-37-37 stitches. Change to circular needle size 7 mm = US 10,75. Work rib, starting from the side with purl (reversed stockinette stitch/the wrong side out) as follows: 1 edge stitch in garter stitch (knit 2, purl 3) until there is 1 stitch left, 1 edge stitch in garter stitch. When the rib measures 5 cm = 2" bind off with knit over knit and purl over purl. The sleeve measures approx. 55-56-55-56-56-57 cm = 21⅝"-22"-21⅝"-22"-22"-22½" from the sleeve cap down. Work the other sleeve in the same way. ASSEMBLY: Sew sleeves to body inside the bind-off/cast-on edge. Sew sleeve seams. Make sure that the seam is not tight. |
|||||||||||||||||||||||||||||||
Diagram explanations |
|||||||||||||||||||||||||||||||
|
|||||||||||||||||||||||||||||||
|
|||||||||||||||||||||||||||||||
|
|||||||||||||||||||||||||||||||

|
|||||||||||||||||||||||||||||||
|
|||||||||||||||||||||||||||||||
|
|||||||||||||||||||||||||||||||
|
Have you made this or any other of our designs? Tag your pictures in social media with #dropsdesign so we can see them! Do you need help with this pattern?You'll find tutorial videos, a Comments/Questions area and more by visiting the pattern on garnstudio.com. © 1982-2024 DROPS Design A/S. We reserve all rights. This document, including all its sub-sections, has copyrights. Read more about what you can do with our patterns at the bottom of each pattern on our site. |
|||||||||||||||||||||||||||||||


With over 40 years in knitting and crochet design, DROPS Design offers one of the most extensive collections of free patterns on the internet - translated to 17 languages. As of today we count 304 catalogs and 11422 patterns - 11417 of which are translated into English (US/in).
We work hard to bring you the best knitting and crochet have to offer, inspiration and advice as well as great quality yarns at incredible prices! Would you like to use our patterns for other than personal use? You can read what you are allowed to do in the Copyright text at the bottom of all our patterns. Happy crafting!
Comments / Questions (174)
Dag, Ik loop vast bij de volgende stap: voorpanden en het lijf naar beneden toe. er zijn 2 parkeerdraden. Dus brei ik gewoon heen en weer, toch? De gehele naald af, terwijl ik verkorte toeren brei? De uitleg start niet met: linker -rechterpand. Toch bestaat dit stuk uit twee delen. Ik snap nog niet goed hoe de boel in elkaar moet vloeien. Heeft u misschien nog een tekening? Dank alvast!
04.05.2020 - 22:59DROPS Design answered:
Dag Laura,
Als je de voorpanden en het lijf naar beneden toe breit, brei je heen en weer en brei je niet meer over de hals. Je begint aan de goede kant bij het linker voorpand, dan naar beneden en vervolgens over het rechter voorpand. Dit is het gedeelte dat je heen en weer om de cirkel breit, te zien onderaan op de tekening.
05.05.2020 - 11:51Hej Når man kommer til at skulle slå masker op til ærmer, efter de har lukket af og derefter skal følge diagram A3, hvad strikker man så henover de opslåede masker? Ifølge opskriften skal man ned igennem den 4. Maske og tage garnet igennem, men det kan man af gode grunde ikke, da man jo lige har slået maskerne op (ved ærmerne). Skal mønsteret så vidt muligt følges ved ærmerne?
20.03.2020 - 05:41DROPS Design answered:
Hej Janni, de strikkes i glatstrik til du kan følge diagrammet. God fornøjelse!
24.03.2020 - 08:34Jeg har strikket denne skønne trøje, men den fælder meget ! Hvad kan jeg gøre ?
26.02.2020 - 09:14DROPS Design answered:
Hej Ninna, langhårede garner fælder altid mere eller mindre. Nogle prøver at lægge tøjet i fryseren og bagefter ryster og børster de løse hår af med en blød børste. Den vil dog altid fælde mindre for hver gang. God fornøjelse!
26.02.2020 - 09:57Vielen Dank für Ihre vorherige Anwort. Hier kommt schon die nächste Frage: der Trick in dem Video mit dem Umschlag bei den verkürzten Reihen funktioniert doch hier nicht, weil man nicht über die komplette Reihe zurück strickt. Sehe ich das richtig?
05.02.2020 - 11:47DROPS Design answered:
Liebe Ingrid, diesen Trick können Sie schon stricken, denn alle Maschen werden danach bei der RAND gestrickt (= der Rand wird dann über alle stillgelegten Maschen + die restlichen Maschen gestrickt). Viel Spaß beim stricken!
05.02.2020 - 14:35Sind denn die Korrekturen der Anleitung in die Anleitung eingebaut worden? Gerade bei der ersten klingt es in der Anleitung und in der Korrektur unterschiedlich!
04.02.2020 - 18:28DROPS Design answered:
Liebe Ingrid, wenn Sie die Anleitung vor den Korrekturen gedruckt haben, dann gibt es Unterschiedlichkeit, wenn Sie die Anleitung nach den Korrekturen gedruckt haben, sind diese Korrekturen schon gemacht. Viel Spaß beim stricken!
05.02.2020 - 08:00Bonjour, Je souhaiterais faire ce modèle mais en moins long (pour qu'il arrive au milieu des fesses à peu près). Est-ce possible ? Merci.
24.01.2020 - 14:52DROPS Design answered:
Bonjour Mme Martin, c'est probablement possible mais il vous faudra recalculer les explications pour l'adapter comme vous le souhaitez - nous ne sommes malheureusement pas en mesure de pouvoir adapter chacun de nos modèles à chaque demande. N'hésitez pas à demander de l'aide - même par mail ou téléphone - à votre magasin DROPS ou à un forum tricot. Bon tricot!
24.01.2020 - 14:57Hov nu fandt jeg ud af det 👍😊
22.11.2019 - 19:26DROPS Design answered:
Hei Jane. Så flott, god fornøyelse videre på sirkeljakken. mvh DROPS design
25.11.2019 - 10:25Hvis jeg tager ud det angivne antal masker til ærmerne har jeg strikket mere end 4 cm, men 14 cm .Er det en fejl i opskriften eller er jeg gal på den?
22.11.2019 - 19:24DROPS Design answered:
Hei Jane. Ser at du har funnet ut av spørsmålet ditt, så flott. God Fornøyelse.
25.11.2019 - 10:26BONJOUR RANGS RACCOURCIS j'ai fait 7 fois les rgs racourcis maintenant je suis perdus je ne c'est pas quelle maille prendre pour faire chaque cote ?
27.10.2019 - 20:32DROPS Design answered:
Bonjour Mme Corbel, je ne suis pas bien sûre de visualiser où vous en êtes; avez-vous tricoté les 42 rangs de la première partie des devants/bas de la veste? Si tel est le cas, vous continuez maintenant en rangs raccourcis toujours à partir du marqueur du milieu du bas de la veste en remontant le long du devant gauche (laissez de nouvelles mailles en attente comme indiqué), puis vous reprendrez le devant droit en rangs raccourcis pour l'autre côté. Quand les devants sont terminés, vous reprendrez toutes les mailles de tout le tour de la veste pour tricoter la bordure. Bon tricot!
05.11.2019 - 09:49I am unsure about the sizing, being a circular design, even with the chart, and I have no suitable garment to compare with it. Please could you tell me the too fit bust sizes of S-M-L-XL-XXL-XXXL,and whether these are a close or generous fit Thank you
21.10.2019 - 16:06DROPS Design answered:
Dear Mrs Warner, you can compare the measurements on back piece (= 32-32-38-38-41-41 cm) as well as armholes (= 18-19-20-21-22-23 cm), if you hesitate between two sizes, depending on how tight or loose you'd like the jacket to be, you can choose the smaller or the larger size (it may also vary with what you are intending to wear under the jacket). Your DROPS store can always assist you - even by telephone or by mail if you need further assistance choosing a size. Happy knitting!
21.10.2019 - 16:11