
Popular categories
Looking for a yarn?


|
|||||||||||||||||||||||||||||||
Empress |
|||||||||||||||||||||||||||||||
 |
 |
||||||||||||||||||||||||||||||
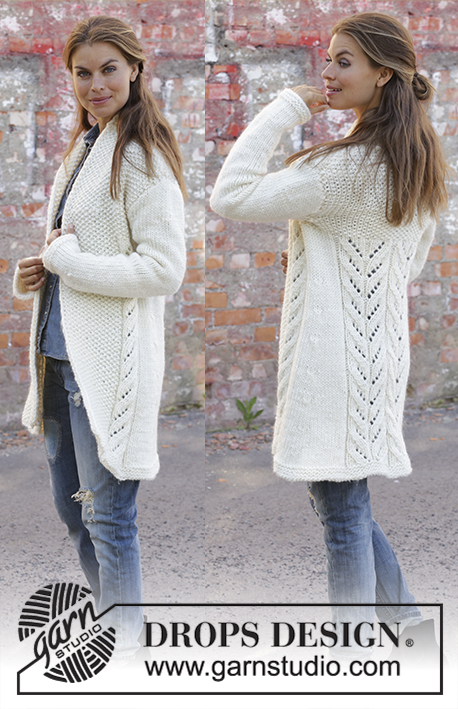
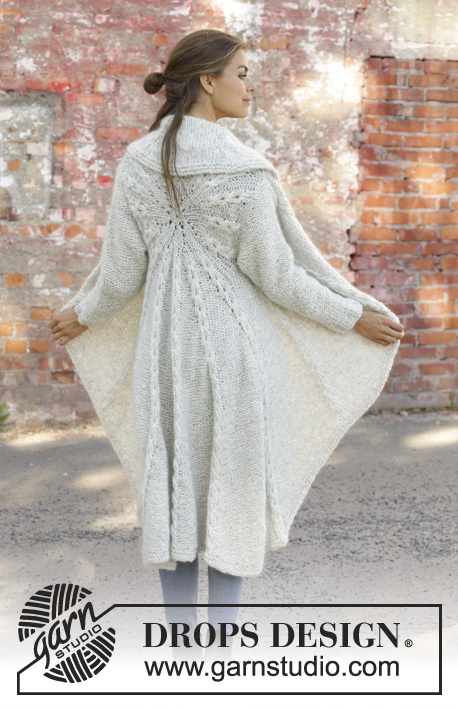
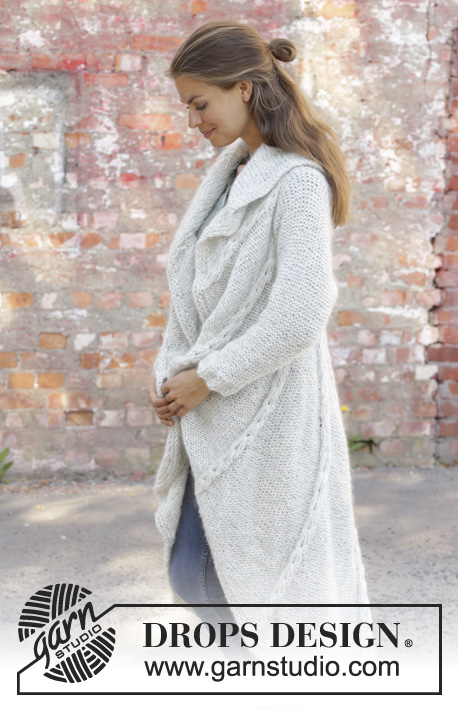
Knitted long circle jacket in 1 strand DROPS Air and 1 strand DROPS Brushed Alpaca Silk. The piece is worked in the round in a circle with texture. Sizes S - XXXL.
DROPS 194-17 |
|||||||||||||||||||||||||||||||
|
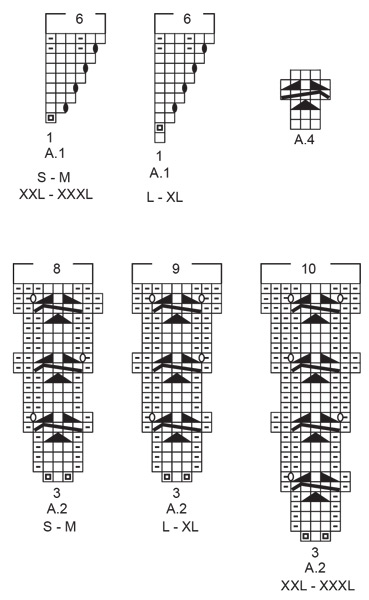
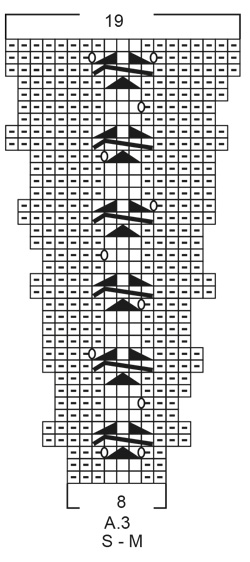
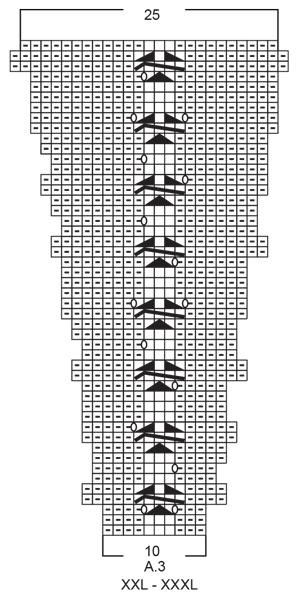
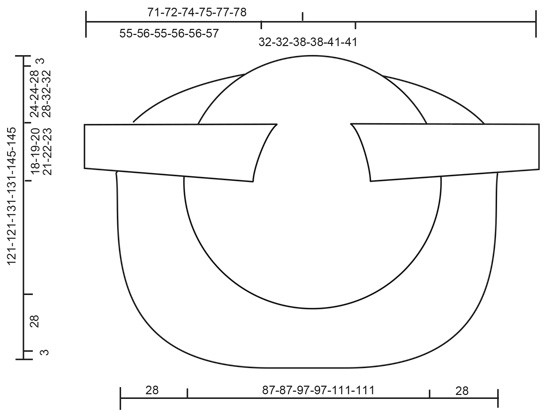
------------------------------------------------------- EXPLANATIONS FOR THE PATTERN: ------------------------------------------------------- RIDGE/GARTER STITCH (worked in the round): 1 ridge = 2 rounds. Knit 1 round and purl 1 round. RIDGE/GARTER STITCH (worked back and forth): 1 ridge = knit 2 rows. PATTERN: See diagrams A.1 to A.4. Choose diagram for your size. The diagrams show all the rows in the pattern seen from the right side! DECREASE TIP (for sleeves): All decreases are made from the side in purl! Decrease 1 stitch by purling 2 stitches together ------------------------------------------------------- START THE PIECE HERE: ------------------------------------------------------- CIRCLE JACKET - SHORT OVERVIEW OF THE PIECE: The piece is worked in the round in a circle from the middle of the back outwards. Change to circular needle(s) when necessary. Then work back and forth with short rows for the front pieces and down the back. The sleeves are worked top down in stockinette stitch with the wrong side out. Because of the weight of the yarn, the garment will stretch somewhat after use. CIRCLE JACKET: CIRCLE: Cast on 8 stitches with double pointed needles size 8 mm = US 11 and 1 strand Air and 1 strand Brushed Alpaca Silk (= 2 strands). Divide the stitches between 4 needles so that there are 2 stitches on each. Insert a marker thread at the beginning of the round. Allow the marker thread to follow your work onwards. Work pattern in the round according to A.1 – choose diagram for your size, a total of 8 times on the round. REMEMBER THE KNITTING GAUGE! When A.1 is finished, there are 48 stitches on the round. Now work pattern as follows: Work A.2 – choose diagram for your size, a total of 16 times on the round. After the next-to-last round in A.2 there are 128-128-144-144-160-160 stitches on the round. The last round in A.2 is worked as follows: Work the first 39-39-45-45-49-49 stitches (there is now 1-1-0-0-1-1 stitch left in the last repeat of A.2 worked), insert a new marker thread here (follows your work onwards and is later used when you work short rows from the front pieces and down the body on the back piece), bind off the next 20-21-22-23-24-25 stitches (= armhole), work the next 49-47-55-53-63-61 stitches, bind off the last 20-21-22-23-24-25 stitches (= armhole). The piece measures approx. 39-39-41-41-47-47 cm = 15¼"-15¼"-16⅛"-16⅛"-18½"-18½" in diameter. The next round is worked as follows: Work A.3 – choose diagram for your size (= 8-8-9-9-10-10 stitches on the first round in the diagram) a total of 16 times on the round and at the same time cast on 20-21-22-23-24-25 new stitches on the needle where the stitches were bind off for the armholes = 128-128-144-144-160-160 stitches. Continue in the round with A.3 until the whole diagram has been completed in height. There are now 304-304-352-352-400-400 stitches on the round. The piece measures approx. 87-87-97-97-111-111 cm = 34¼"-34¼"-38¼"-38¼"-43¾"-43¾" in diameter. Cut the strand. Place the first 94-94-110-110-124-124 stitches on the round (= stitches between the 2 marker threads) on a thread. FRONT PIECES AND DOWN THE BODY: There are now 210-210-242-242-276-276 stitches for the front pieces and down the body on the back piece. Start from the right side after the second marker thread and work short rows back and forth for the front pieces and down the body on the back piece as follows: ROW 1 (right side): Purl over purl and work A.4 (= 3 stitches) over each cable until there are 3 stitches left before the next marker thread (i.e. start of round), turn. ROW 2 (wrong side): Work back until there are 3 stitches left before the marker thread, turn. ROW 3: Purl over purl and work A.4 over each of the cables until there are 6 stitches left before the marker thread, AT THE SAME TIME increase 1 purled stitch after each cable/A.4, turn. ROW 4: Work back until there are 6 stitches left before the marker thread, turn. Continue back and forth like this by working 3 fewer stitches than the previous row and increase 1 stitch after each cable/A.4 every 4th row until you have worked 7 repeats of A.4 in height (= 42 rows). The piece measures approx. 72-72-77-77-84-84 cm = 28⅜"-28⅜"-30⅜"-30⅜"-33"-33" from the middle of the circle and down mid back. The last row is worked from the wrong side. Do not cut the strand. Insert a marker thread in the middle cable/A.4 mid back of jacket. Continue back and forth with pattern as before over the bottom of the left front piece as follows: ROW 1 (right side): Work until there are 4 stitches left before the cable/A.4 with the marker thread mid back, turn. ROW 2 (wrong side): Work until there are 3 more stitches left before the marker thread than the previous row (start of round), AT THE SAME TIME increase 1 purled stitch after each cable/A.4, turn. ROW 3 (right side): Work until there are 4 more stitches than last time left before the cable/A.4 with the marker thread mid back, turn. ROW 4 (wrong side): Work until there are 3 more stitches before the marker thread than the previous row, turn. Continue back and forth with pattern and increase after each cable/A.4 every 4th row until you have worked 3 repeats of A.4 in height (= 18 rows). Cut the strand. Start from the right side and after A.4/mid back and work short rows back and forth over the bottom of the right front piece in the same way, but reversed, i.e. each row from the wrong side is turned when there are 4 more stitches before the cable/A.4 with the marker thread mid back than the previous time and on each row from the right side is turned when there are 3 more stitches left than the previous time. EDGE: Place all stitches on the circle back on circular needle and work 2 RIDGES – read description above, around the whole circle. Bind off, but to avoid the bind-off edge being tight you can make 1 yarn over after approx. each 5th stitch - the yarn overs are bind off as normal stitches. SLEEVE: The sleeve is worked in stockinette stitch with the wrong side out (reversed stockinette stitch). Cast on 11-11-12-12-14-14 stitches with circular needle size 8 mm = US 11 and 1 strand Air and 1 strand Brushed Alpaca Silk (= 2 strands). Work stockinette stitch back and forth, AT THE SAME TIME cast on new stitches at the end of each row in each side as follows: Cast on 2 stitches 2 times, 1 stitch 3-4-5-6-6-7 times, 2 stitches 1 time and 4 stitches 1 time = 37-39-42-44-46-48 stitches. THE PIECE IS NOW MEASURED FROM HERE. Continue back and forth with stockinette stitch and 1 edge stitch in GARTER STITCH – read description above, in each side. When the piece measures 4 cm decrease 1 stitch inside the 1 edge stitch in garter stitch in each side – read DECREASE TIP. Decrease like this every 7-6-6-5-5-4 cm = 2¾"-2⅜"-2⅜"-2"-2"-1½" a total of 6-7-7-8-8-9 times = 25-25-28-28-30-30 stitches. When the piece measures 42-42-40-40-39-39 cm = 16½"-16½"-15¾"-15¾"-15¼"-15¼" increase 7-7-4-9-7-7 stitches evenly on row = 32-32-32-37-37-37 stitches. Change to circular needle size 7 mm = US 10,75. Work rib, starting from the side with purl (reversed stockinette stitch/the wrong side out) as follows: 1 edge stitch in garter stitch (knit 2, purl 3) until there is 1 stitch left, 1 edge stitch in garter stitch. When the rib measures 5 cm = 2" bind off with knit over knit and purl over purl. The sleeve measures approx. 55-56-55-56-56-57 cm = 21⅝"-22"-21⅝"-22"-22"-22½" from the sleeve cap down. Work the other sleeve in the same way. ASSEMBLY: Sew sleeves to body inside the bind-off/cast-on edge. Sew sleeve seams. Make sure that the seam is not tight. |
|||||||||||||||||||||||||||||||
Diagram explanations |
|||||||||||||||||||||||||||||||
|
|||||||||||||||||||||||||||||||
|
|||||||||||||||||||||||||||||||
|
|||||||||||||||||||||||||||||||

|
|||||||||||||||||||||||||||||||
|
|||||||||||||||||||||||||||||||
|
|||||||||||||||||||||||||||||||
|
Have you made this or any other of our designs? Tag your pictures in social media with #dropsdesign so we can see them! Do you need help with this pattern?You'll find tutorial videos, a Comments/Questions area and more by visiting the pattern on garnstudio.com. © 1982-2024 DROPS Design A/S. We reserve all rights. This document, including all its sub-sections, has copyrights. Read more about what you can do with our patterns at the bottom of each pattern on our site. |
|||||||||||||||||||||||||||||||


With over 40 years in knitting and crochet design, DROPS Design offers one of the most extensive collections of free patterns on the internet - translated to 17 languages. As of today we count 304 catalogs and 11422 patterns - 11417 of which are translated into English (US/in).
We work hard to bring you the best knitting and crochet have to offer, inspiration and advice as well as great quality yarns at incredible prices! Would you like to use our patterns for other than personal use? You can read what you are allowed to do in the Copyright text at the bottom of all our patterns. Happy crafting!
Comments / Questions (174)
Magnifique. Je viens de recevoir ma laine, trop hâte de commencer. La laine est superbement douce au toucher. A plus tard avec photo à l'appui de mon manteau ^_^
04.02.2019 - 14:26Liebes Drop Design Team, beim Rückenteil verstehe ich nicht wie viel Maschen ich ab Reihe 5 still legen muss. Immer 3 mehr als in der vorhergehenden Reihe? Also 3, 6, 9, 12 usw.? Vielen Dank und freundliche Grüße, Barbara
01.02.2019 - 21:22DROPS Design answered:
Liebe Frau Ischebeck, also nach 4. Reihe legen Sie 3 Maschen mehr still, dh es sind im Faden 3, dann 6, 9, 12 usw stillgelegten Maschen. Viel Spaß beim stricken!
04.02.2019 - 09:15No me puedo poner en contacto con ustedes para resolver algunas dudas de este patrón
23.01.2019 - 22:15Bonjour, dans cette partie vous afficher augmenter 1 maille envers que RANG 2: RANG 2 (sur l’envers): Tricoter jusqu'à ce qu'il reste 3 mailles en plus qu’au rang précédent avant le fil marqueur (début des tours), EN MÊME TEMPS, augmenter 1 maille envers après chaque torsade/A.4, tourner. Alors on n'augmente pas 2 maille dans chaque torsade A4? Merci de votre réponse.
18.01.2019 - 18:09DROPS Design answered:
Bonjour Mme Bashka, sur ce rang 2, on va augmenter 1 seule maille avant chaque torsade/A.4. Bon tricot!
21.01.2019 - 09:13The pattern advises double threads and 550g Drops Air and 300g brushed alpaca silk for an xl. I want to make the pattern in just Drops Air Orange. Do I then use 2 threads Drops air Orange or just a single one? How much Drops Air Orange Melange should I order? How much do you think having just the heavier wool will make the sweater sag more? Thanks in advance.
18.01.2019 - 14:02DROPS Design answered:
Dear Damae, due to the different texture of both yarn, 2 strands DROPS Air may look different and have not the same tension as 1 strand Air + 1 strand Brushed Alpaca Silk. A good idea would be to make first a swatch to check the tension and texture. Remember your DROPS Store will provide you any further individual assistance choosing yarns even alternatives - contact them even per mail or telephone. Happy knitting!
18.01.2019 - 14:40Bonjour, Pour les devant de la veste, on tricote bien en raccourcissant les rangs de 3 mailles de chaque côté comme avant, et de 4 mailles au milieu ? J'ai un doute ... D'avance merci
18.01.2019 - 13:20DROPS Design answered:
Bonjour Catherine, on continue effectivement à tricoter 4 m en moins côté dos (en bas de la veste) et 3 m en moins côté devant (en haut de la veste) pendant un total de 18 rangs. Bon tricot!
18.01.2019 - 14:35Voeg de rechter naald in bij het midden van de 3 recht gebreide steken 4 naalden hieronder, maak 1 omslag en haal de draad op naar de goede kant, zodat de omslag 4½ cm lang wordt , 3 recht, voeg de rechter naald in bij dezelfde steek, maak 1 omslag en haal de draad op naar de goede kant zodat de omslag 4½ cm lang wordt Hallo .... Dit is de uitleg dat ik niet begrijp alhoewel dat ik een redelijkebreister ben . Kan je me hiermee een betere uitleg zenden aub Dank u Groetjes Gigi
13.01.2019 - 13:44DROPS Design answered:
Dag Gigi,
Als je bij deze zwarte driehoekje bent, dan steek je de rechter naald in de middelste steek van de drie tricotsteken, dan maak je een omslag om de naald aan de achterkant van het werk en deze draad haal je met de naald naar voren. Omdat je 4 naalden eronder ingestoken hebt, moet je de draad naar boven halen (ongeveer 4,5 cm), dan brei je 3 steken recht en dan herhaal je het zelfde aan het eind van deze 3 steken. Je hebt dan a.h.w. 2 lussen op de voorkant van je werk die als een V-vorm uit de steek 4 naalden ervoor komen. Hopelijk is het zo duidelijk :) Bekijk anders deze video hieronder:
17.01.2019 - 11:41Hartelijk dank voor de reactie. Ik begrijp echter nog steeds niet hoe ik op de 22 opgezette steken (voorkant armsgat) 4 naalden lager moet insteken. Met de verkorte toeren heb ik me nog niet bezig gehouden. Eerst maar kijken of ik de cirkel (A3) voor elkaar krijg.
06.01.2019 - 13:54DROPS Design answered:
Dag Katinka,
Normaal steek je de rechter naald in de steek op de linker naald, maar nu steek je de rechter naald in de middelste van de 3 recht gebreide steken, die je 4 naalden eerder hebt gemaakt.
23.01.2019 - 11:46Bonjour, j'aimerais savoir quand vous dites au début du patron de répéter 8 fois A1 en largeur, je n'arrive pas à comprendre. Lorsque je le réalise, j'obtiens un tube et non un cercle plat. Besoin d'aide s'il vous plaît. Merci
05.01.2019 - 17:38DROPS Design answered:
Bonjour Mme Loyer, vous commencez par monter 8 mailles et répétez 8 fois A.1 (= A.1 = 1 maille) en rond (= en largeur). En fonction de la taille, vous augmentez dès le 1er (ou le 2ème) tour, puis tous les 2 tours, le nombre de mailles va augmenter, et le tricot sera ainsi plat et doit former un rond (après A.1 vous avez 6 m dans chaque A.1 x 8 A.1 = 48 mailles). Bon tricot!
07.01.2019 - 10:35Bonjour, je ne comprend pas la fin de la veste, la partie avec les rangs raccourcis. 1er tour je laisse 4 mailles avant la torsade, au 2ème tour je vais jusqu'au fil marqueur ou je fais 3 mailles en plus du rang précédent ? Pour le 3ème tour je vais jusqu'à la torsade ou je m'arrête 8 mailles avant la torsade ? Merci de votre réponse c'est mon premier ouvrage aussi complexe et ça n'est pas joli pour le moment
04.01.2019 - 11:50DROPS Design answered:
Bonjour Marie, pour la toute dernière partie de la veste (après les premiers rangs raccourcis des devants/bas de la veste), on tricote au rang 1 jusqu'à ce qu'il reste 4 m avant la torsade, et sur l'envers jusqu'à ce qu'il reste 3 m en plus avant le fil marqueur (début des tours) qu'au rang précédent, au rang 3, vous vous tricotez jusqu'à ce qu'il reste 8 m (= 4 m de plus), et au rang 4 jusqu'à ce qu'il reste 6 m (= 3 m en plus) et ainsi de suite. Bon tricot!
04.01.2019 - 12:52