
Popular categories
Looking for a yarn?


|
||||||||||||||||||||||
Flora Viola |
||||||||||||||||||||||
 |
 |
|||||||||||||||||||||
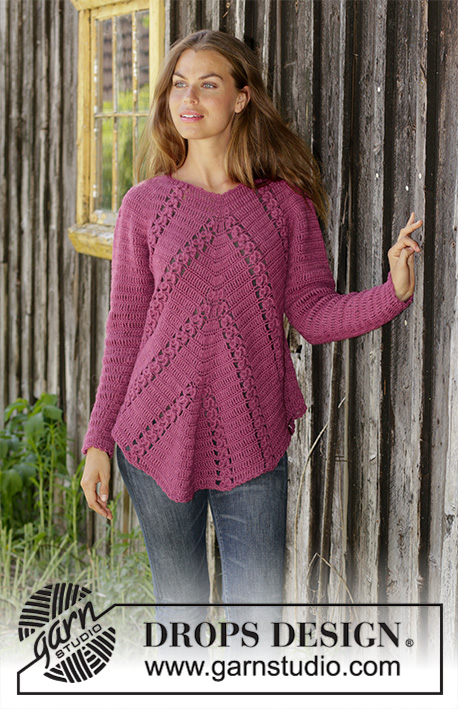
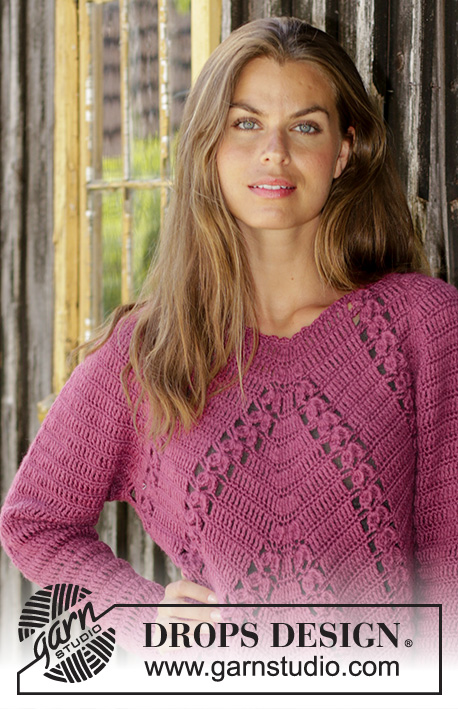
Crocheted sweater with raglan in DROPS Puna. Piece is crocheted top down in an angle with fans, lace pattern and A-shape. Size: S - XXXL
DROPS 196-20 |
||||||||||||||||||||||
|
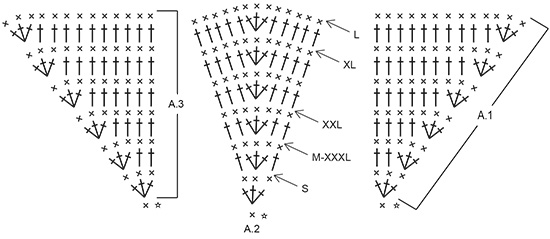
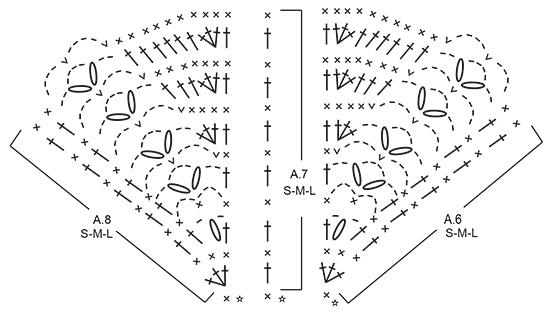
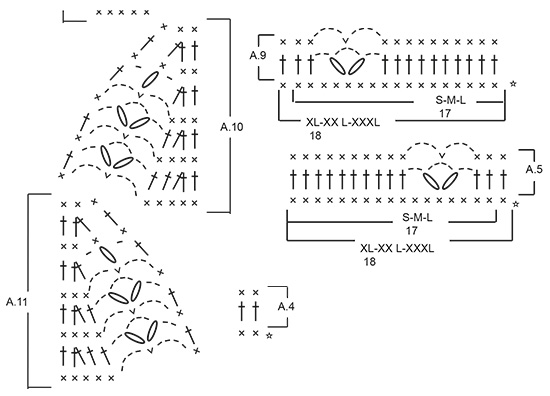
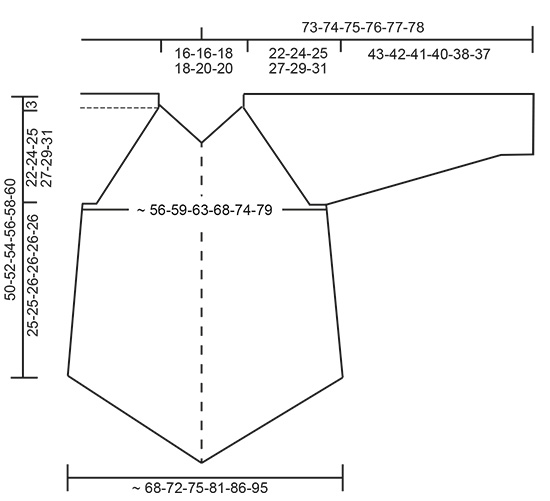
---------------------------------------------------------- EXPLANATION FOR THE PATTERN: ---------------------------------------------------------- CROCHET INFORMATION: At beginning of every round with treble crochets replace first treble crochet with 4 chain stitches. Finish round with 1 slip stitch in 4th chain stitch at beginning of round. On every round with single crochets replace first single crochet with 1 chain stitch. Finish round with 1 slip stitch in first chain stitch at beginning of round. PATTERN: See diagrams A.1 to A.11. Choose diagram for your size. 1 fan = 2 chain stitches + 1 bobble + 4 chain stitches + 1 bobble + 2 chain stitches. DECREASE TIP (applies to sleeves): All decreases are done on 1 round with treble crochets. Work 1 treble crochet in each of the first 2 single crochets, work the next 2 treble crochets together (= 1 stitch decreased), work 1 treble crochet in every single crochet until 4 single crochets remain on round, work the next 2 treble crochets together (= 1 stitch decreased), work 1 treble crochet in each of the last 2 single crochets. ---------------------------------------------------------- START THE PIECE HERE: ---------------------------------------------------------- SWEATER - SHORT OVERVIEW OF THE PIECE: Work in the round top down. First work a yoke. Then divide the piece into body and sleeves and continue in the round separately. YOKE: Work 102-102-111-116-116-125 chain stitches on hook size 4.5 mm = US 7 with Puna and form a ring with 1 slip stitch in first chain stitch. Work 1 chain stitch (= first single crochet) - read CROCHET INFO, skip first chain stitch, work 1 single crochet in each of the next 3-3-5-3-3-5 chain stitches, * skip 1 chain stitch, 1 single crochet in each of the next 6 chain stitches *, work from *-* and finish with 1 slip stitch in first chain stitch on round = 88-88-96-100-100-108 single crochets. Then work pattern as follows: Round begins in transition between back piece and sleeve (i.e. first work over sleeve, front piece, sleeve and finally back piece). Right sleeve: Work A.1 over first stitch, A.2 over 1 stitch, A.3 over 1 stitch. Front piece: Work A.4 over the next 2-2-4-2-2-4 stitches, A.5 over 17-17-17-18-18-18 stitches, A.6 over 1-1-1-3-3-3 stitches, A.7 over 1 stitch (= mid front), A.8 over 1-1-1-3-3-3 stitches, A.9 over 17-17-17-18-18-18 stitches, A.4 over the next 2-2-4-2-2-4 stitches. Left sleeve: Work as right sleeve. Back piece: Work as front piece. Continue pattern like this. REMEMBER THE CROCHET GAUGE! Repeat A.4, A.5 and A.9 vertically. Work A.2 until arrow for your size, then work A.4 over these stitches. When A.1, A.3, A.6, A.7 and A.8 have been worked 1 time vertically, there are 55-55-59-63-63-67 single crochets and 4 fans on each front piece/back piece and 29-31-39-37-33-31 single crochets on each sleeve = 168-172-196-200-192-196 single crochets + 8 fan pattern in total. Piece measures approx. 14 cm = 5½" measured along shoulder. Then work as follows: Right sleeve: Work A.1 over first stitch, A.4 over the next 27-29-37-35-31-29 stitches, A.3 over 1 stitch. Front piece: Work A.4 over the next 2-2-4-2-2-4 stitches, A.5 2 times in total in width, A.6 over the next 1-1-1-3-3-3 stitches, A.7 (= 1 stitch = mid front), A.8 over the next 1-1-1-3-3-3 stitches, A.9 2 times in total in width, A.4 over the next 2-2-4-2-2-4 stitches. Left sleeve: Work as right sleeve. Back piece: Work as front piece. Continue pattern like this until piece measures 22-24-25-27-29-31 cm 8¾"-9½"-9¾"-10⅝"-11⅜"-12¼" in total, measured along the shoulder (i.e. approx. 7-9-10-12-14-15 rounds after first repetition of pattern A.1, A.3 and A.6 to A.8). There are now approx. 65-71-77-89-93-97 single crochets/treble crochets and approx. 6-6-6-6-6-8 fans on each front piece/back piece and approx. 45-51-59-61-61-63 single crochets/treble crochets on each sleeve = approx. 220-244-272-300-308-320 single crochets/treble crochets + approx. 12-12-12-12-12-16 fan pattern in total. Now divide the piece for sleeves and body as follows: Right sleeve: Skip sleeve stitches (= approx. 45-51-59-61-61-63 stitches) and work 6-6-6-8-10-12 chain stitches under sleeve. Front piece: Work pattern as before. Left sleeve: Skip sleeve stitches (= approx. 45-51-59-61-61-63 stitches) and work 6-6-6-8-10-12 chain stitches under sleeve. Back piece: Work as front piece. There are now approx. 71-77-83-93-103-109 single crochets/treble crochets/chain stitches (including chain stitches under sleeve) + approx. 6-6-6-6-6-8 fans on each front piece/back piece = approx. 142-154-166-186-206-218 single crochets/treble crochets and approx. 12-12-12-12-12-16 fan pattern in total. BODY: Work 1 round with pattern as before and 1 single crochet/treble crochet in every chain stitch under sleeve. Displace round so that it begins mid under sleeve. Insert 1 marker mid under both sleeves. Then work pattern as before but decrease stitches in each side as follows: Front piece: Work A.4 over the first 2-2-4-4-5-8 stitches, A.10 over the next 5 stitches + fan pattern + 1 stitch (adjust which round to begin on according to pattern), work pattern as before (i.e. continue to increase mid front) until 8-8-10-10-11-14 stitches remain and 1 fan before marker, work A.11 over 1 stitch + fan pattern + 5 stitches, work A.4 over the next 2-2-4-4-5-8 stitches. Back piece: Work as front piece. Continue pattern like this. I.e. on every round with treble crochets increase stitches on each side of A.7 (i.e. increase stitches in A.6 and A.8) and decrease stitches in A.10 and A.11 (when decreasing/increasing treble crochets increase 2 treble crochets on each side of A.7 (= 8 treble crochets increased) and decrease 1 treble crochet in every A.10/A.11 (= 4 treble crochets decreased in total), i.e. increase 4 treble crochets in total on round). Decrease pattern in the sides and increase for new pattern mid front/mid back. When A.10 and A.11 have been worked 1 time vertically, continue decrease in treble crochets as before (i.e. now there is no decrease in the fan pattern). When piece measures 20 cm = 8" from where body was divided from sleeve, measured along the side on the shortest, increase stitches as before, but do not increase for fans, i.e. work all stitches increased in single crochets/treble crochets. When piece measures 25-25-26-26-26-26 cm = 9¾"-9¾"-10¼"-10¼"-10¼"-10¼" from where body was divided sleeve, measured along the shortest (i.e. approx. 11 rounds with treble crochets = 11 times increased), work 1 edge as follows: Work * 1 single crochet, 3 chain stitches, skip approx. 1 cm = ⅜" *, work from *-* in the round, adjust to finish with 3 chain stitches and 1 slip stitch in first single crochet. Make sure edge is not too tight, skip fewer stitches if needed. Fasten off. Sweater measures approx. 50-52-54-56-58-60 cm = 19¾"-20½"-21¼"-22"-22¾"-23⅝" measured from shoulder and down on the shortest. SLEEVE: Fasten strand with 1 slip stitch in 3rd chain stitch under sleeve, work 1 single crochet/treble crochet in each of the 2-2-2-3-4-5 chain stitches under sleeve (adjust whether to work single crochet or treble crochet according to pattern), work 1 single crochet/treble crochet in each of the approx. 45-51-59-61-61-63 stitches skipped for sleeve and finish with 1 single crochet/treble crochet in each of the last 3-3-3-4-5-6 chain stitches under sleeve = approx. 51-57-65-69-71-75 single crochets/treble crochets. Continue in the round according to A.4. When sleeve measures 2 cm = ¾", decrease 2 stitches under sleeve - read DECREASE TIP. Decrease like this every 5-3-2½-2½-2½-2 cm = 2"-1⅛"-1"-1"-1"-¾" 8-11-13-13-14-15 times in total = approx. 35-36-39-43-43-45 stitches. Continue pattern until piece measures 43-42-41-40-38-37 cm = 17"-16½"-16⅛"-15¾"-15"-14½", now work 1 edge around the sleeve as follows: Work * 1 single crochet, 3 chain stitches, skip approx. 1 cm = ⅜" *, work from *-* around the entire sleeve, adjust to finish with 3 chain stitches and 1 slip stitch in first single crochet. Fasten off. Work the other sleeve the same way. NECK EDGE: Crochet an edge around the neck as follows: Begin mid on top of shoulder, fasten strand with 1 slip stitch in 1 stitch, work * 1 single crochet in next stitch, 3 chain stitches, skip approx. 1 cm = 1⅛" *, work from *-* in the round as follows, adjust to finish round with 3 chain stitches and 1 slip stitch in first single crochet. Make sure edge is not too tight at the neck, skip fewer stitches if needed. Fasten off. |
||||||||||||||||||||||
Diagram explanations |
||||||||||||||||||||||
|
||||||||||||||||||||||
|
||||||||||||||||||||||
|
||||||||||||||||||||||

|
||||||||||||||||||||||
|
||||||||||||||||||||||
|
||||||||||||||||||||||
|
Have you made this or any other of our designs? Tag your pictures in social media with #dropsdesign so we can see them! Do you need help with this pattern?You'll find tutorial videos, a Comments/Questions area and more by visiting the pattern on garnstudio.com. © 1982-2024 DROPS Design A/S. We reserve all rights. This document, including all its sub-sections, has copyrights. Read more about what you can do with our patterns at the bottom of each pattern on our site. |
||||||||||||||||||||||


With over 40 years in knitting and crochet design, DROPS Design offers one of the most extensive collections of free patterns on the internet - translated to 17 languages. As of today we count 304 catalogs and 11422 patterns - 11417 of which are translated into English (US/in).
We work hard to bring you the best knitting and crochet have to offer, inspiration and advice as well as great quality yarns at incredible prices! Would you like to use our patterns for other than personal use? You can read what you are allowed to do in the Copyright text at the bottom of all our patterns. Happy crafting!
Comments / Questions (91)
Help please! I am on the "Body" section and I just don't understand it. Can I get some clarification? What does displace round so it begins under arm? Slip stitch to there from the previous row? I am so totally lost when reading the front piece directions. In fact I can understand the charts so much better than the written directions. Can you clarify this for me too?
31.01.2020 - 20:18DROPS Design answered:
Dear Jan, the rounds will now start mid under sleeve, you can slip stitch to the mid under sleeve (to the middle of the new 6-8-10-12 chains cast on mid under 1st sleeve) or cut and join the yarn at the right place. Then work *A.4 mid under sleeve over the first 2-8 sts, A.10, then continue as before (with increases as efore) until 8-10-11-14 sts + 1 fan remain before marker on the side and work A.11, and finish with A.4 to the marker*, repeat from *-* one more time for back piece. Happy crocheting!
03.02.2020 - 09:23En el diagrama A2 están correctas las tallas? El aumento de la talla M, es igual a la XXXL?
24.12.2019 - 15:42DROPS Design answered:
Hola Sunshine, el patrón está correcto, el número de puntos es mayor en la talla XXXL que en la M, y los aumentos se trabajan según el patrón.
26.12.2019 - 23:55Bonjour, je voudrais bien faire ce modèle ainsi que d'autres mais j'y arrive qu'en suivant une vidéo. Je ne sais pas lire les explications au crochet. Par contre aux aiguilles pas de problème. Dommage 😥
12.12.2019 - 12:52DROPS Design answered:
Bonjour Nathalie, lisez dans un premier temps comment crocheter un diagramme, puis, pour vous aider, vous pouvez découper les différents diagrammes (imprimez-en ou photocopiez-les en plusieurs exemplaires) et faites un petit montage sur papier pour bien suivre l'ordre dans lequel vous devez les crocheter. Bon crochet!
12.12.2019 - 14:07Bij dit patroon moet je bij het begin extra lossen opzetten zodat de opzettoer niet te strak wordt. Ik heb zelf (bij toeval) in een filmpje op YouTube ontdekt hoe je hakend de 1e toer vasten kan opzetten. Had ik dit maar eerder ontdekt, het resultaat is een mooie 1e toer die niet te strak of te los is. Nog een heel groot voordeel vind ik dat als de 1e toer uit bijna 100 steken bestaat het zo makkelijk is om de steken te tellen. Is het niet makkelijk voor anderen om ze hierop te wijzen.
10.12.2019 - 06:33Me encanta el saco pero no entiendo el patrón, me ayudaría más un video, por favor, por favor
07.10.2019 - 03:14Es posible tener un video para elaborar este saco. Gracias
04.10.2019 - 05:46DROPS Design answered:
Hola Sofia. Bajo el patrón tienes vídeos relacionados que pueden ayudarte a realizar el modelo. No hay un video de la elaboración completa del jersey.
13.10.2019 - 22:50Beautiful sweater but decided after trying to read through the diagrams and instructions I will pass on this one. I agree with another commenter that instructions should be written. I can see from the comments that many are having difficulty.
21.09.2019 - 17:57DROPS Design answered:
Dear Carolyn, The DROPS patterns are knitted and crocheted by thousands and thousands of people around the world. We understand however that in certain countries, with different knitting/crochet traditions than Scandinavia, our patterns might be written in a way that differs from what some are used to. But of course we want everyone to understand our patterns, so that’s why we have created an extensive library of tutorial videos as well as step by step lessons that explain how to follow the techniques we use and how to read the diagrams in our patterns. Give them a try!
23.09.2019 - 10:19I love this pattern - I cannot work out the symbolised patterns at all, never haven abject to. Is there a video tutorial if this garment being made? I’ve tried the tutorials in reading symbolised patterns to no avail my brain just dies nitcsrfm to dirk that way! N Cheers Annette
29.08.2019 - 05:50DROPS Design answered:
Dear Annette, there are no video to this pattern, you will find how to read crochet diagrams here, should you need any further individual assistance reading diagram, please contact your DROPS store, even per mail or telephone. Happy crocheting!
29.08.2019 - 09:37Can you tell me is the drops puma yarn a light weight worsted yarn or regular worsted yarn. Can it be substituted with a regular worsted weight American yarn? Like red heart or love or bernat?
19.07.2019 - 03:08DROPS Design answered:
Dear Mrs Thornton, We are able to provide free patterns thanks to our yarns sold throughout the world. You will therefore understand that we can only recomand you to contact your DROPS Store shipping to USA for any further help & assistance. Thank you for your comprehension.
19.07.2019 - 08:16Bonjour, Je veux réaliser l'échantillon, (j'utilise un fil différent), et je lis qu'il faut monter jusqu'à 5,5 rangs, comment faire un demi rang ? Merci
25.06.2019 - 08:49DROPS Design answered:
Bonjour Mc, pour votre échantillon, montez toujours davantage de mailles en l'air et crochetez plus de mailles en l'air que le nombre indiqué pour 10 cm, et crochetez également plus de rangs en hauteur que le nombre indiqué pour l'échantillon, il est ainsi plus facile de mesurer les 10 cm en largeur et en hauteur. Bon crochet!
25.06.2019 - 11:24