
Popular categories
Looking for a yarn?


|
||||||||||||||||
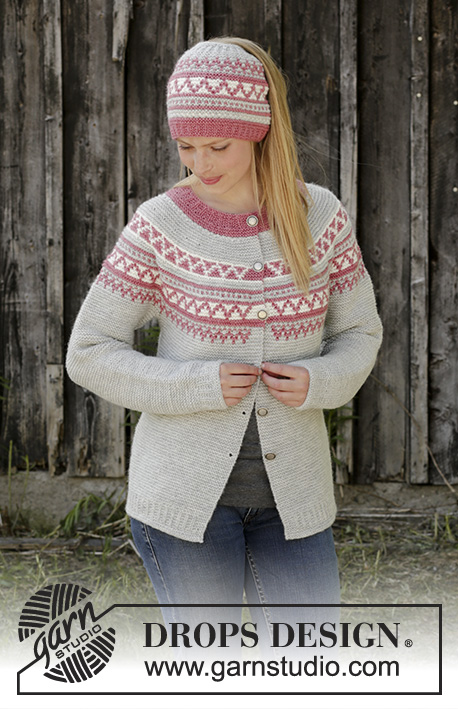
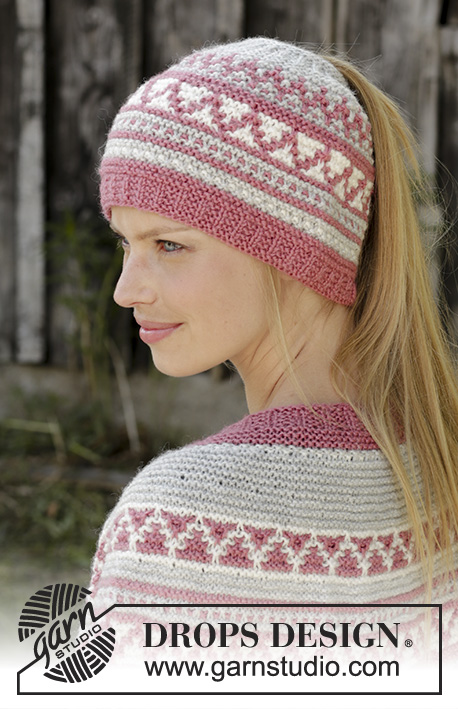
Hint of Heather Hat |
||||||||||||||||
 |
 |
|||||||||||||||
Knitted hat in DROPS Nord. Piece is knitted bottom up in garter stitch, mosaic pattern and opening for ponytail.
DROPS 197-19 |
||||||||||||||||
|
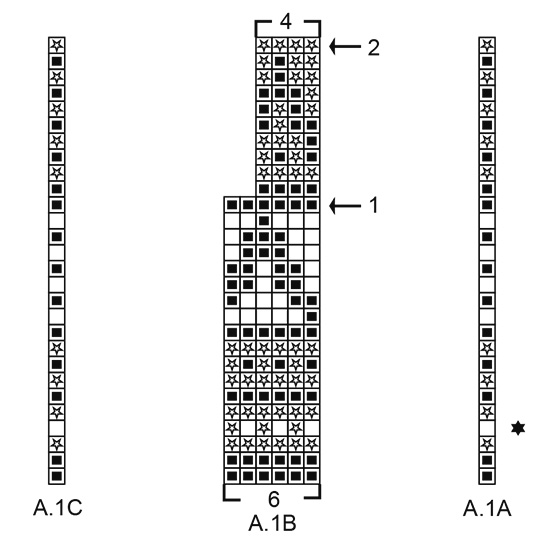
---------------------------------------------------------- EXPLANATION FOR THE PATTERN: ---------------------------------------------------------- GARTER STITCH (back and forth): 1 ridge = knit 2 rows. DECREASE TIP (evenly spaced): All decreases are done from the right side! To calculate how to decrease evenly on needle, use the total number of stitches on row (e.g. 110 stitches), minus edge stitches (e.g. 2 stitches) and divide the remaining stitches by number of decreases to be done (e.g. 12 stitches) = 9. In this example decrease by knitting alternately every 8th and 9th stitch together. Do not decrease over edge stitches. MOSAIC PATTERN: See diagram A.1 and read explanation for technique below. Every row in diagram equals 2 rows. I.e. from right side work diagram from right to left and from wrong side work same row from left to right. On all rows from right side hold yarn behind piece (i.e. on wrong side of piece) when slipping a stitch. On all rows from wrong side hold yarn in front of piece (i.e. towards you and still on wrong side of piece) when slipping a stitch. Make sure that the yarn is not too tight on wrong side of piece. To maintain control over pattern insert a marker between every pattern repetition with A.1B. A.1A = start stitch from right side and end stitch from wrong side (stitch should be worked). A.1B = 1 pattern repetition. A.1C = end stitch from right side and start stitch from wrong side (stitch should be worked). On the rows in one color in diagram work 1 ridge back and forth over all stitches without slipping any stitches. On first pattern row in A.1 that has an empty square in A.1A and A.1C (color A – row marked with a star in A.1A), knit all stitches with color A and slip all stitches with color C. On the other pattern rows with an empty square or a square with star in A.1A and A.1C (color A or C), knit all stitches with color A and slip all stitches with color B. On every pattern row that has a black square in A.1A and A.1C (color B), knit all stitches with color B and slip all stitches with color A or C. ---------------------------------------------------------- START THE PIECE HERE: ---------------------------------------------------------- HAT - SHORT OVERVIEW OF THE PIECE: Worked back and forth on circular needle, bottom up. First work and edge at the bottom. Then work in mosaic pattern. It is important to follow the diagrams. Work the entire color pattern in garter stitch but do not work pattern in regular garter stitch stitches. The color pattern is formed by slipping the stitches as explained above. Read the entire explanation for mosaic pattern before working! Finish by working an edge at the top of hat before sewing the piece together mid back. Hat is open at the top to make room for a ponytail. HAT: Cast on 110-116-122 stitches on circular needle size 3 mm = US 2,5 with old pink. Work 1 ridge in GARTER STITCH - read explanation above. Then work as follows: ROW 1 (= right side): Knit all stitches. ROW 2 (= wrong side): Knit 1, * purl 1, knit 2 *, work from *-* until 2 stitches remain on row, purl 1 and finish with knit 1. Repeat 1st and 2nd row until piece measures 2-2-3 cm = ¾"-¾"-1⅛" from cast-on edge. Switch to circular needle size 3.5 mm = US 4 and work MOSAIC PATTERN - see explanation above. I.e. work A.1A over first stitch, repeat A.1B until 1 stitch remains on needle (= 18-19-20 repetitions of 6 stitches), finish with A.1C over last stitch. Continue pattern like this but remember that 1 row in diagram = 2 rows. REMEMBER THE KNITTING GAUGE! AT THE SAME TIME on every row marked with arrow in A.1B decrease evenly as explained below - read DECREASE TIP. On row marked with arrow-1 decrease 12-10-12 stitches evenly = 98-106-110 stitches (there is now room for 24-26-27 repetitions of 4 stitches). On row with arrow-2 decrease 24-26-24 stitches evenly = 74-80-86 stitches on needle. A.1 is now done. Continue back and forth over all stitches with pearl grey until piece measures 15-16-17 cm = 6"-6¼"-6¾". Switch to circular needle size 3 mm = US 2,5 and work as follows: ROW 1 (= right side): Knit all stitches. ROW 2 (= wrong side): Knit 1, * purl 1, knit 2 *, work from *-* until 2 stitches remain on row, purl 1 and finish with knit 1. Repeat rows 1 and 2 until the same number of rows has been worked as at the bottom edge on hat, i.e. approx 2-2-3 cm = ¾"-¾"-1⅛". then work 2 ridges back and forth over all stitches AT THE SAME TIME decrease 24-26-28 stitches evenly on first row = 50-54-58 stitches. Loosely bind off with knit from right side. Piece measures approx. 18-19-21 cm = 7"-7½"-8¼" from top and down. ASSEMBLY: Sew hat together mid back inside 1 edge stitch in garter stitch in each side. |
||||||||||||||||
Diagram explanations |
||||||||||||||||
|
||||||||||||||||
|
||||||||||||||||
|
Have you made this or any other of our designs? Tag your pictures in social media with #dropsdesign so we can see them! Do you need help with this pattern?You'll find tutorial videos, a Comments/Questions area and more by visiting the pattern on garnstudio.com. © 1982-2024 DROPS Design A/S. We reserve all rights. This document, including all its sub-sections, has copyrights. Read more about what you can do with our patterns at the bottom of each pattern on our site. |
||||||||||||||||


With over 40 years in knitting and crochet design, DROPS Design offers one of the most extensive collections of free patterns on the internet - translated to 17 languages. As of today we count 304 catalogs and 11422 patterns - 11417 of which are translated into English (US/in).
We work hard to bring you the best knitting and crochet have to offer, inspiration and advice as well as great quality yarns at incredible prices! Would you like to use our patterns for other than personal use? You can read what you are allowed to do in the Copyright text at the bottom of all our patterns. Happy crafting!
Comments / Questions (15)
Ich habe die Mütze mit Hilfe des Videos schnell gestrickt - sie gefällt mir auch sehr gut :-) Meine Frage: könnte man sie auch in Runden stricken und wie wird dann das Mosaikmuster ausgeführt? Die Mütze ist toll, aber die Naht stört mich. Vielen lieben Dank
15.11.2022 - 08:43DROPS Design answered:
Liebe Silvia, Mosaikmuster wird meistens in Hin- und Rückreihen gestrickt, aber wahrscheinlich können Sie das Muster auch so anpassen, damit Sie immer in Runden stricken. Gerne kann Ihnen Ihr DROPS Händler damit helfen - auch per Telefon oder per E-Mail. Viel Spaß beim stricken!
15.11.2022 - 09:54Så er der en video som viser hvordan man gør :)
How to work the mosaic pattern to the hat in DROPS 197-19 from Garnstudio Drops design on Vimeo.
24.04.2020 - 09:37Det er umulig å strikke pinne 25 (13) slik du har forklart. Det er tre masker i hver farge på pinne 12. Så skal det være på pinne 25 (13) 2+1, 2+1... Dette går ikke å løfte og strikke som forklart. Og ja, jeg har lest og sett video av mosaikk strikk...
30.03.2020 - 21:14DROPS Design answered:
13. rad (25. pinne som strikkes) strikkes fra retten slik: A.1a, A.1b (1 rett natur, løft 1 maske gml rosa og løft 1 maske natur løst av pinnen og hold natur tråden bak, strikk 1 rett natur, løft 1 maske natur og løft 1 maske gml rosa løst av pinnen, hold natur tråden bak) x 18-19-20 rapporter og A.1c. 13. rad (26. pinne som strikkes) strikkes fra vrangen slik: A.1a, A.1b (løft 1 maske gml rosa og løft 1 maske natur løst av pinnen og hold natur tråden foran, strikk 1 rett natur, løft 1 maske natur og løft 1 maske gml rosa løst av pinnen, hold natur tråden bak, 1 rett natur ) x 18-19-20 rapporter og A.1c. God Fornøyelse!
16.04.2020 - 15:50Omgang 13 på luen! Der står at man skal løfte av rosa maske, men der er er ikke to rosa å løfte av!! Dette er spurt om tidligere uten noe utdypende svar!!
21.11.2019 - 17:44DROPS Design answered:
Hei Marit. 13. rad (25. pinne som strikkes) strikkes fra retten slik: A.1a, A.1b (1 rett natur, løft 1 maske gml rosa og løft 1 maske natur løst av pinnen og hold natur tråden bak, strikk 1 rett natur, løft 1 maske natur og løft 1 maske gml rosa løst av pinnen, hold natur tråden bak) x 18-19-20 rapporter og A.1c. 13. rad (26. pinne som strikkes) strikkes fra vrangen slik: A.1a, A.1b (løft 1 maske gml rosa og løft 1 maske natur løst av pinnen og hold natur tråden foran, strikk 1 rett natur, løft 1 maske natur og løft 1 maske gml rosa løst av pinnen, hold natur tråden bak, 1 rett natur ) x 18-19-20 rapporter og A.1c. God Fornøyelse!
05.12.2019 - 13:43Får ikke mønster til å stemme. Der eg skal ta masker løst av i rosa er det kvite masker fra forrige runde. Se mønster lue, rad 13.
27.08.2019 - 18:39DROPS Design answered:
Hei Sigrid. Litt usikker på hvor det blir feil hos deg, men det er veldig viktig å lese forklaringen til MOSAIKKMØNSTER, og man vet på hvilken pinner man skal holde tråden bak arbeidet og hvilken pinne man skal holde pinnen foran arbeidet. Ta gjene en titt på videoen "Hvordan strikket et mosaikkmønster". God Fornøyelse!
23.09.2019 - 10:59Estoy tejiendo esta prenda y es hermosa, gracias
24.07.2019 - 05:00Bonjour Quand vous écrivez glisser les mailles, voulez vous dire juste les mettre sur l'autre côté sans les tricoter? Merci pour les infos
16.06.2019 - 18:57DROPS Design answered:
Bonjour Carole, tout à fait, quand on glisse une maille, on la prend avec l'aiguille droite comme pour la tricoter à l'endroit et on la lâche de l'aiguille gauche, sans la tricoter. Veillez à ne pas oublier de bien positionner votre fil de pelote (derrière sur l'endroit et devant sur l'envers) pour qu'il passe bien sur l'envers derrière les mailles glissées. Bon tricot!
17.06.2019 - 08:17Mein Problem ist bei Zeile 13, an der ich verzweifle.Beginn mit 2 natur, dann 2 altrosa, die ja abgehoben werden sollen. Doch wie kann ich eine altrosa Masche abheben, wenn in der darunterliegenden Reihe keine altrosa Masche, sondern eine natur liegt???? Das gleiche Problem sehe ich der 13. Reihe. Oder bin ich einem Denkfehler unterlegen?
17.12.2018 - 17:44DROPS Design answered:
Liebe Frau Anders, Diagram ist hier korrekt, Sie stricken nur die Maschen mit natur, die anderen werden einfach abgehoben - diese Maschen sind nicht im natur, nur damit Sie sie nicht stricken. 2 Reihe danach machen Sie genauso das gleiche. Viel Spaß beim stricken!
19.12.2018 - 09:52In Reihe 12 Beginn altrosa und natur wird gehoben. Man kann aber keine 3 Hebemaschen hintereinander stricken!! Da scheint ein Fehler zu sein!! Oder wie soll das gestrickt werden???
15.11.2018 - 12:20DROPS Design answered:
Liebe Frau Brike, bei der 12. Reihe werden Sie mit altrosa stricken und alle Maschen mit natur abheben - darauf nur achten Sie, dass der Faden auf der Rückseite nicht gespannt wird. Viel Spaß beim stricken!
15.11.2018 - 14:32Hej igen. Jeg kan slet ikke se nogen opskrift på huen under model nr 197-19. Derimod har jeg nu fundet den under model nr 197-18 nedenunder opskriften på jakken. Men opskriften burde vel også ligge på nr 197-19, som kun viser huen?
14.11.2018 - 12:06DROPS Design answered:
Hej Eva, Så er opskriften lagt ud. God fornøjelse!
14.11.2018 - 15:29