DROPS Nord
DROPS Nord
45% Alpaca, 30% Polyamide, 25% Wool
from 2.70 £ /50g
DROPS Kid-Silk
DROPS Kid-Silk
75% Mohair, 25% Silk
from 4.60 £ /25g
Get the yarn to make this pattern from 49.20£.

The yarn cost is calculated from the pattern’s smallest size and the yarn’s cheapest product type. Looking for an even better price? You might find it on the DROPS Deals!

DROPS SS24

Blue Helix

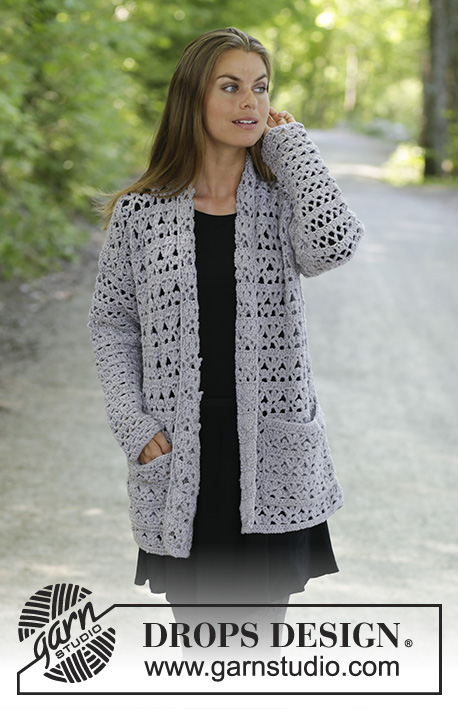
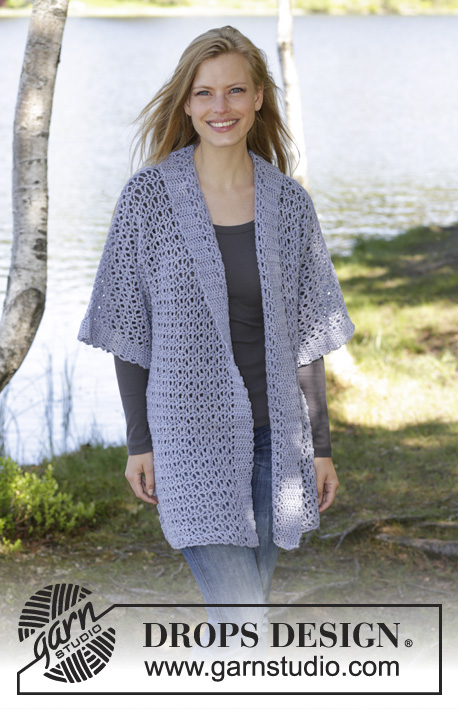
Circle crocheted jacket in 1 strand DROPS Nord + 1 strand DROPS Kid-Silk. Piece is worked with lace pattern. Size: S - XXXL

DROPS 194-36
DROPS design: Pattern z-833
Yarn group A + A or C
----------------------------------------------------------

Size: S/M - L/XL - XXL/ XXXL
Materials:
DROPS NORD from Garnstudio (belongs to yarn group A)
400-450-550 g colour 16, jeans blue
And use:
DROPS KID-SILK from Garnstudio (belongs to yarn group A)
150-175-200 g colour 27, jeans blue

----------------------------------------------------------
ACCESSORIES FOR THE PIECE:

CROCHET TENSION:
14 treble crochets in width and 8.5 rows vertically and 1 strand of each quality = 10 x 10 cm.

CROCHET HOOK:
DROPS CROCHET HOOK size 5 mm
Hook size is only a suggestion! If you have too many stitches on 10 cm switch to larger hook. If you have too few stitches on 10 cm switch to smaller hook.

----------------------------------------------------------

-------------------------------------------------------

Alternative Yarn – See how to change yarns here
Yarn Groups A to F – Use the same pattern and change the yarn here
Yarn usage using an alternative yarn – Use our yarn converter here

-------------------------------------------------------

DROPS Nord
DROPS Nord
45% Alpaca, 30% Polyamide, 25% Wool
from 2.70 £ /50g
DROPS Kid-Silk
DROPS Kid-Silk
75% Mohair, 25% Silk
from 4.60 £ /25g
Get the yarn to make this pattern from 49.20£.

The yarn cost is calculated from the pattern’s smallest size and the yarn’s cheapest product type. Looking for an even better price? You might find it on the DROPS Deals!

Pattern instructions

NOTE: This pattern is written in British English. All measurements in charts are in cm. For conversion from cm to inches - click here. There are different terms for crocheting in British and American English. If this pattern includes crochet, click for "crochet terms" here. For this pattern in American English, please click here.
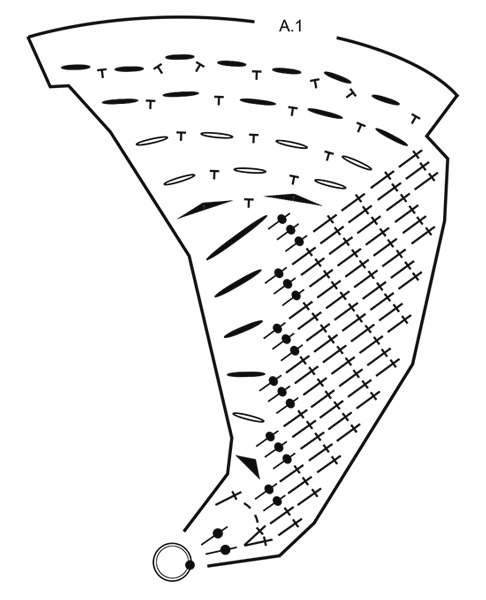
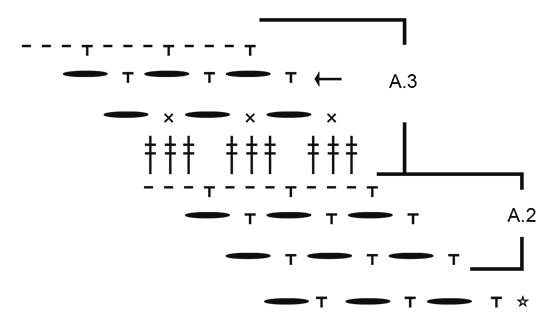
EXPLANATION FOR THE PATTERN:

----------------------------------------------------------

PATTERN:
See diagrams A.1 to A.3.

CROCHET INFO-1:
Replace first double crochet at beginning of round with 1 chain stitch, finish round with 1 slip stitch in 1st chain stitch at beginning of round.
Replace first treble crochet at beginning of round with 3 chain stitches, finish round with 1 slip stitch in 3rd chain stitch at beginning of round.
Replace first double treble crochet at beginning of round with 4 chain stitches, finish round with 1 slip stitch in 4th chain stitch at beginning of round.

CROCHET INFO-2 (transition to next round):
Work slip stitches to first stitch on next round. If there is a chain space on last round work chain stitches until middle of first chain space on round. NOTE: Applies from the end of 3rd round in A.1 and until finished measurements.

INCREASE TIP:
Increase 1 chain space as follows: Work * 1 double crochet + 1 chain space *, work from *-* 2 times in total around same chain space.

DECREASE TIP (applies to sleeves):
NOTE: Pattern displaces the beginning of round, therefore adjust so that the 2 decreases are done mid under sleeve.
Decrease 1 chain space as follows: Work 1 double crochet around chain space, 1 double crochet around next chain space, 6 chain stitches.

----------------------------------------------------------

START THE PIECE HERE:

----------------------------------------------------------

JACKET - SHORT OVERVIEW OF THE PIECE:
Work piece in the round in a circle from mid back of back and outwards. Work armholes on the circle. Work front pieces back and forth and then work a finishing edge around the entire circle. Work sleeves in the round, top down.

CIRCLE:
Work 4 chain stitches on hook size 5 mm with 1 strand Nord + 1 strand Kid-Silk (= 2 strands) and form a ring with 1 slip stitch in first chain stitch made. Then work pattern in the round according to diagram A.1 7 times in total on round - read CROCHET INFO-1 and CROCHET INFO-2. REMEMBER THE CROCHET TENSION! When A.1 has been worked vertically, there are 49 chain spaces on last round. The circle measures approx. 34 cm in diameter.
Cut the yarn, and begin next round in 4th chain space = mid back/neck. Now continue in the different sizes as follows:

SIZE S-M:
= 49 chain spaces.
Work first round in A.2 - AT THE SAME TIME work armholes as follows:
Work around each of the first 7 chain spaces, work 35 loose chain stitches (= armhole), skip 8 chain spaces, work around each of the next 19 chain spaces, work 35 loose chain stitches (= armhole), skip 8 chain spaces, work around each of the last 7 chain spaces.
Repeat 2nd round in A.2 - AT THE SAME TIME increase - read INCREASE TIP, as follows:
Work around each of the first 7 chain spaces - increase 2 chain spaces over these chain spaces, work 10 chain spaces/double crochets around armhole (= 2 increases), work around each of the next 19 chain spaces - increase 7 chain spaces over these chain spaces, work 10 chain spaces/double crochets around armhole (= 2 increases), work around each of the last 7 chain spaces - increase 2 chain spaces over these chain spaces (= 15 increases in total on round) = 64 chain spaces.
Then work 3rd round in A.2 without increasing. The circle measures approx. 45 cm in diameter.

SIZE L/XL - XXL/XXXL:
= 49 chain spaces.
Work first round in A.2 - AT THE SAME TIME increase 15 chain spaces evenly (i.e. increase 1 chain space over approx. every 3rd chain space) - read INCREASE TIP = 64 chain spaces.
Work second round in A.2 - AT THE SAME TIME work armholes as follows:
Work around each of the first 8 chain spaces, work 38-41 loose chain stitches (= armhole), skip 9 chain spaces, work around each of the next 30 chain spaces, work 38-41 loose chain stitches (= armhole), skip 9 chain spaces, work around each of the last 8 chain spaces.
Then work 3rd round in A.2 without increasing. The circle measures approx. 45 cm in diameter.

ALL SIZES:
= 64 chain spaces for all sizes
Then work diagram A.3 in the round, work A.3 5-6-7 times in total vertically - AT THE SAME TIME increase on round marked with arrow in diagram - remember INCREASE TIP, as follows:
Increase 16 chain spaces on every round with increase, i.e.
1ST TIME: Increase 1 chain space around every 4th chain space = 80 chain spaces.
2ND TIME: Increase 1 chain space around every 5th chain space = 96 chain spaces.
3RD TIME: Increase 1 chain space around every 6th chain space = 112 chain spaces.
4TH TIME: Increase 1 chain space around every 7th chain space = 128 chain spaces.
5TH TIME: Increase 1 chain space around every 8th chain space = 144 chain spaces.
Now continue in the different sizes as follows:

SIZE S-M:
Fasten off. The circle measures approx. 100 cm in diameter.

SIZE L/XL:
6TH TIME: Increase 1 chain space around every 9th chain space = 160 chain spaces.
Fasten off. The circle measures approx. 111 cm in diameter.

SIZE XXL/XXXL
6TH TIME: Increase 1 chain space around every 9th chain space = 160 chain spaces.
7TH TIME: Increase 1 chain space around every 10th chain space = 176 chain spaces.
Fasten off. The circle measures approx. 122 cm in diameter.

ALL SIZES:
= 144-160-176 chain spaces.
Continue working only over 40-44-47 chain spaces in each side – i.e. do not work over 32-36-40 chain spaces at the top by neck and 32-36-42 chain spaces at bottom of back. Continue with explanation under left front piece.

LEFT FRONT PIECE:
= 40-44-47 chain spaces. Continue back and forth as follows:
ROW 1: Work slip stitches until middle of the first chain space, 1 double crochet, * work 6 chain stitches, 1 double crochet around next chain space *, repeat from *-* and finish with 1 double crochet around last chain space = 39-43-46 chain spaces.
Repeat 1st row 3-3-7 more times. There are 36-40-39 chain spaces at the edge of front piece. Cut the yarn.

RIGHT FRONT PIECE:
Work same way as on left front piece over 40-44-47 chain spaces in the right side. Fasten off. 

FINISHING EDGE:
Work an edge around the entire circle as follows: Work last round in A.3, i.e. over every chain space work 1 double crochet and 3 chain stitches. Then work 1st round in A.3, i.e. work 3 double treble crochet around every chain space. Fasten off. Piece measures approx. 104-115-126 cm in diameter vertically and approx. 114-126-146 cm in diameter in width.

SLEEVE:
Work sleeve in the round from armhole.
Begin mid under sleeve and work 57-63-66 double treble crochets evenly around armhole (= approx. 3 double treble crochets around every chain space) = 1st round in A.3. Continue in the round on A.3 to and with last round. Then repeat A.3 vertically - AT THE SAME TIME decrease 2 chain spaces mid under sleeve, decrease on round marked with arrow in diagram - read DECREASE TIP. Decrease like this on every round marked with arrow 4-5-5 times in total = 11-11-12 chain spaces. Continue without decrease until sleeve measures approx. 42-44-46 cm - adjust to finish after a round with double treble crochets. Fasten off. Work the other sleeve the same way.

This pattern has been corrected.

Updated online: 23.06.2021
Under SIZE S-M:
... Then work 3rd round in A.2 without increasing. The circle measures approx. 45 cm in diameter.

under SIZE L/XL - XXL/XXXL:
... Then work 3rd round in A.2 without increasing. The circle measures approx. 45 cm in diameter.

Diagram

symbols = 4 chain stitches, form a ring with 1 slip stitch in first chain stitch - see point on circle, round begins and ends here
symbols = 1 chain stitch
symbols = 4 chain stitches
symbols = 5 chain stitches
symbols = 6 chain stitches
symbols = this round has already been worked, begin on next round (= 1st round)!
symbols = double crochet around chain space
symbols = double crochet in stitch
symbols = treble crochet in stitch
symbols = treble crochet around chain space
symbols = double treble crochet around chain space
symbols = increase round
diagram
diagram
diagram
Do you have a question? See a list of frequently asked questions (FAQ)

Knitting tension is what determines the final measurements of your work, and is usually measured per 10 x 10 cm. It is provided like so: number of stitches in width x number of rows in height - eg: 19 stitches x 26 rows = 10 x 10 cm.

The knitting tension is very individual; some people knit/crochet loosely while others work tightly. You adjust the knitting tension with the needle size, which is why the suggested needle size is only meant as a guide! You need to adjust this (up or down) to ensure that YOUR knitting tension matches the knitting tension provided in the pattern. If you work with a different knitting tension than provided you will have a different yarn consumption, and your work will have different measurements than what the pattern suggests.

The knitting tension also determines which yarns can replace each other. As long as you achieve the same knitting tension you can replace one yarn with another.

See DROPS lesson: How to measure your tension/gauge

See DROPS video: How to make a gauge tension swatch

The required amount of yarn is provided in grams, eg: 450 g. To calculate how many balls you’ll need you first need to know how many grams are in 1 ball (25g, 50g or 100g). This information is available if you click on the individual yarn quality on our pages. Divide the amount required with the amount of each ball. For example, if each ball is 50g (the most common amount), the calculation will be as follows: 450 / 50 = 9 balls.

The important thing when changing from one yarn to another is that the knitting/crochet tension remains the same. This is so that the measurements of the finished piece will be the same as on the sketch provided. It is easier to achieve the same knitting tension using yarns from the same yarn group. It is also possible to work with multiple strands of a thinner yarn to achieve the knitting tension of a thicker one. Please try our yarn converter. We recommend you to always work a test swatch.

Please NOTE: when changing yarn the garment might have a different look and feel to the garment in the photo, due to individual properties and qualities of each yarn.

See DROPS lesson: Can I use a different yarn than the one mentioned in the pattern?

All our yarns are categorised into yarn groups (from A to F) according to thickness and knitting tension – group A contains the thinnest yarns and group F the thickest. This makes it easier for you to find alternative yarns to our patterns, should you wish to switch yarn. All yarns within the same group have a similar knitting tension and can easily replace each other. However, different yarn qualities have different structures and properties which will give the finished work a unique look and feel.

Click here for an overview of the yarns in each yarn group

At the top of all our patterns you’ll find a link to our yarn calculator, which is a helpful tool should you wish to use a different yarn than suggested. By filling in the yarn quality you wish to replace, the amount (in your size) and number of strands, the calculator will present good alternative yarns with the same knitting tension. Additionally it will tell you how much you’ll require in the new qualities and whether you’ll need to work with multiple strands. Most skeins are 50g (some are 25g or 100g).

If the pattern is worked with multiple colours, every colour will have to be calculated separately. Similarly, if the pattern is worked with several strands of different yarns (for example 1 strand Alpaca and 1 strand Kid-Silk) you will have to find alternatives for each, individually.

Click here to see our yarn calculator

Since different yarns have different qualities and textures we have chosen to keep the original yarn in our patterns. However, you can easily find options among our available qualities by using our yarn calculator, or simply pick a yarn from the same yarn group.

It is possible that some retailers still have discontinued yarns in stock, or that someone has a few skeins at home that they would like to find patterns for.

The yarn calculator will provide both alternative yarn as well as required amount in the new quality.

If you think it's hard to decide what size to make, it can be a good idea to measure a garment you own already and like the size of. Then you can pick the size by comparing those measures with the ones available in the pattern's size chart.

You'll find the size chart at the bottom of the pattern.

See DROPS lesson: How to read size chart

The needle size provided in the pattern serves only as a guide, the important thing is to follow the knitting tension. And since knitting tension is very individual, you will have to adjust the needle size to ensure that YOUR tension is the same as in the pattern – maybe you’ll have to adjust 1, or even 2 needle sizes, up or down to achieve the correct tension. For this, we recommend that you work test swatches.

Should you work with a different knitting tension than the one provided, the measurements of the finished garment might deviate from the measurement sketch.

See DROPS lesson: How to measure your tension/gauge

See DROPS video: How to make a tension/gauge swatch

Working a garment top-down provides more flexibility and room for personal adjustment. For example it is easier to try the garment on while working, as well as making adjustments to length of yoke and shoulder caps.

The instructions are carefully explaining every step, in the correct order. Diagrams are adjusted to the knitting direction and are worked as usual.

The diagram depicts all rows/rounds, and every stitch seen from the right side. It is read from bottom to top, from right to left. 1 square = 1 stitch.

When working back and forth, every other row is worked from the right side and every other row is worked from the wrong side. When working from the wrong side, the diagram will have to be worked reversed: from left to right, knit stitches are purled, purl stitches are knit etc.

When working in the round every round is worked from the right side and the diagram are worked from right to left on all rounds.

See DROPS lesson: How to read knitting diagrams

The diagram depicts all rows/rounds, and every stitch seen from the right side. It is worked from bottom to top, from right to left.

When working back and forth every other row is worked from the right side: from right to left and every other row is worked from the wrong side: from left to right.

When working in the round, every row in the diagram are worked from the right side, from right to left.

When working a circular diagram you start in the middle and work your way outwards, counter clockwise, row by row.

The rows usually start with a given number of chain stitches (equivalent to the height of the following stitch), this will either be depicted in the diagram or explained in the pattern.

See DROPS lesson: How to read crochet diagrams

Instructions for working several diagrams after each other on the same row/round, will often be written like so: “work A.1, A.2, A.3 a total of 0-0-2-3-4 times". This means you work A.1 once, then A.2 is worked once, and A.3 is repeated (in width) the number of times provided for your size – in this case like so: S = 0 times, M = 0 times, L=2 times, XL= 3 times and XXL = 4 times.

The diagrams are worked as usual: begin with the first row in A.1, then work the first row in A.2 etc.

See DROPS lesson: How to read knitting diagrams

See DROPS lesson: How to read crochet diagrams

The total width of the garment (from wrist-to-wrist) will be larger in the larger sizes, despite the actual sleeves being shorter. The larger sizes have longer sleeve caps and wider shoulders, so there will be a good fit in all sizes.

The measurement sketch/schematic drawing provides information regarding the full length of the garment. If it’s a jumper or a jacket the length is measured from the highest point on the shoulder closest to the neckline, and straight down to the bottom of the garment. It is NOT measured from the tip of shoulder. Similarly, the length of yoke is measured from the highest point on the shoulder and down to where yoke is split into body and sleeves.

On a jacket measures are never taken along bands, unless specifically stated. Always measure inside band stitches when measuring the length.

See DROPS lesson: How to read a schematic drawing

Diagrams are often repeated on the round or in height. 1 repeat is the diagram the way it appears in the pattern. If it says to work 5 repeats of A.1 in the round, then you work A.1 a total of 5 times after/next to each other in the round. If it says to work 2 repeats of A.1 vertically/in height you work the entire diagram once, then begin again at the start and work the entire diagram one more time.

Chain stitches are slightly narrower than other stitches and to avoid working the cast-on edge too tight, we simply chain more stitches to begin with. The stitch count will be adjusted on the following row to fit the pattern and measurement sketch.

The rib edge is more elastic and will contract slightly compared to, for example, stocking stitch. By increasing before the rib edge, you avoid a visible difference in width between the rib edge and the rest of the body.

It’s very easy to cast off too tightly, and by making yarn overs while casting off (and simultaneously casting these off) you avoid a too tight cast off edge.

See DROPS video: How to bind off with yarn overs (yo)

To achieve an even increase (or decrease) you can increase on, for example: every 3rd and 4th row alternately, like so: work 2 rows and increase on the 3rd row, work 3 rows and increase on the 4th. Repeat this until the increase is complete.

See DROPS lesson: Increase or decrease 1 st on every 3rd and 4th row alternately

Should you prefer to work in the round instead of back and forth, you may of course adjust the pattern. You’ll need to add steeks mid-front (usually 5 stitches), and follow the instructions. When you would normally turn and work from the wrong side, simply work across the steek and continue in the round. At the end you’ll cut the piece open, pick up stitches to work bands, and cover the cut edges.

See DROPS video: How to knit steeks and cut open

Should you prefer to work back and forth instead of in the round, you may of course adjust the pattern so you work the pieces separately and then assemble them at the end. Divide the stitches for the body in 2, add 1 edge stitch in each side (for sewing) and work the front and back pieces separately.

See DROPS lesson: Can I adapt a pattern for circular needles into straight needles?

Pattern repeats can vary slightly in the different sizes, in order to get the correct proportions. If you’re not working the exact same size as the garment in the photo, yours might deviate slightly. This has been carefully developed and adjusted so that the complete impression of the garment is the same in all sizes.

Make sure to follow instructions and diagrams for your size!

If you have found a pattern you like which is available in women’s size it’s not very difficult to convert it to men’s size. The biggest difference will be the length of sleeves and body. Start working on the women size that you think would fit across the chest. The additional length will be worked right before you cast off for the armhole/sleeve cap. If the pattern is worked top-down you can add the length right after the armhole or before the first decrease on sleeve.

Regarding additional yarn amount, this will depend on how much length you add, but it is better with a skein too many than too few.

All yarns will have excess fibres (from production) that might come off as lint or shedding. Brushed yarns (ie hairier yarns) have more of these loose, excess fibres, causing more shedding.

Shedding also depends on what is worn under or over the garment, and whether this pulls at the yarn fibres. It’s therefore not possible to guarantee that there will be no shedding

Below are some tips on how to get the best result when working with hairier yarns:

1. When the garment is finished (before you wash it) shake it vigorously so the looser hairs come off. NOTE: do NOT use a lint roller, brush or any method that pulls at the yarn.

2. Place the garment in a plastic bag and put it in your freezer - the temperature will cause the fibres to become less attached to each other, and excess fibres will come off easier.

3. Leave in the freezer for a few hours before taking it out and shaking it again.

4. Wash the garment according to the instructions on the yarn label.

Pilling is a natural process that happens to even the most exclusive of fibers. It's a natural sign of wear and tear that is hard to avoid, and that is most visible in high friction areas of your garment like a sweater's arms and cuffs.

You can make your garment look as new by removing the pilling, using a fabric comb or a pill/lint remover.

Still can't find the answer you need? Then scroll down and leave your question so one of our experts can try to help you. This will be done normally within 5 to 10 working days.
In the meantime, you can read the questions and answers that others have left to this pattern or join the DROPS Workshop on Facebook to get help from fellow knitters/crocheters!

You might also like...

Post a comment to pattern DROPS 194-36

We would love to hear what you have to say about this pattern!

If you want to leave a question, please make sure you select the correct category in the form below, to speed up the answering process. Required fields are marked *.

Comments / Questions (79)

country flag Rosa wrote:

Hej! Jag har virkat många drops mönster men har aldrig haft så svårt att förstå. Jag bhar oxå läst alla frågor och kommentarer,men...... När jag virkar a2; varv3, alltså 1a varvet där maskorna för ärmhålet finns, ska jag virka om den stora luftmaskbågen, eller?

06.07.2021 - 15:56

country flag Solei wrote:

Hej, Jag har kommit till raden med ärmhål och kan inte förstå vad som menas med "virka om var och en av de första 8 luftmaskbågarna". Virka om, vad gör jag då? Virka dubbelt i samma maskor?

06.07.2021 - 15:30

DROPS Design answered:

Hej Solei. Vi menar att du ska virka om ( inte i ) luftmaskbågen, se denna video. Mvh DROPS Design

08.07.2021 - 08:28

country flag KATY wrote:

Bonjour, J'aimerai faire ce modèle, mais avec la laine DROPS Belle, pour avoir un effet relief Je fais une taille 42, combien de pelotes dois prévoir svp ? merci d'avance pour votre réponse cordialemnet

27.03.2021 - 11:16

DROPS Design answered:

Bonjour Katy, DROPS Belle est du groupe de fils B, il vaudrait mieux prendre la laine du groupe C. Essayez notre convertisseur qui se trouve devant les explications. Comment choisir une taille appropriee vous trouverez ICI. Bon crochet!

30.03.2021 - 13:18

country flag Karen wrote:

Have completed the round and am beginning the left front piece. On the instructions it states slip stitch to middle of first chain stitch. Where do you begin the slip stitch? At the middle of neck/back or?

13.03.2021 - 06:42

DROPS Design answered:

Dear Karen, fold your circle double to have armholes matching together, then count the chain spaces you will have to leave unworked (for neck/bottom) and the one you will have to work over for each front piece. Join the the yarn in the middle of the first chain space or in the sc before that chain-space and crochet 1 sl st in each of the chains to reach the middle of this first ch-space. Happy crocheting!

15.03.2021 - 08:22

country flag Mireille Fourdrinier wrote:

Bonjour Je coince au niveau des manches mes emmanchures sont à l'envers du travail. Je ne sais pas commencer les manches pourriez vous m'aider ?

02.03.2021 - 14:54

DROPS Design answered:

Bonjour Mme Fourdrinier, les manches vont se crocheter en commençant sur l'endroit du gilet, en bas de l'emmanchure, autrement dit, pour la manche gauche, crochetez d'abord dans les mailles en l'air crochetées (devant) puis dans les mailles sautées (côté dos du cercle), et pour la manche droite, commencez par crocheter les mailles sautées pour l'emmanchure (côté dos) puis terminez par crocheter dans les mailles en l'air (côté devant). Bonne continuation!

02.03.2021 - 16:06

country flag Karen F Jones wrote:

. Wondering how to proceed from the first round of A3, then repeat 5 times, and how to do a repeat.to make it long. Iove this pattern and have finally gotten to the final section, the sleeves. I dont.want to loose it.now. hope this.makes.more.sense.

15.02.2021 - 15:21

DROPS Design answered:

Dear Mrs Jones, the first round of A.3 is worked around armhole, ie crochet 3 treble crochets (US-terms) around each ch-space of the armhole (= 1st row in A.3), work one time the diagram in height and then from next repeat in height decrease on the row with an arrow as explained under DECREASE TIP (applies to sleeve). After 11-12 ch-spaces in A.3 remain in the round, continue with A.3 without decreasing anymore to finished measurements - you can try on the jacket to adjust length. Happy crocheting!

16.02.2021 - 08:43

country flag Karen Jones wrote:

I am starting the second attempt on the sleeves with the L/XL pattern. Repeating as I'm reading leaves the sleeves at mid arm. A little help please?

15.02.2021 - 06:22

DROPS Design answered:

Dear Mrs Jones, I'm sorry I don't understand what you mean there, could you please give us more details? Until where exactly have you now worked on the pattern (armholes or sleeve, which height/row, ..) thank you!

15.02.2021 - 09:27

country flag Annemarie Kappen wrote:

Het lukt mij niet na de cirkel, om de aantal hoeveelheid kloppende meerderingen te maken ?

11.01.2021 - 16:04

country flag Lyndy wrote:

Hi, with reference to pattern z833 Blue Helix, can you tell me if the pattern has been translated at all into a normal text written type of pattern? Following diagram of jacket on page 7 (I cannot see that this diagram forms a circle) does this diagram indicate that jacket is made up in several pieces and then comes together to make the circle? I have spent nearly £100 on yarn & still deciphering pattern before comencing. It is almost impossible to unpick mohair without waste

30.10.2020 - 14:48

DROPS Design answered:

Dear Lyndy, this pattern has only diagrams - you will find how to read crochet diagrams here and especially here how to read a fraction of circle here as A.1 shows - A.1 will be worked a total of 7 rounds in the round, ie on round 1 you work 2 treble crochets x 7 repeats = 14 trebles etc.. Hope this will help. Happy crocheting!

30.10.2020 - 15:25

country flag Conny wrote:

Hallo,kan de bleu helix ook gehaakt worden met acryl wol ?Groetjes

24.09.2020 - 17:55

DROPS Design answered:

Dag Conny,

Ja, je kunt dit patroon natuurlijk met ander garen maken. Het gaat erom dat je eenzelfde stekenverhouding hebt, zodat je uitkomt met de maten.

18.11.2020 - 13:40