
Popular categories
Looking for a yarn?


|
||||||||||||||||
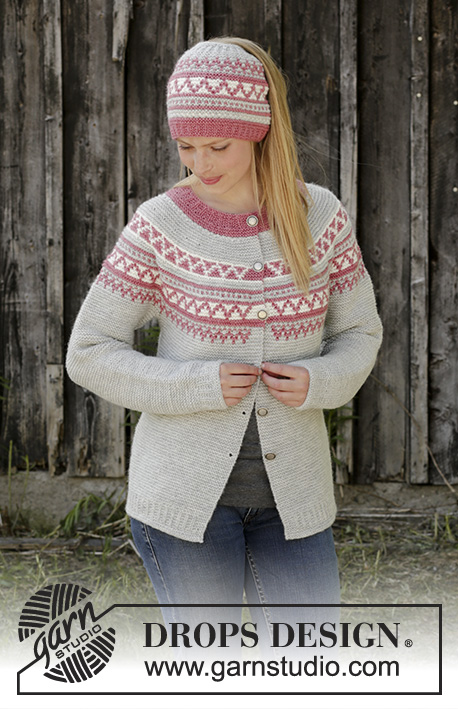
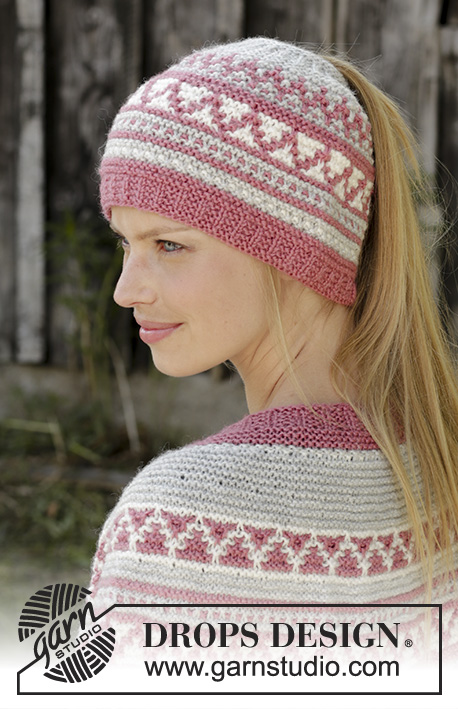
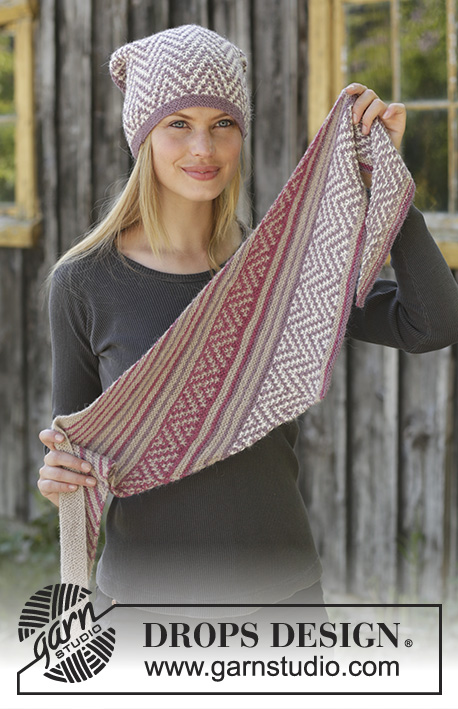
Hint of Heather Set |
||||||||||||||||
 |
 |
|||||||||||||||
Knitted neck warmer in DROPS Nord. Piece is knitted top down in garter stitch and mosaic pattern. Knitted mittens in DROPS Nord. Piece is knitted in garter stitch and mosaic pattern.
DROPS 197-17 |
||||||||||||||||
|
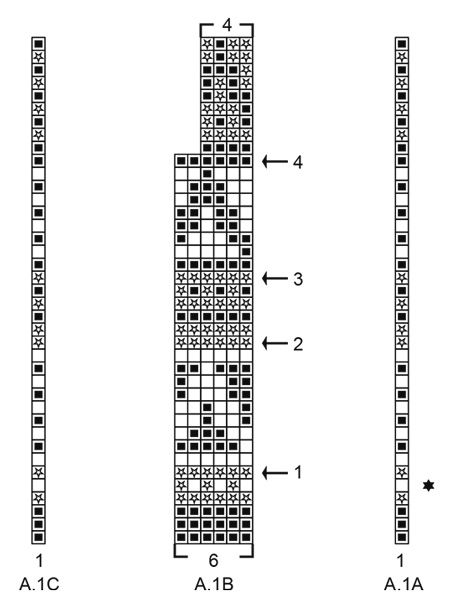
EXPLANATION FOR THE PATTERN: ---------------------------------------------------------- GARTER STITCH (back and forth): 1 ridge = knit 2 rows. GARTER STITCH (worked in the round): 1 ridge = 2 rounds. Knit 1 round and purl 1 round. INCREASE/DECREASE TIP (evenly spaced): All increases are done from the right side. To calculate how to increase/decrease evenly, use the total number of stitches on row (e.g. 122 stitches), minus edge stitches (e.g. 2 stitches) and divide the remaining stitches by number of increases to be done (e.g. 12) = 10. In this example increase by making 1 yarn over after every 10th stitch. On next row knit yarn overs twisted to avoid holes. If decreasing knit every 9th and 10th stitch together. INCREASE TIP-2 (applies to thumb gusset): Increase for thumb on each side of stitch with marker as follows: Begin before stitch with marker, make 1 yarn over, knit 1 (= stitch with marker), make 1 yarn over (= 2 stitches increased). On next row knit yarn overs twisted to avoid holes. Continue increase like this but on next increase make 1 yarn over on each side of the increased stitches from previous increase, i.e. there are 2 stitches more between yarn overs on every increase. MOSAIC PATTERN: See diagram A.1 (neck warmer) and A.2 (mittens) and read explanation for technique below. Every row in diagrams equals 2 rows. I.e. from right side work diagram from right to left and from wrong side work same row from left to right. On all rows from right side hold yarn behind piece (i.e. on wrong side of piece) when slipping a stitch. On all rows from wrong side hold yarn in front of piece (i.e. towards you and still on wrong side of piece) when slipping a stitch. Make sure that the yarn is not too tight on wrong side of piece. To maintain control over pattern insert a marker between every pattern repetition with A.1B/A.2B. A.1A/A.2A = start stitch from right side and end stitch from wrong side (stitch should be worked). A.1B/A.2B = 1 pattern repetition. A.1C/A.2C = end stitch from right side and start stitch from wrong side (stitch should be worked). On the row in one colour in diagrams work 1 ridge back and forth over all stitches without slipping any stitches. On first pattern row in A.1 and A.2 that has an empty square in A.1A/A.2A and A.1C/A.2C (colour A – row marked with a star in A.1A/A.2A), knit all stitches with colour A and slip all stitches with colour C. On the other pattern rows with an empty square or a square with star in A.1A/A.2A and A.1C/A.2C (colour A or C), knit all stitches with colour A and slip all stitches with colour B. On every pattern row that has a black square in A.1A/A.2A and A.1C/A.2C (colour B), knit all stitches with colour B and slip all stitches with colour A or C. ---------------------------------------------------------- START THE PIECE HERE: ---------------------------------------------------------- NECK WARMER - SHORT OVERVIEW OF THE PIECE: Worked back and forth on circular needle, top down and sewn together when finished. First work an edge at the top and then work mosaic pattern. It is important to follow the diagrams. Work the entire colour pattern in garter stitch but do not work pattern in regular garter stitch stitches. The colour pattern is formed by slipping the stitches. Read explanation for mosaic pattern before working! NECK WARMER: Cast on 128-140 stitches on circular needle size 2.5 mm with old pink. Work 1 ridge in GARTER STITCH - read explanation above. Then work as follows: ROW 1 (= right side): Knit all stitches. ROW 2 (= wrong side): Knit 1, * purl 1, knit 2 *, work from *-* until 2 stitches remain on row, purl 1 and finish with knit 1. Repeat 1st and 2nd row until piece measures 3 cm from cast-on edge. Switch to circular needle size 3.5 mm and work MOSAIC PATTERN - see explanation above. I.e. work A.1A over first stitch, repeat A.1B until 1 stitch remains on needle (= 21-23 repetitions of 6 stitches), finish with A.1C over last stitch. Continue pattern like this but remember that 1 row in diagram = 2 rows. REMEMBER THE KNITTING TENSION! AT THE SAME TIME on every row marked with arrow in A.1B increase evenly as explained below - read INCREASE/DECREASE TIP. On row marked with arrow-1 increase 18-24 stitches evenly = 146-164 stitches (there is now room for 24-27 repetitions of A.1B of 6 stitches). On row with arrow-2 increase 18-18 stitches evenly = 164-182 stitches. On row with arrow-3 increase 18-18 stitches evenly = 182-200 stitches. On row with arrow-4 increase 12-14 stitches evenly = 194-214 stitches. When A.1 has been worked, work in garter stitch back and forth over all stitches with pearl grey until piece measures 26-28 cm. AT THE SAME TIME on last row from right side increase 18-19 stitches evenly = 212-233 stitches. Switch to circular needle size 2.5 mm and work as follows: ROW 1 (= right side): Knit all stitches. ROW 2 (= wrong side): Knit 1, * purl 1, knit 2 *, work from *-* until 1 stitch remains on needle and finish with knit 1. Repeat 1st and 2nd row until edge measures 3 cm. Work 2 ridges back and forth over all stitches. Switch back to circular needle size 4.5 mm and loosely cast off by knitting from right side. Neck warmer measures approx. 30-32 cm from top and down. ASSEMBLY: Sew neck edge together in the side inside 1 edge stitch in garter stitch in each side. ---------------------------------------------------------- MITTENS - SHORT OVERVIEW OF THE PIECE: Mittens are worked back and forth on circular needle in parts, bottom up and sewn together in the side when finished. First work an edge at the bottom. Then work mosaic pattern before continuing with garter stitch in pearl grey. It is important to follow the diagrams. Work the entire colour pattern in garter stitch but do not work pattern in regular garter stitch stitches. The colour pattern is formed by slipping the stitches. Read the explanation for mosaic pattern! Work thumbs in the round on double pointed needles. RIGHT MITTEN: Cast on 48-51 stitches on circular needle size 2.5 mm with old pink. Work 1 ridge in GARTER STITCH - read explanation above. Then work as follows: ROW 1 (= right side): Knit all stitches. ROW 2 (= wrong side): Knit 1, * purl 1, knit 2 *, work from *-* until 2 stitches remain on row, purl 1 and finish with knit 1. Repeat 1st and 2nd row until piece measures 3 cm in both sizes. Switch to circular needle size 3 mm and work 1 ridge with old pink while decreasing 2-1 stitch evenly on first row = 46-50 stitches on needle. Then work MOSAIC PATTERN - read explanation above. I.e. work A.2A over first stitch, repeat A.2B until 1 stitch remains on needle (= 11 repetitions of A.2B of 4 stitches), finish with A.2C over last stitch. Continue pattern like this but remember that 1 row in diagram = 2 rows. REMEMBER THE KNITTING TENSION! When A.2 has been worked, work in garter stitch back and forth over all stitches with pearl grey – AT THE SAME TIME on first row from right side after A.2 decrease 2-4 stitches evenly – read INCREASE/DECREASE TIP = 44-46 stitches. When piece measures 9-10 cm, insert 1 marker in the 23rd-24th stitch on needle (from right side). On next row from right side increase for thumb gusset on each side of stitch with marker - read INCREASE TIP (= 2 stitches increased). Increase like this every 4th row (i.e. every other row from right side) 7-8 times in total = 58-62 stitches. Work until piece measures 15½-16½ cm. Now slip the 15-17 thumb stitches on 1 stitch holder. On next row, cast on 1 new stitch behind thumb stitches = 44-46 stitches on needle. Work until piece measures 23-24 cm. On next row from right side decrease 4 stitches evenly = 40-42 stitches. Knit 3 rows. On next row decrease 4 stitches evenly = 36-38 stitches. Repeat decrease with 4 stitches on every other row (i.e. every row from right side) 7 times in total = 12-14 stitches remain on needle. Knit 1 row. On next row knit all stitches together 2 by 2 = 6-7 stitches remain on needle. Cut the yarn. Pull yarn through the remaining stitches, tighten and fasten. Mitten measures approx. 26-27 cm from top and down. THUMB: Distribute the 15-17 stitches from stitch holder on double pointed needles size 3 mm and pick in addition up 2 stitches in the edge behind the thumb stitches = 17-19 stitches. Work in GARTER STITCH in the round on double pointed needles - read explanation above. When thumb measures 5½-6 cm, knit all stitches together 2 by 2 = 9-10 stitches. Work 1 round without decrease. On next round knit all stitches together 2 by 2 = 5-5 stitches remain. Cut the yarn. Pull yarn through the remaining stitches, tighten and fasten. Thumb measures approx. 5½-6 cm from top and down. ASSEMBLY: Sew mitten together in the side - sew edge to edge in outer loop of edge stitch so that the seam is flat. LEFT MITTEN: Cast on 48-51 stitches on circular needle size 2.5 mm with old pink. Work 1 ridge in GARTER STITCH - read explanation above. Then work as follows: ROW 1 (= right side): Knit all stitches. ROW 2 (= wrong side): Knit 1, * purl 1, knit 2 *, work from *-* until 2 stitches remain on row, purl 1 and finish with knit 1. Repeat 1st and 2nd row until piece measures 3 cm in both sizes. Switch to circular needle size 3 mm and work 1 ridge with old pink while decreasing 2-1 stitch evenly on first row = 46-50 stitches on needle. Then work MOSAIC PATTERN - read explanation above. I.e. work A.2A over first stitch, repeat A.2B until 1 stitch remains on needle (= 11 repetitions of A.2B of 4 stitches), finish with A.2C over last stitch. Continue pattern like this but remember that 1 row in diagram = 2 rows. REMEMBER THE KNITTING TENSION! When A.2 have been worked, work in garter stitch back and forth over all stitches with pearl grey – AT THE SAME TIME on first row from right side after A.2 decrease 2-4 stitches evenly – read INCREASE/DECREASE TIP = 44-46 stitches. When piece measures 9-10 cm, insert 1 marker in the 21st-22nd stitch on needle (from right side). On next row from right side increase for thumb gusset on each side of stitch with marker - read INCREASE TIP (= 2 stitches increased). Increase like this every 4th row (i.e. every other row from right side) 7-8 times in total = 58-62 stitches. Work until piece measures 15½-16½ cm. Now slip the 15-17 thumb stitches on 1 stitch holder. On next round, cast on 1 new stitch behind thumb stitches = 44-46 stitches on needle. Work until piece measures 23-24 cm. On next row from right side decrease 4 stitches evenly = 40-42 stitches. Knit 3 rows. On next row decrease 4 stitches evenly = 36-38 stitches. Repeat decrease with 4 stitches on every other row (i.e. every row from right side) 7 times in total = 12-14 stitches remain on needle. Knit 1 row. On next row knit all stitches together 2 by 2 = 6-7 stitches remain on needle. Cut the yarn. Pull yarn through the remaining stitches, tighten and fasten. Mitten measures approx. 26-27 cm from top and down. Work thumb the same way as on right mitten. |
||||||||||||||||
Diagram explanations |
||||||||||||||||
|
||||||||||||||||
|
||||||||||||||||

|
||||||||||||||||
|
Have you made this or any other of our designs? Tag your pictures in social media with #dropsdesign so we can see them! Do you need help with this pattern?You'll find tutorial videos, a Comments/Questions area and more by visiting the pattern on garnstudio.com. © 1982-2024 DROPS Design A/S. We reserve all rights. This document, including all its sub-sections, has copyrights. Read more about what you can do with our patterns at the bottom of each pattern on our site. |
||||||||||||||||


With over 40 years in knitting and crochet design, DROPS Design offers one of the most extensive collections of free patterns on the internet - translated to 17 languages. As of today we count 304 catalogues and 11422 patterns - 11422 of which are translated into English (UK/cm).
We work hard to bring you the best knitting and crochet have to offer, inspiration and advice as well as great quality yarns at incredible prices! Would you like to use our patterns for other than personal use? You can read what you are allowed to do in the Copyright text at the bottom of all our patterns. Happy crafting!
Comments / Questions (7)
When knitting the yarn over on the wrong side, it there supposed to be a hole after knitting it? Or am I supposed to knit like it is a twisted yarn over? Thanks very much.
07.02.2021 - 02:34DROPS Design answered:
Dear Mrs Meade, yarn overs are worked knitted twisted to avoid holes. Happy knitting!
08.02.2021 - 11:35When working the mosaic pattern, is the wrong side a knit row following the mosaic pattern?
30.11.2020 - 13:24DROPS Design answered:
Dear Mrs Meade, from WS work all rows in garter stitch as shown in the diagram (= read now diagram from the left towards the right) holding yarn in front of piece (i.e. towards you and still on wrong side of piece) when slipping a stitch. Make sure that the yarn is not too tight on wrong side of piece. See also that video. Happy knitting!
30.11.2020 - 16:11Bonjour POUR LE PATRON DROPS design: Modèle n°-019 \r\nHINT OF HEATHER SET\r\nJe voudrai avoir des explications supplémentaires entre les lignes 9, 10, 11 pour le changement de couleur du diagramme A1B
17.01.2019 - 21:21DROPS Design answered:
Bonjour Mme Gingras, les rangs 9 et 10 se tricotent en coloris A, seules les mailles indiquées en coloris A sont tricotées, les autres sont glissées. Au rang 10, vous tricotez en coloris B et glissez les mailles représentées en coloris A dans le diagramme. Bon tricot!
18.01.2019 - 08:54Bonjour POUR LE PATRON DROPS design: Modèle n°-019 \r\nHINT OF HEATHER SET\r\nJe voudrai avoir des explications supplémentaires entre les lignes 9, 10, 11 pour le changement de couleur du diagramme A1B
17.01.2019 - 21:15Brauche dringend die Anleitung zu diesem Modell!!!Danke
10.08.2018 - 15:06Würde gern dieses Modell Stricken, kann aber die Anleitung nicht aufmachen! Was soll ich tun? Danke
23.07.2018 - 17:45Würde gern dieses Modell Stricken, kann aber die Anleitung nicht aufmachen! Hab keinen passenden Namen gefunden! Danke
23.07.2018 - 17:20