DROPS Kid-Silk uni colour 75% Mohair, 25% Silk |
9.40 CAD /25g |
Order |
Clicking the ORDER button will redirect you to Wool Warehouse Direct Ltd website
The yarn cost is calculated from the pattern’s smallest size and the yarn’s cheapest product type. Looking for an even better price? You might find it on the DROPS Deals!
-------------------------------------------------------
Alternative Yarn – See how to change yarns here
Yarn Groups A to F – Use the same pattern and change the yarn here
Yarn usage using an alternative yarn – Use our yarn converter here
-------------------------------------------------------
DROPS Kid-Silk uni colour 75% Mohair, 25% Silk 9.40 CAD /25g Order |
Clicking the ORDER button will redirect you to Wool Warehouse Direct Ltd website
The yarn cost is calculated from the pattern’s smallest size and the yarn’s cheapest product type. Looking for an even better price? You might find it on the DROPS Deals!
= knit | |
= purl | |
= between 2 stitches make 1 yarn over; the yarn over is worked twisted on the next round to avoid a hole | |
= place 4 stitches on cable needle behind piece, knit 4, knit 4 from cable needle | |
= place 4 stitches on cable needle in front of piece, knit 4, knit 4 from cable needle | |
= knitting direction |
Each of our patterns has specific tutorial videos to help you.
These step-by-step tutorials might also help you:
Why is the knitting/crochet tension so important?
Knitting tension is what determines the final measurements of your work, and is usually measured per 10 x 10 cm. It is provided like so: number of stitches in width x number of rows in height - eg: 19 stitches x 26 rows = 10 x 10 cm.
The knitting tension is very individual; some people knit/crochet loosely while others work tightly. You adjust the knitting tension with the needle size, which is why the suggested needle size only serve as a guide! You need to adjust this (up or down) to ensure that YOUR knitting tension matches the knitting tension provided in the pattern. If you work with a different knitting tension than provided you will have a different yarn consumption, and your work will have different measurements than what the pattern suggests.
The knitting tension also determines which yarns can replace each other. As long as you achieve the same knitting tension you can replace one yarn with another.
See DROPS lesson: How to measure your tension/gauge
See DROPS video: How to make a gauge tension swatch
How do I know how many balls of yarn I need?
The required amount of yarn is provided in grams, eg: 450 g. To calculate how many balls you’ll need you first need to know how many grams are in 1 ball (25g, 50g or 100g). This information is available if you click on the individual yarn quality on our pages. Divide the amount required with the amount of each ball. For example, if each ball is 50g (the most common amount), the calculation will be as follows: 450 / 50 = 9 balls.
Can I use a different yarn than what the pattern suggests?
The important thing when changing from one yarn to another is that the knitting/crochet tension remains the same. This is so that the measurements of the finished piece will be the same as on the sketch provided. It is easier to achieve the same knitting tension using yarns from the same yarn group. It is also possible to work with multiple strands of a thinner yarn to achieve the knitting tension of a thicker one. Please try our yarn converter. We recommend you to always work a test swatch.
Please NOTE: when changing yarn the garment might have a different look and feel to the garment in the photo, due to individual properties and qualities of each yarn.
See DROPS lesson: Can I use a different yarn than the one mentioned in the pattern?
What are the yarn groups?
All our yarns are categorised into yarn groups (from A to F) according to thickness and knitting tension – group A contains the thinnest yarns and group F the thickest. This makes it easier for you to find alternative yarns to our patterns, should you wish to switch yarn. All yarns within the same group have a similar knitting tension and can easily replace each other. However, different yarn qualities have different structures and properties which will give the finished work a unique look and feel.
How do I use the yarn converter?
At the top of all our patterns you’ll find a link to our yarn converter, which is a helpful tool should you wish to use a different yarn than suggested. By filling in the yarn quality you wish to replace, the amount (in your size) and number of strands, the converter will present good alternative yarns with the same knitting tension. Additionally it will tell you how much you’ll require in the new qualities and whether you’ll need to work with multiple strands. Most skeins are 50g (some are 25g or 100g).
If the pattern is worked with multiple colours, every colour will have to be converted separately. Similarly, if the pattern is worked with several strands of different yarns (for example 1 strand Alpaca and 1 strand Kid-Silk) you will have to find alternatives for each, individually.
Why do you show discontinued yarns in the patterns?
Since different yarns have different qualities and textures we have chosen to keep the original yarn in our patterns. However, you can easily find options among our available qualities by using our yarn converter, or simply pick a yarn from the same yarn group.
It is possible that some retailers still have discontinued yarns in stock, or that someone has a few skeins at home that they would like to find patterns for.
The yarn converter will provide both alternative yarn as well as required amount in the new quality.
What size should I knit?
If you think it's hard to decide what size to make, it can be a good idea to measure a garment you own already and like the size of. Then you can pick the size by comparing those measures with the ones available in the pattern's size chart.
You'll find the size chart at the bottom of the pattern.
See DROPS lesson: How to read size chart
Why do I get the wrong knitting tension with the suggested needle size?
The needle size provided in the pattern serves only as a guide, the important thing is to follow the knitting tension. And since knitting tension is very individual, you will have to adjust the needle size to ensure that YOUR tension is the same as in the pattern – maybe you’ll have to adjust 1, or even 2 needle sizes, up or down to achieve the correct tension. For this, we recommend that you work test swatches.
Should you work with a different knitting tension than the one provided, the measurements of the finished garment might deviate from the measurement sketch.
See DROPS lesson: How to measure your tension/gauge
See DROPS video: How to make a gauge tension swatch
Why is the pattern worked top-down?
Working a garment top-down provides more flexibility and room for personal adjustment. For example it is easier to try the garment on while working, as well as making adjustments to length of yoke and shoulder caps.
The instructions are carefully explaining every step, in the correct order. Diagrams are adjusted to the knitting direction and are worked as usual.
How do I work according to a knitting diagram?
The diagram depicts all rows/rounds, and every stitch seen from the right side. It is read from bottom to top, from right to left. 1 square = 1 stitch.
When working back and forth, every other row is worked from the right side and every other row is worked from the wrong side. When working from the wrong side, the diagram will have to be worked reversed: from left to right, knit stitches are purled, purl stitches are knit etc.
When working in the round every round is worked from the right side and the diagram are worked from right to left on all rounds.
See DROPS lesson: How to read knitting diagrams
How do I work according to a crochet diagram?
The diagram depicts all rows/rounds, and every stitch seen from the right side. It is worked from bottom to top, from right to left.
When working back and forth every other row is worked from the right side: from right to left and every other row is worked from the wrong side: from left to right.
When working in the round, every row in the diagram are worked from the right side, from right to left.
When working a circular diagram you start in the middle and work your way outwards, counter clockwise, row by row.
The rows usually start with a given number of chain stitches (equivalent to the height of the following stitch), this will either be depicted in the diagram or explained in the pattern.
See DROPS lesson: How to read crochet diagrams
How do I work several diagrams simultaneously on the same row/round?
Instructions for working several diagrams after each other on the same row/round, will often be written like so: “work A.1, A.2, A.3 a total of 0-0-2-3-4 times". This means you work A.1 once, then A.2 is worked once, and A.3 is repeated (in width) the number of times provided for your size – in this case like so: S = 0 times, M = 0 times, L=2 times, XL= 3 times and XXL = 4 times.
The diagrams are worked as usual: begin with the first row in A.1, then work the first row in A.2 etc.
See DROPS lesson: How to read knitting diagrams
See DROPS lesson: How to read crochet diagrams
Why are the sleeves shorter in larger sizes?
The total width of the garment (from wrist-to-wrist) will be larger in the larger sizes, despite the actual sleeves being shorter. The larger sizes have longer sleeve caps and wider shoulders, so there will be a good fit in all sizes.
Where on the garment is the length measured?
The measurement sketch/schematic drawing provides information regarding the full length of the garment. If it’s a jumper or a jacket the length is measured from the highest point on the shoulder (usually closest to the neckline), and straight down to the bottom of the garment. It is NOT measured from the tip of shoulder. Similarly, the length of yoke is measured from the highest point on the shoulder and down to where yoke is split into body and sleeves.
See DROPS lesson: How to read a schematic drawing
What is a repeat?
Diagrams are often repeated on the round or in height. 1 repeat is the diagram the way it appears in the pattern. If it says to work 5 repeats of A.1 in the round, then you work A.1 a total of 5 times after/next to each other in the round. If it says to work 2 repeats of A.1 vertically/in height you work the entire diagram once, then begin again at the start and work the entire diagram one more time.
Why does the piece start with more chain stitches than it’s worked with?
Chain stitches are slightly narrower than other stitches and to avoid working the cast-on edge too tight, we simply chain more stitches to begin with. The stitch count will be adjusted on the following row to fit the pattern and measurement sketch.
Why increase before the rib edge when the piece is worked top-down?
The rib edge is more elastic and will contract slightly compared to, for example, stocking stitch. By increasing before the rib edge, you avoid a visible difference in width between the rib edge and the rest of the body.
Why increase in the cast-off edge?
It’s very easy to cast off too tightly, and by making yarn overs while casting off (and simultaneously casting these off) you avoid a too tight cast off edge.
See DROPS video: How to bind off with yarn overs (yo)
How do I increase/decrease on every 3rd and 4th row/round alternately?
To achieve an even increase (or decrease) you can increase on, for example: every 3rd and 4th row alternately, like so: work 2 rows and increase on the 3rd row, work 3 rows and increase on the 4th. Repeat this until the increase is complete.
See DROPS lesson: Increase or decrease 1 st on every 3rd and 4th row alternately
How can I work a jacket in the round instead of back and forth?
Should you prefer to work in the round instead of back and forth, you may of course adjust the pattern. You’ll need to add steeks mid-front (usually 5 stitches), and follow the instructions. When you would normally turn and work from the wrong side, simply work across the steek and continue in the round. At the end you’ll cut the piece open, pick up stitches to work bands, and cover the cut edges.
See DROPS video: How to knit steeks and cut open
Can I work a jumper back and forth instead of in the round?
Should you prefer to work back and forth instead of in the round, you may of course adjust the pattern so you work the pieces separately and then assemble them at the end. Divide the stitches for the body in 2, add 1 edge stitch in each side (for sewing) and work the front and back pieces separately.
See DROPS lesson: Can I adapt a pattern for circular needles into straight needles?
Why is the pattern slightly different than what I see in the photo?
Pattern repeats can vary slightly in the different sizes, in order to get the correct proportions. If you’re not working the exact same size as the garment in the photo, yours might deviate slightly. This has been carefully developed and adjusted so that the complete impression of the garment is the same in all sizes.
Make sure to follow instructions and diagrams for your size!
How do I make a women’s size garment into a men’s size one?
If you have found a pattern you like which is available in women’s size it’s not very difficult to convert it to men’s size. The biggest difference will be the length of sleeves and body. Start working on the women size that you think would fit across the chest. The additional length will be worked right before you cast off for the armhole/sleeve cap. If the pattern is worked top-down you can add the length right after the armhole or before the first decrease on sleeve.
Regarding additional yarn amount, this will depend on how much length you add, but it is better with a skein too many than too few.
How do I prevent a hairy garment from shedding?
All yarns will have excess fibres (from production) that might come off as lint or shedding. Brushed yarns (ie hairier yarns) have more of these loose, excess fibres, causing more shedding.
Shedding also depends on what is worn under or over the garment, and whether this pulls at the yarn fibres. It’s therefore not possible to guarantee that there will be no shedding
Below are some tips on how to get the best result when working with hairier yarns:
1. When the garment is finished (before you wash it) shake it vigorously so the looser hairs come off. NOTE: do NOT use a lint roller, brush or any method that pulls at the yarn.
2. Place the garment in a plastic bag and put it in your freezer - the temperature will cause the fibres to become less attached to each other, and excess fibres will come off easier.
3. Leave in the freezer for a few hours before taking it out and shaking it again.
4. Wash the garment according to the instructions on the yarn label.
Why does my garment pill?
Pilling is a natural process that happens to even the most exclusive of fibers. It's a natural sign of wear and tear that is hard to avoid, and that is most visible in high friction areas of your garment like a sweater's arms and cuffs.
You can make your garment look as new by removing the pilling, using a fabric comb or a pill/lint remover.
Way to Go |
|||||||||||||||||||
|
|
||||||||||||||||||
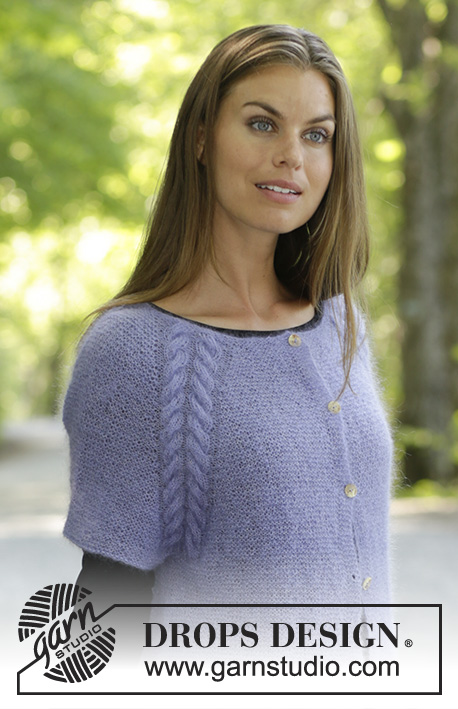
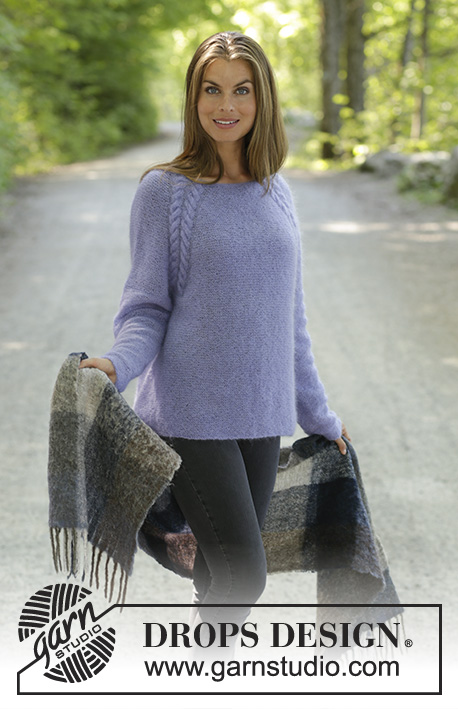
Knitted sweater with raglan in DROPS Kid-Silk. The piece is worked top down with cables, garter stitch and A-shape. Sizes S - XXXL.
DROPS 194-29 |
|||||||||||||||||||
------------------------------------------------------- EXPLANATIONS FOR THE PATTERN: ------------------------------------------------------- RIDGE/GARTER STITCH (worked in the round): 1 ridge = 2 rounds. Knit 1 round and purl 1 round. PATTERN: See diagrams A.1 and A.2. INCREASE TIP-1 (evenly spaced): To work out how to increase evenly, count the total number of stitches on the needle (e.g. 92 stitches) and divide these stitches by the number of increases to be made (e.g. 12) = 7.66. In this example, increase by making 1 yarn over after alternately each 7th and 8th stitch (approx.). On the next round, knit the yarn overs twisted to avoid holes. INCREASE TIP-2 (for sides of body): Work until there are 2 stitches left before the marker, 1 yarn over, work 4 stitches in garter stitch (the marker sits in the middle of these 4 stitches), 1 yarn over. Increase like this at both marker threads (= a total of 4 stitches increased). On the next round work the yarn overs twisted to avoid holes. Then work the new stitches in garter stitch. DECREASE TIP (for sleeves): Decrease 1 stitch on each side of the marker as follows: Work until there are 3 stitches left before the marker, knit 2 together, knit 2 (the marker sits in the middle of these 2 stitches), slip 1 stitch as if to knit, knit 1, pass the slipped stitch over the knitted stitch (= 2 stitches decreased). ------------------------------------------------------- START THE PIECE HERE: ------------------------------------------------------- SWEATER - SHORT OVERVIEW OF THE PIECE: The piece is worked top down. The yoke is worked in the round and then is divided for body and sleeves. The body is continued in the round in garter stitch. The sleeves are worked in the round with double pointed needles in stockinette stitch from the wrong side. YOKE: Cast on 92-96-100-106-110-118 stitches with circular needle size 3 mm / US 2.5 and Kid-Silk. Work 2 RIDGES – read description above. Change to circular needle size 4 mm / US 6. Knit 1 round and increase 12-8-8-14-10-10 stitches evenly on round - read INCREASE TIP-1 = 104-104-108-120-120-128 stitches. Purl 1 round. Then work as follows (the round starts mid back): Work 8-8-9-12-12-14 stitches in garter stitch, A.1 (= 16 stitches), 4 stitches in garter stitch, A.1 over the next 16 stitches, 16-16-18-24-24-28 stitches in garter stitch, A.1 over the next 16 stitches, 4 stitches in garter stitch, A.1 over the next 16 stitches and finish with 8-8-9-12-12-14 stitches in garter stitch. REMEMBER THE GAUGE! When A.1 has been worked 1 time in height there are 128-128-132-144-144-152 stitches on the needle. Now work A.2 (= 22 stitches) over A.1 AT THE SAME TIME as you increase to raglan on the first round in A.2 as follows: Increase with 1 yarn over on each side of each A.2 (= 8 stitches increased). The yarn overs are worked twisted on the next round and then in garter stitch. Increase like this every 2nd round a total of 10-13-17-18-20-22 times, then every 4th round a total of 13-14-13-14-15-16 times (i.e. you increase a total of 23-27-30-32-35-38 times) = 312-344-372-400-424-456 stitches. Continue with pattern and garter stitch until the piece measures 22-24-25-27-29-31 cm / 8⅝"-9⅜"-9 ¾"-10⅝"-11⅜"-12⅛" from the cast-on edge. On the next round decrease 3 stitches over each cable (i.e. 6 stitches in each A.2 = a total of 24 stitches decreased) = 288-320-348-376-400-432 stitches. Now divide the piece for body and sleeves as follows: Work 42-46-50-55-60-66 stitches in garter stitch, place the next 60-68-74-78-80-84 stitches on a thread for sleeve and cast on 8-8-10-10-12-12 stitches under the sleeve, work 84-92-100-110-120-132 stitches in garter stitch, place the next 60-68-74-78-80-84 stitches on a thread for sleeve and cast on 8-8-10-10-12-12 stitches under the sleeve and finish with 42-46-50-55-60-66 stitches in garter stitch = 184-200-220-240-264-288 stitches. BODY: Insert 1 marker in the middle of the 8-8-10-10-12-12 new stitches under each sleeve (= 92-100-110-120-132-144 stitches on both front and back pieces). Continue with garter stitch. When the body measures 2 cm / ¾" from where it was divided from the sleeves, increase 1 stitch on each side of each marker - read INCREASE TIP-2 above. Increase like this every 2½ cm a total of 10 times = 224-240-260-280-304-328 stitches. Continue with garter stitch until the body measures 31-31-32-32-32-32 cm / 12⅛"-12⅛"-12 ½"-12 ½"-12 ½"-12 ½" from where it was divided from the sleeves. Bind off. The piece measures 56-58-60-62-64-66 cm / 22"-22¾"-23⅝"-24⅜"-25¼"-26" from the shoulder. SLEEVE: Place the 60-68-74-78-80-84 stitches from the thread on the one side of the piece onto double pointed needles size 4 mm / US 6 and knit up 1 stitch in each of the 8-8-10-10-12-12 stitches cast on under the sleeve = 68-76-84-88-92-96 stitches. Insert 1 marker in the middle of the 8-8-10-10-12-12 stitches under the sleeve. Continue with knit in the round from the wrong side, i.e. the piece is turned and you work from the wrong side to finished length (the sleeves are this way shown as purl from the right side). When the piece measures 2 cm / ¾", decrease 1 stitch on each side of the marker – read DECREASE TIP above. Decrease like this every 3-2-1½-1½-1½-1 cm a total of 12-15-18-19-20-21 times = 44-46-48-50-52-54 stitches. Continue with knit from the wrong side until the piece measures 40-38-38-36-35-33 cm / 15 ¾"-14⅞"-14⅞"-14⅛"-13 ¾"-13". Change to double pointed needles size 3 mm / US 2.5 and work garter stitch in the round for 3 cm / 1". Bind off with 2 strands. Work the other sleeve in the same way. |
|||||||||||||||||||
Diagram explanations |
|||||||||||||||||||
|
|||||||||||||||||||
Have you made this or any other of our designs? Tag your pictures in social media with #dropsdesign so we can see them! Do you need help with this pattern?You'll find tutorial videos, a Comments/Questions area and more by visiting the pattern on garnstudio.com. © 1982-2024 DROPS Design A/S. We reserve all rights. This document, including all its sub-sections, has copyrights. Read more about what you can do with our patterns at the bottom of each pattern on our site. |
With over 40 years in knitting and crochet design, DROPS Design offers one of the most extensive collections of free patterns on the internet - translated to 17 languages. As of today we count 304 catalogs and 11422 patterns - 11417 of which are translated into English (US/in).
We work hard to bring you the best knitting and crochet have to offer, inspiration and advice as well as great quality yarns at incredible prices! Would you like to use our patterns for other than personal use? You can read what you are allowed to do in the Copyright text at the bottom of all our patterns. Happy crafting!
Comments / Questions (36)
Kerstin wrote:
Hallo liebe Experten. Ich finde den Pulli total klasse. \r\nBei den Angaben für die Garn Menge bin ich verunsichert. Es erscheint mir sehr wenig. Lg. Kerstin.
18.04.2023 - 19:56DROPS Design answered:
Liebe Kerstin, sollte Ihre Maschenprobe stimmen, dann sollten Sie die richtige Garnmenge brauchen. Viel Spaß beim stricken!
19.04.2023 - 08:17Françoise Lelarge wrote:
Je vous remercie pour votre réponse rapide , mais je dois vous avoué que je viens de faire un essais avec deux fils et cela donne très bien dès que je l'aurais fini je vous ferai parvenir une photo . Encore merci pour tout et de vos réponses très rapide cela nous aide beaucoup.
22.11.2021 - 17:19Françoise Lelarge wrote:
Merci de votre réponse avec 2 fils avec aiguille N° 3 mais faut il par la suite que je continue avec 2 fils avec l'aiguille N°4. Je trouve que cela est plus joli et plus vaporeux. En plus j'ai la laine pour exécuter ce modèle.
22.11.2021 - 11:39DROPS Design answered:
Bonjour Mme Lelarge, en fait non, le pull se tricote juste avec un seul fil Kid-Silk (et 21 m x 41 rangs point mousse = 10 x 10 cm pour l'échantillon), si vous continuez avec 2 fils tout du long, vous n'aurez pas la bonne forme finale car la tension sera différente (et la quantité de fil non adaptée). Vous trouverez parmi les modèles tricotés en/avec Kid-Silk certains tricotés avec le fil en double ou bien Kid-Silk + 1 autre fil - cf ici - si vous souhaitez changer de projet, pensez à bien recalculer la quantité si besoin. Bon tricot!
22.11.2021 - 16:14Françoise Lelartge wrote:
Le nombre de mailles en rond 118 mailles même après augmentations pour avoir 128 mailes en XXXl on ne peut pas passer la tête beaucoup trop étroit comment faire?
20.11.2021 - 14:58DROPS Design answered:
Bonjour Mme Lelartge, attention à bien vérifier votre tension et à ce que votre rang de montage ne soit pas trop serré- vous pouvez par exemple monter les mailles avec 2 aiguilles, ou bien avec 2 fils ou bien avec une aiguille d'une taille au-dessus, au choix. Bon tricot!
22.11.2021 - 09:01Anita Bentsen Laursen wrote:
Kan mængden af garn passe
10.09.2021 - 12:13DROPS Design answered:
Hej Anita, ja garnforbruget skal stemme :)
10.09.2021 - 15:20Kasia wrote:
Dzień dobry, mam wątpliwość co do tego wzoru - na zdjęciu modelka ma sweter z normalnym dekoldem, przy czym schemat mówi o 16 cm (rozmiar S) szerokości przy szyi. Niestety zaczełam robić i moje obawy się potwierdziły - nie jestem w stanie przecisnąć głowy. Nie chciałabym na samą szyję zmieniać drutów, bo proporcje całego swetra się zaburzą, a włóczka Kid Silk pruje się wyjątkowo trudno. Proszę o podpowiedź
18.03.2021 - 09:20DROPS Design answered:
Witaj Kasiu, wystarczy jak nabierzesz oczka na grubszych drutach. Ja zawsze nabieram na 2. Nabieraj dosyć luźno. Później możesz już zmienić druty na takie jakich będziesz używać. Powodzenia!
18.03.2021 - 15:05Heidi Balling wrote:
Ifølge opskriften er den strikket med 1 tråd kids-silk. Er det korrekt? - for jeg synes, at den ser rimeligt tæt ud, når man tænker på, hvor tyndt dette garn er. Den er strikket i ret. Hvis jeg vil strikke den i glat - skal der så laves om på opskriften (garnforbrug, antal masker, længde osv?). På forhånd mange tak.
07.12.2020 - 20:45DROPS Design answered:
Hej Heidi, ja det stemmer, den er strikket i retstrik med 1 tråd DROPS Kid-Silk :)
08.12.2020 - 08:12Vigdis wrote:
Jeg har kommet til delingen av bol og armer, og skjønner ikke hvordan masketallene i oppskriften kan stemme? Jeg sikker på at jeg har fulgt oppskriften riktig til nå. Strikker XXL, men hvordan kan en sette av 60 m tilriller, deretter 80 m til ermer? Hva med de resterende m fra flettene?
12.10.2020 - 21:01DROPS Design answered:
Hei Vigdis. Har du felt 6 masker i hver flette (4 fletter det det felles 6 masker = 24 felte masker)? = 400 masker på pinnen. Nå strikkes 60 masker i riller (=½ bakstykket), sett de neste 80 maskene på 1 tråd (= 1. erm), legg opp 12 masker (under 1. erme), strikk 120 masker i riller (= forstykket), sett de neste 80 maskene på 1 tråd (= 2. erm), legg opp 12 masker (=under 2.erme) og strikk 60 masker i riller (= ½ bakstykket). Du skal nå ha 60+12+120+12+60 = 264 masker på pinnen og 80 masker på 1 tråd x 2. God Fornøyelse!
19.10.2020 - 09:58Lilly Søviknes wrote:
Ermene skal altså ikke være lik strikket som bolen?Kun vrange masker som sees fra retten?
30.09.2020 - 12:57Lilly Søviknes wrote:
Forstår ikke hvorfor ermene skal strikkes fra vrangen?Det må vel gå an å strikke vanlig fra retten eller?
29.09.2020 - 22:00DROPS Design answered:
Hej Lilly, det er for at ærmerne strikkes i glatstrik med vrangen ud. Vil du hellere strikke vrang rundt på hver omgang, så kan du naturligvis strikke dem fra retsiden :)
30.09.2020 - 11:49