DROPS Fabel
DROPS Fabel
75% Wool, 25% Polyamide
from 2.30 £ /50g
Get the yarn to make this pattern from 23.00£.

The yarn cost is calculated from the pattern’s smallest size and the yarn’s cheapest product type. Looking for an even better price? You might find it on the DROPS Deals!

DROPS SS24

Diamond Cut

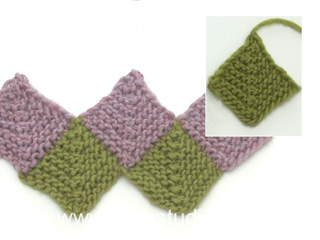
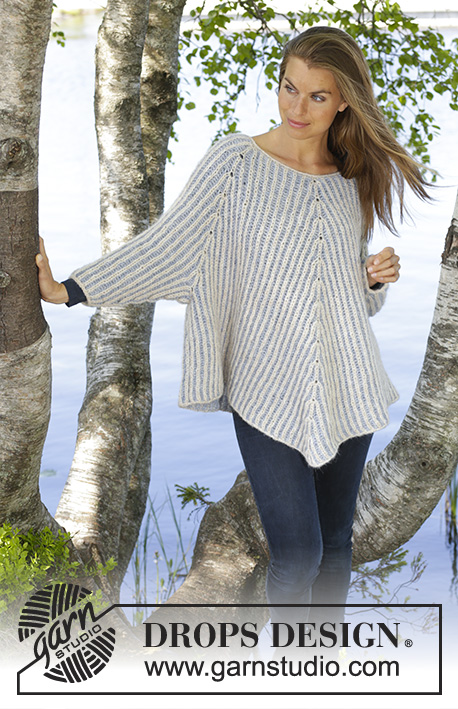
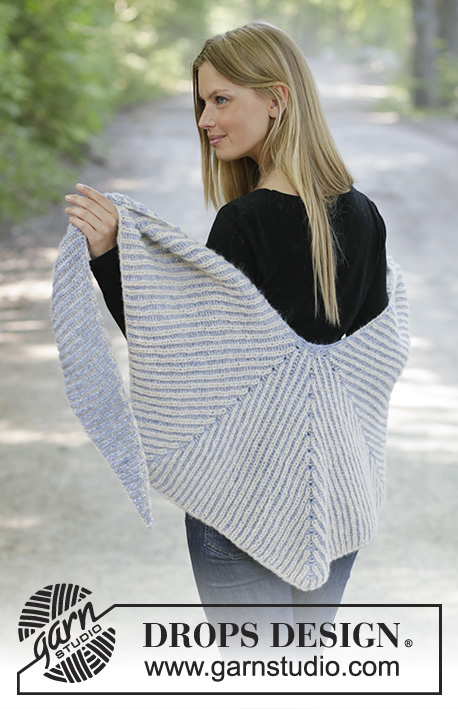
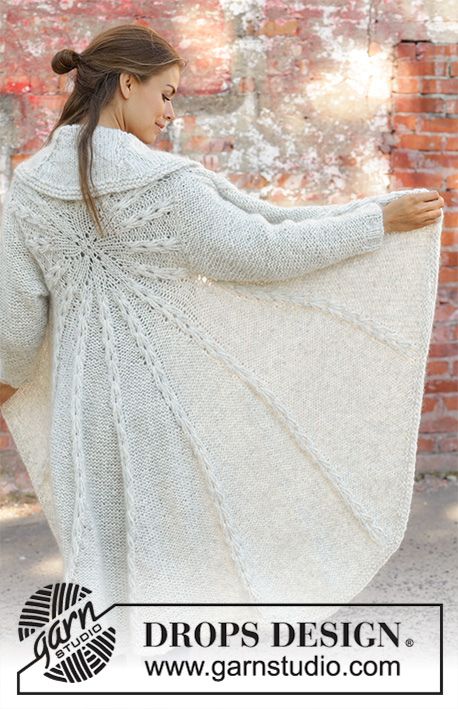
Knitted tunic in DROPS Fabel. The piece is worked back and forth with garter stitch, domino squares and stripes. Sizes S - XXXL.

DROPS 194-27
DROPS Design: Pattern no fa-413
Yarn group A
-------------------------------------------------------

Sizes: S - M - L - XL - XXL - XXXL
Materials:
DROPS FABEL from Garnstudio (belongs to yarn group A)
150-150-200-200-200-250 g colour 623, rose mist
100-150-150-150-150-200 g colour 655, wooden rose
150-150-150-150-200-200 g colour 905, salt and pepper
100-150-150-150-150-150 g colour 200, grey

-------------------------------------------------------
ACCESSORIES FOR THE PIECE:

KNITTING TENSION:
23 stitches in width and 45 rows in height with garter stitch = 10 x 10 cm.

NEEDLES:
DROPS CIRCULAR NEEDLE SIZE 3.5 MM: length 40 cm and 80 cm for garter stitch.
The needle size is only a guide. If you have too many stitches on 10 cm, change to a larger needle size. If you have too few stitches on 10 cm, change to a smaller needle size.
-------------------------------------------------------

-------------------------------------------------------

Alternative Yarn – See how to change yarns here
Yarn Groups A to F – Use the same pattern and change the yarn here
Yarn usage using an alternative yarn – Use our yarn converter here

-------------------------------------------------------

DROPS Fabel
DROPS Fabel
75% Wool, 25% Polyamide
from 2.30 £ /50g
Get the yarn to make this pattern from 23.00£.

The yarn cost is calculated from the pattern’s smallest size and the yarn’s cheapest product type. Looking for an even better price? You might find it on the DROPS Deals!

Pattern instructions

NOTE: This pattern is written in British English. All measurements in charts are in cm. For conversion from cm to inches - click here. There are different terms for crocheting in British and American English. If this pattern includes crochet, click for "crochet terms" here. For this pattern in American English, please click here.
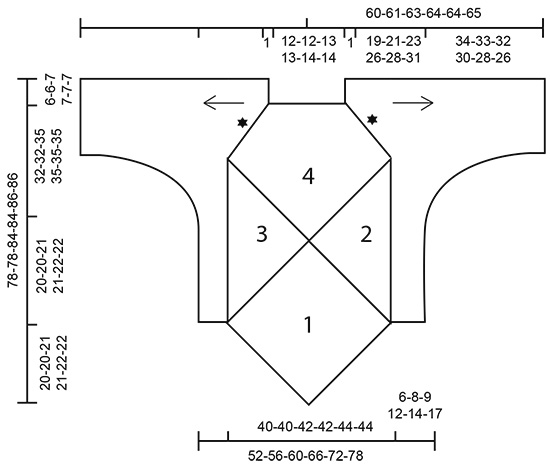
EXPLANATIONS FOR THE PIECE:

-------------------------------------------------------

RIDGE/GARTER STITCH (worked in the round):
1 ridge = 2 rounds. Knit 1 round and purl 1 round.

RIDGE/GARTER STITCH (worked back and forth):
1 ridge = Knit 2 rows.

STRIPES-1:
* 1 ridge wooden rose, 1 ridge salt and pepper *, work from *-*.

STRIPES-2:
* 1 ridge rose mist, 1 ridge grey *, work from *-*.

STRIPES SLEEVES:
Work 15-15-16-16-17-17 cm with * 1 ridge rose mist, 1 ridge salt and pepper *, work from *-*.
Work 5 cm with * 1 ridge rose mist, 1 ridge grey *, work from *-*.
Work 3 cm with * 1 ridge salt and pepper, 1 ridge grey *, work from *-*.
Work 15 cm with * 1 ridge wooden rose, 1 ridge rose mist *, work from *-*.
Work 1 cm with * 1 ridge grey, 1 ridge salt and pepper *, work from *-*.
Work 8 cm with * 1 ridge rose mist, 1 ridge grey *, work from *-*.
Work 4 cm with * 1 ridge wooden rose, 1 ridge rose mist *, work from *-*.
Continue to finished length with * 1 ridge grey, 1 ridge wooden rose *, work from *-*.

-------------------------------------------------------

START THE PIECE HERE:

-------------------------------------------------------

TUNIC - SHORT OVERVIEW OF THE PIECE:
The piece is worked back and forth with circular needle. You first work whole and half domino squares. Then work the shoulder and pick up stitches down the edge of the section with domino squares before working garter stitch and stripes out to the side for body and sleeves.

FRONT PIECE:
WHOLE DOMINO SQUARE (1):
Cast on 129-129-137-137-145-145 stitches with circular needle size 3.5 mm and wooden rose. Insert a marker in the middle stitch of the row (= 64-64-68-68-72-72 stitches on each side of the stitch with marker). Work GARTER STITCH and STRIPES-1 – read description above and work domino square as follows:
ROW 1 (= wrong side): Knit.
ROW 2 (= right side): Knit until there is 1 stitch left before the marker, slip 1 stitch as if to knit, knit 2 together and pass the slipped stitch over the knitted together stitches, knit to end of row.
Repeat rows 1 and 2, i.e. decrease 2 stitches in middle of square every 2nd row until there is stitch left on the row. Cut the strand and pull it through the stitch. 
The domino square measures approx. 28-28-30-30-31-31 x 28-28-30-30-31-31 cm.

HALF DOMINO SQUARE (2):
Start from the right side with circular needle size 3.5 mm and rose mist and knit up 65-65-69-69-73-73 stitches (= 2 stitches in first ridge and 1 stitch in each of the next ridges) along the right side of the first domino square. Work STRIPES-2 – read description above and work a half domino square as follows:
ROW 1 (= wrong side): Knit.
ROW 2 (= right side): Knit 2 together, knit to end of row.
Repeat rows 1 and 2, i.e. decrease 1 stitch every 2nd row until there is 1 stitch left on the row. Cut the strand and pull it through the stitch. 

HALF DOMINO SQUARE (3):
Start from the right side with circular needle size 3.5 mm and rose mist and knit up 65-65-69-69-73-73- stitches (= 1 stitch in each ridge until there is 1 ridge left and 2 stitches in last ridge) along the left side of the first domino square. Work STRIPES-2 and work a half domino square as follows:
ROW 1 (= wrong side): Knit.
ROW 2 (= right side): Knit until there are 2 stitches left on row, slip 1 stitch as if to knit, knit 1 and pass the slipped stitch over the knitted stitch.
Repeat rows 1 and 2, i.e. decrease 1 stitch every 2nd row until there is 1 stitch left. Cut strand and pull it through the stitch. 

WHOLE DOMINO SQUARE WITH DECREASE FOR NECK (4):
Start from right side with circular needle size 3.5 mm and wooden rose and knit up 64-64-68-68-72-72 stitches (= 1 stitch in each ridge) along the side of half domino square (2), knit up 1 stitch in the transition between the 3 domino squares and continue by knitting up 64-64-68-68-72-72 stitches (= 1 stitch in each ridge) along the side of half domino square (3) = 129-129-137-137-145-145 stitches. Insert a marker in the middle stitch of the row (= 64-64-68-68-72-72 stitches on each side of the stitch with marker). Work STRIPES-1 and work domino square as follows:
ROW 1 (= wrong side): Knit.
ROW 2 (= right side): Knit until there is 1 stitch left before the marker, slip 1 stitch as if to knit, knit 2 together and pass the slipped stitch over the knitted together stitches, knit to end of row.
Repeat rows 1 and 2, i.e. decrease 2 stitches in middle of square every 2nd row until there are 47-47-51-51-51-51 stitches left on the row (i.e. after you have worked 41-41-43-43-47-47 ridges). Now work as follows:
ROW 83-83-87-87-95-95 (= wrong side): Knit.
ROW 84-84-88-88-96-96 (= right side): Knit 2 together, knit until there is 1 stitch left before the marker, slip 1 stitch as if to knit, knit 2 together and pass the slipped stitch over the knitted together stitches, knit until there are 2 stitches left on row, slip 1 stitch as if to knit, knit 1 and pass the slipped stitch over the knitted stitch.
Repeat these last 2 rows, i.e. you decrease 2 stitches middle of square and 1 stitch in each side (= 4 stitches decreased) every 2nd row until there are 3 stitches left on row.
Knit 1 row over all stitches, then work the last row as follows: Slip 1 stitch as if to knit, knit 2 together and pass the slipped stitch over the knitted together stitches = 1 stitch left. Cut strand and pull it through stitch. 

BACK PIECE:
Cast on and work in same way as front piece.

LEFT SHOULDER, SIDE OF BODY AND SLEEVE:
Now work left shoulder, side of body and sleeve back and forth in garter stitch and work STRIPES SLEEVES - read description above:
Cast on 27-27-31-31-33-33 stitches with circular needle size 3.5 mm and rose mist. Work garter stitch back and forth, AT THE SAME TIME at the end of each row cast on 1 new stitch. Work like this until you have worked 29-29-31-31-31-31 ridges and increased 29-29-31-31-31-31 stitches in each side of the piece = 85-85-93-93-95-95 stitches on needle. After the last row from the wrong side cut the strand. Leave the stitches on a circular needle or thread and work with circular needle size 3.5 mm as follows: Knit up from right side 92-92-97-97-101-101 stitches along the side of square (2) (see sketch) and use the next colour in the stripe. Continue from the right side over the 85-85-93-93-95-95 stitches on needle/thread, knit up 92-92-97-97-101-101 stitches along side of domino square on the other side = 269-269-287-287-297-297 stitches on row. Continue back and forth with garter stitch and stripes until piece measures 6-8-9-12-14-17 cm from where you knitted up stitches along the half domino squares. At the beginning of the next 2 rows cast off 46-46-48-48-51-51 stitches (= sides of tunic) = 177-177-191-191-195-195 stitches on needle. Insert a marker in each side of the piece (they mark the splits in sides and are used later in assembly). Continue with garter stitch and stripes and on the next row begin to cast off in each side for sleeve:
Cast off stitches at beginning of every 4th row (every 2nd ridge) in each side as follows: Cast off 5 stitches 4-4-5-5-5-5 times, 2 stitches 7-7-8-8-9-9 times and 1 stitch 14-13-12-11-10-9 times = 81-83-85-87-89-91 stitches. Continue until the sleeve measures 53-54-55-56-56-57 cm from the cast-on edge. Cast off. Make sure that the cast-off edge is not tight.

RIGHT SHOULDER, SIDE OF BODY AND SLEEVE:
Work in the same way as left shoulder, side of body (i.e., knit up stitches along the side of square (3)) and sleeve.

ASSEMBLY:
Sew seam in raglan line – see black star in illustration. Sew with rose mist and sew in the outermost stitch-loop so that the seam is flat. Make sure that the seam is not tight.
Sew sleeve seam from the cast-off edge at bottom of sleeve and upwards to the marker which was inserted before casting off 46-46-48-48-51-51 stitches for side in tunic. Repeat in other side.

NECK:
Start in the one raglan seam from the right side and knit up 118-140 stitches with short circular needle size 3.5 mm and wooden rose. Work 3 RIDGES in the round - read description above. Cast off with knit. Cut and fasten strand.

Diagram

symbols = knitting direction
symbols = seam (raglan line - the sleeves are sewn to front/back piece here)
diagram
Do you have a question? See a list of frequently asked questions (FAQ)

Knitting tension is what determines the final measurements of your work, and is usually measured per 10 x 10 cm. It is provided like so: number of stitches in width x number of rows in height - eg: 19 stitches x 26 rows = 10 x 10 cm.

The knitting tension is very individual; some people knit/crochet loosely while others work tightly. You adjust the knitting tension with the needle size, which is why the suggested needle size is only meant as a guide! You need to adjust this (up or down) to ensure that YOUR knitting tension matches the knitting tension provided in the pattern. If you work with a different knitting tension than provided you will have a different yarn consumption, and your work will have different measurements than what the pattern suggests.

The knitting tension also determines which yarns can replace each other. As long as you achieve the same knitting tension you can replace one yarn with another.

See DROPS lesson: How to measure your tension/gauge

See DROPS video: How to make a gauge tension swatch

The required amount of yarn is provided in grams, eg: 450 g. To calculate how many balls you’ll need you first need to know how many grams are in 1 ball (25g, 50g or 100g). This information is available if you click on the individual yarn quality on our pages. Divide the amount required with the amount of each ball. For example, if each ball is 50g (the most common amount), the calculation will be as follows: 450 / 50 = 9 balls.

The important thing when changing from one yarn to another is that the knitting/crochet tension remains the same. This is so that the measurements of the finished piece will be the same as on the sketch provided. It is easier to achieve the same knitting tension using yarns from the same yarn group. It is also possible to work with multiple strands of a thinner yarn to achieve the knitting tension of a thicker one. Please try our yarn converter. We recommend you to always work a test swatch.

Please NOTE: when changing yarn the garment might have a different look and feel to the garment in the photo, due to individual properties and qualities of each yarn.

See DROPS lesson: Can I use a different yarn than the one mentioned in the pattern?

All our yarns are categorised into yarn groups (from A to F) according to thickness and knitting tension – group A contains the thinnest yarns and group F the thickest. This makes it easier for you to find alternative yarns to our patterns, should you wish to switch yarn. All yarns within the same group have a similar knitting tension and can easily replace each other. However, different yarn qualities have different structures and properties which will give the finished work a unique look and feel.

Click here for an overview of the yarns in each yarn group

At the top of all our patterns you’ll find a link to our yarn calculator, which is a helpful tool should you wish to use a different yarn than suggested. By filling in the yarn quality you wish to replace, the amount (in your size) and number of strands, the calculator will present good alternative yarns with the same knitting tension. Additionally it will tell you how much you’ll require in the new qualities and whether you’ll need to work with multiple strands. Most skeins are 50g (some are 25g or 100g).

If the pattern is worked with multiple colours, every colour will have to be calculated separately. Similarly, if the pattern is worked with several strands of different yarns (for example 1 strand Alpaca and 1 strand Kid-Silk) you will have to find alternatives for each, individually.

Click here to see our yarn calculator

Since different yarns have different qualities and textures we have chosen to keep the original yarn in our patterns. However, you can easily find options among our available qualities by using our yarn calculator, or simply pick a yarn from the same yarn group.

It is possible that some retailers still have discontinued yarns in stock, or that someone has a few skeins at home that they would like to find patterns for.

The yarn calculator will provide both alternative yarn as well as required amount in the new quality.

If you think it's hard to decide what size to make, it can be a good idea to measure a garment you own already and like the size of. Then you can pick the size by comparing those measures with the ones available in the pattern's size chart.

You'll find the size chart at the bottom of the pattern.

See DROPS lesson: How to read size chart

The needle size provided in the pattern serves only as a guide, the important thing is to follow the knitting tension. And since knitting tension is very individual, you will have to adjust the needle size to ensure that YOUR tension is the same as in the pattern – maybe you’ll have to adjust 1, or even 2 needle sizes, up or down to achieve the correct tension. For this, we recommend that you work test swatches.

Should you work with a different knitting tension than the one provided, the measurements of the finished garment might deviate from the measurement sketch.

See DROPS lesson: How to measure your tension/gauge

See DROPS video: How to make a tension/gauge swatch

Working a garment top-down provides more flexibility and room for personal adjustment. For example it is easier to try the garment on while working, as well as making adjustments to length of yoke and shoulder caps.

The instructions are carefully explaining every step, in the correct order. Diagrams are adjusted to the knitting direction and are worked as usual.

The diagram depicts all rows/rounds, and every stitch seen from the right side. It is read from bottom to top, from right to left. 1 square = 1 stitch.

When working back and forth, every other row is worked from the right side and every other row is worked from the wrong side. When working from the wrong side, the diagram will have to be worked reversed: from left to right, knit stitches are purled, purl stitches are knit etc.

When working in the round every round is worked from the right side and the diagram are worked from right to left on all rounds.

See DROPS lesson: How to read knitting diagrams

The diagram depicts all rows/rounds, and every stitch seen from the right side. It is worked from bottom to top, from right to left.

When working back and forth every other row is worked from the right side: from right to left and every other row is worked from the wrong side: from left to right.

When working in the round, every row in the diagram are worked from the right side, from right to left.

When working a circular diagram you start in the middle and work your way outwards, counter clockwise, row by row.

The rows usually start with a given number of chain stitches (equivalent to the height of the following stitch), this will either be depicted in the diagram or explained in the pattern.

See DROPS lesson: How to read crochet diagrams

Instructions for working several diagrams after each other on the same row/round, will often be written like so: “work A.1, A.2, A.3 a total of 0-0-2-3-4 times". This means you work A.1 once, then A.2 is worked once, and A.3 is repeated (in width) the number of times provided for your size – in this case like so: S = 0 times, M = 0 times, L=2 times, XL= 3 times and XXL = 4 times.

The diagrams are worked as usual: begin with the first row in A.1, then work the first row in A.2 etc.

See DROPS lesson: How to read knitting diagrams

See DROPS lesson: How to read crochet diagrams

The total width of the garment (from wrist-to-wrist) will be larger in the larger sizes, despite the actual sleeves being shorter. The larger sizes have longer sleeve caps and wider shoulders, so there will be a good fit in all sizes.

The measurement sketch/schematic drawing provides information regarding the full length of the garment. If it’s a jumper or a jacket the length is measured from the highest point on the shoulder closest to the neckline, and straight down to the bottom of the garment. It is NOT measured from the tip of shoulder. Similarly, the length of yoke is measured from the highest point on the shoulder and down to where yoke is split into body and sleeves.

On a jacket measures are never taken along bands, unless specifically stated. Always measure inside band stitches when measuring the length.

See DROPS lesson: How to read a schematic drawing

Diagrams are often repeated on the round or in height. 1 repeat is the diagram the way it appears in the pattern. If it says to work 5 repeats of A.1 in the round, then you work A.1 a total of 5 times after/next to each other in the round. If it says to work 2 repeats of A.1 vertically/in height you work the entire diagram once, then begin again at the start and work the entire diagram one more time.

Chain stitches are slightly narrower than other stitches and to avoid working the cast-on edge too tight, we simply chain more stitches to begin with. The stitch count will be adjusted on the following row to fit the pattern and measurement sketch.

The rib edge is more elastic and will contract slightly compared to, for example, stocking stitch. By increasing before the rib edge, you avoid a visible difference in width between the rib edge and the rest of the body.

It’s very easy to cast off too tightly, and by making yarn overs while casting off (and simultaneously casting these off) you avoid a too tight cast off edge.

See DROPS video: How to bind off with yarn overs (yo)

To achieve an even increase (or decrease) you can increase on, for example: every 3rd and 4th row alternately, like so: work 2 rows and increase on the 3rd row, work 3 rows and increase on the 4th. Repeat this until the increase is complete.

See DROPS lesson: Increase or decrease 1 st on every 3rd and 4th row alternately

Should you prefer to work in the round instead of back and forth, you may of course adjust the pattern. You’ll need to add steeks mid-front (usually 5 stitches), and follow the instructions. When you would normally turn and work from the wrong side, simply work across the steek and continue in the round. At the end you’ll cut the piece open, pick up stitches to work bands, and cover the cut edges.

See DROPS video: How to knit steeks and cut open

Should you prefer to work back and forth instead of in the round, you may of course adjust the pattern so you work the pieces separately and then assemble them at the end. Divide the stitches for the body in 2, add 1 edge stitch in each side (for sewing) and work the front and back pieces separately.

See DROPS lesson: Can I adapt a pattern for circular needles into straight needles?

Pattern repeats can vary slightly in the different sizes, in order to get the correct proportions. If you’re not working the exact same size as the garment in the photo, yours might deviate slightly. This has been carefully developed and adjusted so that the complete impression of the garment is the same in all sizes.

Make sure to follow instructions and diagrams for your size!

If you have found a pattern you like which is available in women’s size it’s not very difficult to convert it to men’s size. The biggest difference will be the length of sleeves and body. Start working on the women size that you think would fit across the chest. The additional length will be worked right before you cast off for the armhole/sleeve cap. If the pattern is worked top-down you can add the length right after the armhole or before the first decrease on sleeve.

Regarding additional yarn amount, this will depend on how much length you add, but it is better with a skein too many than too few.

All yarns will have excess fibres (from production) that might come off as lint or shedding. Brushed yarns (ie hairier yarns) have more of these loose, excess fibres, causing more shedding.

Shedding also depends on what is worn under or over the garment, and whether this pulls at the yarn fibres. It’s therefore not possible to guarantee that there will be no shedding

Below are some tips on how to get the best result when working with hairier yarns:

1. When the garment is finished (before you wash it) shake it vigorously so the looser hairs come off. NOTE: do NOT use a lint roller, brush or any method that pulls at the yarn.

2. Place the garment in a plastic bag and put it in your freezer - the temperature will cause the fibres to become less attached to each other, and excess fibres will come off easier.

3. Leave in the freezer for a few hours before taking it out and shaking it again.

4. Wash the garment according to the instructions on the yarn label.

Pilling is a natural process that happens to even the most exclusive of fibers. It's a natural sign of wear and tear that is hard to avoid, and that is most visible in high friction areas of your garment like a sweater's arms and cuffs.

You can make your garment look as new by removing the pilling, using a fabric comb or a pill/lint remover.

Still can't find the answer you need? Then scroll down and leave your question so one of our experts can try to help you. This will be done normally within 5 to 10 working days.
In the meantime, you can read the questions and answers that others have left to this pattern or join the DROPS Workshop on Facebook to get help from fellow knitters/crocheters!

You might also like...

Post a comment to pattern DROPS 194-27

We would love to hear what you have to say about this pattern!

If you want to leave a question, please make sure you select the correct category in the form below, to speed up the answering process. Required fields are marked *.

Comments / Questions (65)

country flag Esther wrote:

Ik wil drops trui 194-27 breien in een andere kleurcombinatie waarbij ik bv. Fabel 677 wil gebruiken. Welke andere 3 kleuren zou u aanraden? Met vriendelijke groet, Esther

15.12.2022 - 09:52

DROPS Design answered:

Dag Esthter,

Kleur is echt een kwestie van smaak, dus ik raad je aan om naar een verkooppunt in de buurt te gaan waar je de kleuren kunt bekijken. Je kunt ook een aantal kleuren bestellen via een webwinkel en de kleuren die je niet mooi vindt terug sturen.

15.12.2022 - 19:02

country flag Ineke wrote:

Sorry, mijn vorige opmerking aub negeren....ik zat helemaal fout! Prachtig patroon en ik heb de trui bijna af.....wel veel wol over maar daar maakmik wel wat anders van

20.10.2022 - 15:35

country flag Ineke wrote:

Bij de minderingen voor de mouw staat 5 x 5 iedere 2de ribbel afkanten...prima klopt helemaal...maar dan staat er dat je een x aantal keren 2 steken moet minderen en dan een x aantal keren 1 steek moet minderen....Op het origineel van het patroon staat 2 x 8 st. minderen en dan 1 x 9.......!!!!

15.10.2022 - 16:53

country flag Elfrid Harstaf wrote:

Jeg holder på å strikke Diamond Cut, men er usikker på om jeg gjør riktig. Om jeg følger oppskriften og strikker 1.pinne i rillen fra vrangen og 2.pinne fra retten så blir på en måte vrangsiden på retten? Skal det være sånn? Det ser ikke sånn ut på bildene. Der er stripene mer tydelige og det ser ut som at det er strikket 1.pinne fra retten og 2.pinne fra vrangen i hver av fargene?

18.09.2022 - 22:26

DROPS Design answered:

Hei Elfrid, Du strikker alle pinner rett (rillestrikk). Fargestripene er også 1 pinne med den ene fargen og 1 pinne med den andre fargen (bortsett fra på ermene hvor det er lengre striper). Håper dette hjelper og god fornøyelse!

21.09.2022 - 08:16

country flag Liduina Beckers-van Atteveld wrote:

Dank voor je antwoord van 28/4. Zo staat het ook in het patroon. Maar de vraag gaat over de boven punt van vierhoek 4. In de foto van het model is het namelijk geen punt maar is het afgeplat en lijken er veel meer dan 3 steken over te blijven om de nekrand te vormen. Hoeveel steken na de vermindering voor de halslijn blijven op de naald om afgehecht te worden? Het moeten zeker 20 of 30 zijn, toch?

28.04.2022 - 10:21

DROPS Design answered:

Dag Liduina,

Juist door de minderingen aan beide kanten, maak je de halslijn, dus het is niet zo dat je ongeveer 20 steken over houdt om af te kanten. De ribbels staan immers schuin op die halslijn en door steeds te minderen ontstaat de halslijn.

04.05.2022 - 08:46

country flag Liduina Beckers wrote:

In de foto van Diamond Cut is het Domino Vierkant 4 niet vierkant, maar in de beschrijving staat dat je door moet breien tot het wel vierkant is. Klopt dat? Heb je dan niet een te kleine halslijn?

24.04.2022 - 18:48

DROPS Design answered:

Dag Liduina,

Als er 47-47-51-51-51-51 steken over zijn op de naald, brei je minderingen aan elke kant van het breiwerk; dit zijn de minderingen voor de hals.

28.04.2022 - 09:23

country flag Kathe wrote:

Hej. Jeg forstår ikke at man skal strikke til der kun er 3 masker tilbage i felt 4, når halsen på modellen er lige.

06.04.2022 - 16:20

DROPS Design answered:

Hej Kathe, halsen bliver automatisk lige når du følger forklaringen :)

08.04.2022 - 08:48

country flag Lena Hörnstein wrote:

Hjälp!!!! På mönster 194/27 undrar jag, räknas upplägget som ett varv och är det i så fall ett avigt eller rätt varv på hel dominoruta? Om det är avigt hur blir det då på den halva eftersom man skall sticka upp maskor från rätsidan? Räknas det som första varvet och i så fall måste väl det vara rätt? Det känns som om mina färger inte blir rätt, de tydligaste ränderna kommer på det som jag trodde var avigsida.

18.02.2022 - 12:04

DROPS Design answered:

Hei Lena. Oppleggskanten regnes ikke som en pinne. Når du strikker Hel Dominorute er første pinne fra vrangen og det strikkes rett, andre pinne er fra retten og strikkes rett. Det er det samme når du strikker Halv Dominorute (1. pinne er vrangen og det strikkes rett og 2.pinne er fra retten og det strikkes rett). mvh DROPS Design

21.02.2022 - 10:31

country flag Catharina wrote:

Ik heb het werk volgens de beschrijving opgezet en ben begonnen met strepen 1 (1 ribbel wooden rose en 1 ribbel salt en pepper). Volgens de beschrijving is de eerste naald de verkeerde kant en worden de minderingen aan de goede kant gedaan (dit is dus de tweede naald van de ribbel). Toch lijkt me de kant waar de strepen goed zichtbaar zijn, de goede kant te zijn. Hetgeen betekent dat ik de minderingen uitvoer aan de verkeerde kant. Wat heb ik hier niet goed begrepen? Kunt u mij dit uitleggen?

15.02.2022 - 16:04

country flag Jan Jones wrote:

I really love the look of this pattern apart from the full domino square (1) and would love to find a way of making it into a half domino square so that the bottom of the tunic goes straight across the front and back in a line to meet the two half domino squares. Having already purchased the yarn I will try to find a way! Thank you for all your brilliant patterns and yarn. Our daughter disovered Garn Studio and I am very grateful to her and you. Best wishes - Jan

18.12.2021 - 11:30