
Popular categories
Looking for a yarn?


|
|||||||
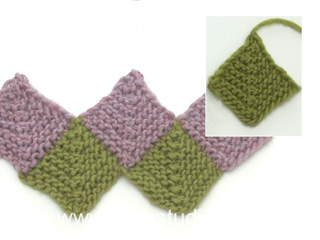
Diamond Cut |
|||||||
 |
 |
||||||
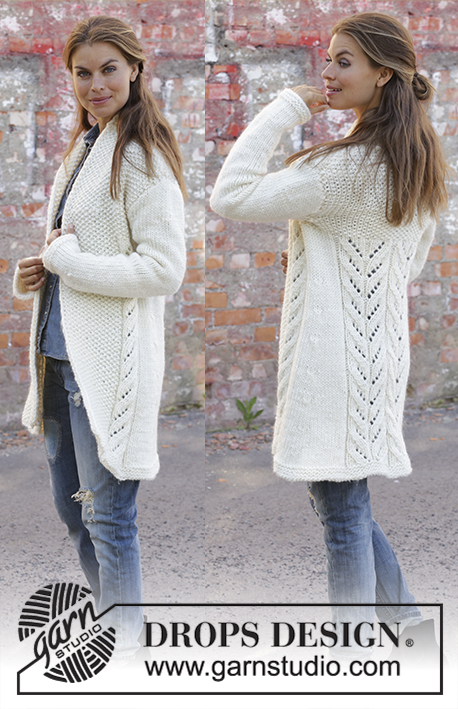
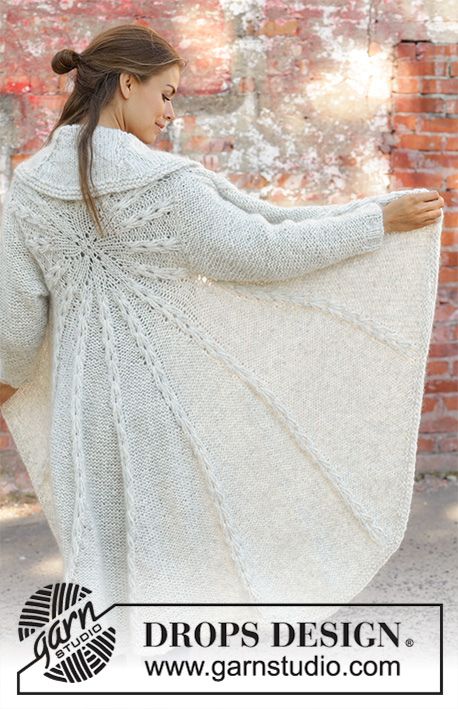
Knitted tunic in DROPS Fabel. The piece is worked back and forth with garter stitch, domino squares and stripes. Sizes S - XXXL.
DROPS 194-27 |
|||||||
|
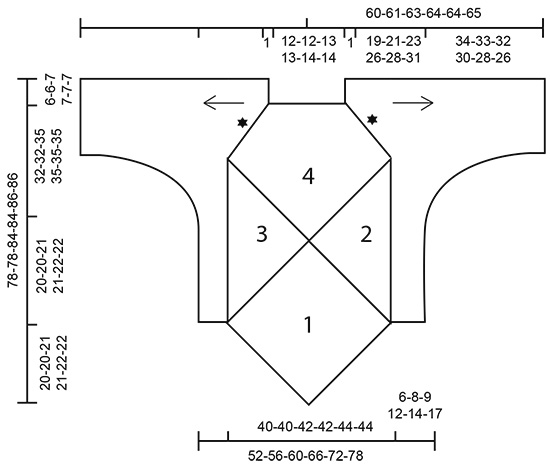
EXPLANATIONS FOR THE PIECE: ------------------------------------------------------- RIDGE/GARTER STITCH (worked in the round): 1 ridge = 2 rounds. Knit 1 round and purl 1 round. RIDGE/GARTER STITCH (worked back and forth): 1 ridge = Knit 2 rows. STRIPES-1: * 1 ridge wooden rose, 1 ridge salt and pepper *, work from *-*. STRIPES-2: * 1 ridge rose mist, 1 ridge grey *, work from *-*. STRIPES SLEEVES: Work 15-15-16-16-17-17 cm with * 1 ridge rose mist, 1 ridge salt and pepper *, work from *-*. Work 5 cm with * 1 ridge rose mist, 1 ridge grey *, work from *-*. Work 3 cm with * 1 ridge salt and pepper, 1 ridge grey *, work from *-*. Work 15 cm with * 1 ridge wooden rose, 1 ridge rose mist *, work from *-*. Work 1 cm with * 1 ridge grey, 1 ridge salt and pepper *, work from *-*. Work 8 cm with * 1 ridge rose mist, 1 ridge grey *, work from *-*. Work 4 cm with * 1 ridge wooden rose, 1 ridge rose mist *, work from *-*. Continue to finished length with * 1 ridge grey, 1 ridge wooden rose *, work from *-*. ------------------------------------------------------- START THE PIECE HERE: ------------------------------------------------------- TUNIC - SHORT OVERVIEW OF THE PIECE: The piece is worked back and forth with circular needle. You first work whole and half domino squares. Then work the shoulder and pick up stitches down the edge of the section with domino squares before working garter stitch and stripes out to the side for body and sleeves. FRONT PIECE: WHOLE DOMINO SQUARE (1): Cast on 129-129-137-137-145-145 stitches with circular needle size 3.5 mm and wooden rose. Insert a marker in the middle stitch of the row (= 64-64-68-68-72-72 stitches on each side of the stitch with marker). Work GARTER STITCH and STRIPES-1 – read description above and work domino square as follows: ROW 1 (= wrong side): Knit. ROW 2 (= right side): Knit until there is 1 stitch left before the marker, slip 1 stitch as if to knit, knit 2 together and pass the slipped stitch over the knitted together stitches, knit to end of row. Repeat rows 1 and 2, i.e. decrease 2 stitches in middle of square every 2nd row until there is stitch left on the row. Cut the strand and pull it through the stitch. The domino square measures approx. 28-28-30-30-31-31 x 28-28-30-30-31-31 cm. HALF DOMINO SQUARE (2): Start from the right side with circular needle size 3.5 mm and rose mist and knit up 65-65-69-69-73-73 stitches (= 2 stitches in first ridge and 1 stitch in each of the next ridges) along the right side of the first domino square. Work STRIPES-2 – read description above and work a half domino square as follows: ROW 1 (= wrong side): Knit. ROW 2 (= right side): Knit 2 together, knit to end of row. Repeat rows 1 and 2, i.e. decrease 1 stitch every 2nd row until there is 1 stitch left on the row. Cut the strand and pull it through the stitch. HALF DOMINO SQUARE (3): Start from the right side with circular needle size 3.5 mm and rose mist and knit up 65-65-69-69-73-73- stitches (= 1 stitch in each ridge until there is 1 ridge left and 2 stitches in last ridge) along the left side of the first domino square. Work STRIPES-2 and work a half domino square as follows: ROW 1 (= wrong side): Knit. ROW 2 (= right side): Knit until there are 2 stitches left on row, slip 1 stitch as if to knit, knit 1 and pass the slipped stitch over the knitted stitch. Repeat rows 1 and 2, i.e. decrease 1 stitch every 2nd row until there is 1 stitch left. Cut strand and pull it through the stitch. WHOLE DOMINO SQUARE WITH DECREASE FOR NECK (4): Start from right side with circular needle size 3.5 mm and wooden rose and knit up 64-64-68-68-72-72 stitches (= 1 stitch in each ridge) along the side of half domino square (2), knit up 1 stitch in the transition between the 3 domino squares and continue by knitting up 64-64-68-68-72-72 stitches (= 1 stitch in each ridge) along the side of half domino square (3) = 129-129-137-137-145-145 stitches. Insert a marker in the middle stitch of the row (= 64-64-68-68-72-72 stitches on each side of the stitch with marker). Work STRIPES-1 and work domino square as follows: ROW 1 (= wrong side): Knit. ROW 2 (= right side): Knit until there is 1 stitch left before the marker, slip 1 stitch as if to knit, knit 2 together and pass the slipped stitch over the knitted together stitches, knit to end of row. Repeat rows 1 and 2, i.e. decrease 2 stitches in middle of square every 2nd row until there are 47-47-51-51-51-51 stitches left on the row (i.e. after you have worked 41-41-43-43-47-47 ridges). Now work as follows: ROW 83-83-87-87-95-95 (= wrong side): Knit. ROW 84-84-88-88-96-96 (= right side): Knit 2 together, knit until there is 1 stitch left before the marker, slip 1 stitch as if to knit, knit 2 together and pass the slipped stitch over the knitted together stitches, knit until there are 2 stitches left on row, slip 1 stitch as if to knit, knit 1 and pass the slipped stitch over the knitted stitch. Repeat these last 2 rows, i.e. you decrease 2 stitches middle of square and 1 stitch in each side (= 4 stitches decreased) every 2nd row until there are 3 stitches left on row. Knit 1 row over all stitches, then work the last row as follows: Slip 1 stitch as if to knit, knit 2 together and pass the slipped stitch over the knitted together stitches = 1 stitch left. Cut strand and pull it through stitch. BACK PIECE: Cast on and work in same way as front piece. LEFT SHOULDER, SIDE OF BODY AND SLEEVE: Now work left shoulder, side of body and sleeve back and forth in garter stitch and work STRIPES SLEEVES - read description above: Cast on 27-27-31-31-33-33 stitches with circular needle size 3.5 mm and rose mist. Work garter stitch back and forth, AT THE SAME TIME at the end of each row cast on 1 new stitch. Work like this until you have worked 29-29-31-31-31-31 ridges and increased 29-29-31-31-31-31 stitches in each side of the piece = 85-85-93-93-95-95 stitches on needle. After the last row from the wrong side cut the strand. Leave the stitches on a circular needle or thread and work with circular needle size 3.5 mm as follows: Knit up from right side 92-92-97-97-101-101 stitches along the side of square (2) (see sketch) and use the next colour in the stripe. Continue from the right side over the 85-85-93-93-95-95 stitches on needle/thread, knit up 92-92-97-97-101-101 stitches along side of domino square on the other side = 269-269-287-287-297-297 stitches on row. Continue back and forth with garter stitch and stripes until piece measures 6-8-9-12-14-17 cm from where you knitted up stitches along the half domino squares. At the beginning of the next 2 rows cast off 46-46-48-48-51-51 stitches (= sides of tunic) = 177-177-191-191-195-195 stitches on needle. Insert a marker in each side of the piece (they mark the splits in sides and are used later in assembly). Continue with garter stitch and stripes and on the next row begin to cast off in each side for sleeve: Cast off stitches at beginning of every 4th row (every 2nd ridge) in each side as follows: Cast off 5 stitches 4-4-5-5-5-5 times, 2 stitches 7-7-8-8-9-9 times and 1 stitch 14-13-12-11-10-9 times = 81-83-85-87-89-91 stitches. Continue until the sleeve measures 53-54-55-56-56-57 cm from the cast-on edge. Cast off. Make sure that the cast-off edge is not tight. RIGHT SHOULDER, SIDE OF BODY AND SLEEVE: Work in the same way as left shoulder, side of body (i.e., knit up stitches along the side of square (3)) and sleeve. ASSEMBLY: Sew seam in raglan line – see black star in illustration. Sew with rose mist and sew in the outermost stitch-loop so that the seam is flat. Make sure that the seam is not tight. Sew sleeve seam from the cast-off edge at bottom of sleeve and upwards to the marker which was inserted before casting off 46-46-48-48-51-51 stitches for side in tunic. Repeat in other side. NECK: Start in the one raglan seam from the right side and knit up 118-140 stitches with short circular needle size 3.5 mm and wooden rose. Work 3 RIDGES in the round - read description above. Cast off with knit. Cut and fasten strand. |
|||||||
Diagram explanations |
|||||||
|
|||||||
|
|||||||
|
Have you made this or any other of our designs? Tag your pictures in social media with #dropsdesign so we can see them! Do you need help with this pattern?You'll find tutorial videos, a Comments/Questions area and more by visiting the pattern on garnstudio.com. © 1982-2024 DROPS Design A/S. We reserve all rights. This document, including all its sub-sections, has copyrights. Read more about what you can do with our patterns at the bottom of each pattern on our site. |
|||||||


With over 40 years in knitting and crochet design, DROPS Design offers one of the most extensive collections of free patterns on the internet - translated to 17 languages. As of today we count 304 catalogues and 11422 patterns - 11422 of which are translated into English (UK/cm).
We work hard to bring you the best knitting and crochet have to offer, inspiration and advice as well as great quality yarns at incredible prices! Would you like to use our patterns for other than personal use? You can read what you are allowed to do in the Copyright text at the bottom of all our patterns. Happy crafting!
Comments / Questions (65)
Jeg har svært ved at forstå hvordan man strikker det sidste i halsen. Jeg har 51 masker nu, Jeg skal tage 2 masker ind i begge sider, og tage ind i midten som jeg har gjort hele tiden. Men der står jeg skal fortsætte med det indtil der er 3 masker tilbage. Men halsen er da lige, så der er jo mere end 3 masker? Hvad er det jeg ikke forstår? Mvh Karin Aagaard
15.12.2021 - 21:50Ik snap het bovenste vierkant voor de hals niet helemaal. Moet dit gebreid worden tot? : Herhaal naalden 1 en 2, dus minder 2 steken in het midden van het vierkant iedere 2e naald tot er 47-47-51-51-51-51 steken over zijn op de naald (dus nadat u 41-41-43-43-47-47 ribbels heeft gebreid). Want de bovenzijde van het vierkant moet afgeplat worden voor de hals, indien ik hier verder brei, heb ik terug een volledig vierkant.
22.11.2021 - 10:28DROPS Design answered:
Dag Lily,
Nadat je 41-41-43-43-47-47 ribbels hebt gebreid brei je daarna verder met de minderingen in het midden en daarnaast maak je ook aan elk einde van de naald minderingen om de afvlakking van de hals te maken. Dus vanaf dat minder je iedere tweede naald ook aan het begin en het einde van de naald een steek.
23.11.2021 - 12:24HVORFOR er opskriften på engelsk?????
03.11.2021 - 12:55DROPS Design answered:
Hej Birgitte, det er bare at vælge den danske - du skifter sprog lige under billedet ;) Diamond Cut
04.11.2021 - 08:04Jeg ville rigtig gerne have mål på bryst vidde. Og længde på str L. \r\nSynes det er svært at finde den rigtige str \r\n Vh Karin
02.11.2021 - 17:23DROPS Design answered:
Hej Karin, du finder målene i måleskitsen nederst i opskriften. Her finder du også en lektion om hvordan man læser og bruger måleskitsen - God fornøjelse!
03.11.2021 - 08:28Har ställt en fråga om antal maskor att plocka upp flr sida i den halva dominorutan. Förstår nu att det är rätt i mönstret 92-101. Borde förklaras på ett bättre sätt. Svårt att förstå.
31.10.2021 - 22:25Problem med att sticka sidorna. Jag får inte ihop maskantalet 287. Har plockat upp 64 m längs diagonal i ruta 2 64 m fram+ ärm 93+64 bak. Totalt på stickan 221m. Enligt mönstret ska det vara 287m. Det går inte att få ihop 97m på diagonal i ruta två. Vad hör jag för fel?
31.10.2021 - 12:47I am confused about the instructions on fa-413. Is there a tutorial for this step of the pattern?
07.09.2021 - 23:42DROPS Design answered:
Dear Joanne, all the relevant tutorial videos are linked, just below the pattern. Happy Stitching!
08.09.2021 - 03:01Hei. Det jeg lurer på er i forhold til strikking av sidestykke, skuldre, ermer : når jeg strikker opp 92 masker i fra den ene siden, legger så på de 85 som er på egen pinne.. fra hvor skal jeg hente de neste 92 maskene jeg skal strikke opp? Er det i fra bakstykke?
28.08.2021 - 22:35DROPS Design answered:
Hei Monica. Ja, det er fra bakstykket, du har da 92 + 85 +92 masker på pinnen. mvh DROPS design
06.09.2021 - 10:58Hallo, es geht um den Ärmel. 27 M anschlagen und dann jeweils beidseitig eine M zunehmen! Die Frage ist, auch auf der rückreihe zunehmen? Danke im voraus
20.05.2021 - 17:22DROPS Design answered:
Liebe Uschi, es wird also beidseitig zugenommen, aber immer am Ende jeder Reihe sollen Sie zunehmen, dh am Ende jeder Hinreihe und am Ende jeder Rückreihen (niemals am Anfang), bis 29 Krausrippen gestrickt und 29 Maschen zugenommen wurden. Viel Spaß beim stricken!
21.05.2021 - 07:29Ich müsste jetzt die Schulter links weitermachen. Sie schreiben ich soll 27 M anschlagen. Nehme ich die Maschen nicht, wie sonst, direkt an dem fertigen strickteil auf? Ich meine, stricke ich die Ärmel nicht direkt an? LG Uschi
17.05.2021 - 13:23DROPS Design answered:
Liebe Uschi, nein diese Maschen sollen Sie anschlagen, sie gehören zum Schulterteil beim Halsausshnitt, jetzt stricken Sie in Hin- und Rückreihen (siehe Maßskizze), Sie werden Maschen auffassen erst nach den Zunahmen (schwarzes Sternchen = Naht, nach Raglanzunahmen ca nach 4. Domino). Viel Spaß beim stricken!
17.05.2021 - 14:26