
Popular categories
Looking for a yarn?


|
|||||||
Diamond Cut |
|||||||
 |
 |
||||||
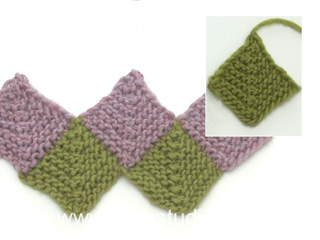
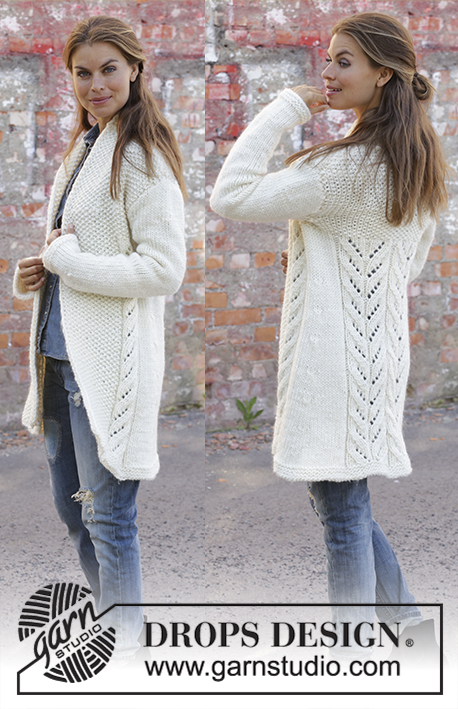
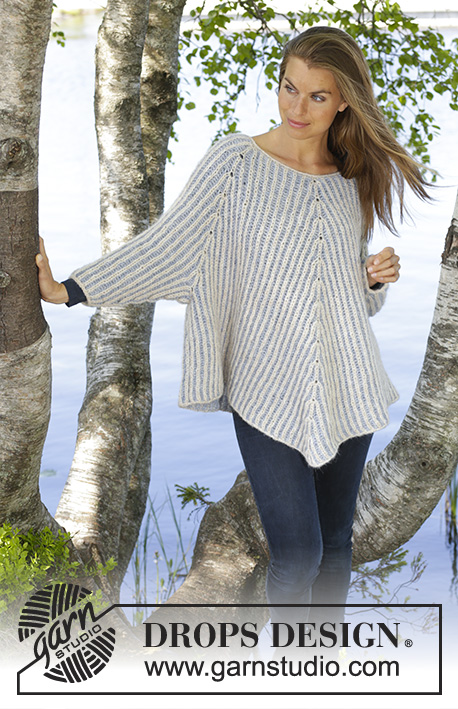
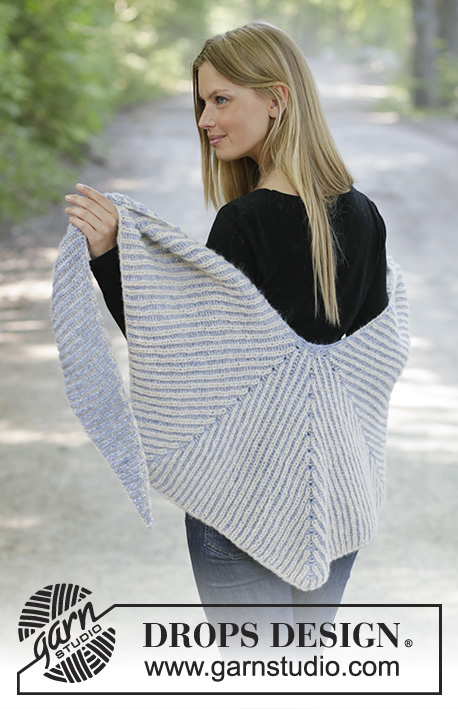
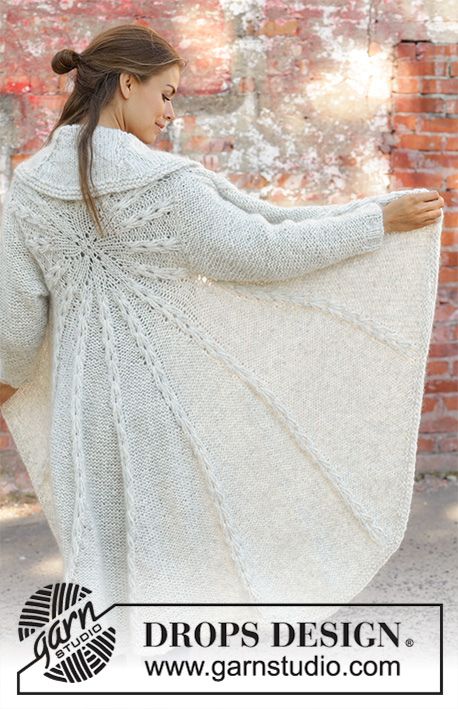
Knitted tunic in DROPS Fabel. The piece is worked back and forth with garter stitch, domino squares and stripes. Sizes S - XXXL.
DROPS 194-27 |
|||||||
|
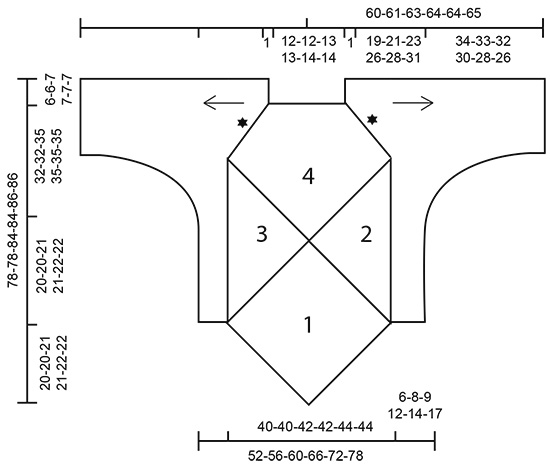
EXPLANATIONS FOR THE PIECE: ------------------------------------------------------- RIDGE/GARTER STITCH (worked in the round): 1 ridge = 2 rounds. Knit 1 round and purl 1 round. RIDGE/GARTER STITCH (worked back and forth): 1 ridge = Knit 2 rows. STRIPES-1: * 1 ridge wooden rose, 1 ridge salt and pepper *, work from *-*. STRIPES-2: * 1 ridge rose mist, 1 ridge grey *, work from *-*. STRIPES SLEEVES: Work 15-15-16-16-17-17 cm with * 1 ridge rose mist, 1 ridge salt and pepper *, work from *-*. Work 5 cm with * 1 ridge rose mist, 1 ridge grey *, work from *-*. Work 3 cm with * 1 ridge salt and pepper, 1 ridge grey *, work from *-*. Work 15 cm with * 1 ridge wooden rose, 1 ridge rose mist *, work from *-*. Work 1 cm with * 1 ridge grey, 1 ridge salt and pepper *, work from *-*. Work 8 cm with * 1 ridge rose mist, 1 ridge grey *, work from *-*. Work 4 cm with * 1 ridge wooden rose, 1 ridge rose mist *, work from *-*. Continue to finished length with * 1 ridge grey, 1 ridge wooden rose *, work from *-*. ------------------------------------------------------- START THE PIECE HERE: ------------------------------------------------------- TUNIC - SHORT OVERVIEW OF THE PIECE: The piece is worked back and forth with circular needle. You first work whole and half domino squares. Then work the shoulder and pick up stitches down the edge of the section with domino squares before working garter stitch and stripes out to the side for body and sleeves. FRONT PIECE: WHOLE DOMINO SQUARE (1): Cast on 129-129-137-137-145-145 stitches with circular needle size 3.5 mm and wooden rose. Insert a marker in the middle stitch of the row (= 64-64-68-68-72-72 stitches on each side of the stitch with marker). Work GARTER STITCH and STRIPES-1 – read description above and work domino square as follows: ROW 1 (= wrong side): Knit. ROW 2 (= right side): Knit until there is 1 stitch left before the marker, slip 1 stitch as if to knit, knit 2 together and pass the slipped stitch over the knitted together stitches, knit to end of row. Repeat rows 1 and 2, i.e. decrease 2 stitches in middle of square every 2nd row until there is stitch left on the row. Cut the strand and pull it through the stitch. The domino square measures approx. 28-28-30-30-31-31 x 28-28-30-30-31-31 cm. HALF DOMINO SQUARE (2): Start from the right side with circular needle size 3.5 mm and rose mist and knit up 65-65-69-69-73-73 stitches (= 2 stitches in first ridge and 1 stitch in each of the next ridges) along the right side of the first domino square. Work STRIPES-2 – read description above and work a half domino square as follows: ROW 1 (= wrong side): Knit. ROW 2 (= right side): Knit 2 together, knit to end of row. Repeat rows 1 and 2, i.e. decrease 1 stitch every 2nd row until there is 1 stitch left on the row. Cut the strand and pull it through the stitch. HALF DOMINO SQUARE (3): Start from the right side with circular needle size 3.5 mm and rose mist and knit up 65-65-69-69-73-73- stitches (= 1 stitch in each ridge until there is 1 ridge left and 2 stitches in last ridge) along the left side of the first domino square. Work STRIPES-2 and work a half domino square as follows: ROW 1 (= wrong side): Knit. ROW 2 (= right side): Knit until there are 2 stitches left on row, slip 1 stitch as if to knit, knit 1 and pass the slipped stitch over the knitted stitch. Repeat rows 1 and 2, i.e. decrease 1 stitch every 2nd row until there is 1 stitch left. Cut strand and pull it through the stitch. WHOLE DOMINO SQUARE WITH DECREASE FOR NECK (4): Start from right side with circular needle size 3.5 mm and wooden rose and knit up 64-64-68-68-72-72 stitches (= 1 stitch in each ridge) along the side of half domino square (2), knit up 1 stitch in the transition between the 3 domino squares and continue by knitting up 64-64-68-68-72-72 stitches (= 1 stitch in each ridge) along the side of half domino square (3) = 129-129-137-137-145-145 stitches. Insert a marker in the middle stitch of the row (= 64-64-68-68-72-72 stitches on each side of the stitch with marker). Work STRIPES-1 and work domino square as follows: ROW 1 (= wrong side): Knit. ROW 2 (= right side): Knit until there is 1 stitch left before the marker, slip 1 stitch as if to knit, knit 2 together and pass the slipped stitch over the knitted together stitches, knit to end of row. Repeat rows 1 and 2, i.e. decrease 2 stitches in middle of square every 2nd row until there are 47-47-51-51-51-51 stitches left on the row (i.e. after you have worked 41-41-43-43-47-47 ridges). Now work as follows: ROW 83-83-87-87-95-95 (= wrong side): Knit. ROW 84-84-88-88-96-96 (= right side): Knit 2 together, knit until there is 1 stitch left before the marker, slip 1 stitch as if to knit, knit 2 together and pass the slipped stitch over the knitted together stitches, knit until there are 2 stitches left on row, slip 1 stitch as if to knit, knit 1 and pass the slipped stitch over the knitted stitch. Repeat these last 2 rows, i.e. you decrease 2 stitches middle of square and 1 stitch in each side (= 4 stitches decreased) every 2nd row until there are 3 stitches left on row. Knit 1 row over all stitches, then work the last row as follows: Slip 1 stitch as if to knit, knit 2 together and pass the slipped stitch over the knitted together stitches = 1 stitch left. Cut strand and pull it through stitch. BACK PIECE: Cast on and work in same way as front piece. LEFT SHOULDER, SIDE OF BODY AND SLEEVE: Now work left shoulder, side of body and sleeve back and forth in garter stitch and work STRIPES SLEEVES - read description above: Cast on 27-27-31-31-33-33 stitches with circular needle size 3.5 mm and rose mist. Work garter stitch back and forth, AT THE SAME TIME at the end of each row cast on 1 new stitch. Work like this until you have worked 29-29-31-31-31-31 ridges and increased 29-29-31-31-31-31 stitches in each side of the piece = 85-85-93-93-95-95 stitches on needle. After the last row from the wrong side cut the strand. Leave the stitches on a circular needle or thread and work with circular needle size 3.5 mm as follows: Knit up from right side 92-92-97-97-101-101 stitches along the side of square (2) (see sketch) and use the next colour in the stripe. Continue from the right side over the 85-85-93-93-95-95 stitches on needle/thread, knit up 92-92-97-97-101-101 stitches along side of domino square on the other side = 269-269-287-287-297-297 stitches on row. Continue back and forth with garter stitch and stripes until piece measures 6-8-9-12-14-17 cm from where you knitted up stitches along the half domino squares. At the beginning of the next 2 rows cast off 46-46-48-48-51-51 stitches (= sides of tunic) = 177-177-191-191-195-195 stitches on needle. Insert a marker in each side of the piece (they mark the splits in sides and are used later in assembly). Continue with garter stitch and stripes and on the next row begin to cast off in each side for sleeve: Cast off stitches at beginning of every 4th row (every 2nd ridge) in each side as follows: Cast off 5 stitches 4-4-5-5-5-5 times, 2 stitches 7-7-8-8-9-9 times and 1 stitch 14-13-12-11-10-9 times = 81-83-85-87-89-91 stitches. Continue until the sleeve measures 53-54-55-56-56-57 cm from the cast-on edge. Cast off. Make sure that the cast-off edge is not tight. RIGHT SHOULDER, SIDE OF BODY AND SLEEVE: Work in the same way as left shoulder, side of body (i.e., knit up stitches along the side of square (3)) and sleeve. ASSEMBLY: Sew seam in raglan line – see black star in illustration. Sew with rose mist and sew in the outermost stitch-loop so that the seam is flat. Make sure that the seam is not tight. Sew sleeve seam from the cast-off edge at bottom of sleeve and upwards to the marker which was inserted before casting off 46-46-48-48-51-51 stitches for side in tunic. Repeat in other side. NECK: Start in the one raglan seam from the right side and knit up 118-140 stitches with short circular needle size 3.5 mm and wooden rose. Work 3 RIDGES in the round - read description above. Cast off with knit. Cut and fasten strand. |
|||||||
Diagram explanations |
|||||||
|
|||||||
|
|||||||
|
Have you made this or any other of our designs? Tag your pictures in social media with #dropsdesign so we can see them! Do you need help with this pattern?You'll find tutorial videos, a Comments/Questions area and more by visiting the pattern on garnstudio.com. © 1982-2024 DROPS Design A/S. We reserve all rights. This document, including all its sub-sections, has copyrights. Read more about what you can do with our patterns at the bottom of each pattern on our site. |
|||||||


With over 40 years in knitting and crochet design, DROPS Design offers one of the most extensive collections of free patterns on the internet - translated to 17 languages. As of today we count 304 catalogues and 11422 patterns - 11422 of which are translated into English (UK/cm).
We work hard to bring you the best knitting and crochet have to offer, inspiration and advice as well as great quality yarns at incredible prices! Would you like to use our patterns for other than personal use? You can read what you are allowed to do in the Copyright text at the bottom of all our patterns. Happy crafting!
Comments / Questions (65)
Kan modellen strikkes i kun 2 farver og hvor mange nøgler af hver farve skal man så bruge?
19.02.2024 - 22:31DROPS Design answered:
Hej Inger, ja det bestemmer du selv, og du skal nok bruge samme antal nøgler (muligvis 1 mindre, men det vil være synd at få for lidt) :)
22.02.2024 - 12:03Hallo, ich habe eine Frage zum 1. Quadrat. Wenn ich jede Reihe zu Ende stricke und immer in der Mitte eine Masche abnehme, erhalte ich dann nicht ein Dreieck? Soll man die Arbeit vor dem Markierer drehen und beide Seiten separat stricken? Irgendwie häng ich und kann mir das nicht vorstellen. LG
05.01.2024 - 18:08DROPS Design answered:
Liebe Frau Zimmermann, in diesem Video zeigen wir, wie man so einen Quadrat strickt, sicher kann das Ihnen helfen, um das Ergebnis zu visualisieren. Viel Spaß beim stricken!
08.01.2024 - 09:30Jeg kan ikke se hvordan stribe fordelingen er på den hele domino.
10.10.2023 - 10:16DROPS Design answered:
Hej Kirsten, den hele DOMINORUDE strikkes ifølge STRIBER-1: * 2 p retstrik rosentræ, 2 p retstrik salt og peber *, strik fra *-*.
17.10.2023 - 12:59Kunt u aangeven welke kleuren bij elkaar kunnen voor bovenstaande trui als rosé mist niet op voorraad is? wat kan daarvoor in de plaats?\r\nOf kunt u een set aangeven met hoofdkleur rood? Met dank Jessica Laumen
16.09.2023 - 16:55DROPS Design answered:
Dag J Lauman,
Hiervoor kun je het beste even contact opnemen met de winkel waar je het garen koopt. Eventueel kun je extra bollen bestellen en die je niet gebruikt stuur je terug.
17.09.2023 - 09:51Hello, thank you for answering my question so quickly! but you have not answered it. The decreases at the neck do not create the neck shape in the picture - it just tapers the point and you get there a bit quicker. Knitting as instructed, decreasing at the sides and in the centre, it does not create the neck shape - I still have a point at the top of the diamond.
28.04.2023 - 10:15DROPS Design answered:
Dear Kim, repeating the last 2 rows (the one mentionned below + the next row from WS) will allow you getting a straight edge, you will decrease 1 st on each side and 2 sts in the middle (as before) until 3 sts remain. In this video, we show how to work such a half domino/how to end this domino to get a flat upper edge - we are working over a smaller number of stitches but this might help you understanding how to decrease. Happy knitting!
28.04.2023 - 11:04Hello, is there an error in this pattern? The picture shows a round neck, but the pattern says to knit a full square - it comes up to a point and the decreases at the side do not create the neckline shown in the picture. thanks
27.04.2023 - 21:08DROPS Design answered:
Dear Kim, you work a whole domino square (4 in the chart), but you will have to decrease to shape neck - see ROW 84-84-88-88-96-96 (= right side) before end of the square. Happy knitting!
28.04.2023 - 10:12Bonsoir Pourriez vous me confirmer que pour le losange 2, les diminutions se font depuis la pointe du bas du futur losange 2 (configuration dans laquelle je me trouve en ayant repris les mailles du bas vers le haut du côté droit du losange 1). Ou devrais-je réduire depuis le haut du losange 2 ? Merci beaucoup d'avance pour votre réponse. Magali
26.04.2023 - 23:58DROPS Design answered:
Bonjour Mme Dubuc, les diminutions du demi-domino 2 se font en début de rang sur l'endroit (si on regarde le schéma, elles seront à droite = ligne droite du triangle 2). Lorsque vous ferez le demi-domino 3, vous diminuez en fin de rang sur l'endroit (= ligne droite du triangle 3 dans le schéma). Bon tricot!
27.04.2023 - 08:26Caro drop design team, Ho ricevuto la risposta alla precedente domanda e credo di non essere stata chiara. Le spiegazioni del quadrato numero 4 con diminuzioni per il collo non sono coerenti con il diagramma. Il diagramma mostra uno scollo di 12-13 cm che corrispondono a 5-6 maglie . La descrizione del lavoro prevede una chiusura di questo quadrato con 0 maglie. Potreste controllare ? Se non c'è un errore potreste spiegarmi dove sbaglio? Grazie Laura.
12.04.2023 - 07:42DROPS Design answered:
Buonasera Laura, lavorando a partire dalle righe 84-84-88-88-96-96 si lavorano le diminuzioni per il collo. Provi a vedere se questo video le può essere di aiuto. Buon lavoro!
06.05.2023 - 23:21Ciao Caro Drop design Team, questa volta ho una domanda: non mi è chiara la diminuzione per il collo: a leggere le spiegazioni ( sia in italiano che in norvegese tradotto) il quadrato viene terminato esattamente come il quadrato intero n. 1, ma a guardare la foto quello che risulta dovrebbe essere un pentagono. Potreste controllare per favore che il lavoro non preveda un numero di maglie in sospeso o addirittura intrecciate da riprendere in seguito? Grazie Laura
07.04.2023 - 09:40DROPS Design answered:
Buonasera Laura, non ci sono correzioni su questo modello. Buon lavoro!
11.04.2023 - 22:54Ciao Caro Drops design Team, Ho trovato un piccolo errore nella traduzione dello schema in italiano. L'originale in norvegese scrive: "84.-84.-88.-88.-96.-96.PINNE (= retten): Strikk 2 masker rett sammen, rett til det gjenstår 1 maske før merket, .." Nella traduzione in italiano manca: " Strikk 2 masker rett sammen" che stando a quallo che dice deepl significa " lavorare due maglie insieme". Potete controllare? grazie Laura
07.04.2023 - 09:35DROPS Design answered:
Buonasera Laura, grazie per la segnalazione: abbiamo corretto il testo. Buon lavoro!
11.04.2023 - 22:53