
Popular categories
Looking for a yarn?


|
|||||||||||||
DROPS 84-7 |
|||||||||||||
|
|
|||||||||||||
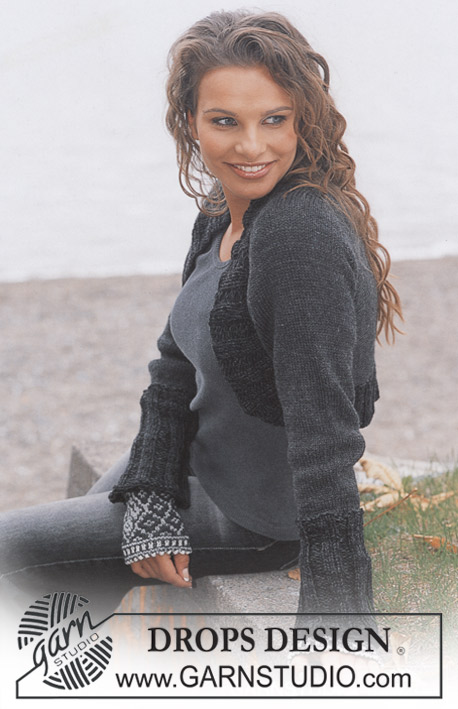
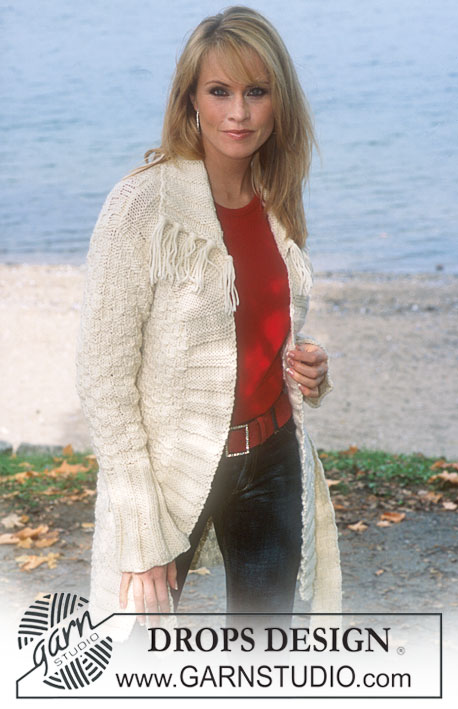
DROPS Cardigan and wristwarmers in Alpaca.
DROPS 84-7 |
|||||||||||||
|
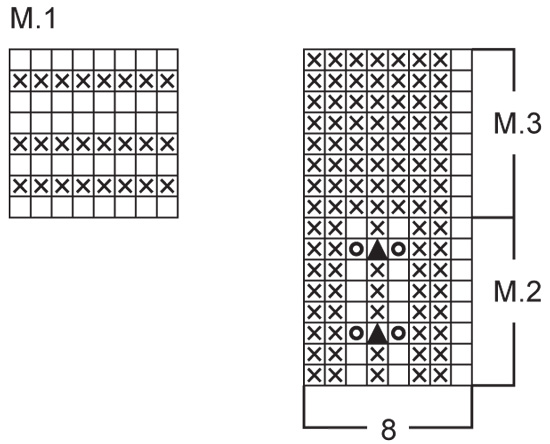
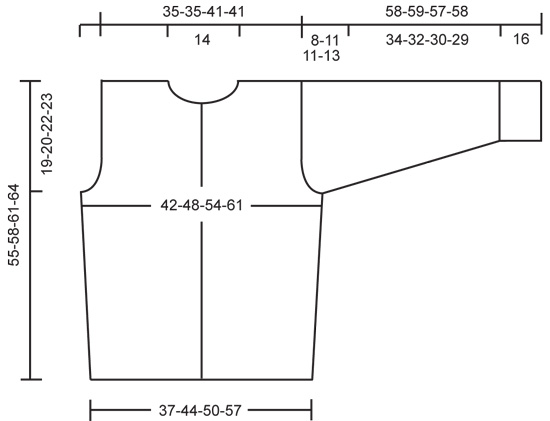
CARDIGAN: Gauge: 24 sts x 32 rows in stockinette st = 10 x 10 cm. Pattern: See charts. The pattern is seen from the right side. Pattern 1 (knit flat): K 5 rows, P 3 rows Pattern 1 (knit in the round): * K 1 row, P 1 row *, repeat * - *, K 2 rows, P 1 row, K 1 row. Buttonhole: Make buttonholes on right buttonband as follows (from right side): K 1 (garter st edge st), P 1, K 1, P 2 tog, yo. On the next row, K the yo. Make buttonholes when the piece measures: Size XS/S: 2, 9, 16, 23, 30, 37 and 45 cm Size M: 2, 10, 17, 25, 32, 40 and 48 cm Size L/XL: 2, 10, 18, 26, 34, 42 and 50 cm Size XXL: 2, 9, 17, 24, 32, 39, 46 and 53 cm Increasing tips: Inc at each side of the 3 lace pattern sts in Pattern 2 (the marker sits in the center of these sts) – P the increased sts (as seen from the right side). Body: Cast on 189-221-253-285 sts on circular needles and knit Pattern 1 (row 1 = right side) – make buttonholes along right buttonband – see instructions above. Then knit as follows (right side row): K 1 (garter st edge st), P 1, K 1, P 3 (= buttonband), Pattern 2 over the following 176-208-240-272 sts, K 1, P 3, K 1, P 1, K 1 (garter st edge st) (the last 6 sts = buttonband). Continue as established over all sts and put a marker in the 51st-59th-67th-75th st in from each edge (the marker sits in the center of a lace repeat) = 87-103-119-135 sts on back. When the piece measures 6 cm inc 1 st at each side of each marker – see increasing tips above – every 5-6-6-7 cm a total of 6-5-5-5 times = 213-241-273-305 sts. When the piece measures 36-38-39-41 cm knit the next row as follows (right side row): knit 53-60-68-76 sts = right front, bind off 7 sts for armhole, knit 93-107-123-139 sts = back, bind off 7 sts for armhole, knit 53-60-68-76 sts = left front. Back: = 93-107-123-139 sts. Bind off for armhole at each side every other row: 2 sts 1-3-3-6 times and 1 st 3-6-6-8 times = 83-83-99-99 sts, continue the pattern keeping 1 edge st at each side in garter st. When the piece measures 53-56-59-62 cm bind off the center 29 sts for the neck. Dec 1 st at each neck edge every other row 2 times = 25-25-33-33 sts remain on each shoulder. Bind off when the piece measures 55-58-61-64 cm. Right front: = 53-60-68-76 sts. Bind off for armhole at the side as on back = 48-48-56-56 sts. Continue the pattern keeping 1 edge st at armhole in garter st (the buttonband sts are knit the same as before). When the piece measures 46-49-51-54 cm – adjust so that you have knit 1 cm over last buttonhole – put the outermost 14 sts at the center front edge on a st holder. Bind off at neck edge every other row: 2 sts 3 times and 1 st 3 times = 25-25-33-33 sts remain on shoulder. Bind off when the piece measures 55-58-61-64 cm. Left front: Knit the same as the right reversing shaping. Sleeve: Cast on 64-64-72-72 sts on double-pointed needles; join and place a marker at the join. Knit Pattern 1, and then knit Pattern 2 – start so that the marker is in the center of a lace pattern. When the piece measures 16 cm – adjust to end after 3 or 7 rows of the chart – knit Pattern 3 to finished measurements. When the piece measures 16 cm inc 1 st each side of marker a total of 8-11-12-17 times: Size XS/S: every 14 rows. Size M: every 9 rows. Size L/XL: every 8 rows Size XXL: every 5 rows = 80-86-96-106 sts – knit the increased sts in Pattern 3 as you go along. When the piece measures 50-48-46-45 cm bind off 7 sts at marker (the st with the marker and 3 sts each side of marked st). Bind off for sleeve cap at each side every other row: 3 sts 1 time, 2 sts 3-2-2-3 times and 1 st 4-10-10-12 times, then 2 sts at each side until the piece measures 57-58-56-57 cm, then bind off 3 sts at each side 1 time. Bind off the remaining sts, the piece measures approx. 58-59-57-58 cm. Assembly: Sew shoulder seams. Neckband: Pick up approx. 100-132 sts around the neck (incl. sts from st holders) on circular needles. Knit 3 rows garter st (row 1 = wrong side), then bind off. Sew in sleeves using edge sts as seam allowance. Sew on buttons. WRISTWARMERS: Measurements: Length: 26 cm Circumference: 18 cm Material: Garnstudio ALPACA 100% alpaca, 50 g./180 m 100 gr nr 0100, natural DROPS 2.5 mm needles, or size needed to obtain correct gauge. Gauge: 25 sts x 50 rows in garter st = 10 x 10 cm. Picot Pattern (knit back and forth on needles): Row 1: knit all sts Row 2: knit all sts Row 3: knit to last 4 sts, K 2 tog, yo, K 2 sts in each of the last 2 sts (2 new sts). Row 4: bind off 1st 2 sts (sl 1st st to begin) and K across remaining sts on row. Repeat rows 1 - 4. Wristwarmer: Cast on 65 sts and knit Picot Pattern – see instructions above. When the piece measures 18 cm, join sts to cast on edge (do not bind off first). Knit a second wristwarmer. |
|||||||||||||
Diagram explanations |
|||||||||||||
|
|||||||||||||
|
|||||||||||||
|
|||||||||||||
|
Have you made this or any other of our designs? Tag your pictures in social media with #dropsdesign so we can see them! Do you need help with this pattern?You'll find tutorial videos, a Comments/Questions area and more by visiting the pattern on garnstudio.com. © 1982-2024 DROPS Design A/S. We reserve all rights. This document, including all its sub-sections, has copyrights. Read more about what you can do with our patterns at the bottom of each pattern on our site. |
|||||||||||||


With over 40 years in knitting and crochet design, DROPS Design offers one of the most extensive collections of free patterns on the internet - translated to 17 languages. As of today we count 304 catalogues and 11422 patterns - 11422 of which are translated into English (UK/cm).
We work hard to bring you the best knitting and crochet have to offer, inspiration and advice as well as great quality yarns at incredible prices! Would you like to use our patterns for other than personal use? You can read what you are allowed to do in the Copyright text at the bottom of all our patterns. Happy crafting!
Comments / Questions (13)
Strikker knapphullene som beskrevet, men de blir ikke i midten av stolpen 🙂 Hva gjør jeg feil? Oppskriften sier 1m rille, 1vr, 1r, 2vr sammen, 1kast.
05.03.2024 - 08:56DROPS Design answered:
Hej Vera, det bliver 1 maske indenfor midten af stolpen og det skal det være :)
07.03.2024 - 15:40Jeg forstår ikke hvordan man strikker hullene. Det står på diagrammet: "kast, 1 m løs av, 2 r sammen, kastet over" Dette får jeg ikke til. Hjelp!
24.02.2024 - 13:20DROPS Design answered:
Hej Vera. Kanske denne video kan vara till hjälp. Den visar "Ta 1 m løs av p som om den skulle strikkes rett, 2 r sm, løft den løse m over". Det är den løse masken du ska løfte over, ikke kastet. Mvh DROPS Design
27.02.2024 - 14:23Bonjour, \r\nPour les augmentations, dois-je comprendre : tricoter jusqu\'à ce qu\'il reste 1 m avant le marqueur-augmentation-3m-augmentation ? Et doivent-elles faire des trous ?\r\nMerci de votre aide.
28.05.2022 - 20:57DROPS Design answered:
Bonjour Christelle, les augmentations ont été corrigées: vous augmentez de part et d'autre du motif M.3 sur chacun des côtés du gilet (aux marqueurs) en faisant 1 jeté, tricotez ces jetés torse au rang suivant pour éviter les trous (ces mailles se tricotent bien en jersey envers). Bon tricot!
30.05.2022 - 08:35Wordt de knoopschatenbies zowel heen als terug gebreid 1r, 1av, 1r, 3 av - patroon - 3 av, 1r, 1av, 1r, dus als het waren in een soort gerstekorrel, of brei je op de naald terug de steken zoals deze zich voordoen, dat wil zeggen, 1av, 1r, 1av, 3 r - patroon - 3 r, 1av, 1r, 1av?
29.01.2021 - 19:23Hej! Körde fast direkt när jag kom till kantmaskorna. Förstår genom instruktionerna vid avmaskningen för knapphål att det ska vara 1 rät, 1 avig, 1 rät, 3 aviga på höger sida och 1 rät, 3 aviga, 1 rät, 1 avig och 1 rät på vänster sida. Stickas kantmaskorna så redan från v 1? Tacksam för snabb hjälp.
27.03.2019 - 21:15DROPS Design answered:
Hei Christine. Du strikker stolpene likt hele veien. Etter at du har lagt opp sier oppskriften: "Sedan fortsätts det så här (från rätsidan): 1 rätst m, 1 am, 1 rm, 3 am (= framkant)" og på slutten av pinnen: " 3 am, 1 rm, 1 am, 1 rätst m (de sista 6 m = framkant)". Du fortsetter å strikke kantmaskene på denne måten oppover. God fornøyelse
03.04.2019 - 10:33Hoe moet ik de kop van de mouw breien? Ik denk dat het patroon niet klopt.
23.01.2019 - 17:31DROPS Design answered:
Dag Anneke,
Het eerste deel van de mouw wordt in de rondte gebreid op sokkenbreinaalden. Bij een hoogte van 50-48-46-45 cm kant je steken af bij de markeerdraad en daar begint dus ook de kop van de mouw. Deze brei je tot een hoogte van 57-58-56-57 cm, waarbij je steeds steken afkant aan de zijkanten.
08.02.2019 - 17:58Lorraine Bruce wrote:
I live in Australia and would love to make this garment. I am unable yo wear Alpaca yarn and wish to make it in wool. I have some 5ply wool I wish to use but I cannot achieve the gauge as stated. I would normally use 3.75mm needles with this yarn but this gives me a tension of 26 sts to 10 cm. Can you suggest how I might be able to adapt this pattern?
04.10.2016 - 05:54DROPS Design answered:
Dear Mrs Bruce, we are unfortunately not able to adjust each of our pattern to each individual request. Please contact the store where you bought your yarn - and see here list of worldwide shipping DROPS Store. Happy knitting!
04.10.2016 - 09:41Er ærmekuplen ikke for kort, fra man har lukket de 7 m. Arb måler her 46 (L/XL), og man skal allerede lukke af, når arb. Måler 57 cm. Så er ærmekuplen kun 11 cm, men ærmegabet er jo 22 cm. Kan det være rigtigt ?
29.09.2016 - 21:14DROPS Design answered:
Hej Susanne. Jo, men din aermekuppel skal jo ikke vaere lige saa höjt som aermegabet, den er buet og monteres ikke lige op om du forstaar.
04.10.2016 - 16:37I flere år har jeg strikker med deres garn og mønster. Liker det veldig godt. Men nå ønsker jeg å strikke modell 84 - 7, og kan ikke få printet ut mønsteret. Hvorfor??
04.02.2016 - 15:54Se tex. Drops 143:1, avsnitt Ärm, rad 5.
04.08.2014 - 15:13