
Popular categories
Looking for a yarn?


|
|||||||||||||||||||
Wednesday Morning |
|||||||||||||||||||
 |
 |
||||||||||||||||||
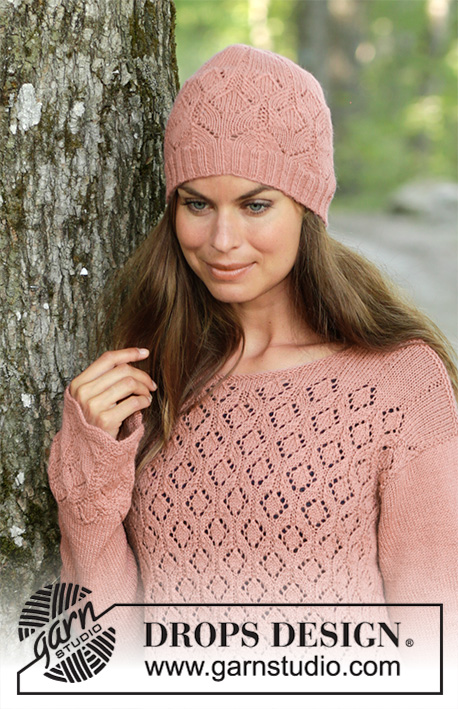
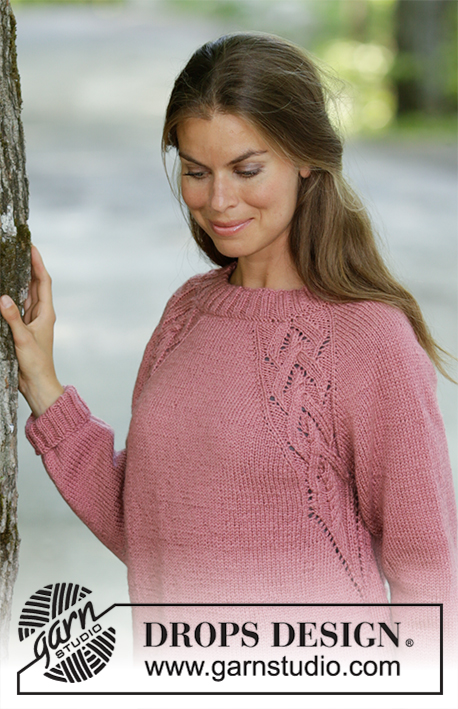
Knitted sweater in DROPS Merino Extra Fine. The piece is worked back and forth with texture and displacement. Sizes S - XXXL.
DROPS 197-27 |
|||||||||||||||||||
|
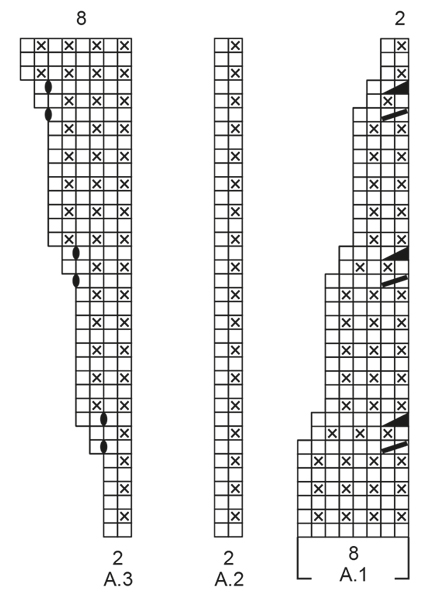
------------------------------------------------------- EXPLANATIONS FOR THE PATTERN: ------------------------------------------------------- RIDGE/GARTER STITCH (worked back and forth): 1 ridge = Knit 2 rows. PATTERN: See diagrams A.1 to A.7. The diagrams show all the rows in the pattern seen from the right side. DECREASE TIP: All decreases are made from the right side! Decrease in the same way as in diagrams A.1 and A.7 as follows: Decrease after the 1 edge stitch in garter stitch when the 2nd stitch on the row is worked in garter stitch as follows: Knit 2 together. Decrease after the 1 edge stitch in garter stitch when the 2nd stitch on the row is knitted as follows: Purl 2 together. Decrease before the 1 edge stitch in garter stitch when the next to last stitch on the row is in garter stitch as follows: Work until there are 3 stitches left on the row, slip 1 stitch as if to knit, knit 1 and pass the slipped stitch over the knitted stitch. Decrease before the 1 edge stitch in garter stitch when the next to last stitch on the row is knitted as follows: Work until there are 3 stitches left on the row, purl 2 together. ------------------------------------------------------- START THE PIECE HERE: ------------------------------------------------------- SWEATER - SHORT OVERVIEW OF THE PIECE: The piece is worked back and forth with circular needle in sections and sewn together to finish. The piece is worked bottom up. FRONT PIECE: Cast on 129-137-145-153-165-177 stitches with circular needle size 4.5 mm / US 7 and Merino Extra Fine. Purl 1 row from the wrong side. Now work pattern from the right side as follows: 1 edge stitch in GARTER STITCH - read description above, work A.1 over the first 8 stitches, A.2 over the next 50-54-58-62-68-74 stitches, A.3 over the next 2 stitches, A.4 over the next 7 stitches (= the middle 7 stitches on the row), A.5 over the next 2 stitches, A.6 over the next 50-54-58-62-68-74 stitches, A.7 over the next 8 stitches and 1 edge stitch in garter stitch. Continue back and forth like this. The number of stitches stays the same, but the pattern is displaced. REMEMBER THE GAUGE! When the diagrams have been completed in height, continue the pattern in the same way, i.e. increase stitches in A.3 and A.5 and decrease stitches in A.1 and A.7. When the piece measures approx. 34-34-35-35-35-35 cm / 13⅜"-13⅜"-13 ¾"-13 ¾"-13 ¾"-13 ¾" from the cast-on edge and up the side of the piece – adjust so that you finish after 5 rows after an increase, work the next row from the right side as follows: Work pattern as before over the first 64-68-72-76-82-88 stitches on the row, work 2 stitches in the next stitch (= mid-stitch), work pattern as before over the last 64-68-72-76-82-88 stitches on the row = 130-138-146-154-166-178 stitches. Insert a marker thread in each side of the piece. THE PIECE IS NOW MEASURED FROM HERE! Place the first 65-69-73-77-83-89 stitches (seen from the right side) on a thread for left shoulder and work the right shoulder. RIGHT SHOULDER: = 65-69-73-77-83-89 stitches. Work 1 row back from the wrong side. Now work pattern as follows from the right side: 2 edge stitches in garter stitch (= towards neck), continue pattern A.6 until there is 1 stitch left and work 1 edge stitch in garter stitch. AT THE SAME TIME on the first row from the right side decrease 1 stitch inside the 1 edge stitch in garter stitch towards the side - read DECREASE TIP. Decrease like this every 4th row a total of 10-10-11-11-12-12 times and when the piece measures 10-11-11-12-13-14 cm / 3⅞"-4 ¼"-4 ¼"-4⅝"-5⅛"-5 ½" from the marker thread bind off 2-2-2-4-4-4 stitches for the armhole = 53-57-60-62-67-73 stitches left on shoulder. When the piece measures 17-18-19-20-21-22 cm / 6¾"-7"-7½"-8"-8¼"-8¾" from the marker thread (= 7-7-8-8-8-8 cm / 2 ¾"-2 ¾"-3⅛"-3⅛"-3⅛"-3⅛" from where you bind off for the armhole) work short rows in pattern as before from the wrong side as follows: ROW 1 (wrong side): Work until there are 2 stitches left on the row, tighten strand. ROW 2 (right side): Work back. ROW 3: Work until there are 4 more stitches left on the row than the previous time (= 6 stitches), tighten strand. ROW 4: Work back. Repeat rows 3 and 4 and turn when there are 4-4-4-4-4-4 more stitches left than on the previous row 7-11-10-13-12-15 more times (= a total of 8-12-11-14-13-16 times) and then when there are 5-3-5-0-3-3 more stitches left than on the previous row 3-1-2-0-3-1 times (NOTE: In size XL turn after there are 4 more stitches left each time). Work 1 ridge over all stitches on row where you decrease 5 stitches evenly on row = 48-52-55-57-62-68 stitches left on shoulder. Bind off. The piece measures approx. 60-62-64-66-68-70 cm / 23⅝"-24⅜"-25¼"-26"-26¾"-27½" / 23⅝"-24⅜"-25¼"-26"-26¾"-27½" from the shoulder down. LEFT SHOULDER: = 65-69-73-77-83-89 stitches. Work 1 row back from the wrong side. Now work pattern as follows from the right side: 1 edge stitch in garter stitch (towards armhole), continue pattern A.6 until there are 2 stitches left and work 2 edge stitches in garter stitch (= towards neck). AT THE SAME TIME on the first row from the right side decrease 1 stitch inside the 1 edge stitch in garter stitch towards the side - remember DECREASE TIP. Decrease like this every 4th row a total of 10-10-11-11-12-12 times and when the piece measures 10-11-11-12-13-14 cm / 3⅞"-4 ¼"-4 ¼"-4⅝"-5⅛"-5 ½" from the marker thread bind off 2-2-2-4-4-4 stitches for the armhole = 53-57-60-62-67-73 stitches left on shoulder. When the piece measures 17-18-19-20-21-22 cm / 6¾"-7"-7½"-8"-8¼"-8¾" from the marker thread (= 7-7-8-8-8-8 cm / 2 ¾"-2 ¾"-3⅛"-3⅛"-3⅛"-3⅛" from where you bind off for the armhole) work short rows in pattern as before from the right side as follows: ROW 1 (right side): Work until there are 2 stitches left on the row, tighten strand. ROW 2 (wrong side): Work back. ROW 3: Work until there are 4 more stitches left than the previous time (= 6 stitches), tighten strand. ROW 4: Work back. Repeat rows 3 and 4 and turn when there are 4-4-4-4-4-4 more stitches left than the previous row 7-11-10-13-12-15 more times (= a total of 8-12-11-14-13-16 times) and then when there are 5-3-5-0-3-3 more stitches left than the previous time 3-1-2-0-3-1 times (NOTE: In size XL turn when there are 4 more stitches left each time). Work 1 ridge over all stitches on row where you decrease 5 stitches evenly on row = 48-52-55-57-62-68 stitches left on shoulder. Bind off. The piece measures approx. 60-62-64-66-68-70 cm / 23⅝"-24⅜"-25¼"-26"-26¾"-27½" / 23⅝"-24⅜"-25¼"-26"-26¾"-27½" from the shoulder down. BACK PIECE: Cast on 121-129-137-145-157-169 stitches with circular needle size 4.5 mm / US 7 and Merino Extra Fine. Purl 1 row from the wrong side. Now work pattern as follows from the right side: 1 edge stitch in garter stitch, work A.2 until there are 2 stitches left on the row, work the first stitch in A.2 and 1 edge stitch in garter stitch. Continue back and forth like this. When the piece measures 44-45-46-47-48-49 cm / 17¼"-17¾"-18"-18½"-19"-19¼" – adjust to match the front piece where you bind off stitches for the armholes, and bind off 2-2-2-4-4-4 stitches at the beginning of the next 2 rows for the armholes in each side = 117-125-133-137-149-161 stitches. Continue working until the piece measures 56-58-60-62-64-66 cm / 22"-22¾"-23⅝"-24⅜"-25¼"-26". Now work garter stitch over the middle 25-25-27-27-29-29 stitches on the row. When you have worked 2 ridges over these stitches, bind off the middle 21-21-23-23-25-25 stitches for neck and each shoulder is finished separately = 48-52-55-57-62-68 stitches on each shoulder. Continue with texture and 1 edge stitch in garter stitch in the side and 2 stitches in garter stitch towards the neck. When the piece measures 59-61-63-65-67-69 cm / 23¼"-24"-24¾"-25½"-26⅜"-27⅛" / 23¼"-24"-24¾"-25½"-26⅜"-27⅛" work 1 ridge over all stitches. Bind off. Work the other shoulder in the same way. The piece measures approx. 60-62-64-66-68-70 cm / 23⅝"-24⅜"-25¼"-26"-26¾"-27½" / 23⅝"-24⅜"-25¼"-26"-26¾"-27½" from the shoulder down. SLEEVE: Cast on 45-45-49-49-53-53 stitches with circular needle size 4.5 mm / US 7 and Merino Extra Fine. Purl 1 row from the wrong side. Now work pattern as follows from the right side: 1 edge stitch in garter stitch, A.2 over the next 16-16-18-18-20-20 stitches, A.3 over the next 2 stitches, A.4 over the middle 7 stitches on the sleeve, A.5 over the next 2 stitches, A.6 over the next 16-16-18-18-20-20 stitches and 1 edge stitch in garter stitch. Continue back and forth like this. You increase stitches on the middle of sleeve in diagrams A.3 and A.5. When the sleeve measures 7 cm / 2¾" decrease 1 stitch in each side - remember DECREASE TIP! NOTE: In size XXXL you do not decrease, but continue to work texture and increase stitches as before. Decrease like this every 10th-12th-18th-30th-28th-0 row a total of 10-8-6-4-4-0 times. When the diagrams have been completed in height continue to increase in the middle of the sleeve as before until you have increased a total of 20-20-18-18-18-16 times and there are 65-69-73-77-81-85 stitches on the needle. Then continue with texture until the sleeve measures 40-39-38-37-36-33 cm / 15 ¾"-15 ¼"-14⅞"-14 ½"-14⅛"-13". Bind off. Work the other sleeve in the same way. ASSEMBLY: Sew the shoulder seams with grafting stitches. Sew sleeves to body inside the 1 edge stitch in garter stitch on the body and inside the bind-off edge on the sleeve. Sew sleeve and side seams in one go inside the 1 edge stitch in garter stitch. |
|||||||||||||||||||
Diagram explanations |
|||||||||||||||||||
|
|||||||||||||||||||
|
|||||||||||||||||||

|
|||||||||||||||||||

|
|||||||||||||||||||
|
Have you made this or any other of our designs? Tag your pictures in social media with #dropsdesign so we can see them! Do you need help with this pattern?You'll find tutorial videos, a Comments/Questions area and more by visiting the pattern on garnstudio.com. © 1982-2024 DROPS Design A/S. We reserve all rights. This document, including all its sub-sections, has copyrights. Read more about what you can do with our patterns at the bottom of each pattern on our site. |
|||||||||||||||||||


With over 40 years in knitting and crochet design, DROPS Design offers one of the most extensive collections of free patterns on the internet - translated to 17 languages. As of today we count 304 catalogs and 11422 patterns - 11417 of which are translated into English (US/in).
We work hard to bring you the best knitting and crochet have to offer, inspiration and advice as well as great quality yarns at incredible prices! Would you like to use our patterns for other than personal use? You can read what you are allowed to do in the Copyright text at the bottom of all our patterns. Happy crafting!
Comments / Questions (63)
De verkorte toeren , zijn de vanaf de schouder naar de hals. Of zijn die van de hals naar de schouder?
23.05.2019 - 20:31DROPS Design answered:
Dag Es,
Aan de kant van de hals krijg je steeds meer steken bij het breien van de verkorte naalden, zodat de schouderlijn ietwat schuin afloopt vanaf de hals naar de mouw.
23.05.2019 - 21:303:22: Bonjour , j arrive au denier paragraphe pour l épaule droite .Après le rang 4 (rang raccourci ).Je ne comprend pas la suite,pouvez vous m expliquer ?Merci beaucoup .cordialement.
01.04.2019 - 11:02DROPS Design answered:
Bonjour Mme Tribout, vous répétez les rangs 3 et 4 et tournez quand il reste 4 m en plus que la fois précédente, soit la fois suivante (rang 5 = 10 mailles, puis 14 mailles et ainsi de suite) cf taille pour le nombre de fois puis tournez quand il reste 5-3-5-0-3-3 m en plus que la fois précédente 3-1-2-0-3-1 fois au total. Bon tricot!
01.04.2019 - 15:29Bonjour , j arrive au denier paragraphe pour l épaule droite .Après le rang 4 (rang raccourci ).Je ne comprend pas la suite,pouvez vous m expliquer ?Merci beaucoup .cordialement.
29.03.2019 - 23:22Hi Drops Team! I'm a little confused with the diagram from the 7th row. Someone can help me or give me some advice. I'm doing an M size. Thank's a lot
01.03.2019 - 18:09DROPS Design answered:
Dear Mireia, on the 7th row you will incrase in A.3/A.5 (with a yarn over worked twisted on next row) and in A.1/A.7 you will decrease as shown in diagram. On next row work the sts as shown in diagram. Happy knitting!
04.03.2019 - 07:39Pour la manche, quelle est la longueur proposée pour la taille M: 39 ou 36? Merci de me répondre
30.01.2019 - 11:33DROPS Design answered:
Bonjour! C'est 39 cm. Bon tricot!
30.01.2019 - 11:34En ce qui concerne le dos, les explications ne sont pas très claires. Je suppose que les diminutions des épaules se font comme celles de devant, sinon pouvez vous m'expliquer? Merci de me répondre.
26.01.2019 - 10:26DROPS Design answered:
Bonjour Mme Savornin, le dos ne se tricote pas comme le devant, on rabat les mailles des emmanchures et on continue simplement comme avant, on rabat les mailles de l'encolure puis on termine chaque épaule séparément. Bon tricot!
28.01.2019 - 10:19Bonsoir, Tout d’abord merci pour ce modèle il est sublime ! Je le tricote en mélanger cotoneribo + brushed alpaga silk c’est très doux ! J’en suis aux manches et je ne comprends pas pourquoi il faut diminuer (d’ailleurs, de chaque côtés ?) alors que sur le modèle graphique les manches s’élargissent.. ? Merci !
08.01.2019 - 19:00DROPS Design answered:
Bonjour Elodie, dès le début de la manche, on augmente dans A.3 et A.5, mais, pour éviter que la manche ne s'élargisse trop vite, on diminue en même temps de chaque côté. On conserve ainsi le motif du dessus de la manche (A.3 et A.5) mais on diminue en même temps de chaque côté pour contrôler l'élargissement de la manche. Bon tricot!
09.01.2019 - 08:17Bonjour, quand on arrive au diminution se font elles coté emmanchure ou encolure, merci
20.12.2018 - 18:29DROPS Design answered:
Bonjour Mme Schütz, les diminutions des épaules se font côté emmanchure, on ne diminue pas pour l'encolure. Bon tricot!
21.12.2018 - 07:56Bonjour! J'arrive à l'emmanchure sur le devant et j'ai 2 questions: 1. Après avoir rabattu les mailles de l'emmanchure, est-ce qu'il faut toujours garder 2 mailles lisière? Ou continuer directement avec le point fantaisie. 2. Plus loin, il faut tricoter des "rangs raccourcis", que signifie "serrer le fil"? Merci d'avance!
30.11.2018 - 20:27DROPS Design answered:
Bonjour Beatriz, côté emmanchure on tricote seulement 1 m lis au point mousse, (les 2 m lis sont côté encolure). Après avoir rabattu les mailles de l'emmanchure, on continue avec 1 m lis au point mousse. Cette vidéo montre la méthode de base pour tricoter les rangs raccourcis et donc, comment serrer le fil au début du rang suivant. Bon tricot!
03.12.2018 - 08:03Anna wrote:
Hi there, Can I use the DROPS Brushed Alpaca Silk yarn for this sweater? Also do you recommend blocking using this material? Thanks! Anna
23.10.2018 - 19:53DROPS Design answered:
Hi Anna, If you use a different garn to the one suggested, it is important to do a trial piece with the new yarn to get the right knitting tension and then adjust the number of stitches in the pattern. Happy knitting!
24.10.2018 - 08:00