
Popular categories
Looking for a yarn?


|
|||||||||||||||||||
Wednesday Morning |
|||||||||||||||||||
 |
 |
||||||||||||||||||
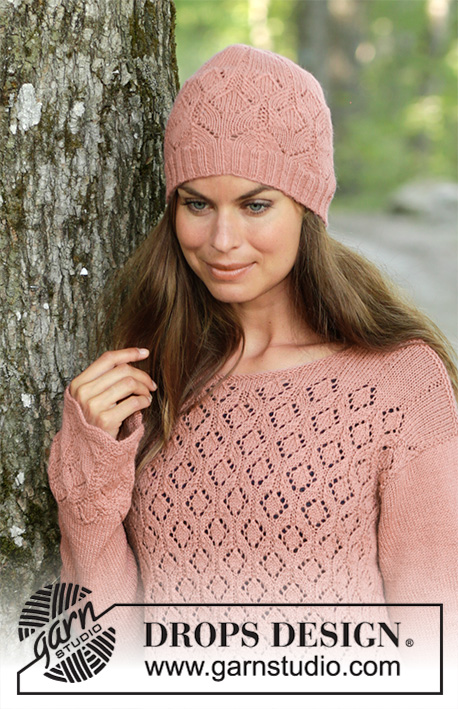
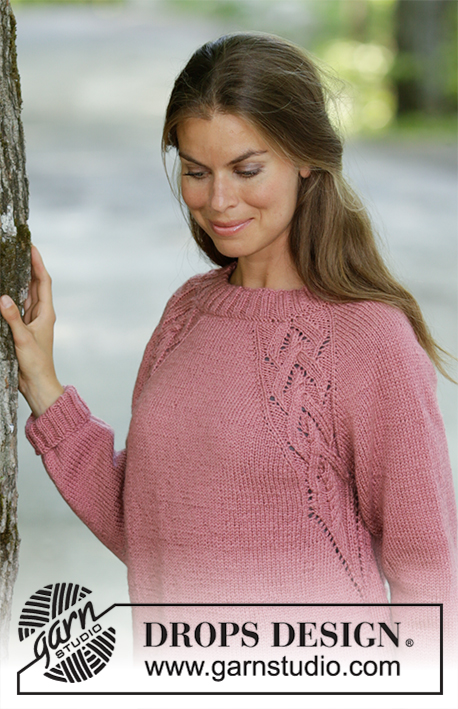
Knitted sweater in DROPS Merino Extra Fine. The piece is worked back and forth with texture and displacement. Sizes S - XXXL.
DROPS 197-27 |
|||||||||||||||||||
|
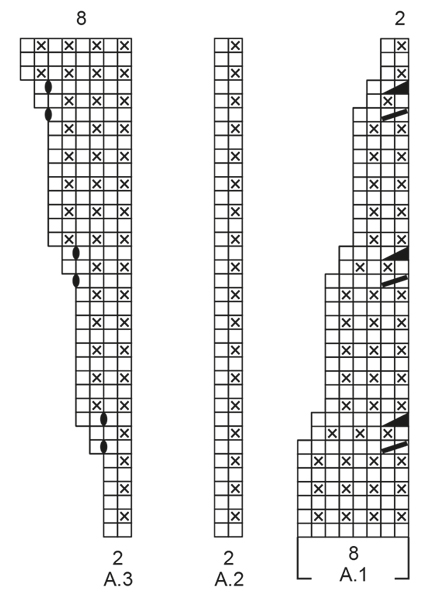
------------------------------------------------------- EXPLANATIONS FOR THE PATTERN: ------------------------------------------------------- RIDGE/GARTER STITCH (worked back and forth): 1 ridge = Knit 2 rows. PATTERN: See diagrams A.1 to A.7. The diagrams show all the rows in the pattern seen from the right side. DECREASE TIP: All decreases are made from the right side! Decrease in the same way as in diagrams A.1 and A.7 as follows: Decrease after the 1 edge stitch in garter stitch when the 2nd stitch on the row is worked in garter stitch as follows: Knit 2 together. Decrease after the 1 edge stitch in garter stitch when the 2nd stitch on the row is knitted as follows: Purl 2 together. Decrease before the 1 edge stitch in garter stitch when the next to last stitch on the row is in garter stitch as follows: Work until there are 3 stitches left on the row, slip 1 stitch as if to knit, knit 1 and pass the slipped stitch over the knitted stitch. Decrease before the 1 edge stitch in garter stitch when the next to last stitch on the row is knitted as follows: Work until there are 3 stitches left on the row, purl 2 together. ------------------------------------------------------- START THE PIECE HERE: ------------------------------------------------------- SWEATER - SHORT OVERVIEW OF THE PIECE: The piece is worked back and forth with circular needle in sections and sewn together to finish. The piece is worked bottom up. FRONT PIECE: Cast on 129-137-145-153-165-177 stitches with circular needle size 4.5 mm / US 7 and Merino Extra Fine. Purl 1 row from the wrong side. Now work pattern from the right side as follows: 1 edge stitch in GARTER STITCH - read description above, work A.1 over the first 8 stitches, A.2 over the next 50-54-58-62-68-74 stitches, A.3 over the next 2 stitches, A.4 over the next 7 stitches (= the middle 7 stitches on the row), A.5 over the next 2 stitches, A.6 over the next 50-54-58-62-68-74 stitches, A.7 over the next 8 stitches and 1 edge stitch in garter stitch. Continue back and forth like this. The number of stitches stays the same, but the pattern is displaced. REMEMBER THE GAUGE! When the diagrams have been completed in height, continue the pattern in the same way, i.e. increase stitches in A.3 and A.5 and decrease stitches in A.1 and A.7. When the piece measures approx. 34-34-35-35-35-35 cm / 13⅜"-13⅜"-13 ¾"-13 ¾"-13 ¾"-13 ¾" from the cast-on edge and up the side of the piece – adjust so that you finish after 5 rows after an increase, work the next row from the right side as follows: Work pattern as before over the first 64-68-72-76-82-88 stitches on the row, work 2 stitches in the next stitch (= mid-stitch), work pattern as before over the last 64-68-72-76-82-88 stitches on the row = 130-138-146-154-166-178 stitches. Insert a marker thread in each side of the piece. THE PIECE IS NOW MEASURED FROM HERE! Place the first 65-69-73-77-83-89 stitches (seen from the right side) on a thread for left shoulder and work the right shoulder. RIGHT SHOULDER: = 65-69-73-77-83-89 stitches. Work 1 row back from the wrong side. Now work pattern as follows from the right side: 2 edge stitches in garter stitch (= towards neck), continue pattern A.6 until there is 1 stitch left and work 1 edge stitch in garter stitch. AT THE SAME TIME on the first row from the right side decrease 1 stitch inside the 1 edge stitch in garter stitch towards the side - read DECREASE TIP. Decrease like this every 4th row a total of 10-10-11-11-12-12 times and when the piece measures 10-11-11-12-13-14 cm / 3⅞"-4 ¼"-4 ¼"-4⅝"-5⅛"-5 ½" from the marker thread bind off 2-2-2-4-4-4 stitches for the armhole = 53-57-60-62-67-73 stitches left on shoulder. When the piece measures 17-18-19-20-21-22 cm / 6¾"-7"-7½"-8"-8¼"-8¾" from the marker thread (= 7-7-8-8-8-8 cm / 2 ¾"-2 ¾"-3⅛"-3⅛"-3⅛"-3⅛" from where you bind off for the armhole) work short rows in pattern as before from the wrong side as follows: ROW 1 (wrong side): Work until there are 2 stitches left on the row, tighten strand. ROW 2 (right side): Work back. ROW 3: Work until there are 4 more stitches left on the row than the previous time (= 6 stitches), tighten strand. ROW 4: Work back. Repeat rows 3 and 4 and turn when there are 4-4-4-4-4-4 more stitches left than on the previous row 7-11-10-13-12-15 more times (= a total of 8-12-11-14-13-16 times) and then when there are 5-3-5-0-3-3 more stitches left than on the previous row 3-1-2-0-3-1 times (NOTE: In size XL turn after there are 4 more stitches left each time). Work 1 ridge over all stitches on row where you decrease 5 stitches evenly on row = 48-52-55-57-62-68 stitches left on shoulder. Bind off. The piece measures approx. 60-62-64-66-68-70 cm / 23⅝"-24⅜"-25¼"-26"-26¾"-27½" / 23⅝"-24⅜"-25¼"-26"-26¾"-27½" from the shoulder down. LEFT SHOULDER: = 65-69-73-77-83-89 stitches. Work 1 row back from the wrong side. Now work pattern as follows from the right side: 1 edge stitch in garter stitch (towards armhole), continue pattern A.6 until there are 2 stitches left and work 2 edge stitches in garter stitch (= towards neck). AT THE SAME TIME on the first row from the right side decrease 1 stitch inside the 1 edge stitch in garter stitch towards the side - remember DECREASE TIP. Decrease like this every 4th row a total of 10-10-11-11-12-12 times and when the piece measures 10-11-11-12-13-14 cm / 3⅞"-4 ¼"-4 ¼"-4⅝"-5⅛"-5 ½" from the marker thread bind off 2-2-2-4-4-4 stitches for the armhole = 53-57-60-62-67-73 stitches left on shoulder. When the piece measures 17-18-19-20-21-22 cm / 6¾"-7"-7½"-8"-8¼"-8¾" from the marker thread (= 7-7-8-8-8-8 cm / 2 ¾"-2 ¾"-3⅛"-3⅛"-3⅛"-3⅛" from where you bind off for the armhole) work short rows in pattern as before from the right side as follows: ROW 1 (right side): Work until there are 2 stitches left on the row, tighten strand. ROW 2 (wrong side): Work back. ROW 3: Work until there are 4 more stitches left than the previous time (= 6 stitches), tighten strand. ROW 4: Work back. Repeat rows 3 and 4 and turn when there are 4-4-4-4-4-4 more stitches left than the previous row 7-11-10-13-12-15 more times (= a total of 8-12-11-14-13-16 times) and then when there are 5-3-5-0-3-3 more stitches left than the previous time 3-1-2-0-3-1 times (NOTE: In size XL turn when there are 4 more stitches left each time). Work 1 ridge over all stitches on row where you decrease 5 stitches evenly on row = 48-52-55-57-62-68 stitches left on shoulder. Bind off. The piece measures approx. 60-62-64-66-68-70 cm / 23⅝"-24⅜"-25¼"-26"-26¾"-27½" / 23⅝"-24⅜"-25¼"-26"-26¾"-27½" from the shoulder down. BACK PIECE: Cast on 121-129-137-145-157-169 stitches with circular needle size 4.5 mm / US 7 and Merino Extra Fine. Purl 1 row from the wrong side. Now work pattern as follows from the right side: 1 edge stitch in garter stitch, work A.2 until there are 2 stitches left on the row, work the first stitch in A.2 and 1 edge stitch in garter stitch. Continue back and forth like this. When the piece measures 44-45-46-47-48-49 cm / 17¼"-17¾"-18"-18½"-19"-19¼" – adjust to match the front piece where you bind off stitches for the armholes, and bind off 2-2-2-4-4-4 stitches at the beginning of the next 2 rows for the armholes in each side = 117-125-133-137-149-161 stitches. Continue working until the piece measures 56-58-60-62-64-66 cm / 22"-22¾"-23⅝"-24⅜"-25¼"-26". Now work garter stitch over the middle 25-25-27-27-29-29 stitches on the row. When you have worked 2 ridges over these stitches, bind off the middle 21-21-23-23-25-25 stitches for neck and each shoulder is finished separately = 48-52-55-57-62-68 stitches on each shoulder. Continue with texture and 1 edge stitch in garter stitch in the side and 2 stitches in garter stitch towards the neck. When the piece measures 59-61-63-65-67-69 cm / 23¼"-24"-24¾"-25½"-26⅜"-27⅛" / 23¼"-24"-24¾"-25½"-26⅜"-27⅛" work 1 ridge over all stitches. Bind off. Work the other shoulder in the same way. The piece measures approx. 60-62-64-66-68-70 cm / 23⅝"-24⅜"-25¼"-26"-26¾"-27½" / 23⅝"-24⅜"-25¼"-26"-26¾"-27½" from the shoulder down. SLEEVE: Cast on 45-45-49-49-53-53 stitches with circular needle size 4.5 mm / US 7 and Merino Extra Fine. Purl 1 row from the wrong side. Now work pattern as follows from the right side: 1 edge stitch in garter stitch, A.2 over the next 16-16-18-18-20-20 stitches, A.3 over the next 2 stitches, A.4 over the middle 7 stitches on the sleeve, A.5 over the next 2 stitches, A.6 over the next 16-16-18-18-20-20 stitches and 1 edge stitch in garter stitch. Continue back and forth like this. You increase stitches on the middle of sleeve in diagrams A.3 and A.5. When the sleeve measures 7 cm / 2¾" decrease 1 stitch in each side - remember DECREASE TIP! NOTE: In size XXXL you do not decrease, but continue to work texture and increase stitches as before. Decrease like this every 10th-12th-18th-30th-28th-0 row a total of 10-8-6-4-4-0 times. When the diagrams have been completed in height continue to increase in the middle of the sleeve as before until you have increased a total of 20-20-18-18-18-16 times and there are 65-69-73-77-81-85 stitches on the needle. Then continue with texture until the sleeve measures 40-39-38-37-36-33 cm / 15 ¾"-15 ¼"-14⅞"-14 ½"-14⅛"-13". Bind off. Work the other sleeve in the same way. ASSEMBLY: Sew the shoulder seams with grafting stitches. Sew sleeves to body inside the 1 edge stitch in garter stitch on the body and inside the bind-off edge on the sleeve. Sew sleeve and side seams in one go inside the 1 edge stitch in garter stitch. |
|||||||||||||||||||
Diagram explanations |
|||||||||||||||||||
|
|||||||||||||||||||
|
|||||||||||||||||||

|
|||||||||||||||||||

|
|||||||||||||||||||
|
Have you made this or any other of our designs? Tag your pictures in social media with #dropsdesign so we can see them! Do you need help with this pattern?You'll find tutorial videos, a Comments/Questions area and more by visiting the pattern on garnstudio.com. © 1982-2024 DROPS Design A/S. We reserve all rights. This document, including all its sub-sections, has copyrights. Read more about what you can do with our patterns at the bottom of each pattern on our site. |
|||||||||||||||||||


With over 40 years in knitting and crochet design, DROPS Design offers one of the most extensive collections of free patterns on the internet - translated to 17 languages. As of today we count 304 catalogs and 11422 patterns - 11417 of which are translated into English (US/in).
We work hard to bring you the best knitting and crochet have to offer, inspiration and advice as well as great quality yarns at incredible prices! Would you like to use our patterns for other than personal use? You can read what you are allowed to do in the Copyright text at the bottom of all our patterns. Happy crafting!
Comments / Questions (63)
I'm a trouble about the 'wednesday morning' pattern. I knitted to the begining of the neckline. However I don't understandhow is the decrease to shape the V neckline. Is the decrease in the near the V neckline? In the zoom picture I can't see any decrease. Thank you very much
07.03.2020 - 22:09DROPS Design answered:
Dear Mrs Moreno, the decreases are done towards armhole there are no decrease worked towards neck. Do not forget to cast off for armhole. Happy knitting!
09.03.2020 - 11:19I am sorry but if I do this, I end up with 6 stitches in a7 before closing line 7. Should I reduce the stitches in A2? Thank you!
27.02.2020 - 16:59DROPS Design answered:
Dear Anthousa, on row 7 in pattern you will decrease 1 stitch at the beg of row in A.1 and increase 1 st in A.3 (= number of sts is the same, pattern will be just displaced). And after A.4 you will also increase 1 st in A.5 and decrease 1 st in A.7 - simply work the row 6 in diagrams as they are shown - repeat dec in A.1/A.7 and inc in A.3/A.5 on row 9 and so on. Happy knitting!
28.02.2020 - 09:37Dear Monica, according the instruction I have to make 2 stitches in A3 but this is only possible until line 6 of the pattern. How should I proceed?
27.02.2020 - 15:48DROPS Design answered:
Dear Anthousa, on row 7 in A.3 knit 2 sts, make 1 yarn over, knit 1 stitch = there are now 3 sts in A.3. Happy knitting!
27.02.2020 - 16:47Hallo, ich verstehe die Ärmelloch-Abnahme nicht! Lt. Zeichnung liegt das Ärmelloch in Höhe Ausschnittbeginn, welche die Stelle markiert, in die der Markierungsfaden eingezogen werden soll. In der Anleitung für den rechten Arm steht "bei einer Länge von 10-... cm ab dem Markierungsfaden 2-... Maschen ... abketten" Dadurch würde in der Mitte des Ärmellochs eine Stufe entstehen. Ist die Anleitung dort fehlerhaft oder habe ich einen Denkfehler?
24.01.2020 - 08:20DROPS Design answered:
Liebe Marlemio, die Maschen für das Armloch ketten Sie wie beschrieben ab, auch wenn die Abnahmen noch nicht fertig sind. Dann stricken Sie wie zuvor bis alle Abnahmen fertig sind. Und dann stricken Sie die verkürzten Reihen. Es ist etwas außergewöhnlich aber es wird so klappen, wie es beschrieben ist. Viel Spaß beim stricken!
24.01.2020 - 14:07Bonjour, j\'ai quelques difficultés pour démarrer ce modèle : on commence par un rang envers sur l\'envers puis les diagrammes A1 à A7. Donc un rang endroit sur l\'endroit et le point texturé se forme sur les rangs à l\'envers avec une maille endroit, une maille envers tout au long du rang. Si c\'est cela et que les diminutions se font sur l\'endroit du tricot donc en mailles endroit pourquoi parle t\'on de mailles au point mousse dans les diminutions.
30.12.2019 - 15:51DROPS Design answered:
Bonjour Annie, c'est bien cela, sur l'endroit, on tricote à l'endroit et sur l'envers, on alterne 1 m end/1 m env = on aura donc 1 m point mousse/1 m jersey. Les diminutions et les augmentations se font sur des rangs en mailles endroit = des rangs sur l'endroit - 1 m au point mousse est une des mailles des diagrammes qui se tricote à l'endroit sur l'endroit et sur l'envers. Bon tricot!
02.01.2020 - 17:17Bonjour j ai encore besoin de votre aide :-) je suis perdu je ne comprends pas ce qu il faut faire rang 1 rang 2 ... ?? serrer le fil ?? Vraiment un grand merci d avance .
18.10.2019 - 08:10DROPS Design answered:
Bonjour Vanessa, on tricote ici des rangs raccourcis, et, pour éviter les trous, on va serrer le fil au moment où on tourne (cf vidéo des rangs raccourcis de base). Si vous avez par ex 60 m, au rang 1 (= sur l'env) tricotez 58 m, rang 2, 58 m, rang 3: 54 m, rang 4: 54 m et continuez ainsi en tricotant 4 m en moins à la fin de chaque rang sur l'envers. Bon tricot!
18.10.2019 - 09:13Bonjour j ai souci de compréhension, j ai fait mes 11 diminutions tous les 4 rangs et j arrive a 15 cm du fil marqueur et vous dites de rabattre 2 mailles a 11 cm du fil .est ce que j airai du rabattre mes 2 mailles a 11cm et continuer tous les 4 rangs ou est ce que j ai un problème autre . Merci d avance
17.10.2019 - 12:34DROPS Design answered:
Bonjour Va, effectivement, on rabat les 2 m pour l'emmanchure à 11 cm depuis le marqueur, même si les diminutions ne sont pas terminées. On continue ensuite les diminutions jusqu'à ce qu'elles soient terminées et, quand l'ouvrage mesure 19 cm, on tricote les rangs raccourcis. Bon tricot!
17.10.2019 - 13:11Gem. Maschenprobe sind 30 R 10cm. Am Foto beginnt der Halsausschnitt gem. meiner Berechnung nach ca. 90 R. Das wären der Maschenprobe entsprechend doch 30cm, nicht 34cm gem. Anleitung? Ich bin bei etwa 30cm Höhe und habe bereits 8x die Abnahme/Umschläge wiederholt (gem. Foto geschieht das nur 7x). Ich stricke das Muster mit Hin- und Rückreihe. Was mache ich falsch? Vielen Dank im Voraus!
06.09.2019 - 11:27DROPS Design answered:
Liebe Maria, die 34 cm sollen an der Seite der Arbeit gemessen werden - und passen Sie an, daß Sie 5 Reihen nach einer Zunahme gestrickt haben. Viel Spaß beim stricken!
06.09.2019 - 11:52Jeg er i tvivl om ærmgabet. Jeg overholder strikkefastheden, men mit måler 16 cm (i stedet for 7 cm), når jeg er færdig med indtagningerne. Dvs. selve ærmgabet kun bliver 16 cm fra aflukningen. Er det meningen, at der skal aflukkes IMENS man er ved indtagningerne?
06.06.2019 - 08:23DROPS Design answered:
Hei Maria. Ja, fellingene innenfor 1 kantmaske går over fler cm enn de 10-11-11-12-13-14 cm du skal strikke før du feller av til ermhull. Etter at det er felt til ermhull fortsetter du med mønster som før, og feller i siden på hver 4. pinne til alle fellinger er ferdig. God fornøyelse
06.06.2019 - 08:37Hallo, ich verstehe die Ab und Zunahme an den Ärmeln nicht. Laut Zeichnung sehe ich keine Abnahme.
24.05.2019 - 19:44DROPS Design answered:
Liebe Claudia, es wird 1 Masche in A.3 (am Ende Diagram = 1 Umschlag = 3. Symbol) und A.5 (Anfang Diagram = 1 Umschlag = 3. Symbol) zugenommen - bei der Rückreihen werden diese Umschläge verschränkt gestrickt (sie sollen keine Löcher bilden). Viel Spaß beim stricken!
27.05.2019 - 08:26