DROPS Merino Extra Fine
100% Wool
from 3.50 £ /50g
Get the yarn to make this pattern from 42.00£.

The yarn cost is calculated from the pattern’s smallest size and the yarn’s cheapest product type. Looking for an even better price? You might find it on the DROPS Deals!

DROPS SS24

Last Harvest

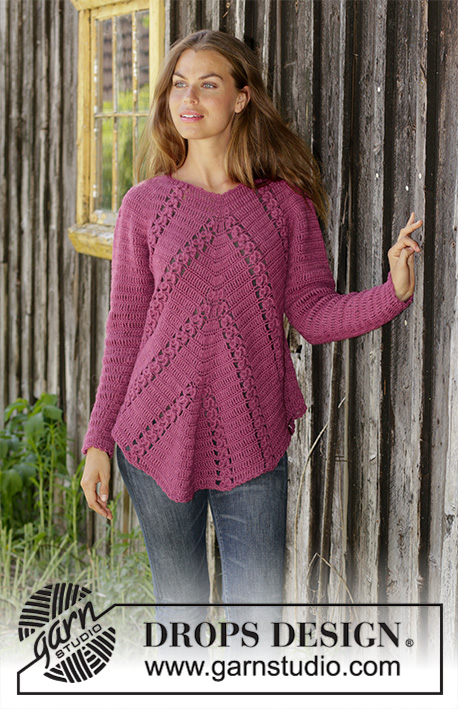
Crocheted jumper in DROPS Merino Extra Fine. The piece is worked with lace pattern, fans and pockets. Sizes S - XXXL

DROPS 196-24
DROPS Design: Pattern no me-149
Yarn group B
-------------------------------------------------------

Sizes: S - M - L - XL - XXL - XXXL
Materials:
DROPS MERINO EXTRA FINE from Garnstudio (belongs to yarn group B)
600-650-700-750-850-950 g colour 32, dark rose

-------------------------------------------------------
ACCESSORIES FOR THE PIECE:

CROCHET TENSION:
16 treble crochets in width and 8 rows in height = 10 x 10 cm.

CROCHET HOOK:
DROPS CROCHET HOOK SIZE 4.5 MM.
The hook size is only a guide. If you have too many stitches on 10 cm, change to a larger hook size. If you have too few stitches on 10 cm, change to a smaller hook size.

-------------------------------------------------------

Alternative Yarn – See how to change yarns here
Yarn Groups A to F – Use the same pattern and change the yarn here
Yarn usage using an alternative yarn – Use our yarn converter here

-------------------------------------------------------

DROPS Merino Extra Fine
100% Wool
from 3.50 £ /50g
Get the yarn to make this pattern from 42.00£.

The yarn cost is calculated from the pattern’s smallest size and the yarn’s cheapest product type. Looking for an even better price? You might find it on the DROPS Deals!

Pattern instructions

NOTE: This pattern is written in British English. All measurements in charts are in cm. For conversion from cm to inches - click here. There are different terms for crocheting in British and American English. If this pattern includes crochet, click for "crochet terms" here. For this pattern in American English, please click here.
-------------------------------------------------------

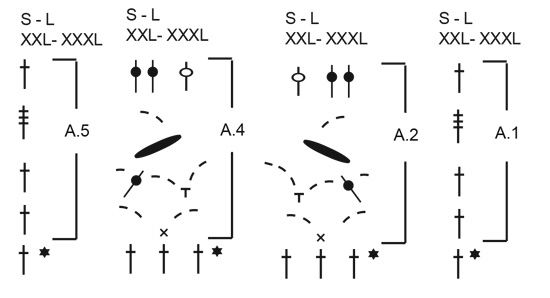
EXPLANATIONS FOR THE PATTERN:

-------------------------------------------------------

PATTERN:
See diagrams A.1 to A.10.
Choose diagram for your size.

CROCHET INFORMATION:
At the beginning of each row of double crochets, replace the first double crochet with 1 chain stitch.
At the beginning of each row of treble crochets, replace the first treble crochet with 3 chain stitches.
At the beginning of each row of double treble crochets, replace the first double treble crochet with 4 chain stitches.
At the beginning of each row of triple treble crochets, replace the first triple treble crochet with 5 chain stitches.

-------------------------------------------------------

START THE PIECE HERE:

-------------------------------------------------------

JUMPER - SHORT OVERVIEW OF THE PIECE:
The piece is worked back and forth. Back and front pieces are worked separately, then you work the sleeves and pockets. All parts are sewn together to finish. An edge is worked around the neck.

BACK PIECE:
Work 94-101-108-122-129-143 chain stitches with hook size 4.5 mm and Merino Extra Fine. Work 1 treble crochet in the 4th chain stitch from the hook (= 2 treble crochets), 1 treble crochet in each of the next 6 chain stitches, * skip 1 chain stitch, 1 treble crochet in each of the next 6 chain stitches *, work from *-* to end of row = 80-86-92-104-110-122 treble crochets.
Then work as follows from the right side:

SIZES M-XL:
Work A.1 (= 1 stitch) - read CROCHET INFORMATION above, A.3 (= 6 stitches) a total of 14-17 times in width and finish with A.5 over the last treble crochet. Continue this pattern onwards. REMEMBER THE CROCHET TENSION! A.1/A.3/A.5 are repeated in height.
When the piece measures approx. 37-39 cm – adjust so that the last row worked is a row of treble crochets, work the armholes as follows: Cut the strand, skip 6-12 stitches (= armhole), work 1 slip stitch in next treble crochet, 3 chain stitches (= 1 treble crochet), A.3 (= 6 stitches) a total of 12-13 times in width and finish with A.5 over the next stitch (there are 6-12 stitches left on row for armhole).
You have now worked the middle 74-80 stitches on the row. On the next row work A.1 in the last stitch. Continue this pattern.

SIZES S-L-XXL-XXXL:
Work A.1 (= 1 stitches) - read CROCHET INFORMATION above, A.2 (= 3 stitches), A.3 (= 6 stitches) a total of 12-14-17-19 times in width, A.4 (= 3 stitches) and finish with A.5 over the last treble crochet. Continue this pattern onwards. REMEMBER THE CROCHET TENSION! A.1 to A.5 are repeated in height.
When the piece measures approx. 36-38-40-41 cm – adjust so that the last row worked is a row of treble crochets, work the armholes as follows: Cut the strand, skip 6-6-12-12 stitches (= armhole), work 1 slip stitch in next treble crochet, 3 chain stitches (= 1 treble crochet), A.2 (= 3 stitches), A.3 (= 6 stitches) a total of 10-12-13-15 times in width, A.4 (= 3 stitches) and finish with A.5 over the next stitch (there are 6-6-12-12 stitches left on row for armhole)
You have now worked the middle 68-80-86-98 stitches on the row. On the next row work A.1 in the last stitch. Continue this pattern.

ALL SIZES:
When the piece measures approx. 52-54-56-58-60-62 cm, adjust to after a row of treble crochets (= from the wrong side), finish each shoulder separately. Work 1 treble crochet in each of the first 20-23-26-23-26-32 treble crochets (= shoulder). The piece measures a total of 54-56-58-60-62-64 cm (if you have not reached the right measurement, continue with 1 treble crochet in each treble crochet to correct length), Cut and fasten strand. Skip 28-28-28-34-34-34 stitches for neck, work 1 slip stitch in next stitch and 3 chain stitches (= 1 treble crochet), work 1 treble crochet in each of the last 19-22-25-22-25-31 stitches. Make sure that this shoulder has the same height as the first shoulder.

FRONT PIECE:
Work as for back piece until the piece measures approx. 42-44-44-46-46-48 cm, adjust so that the last row is the last row in the diagrams (= row of treble crochets from the wrong side). Now divide the piece and finish each shoulder separately as follows:

LEFT SHOULDER (when garment is worn):
The first row is worked from the right side. Work A.1, A.2 over the next 3-0-3-0-3-3 stitches, A.3 over the next 12-18-18-18-18-24 stitches, A.6 over the next 12 stitches, turn the piece. Continue this pattern and decrease for neck according to diagram A.6. When A.6 has been worked 1 time in height there are 20-23-26-23-26-32 stitches on the last row. Work 1 treble crochet in each treble crochet until the piece measures 54-56-58-60-62-64 cm. Cut and fasten strand.

RIGHT SHOULDER (when garment is worn):
Now work right shoulder as follows (first row = right side):
Skip 12-12-12-18-18-18 treble crochets from where A.6 was worked (= for neck), work 1 slip stitch in next stitch, then work A.7 over the same stitch and the next 11 stitches (= a total of 12 stitches), A.3 over the next 12-18-18-18-18-24 stitches, A.4 over the next 3-0-3-0-3-3 stitches and finish with A.5 over the last stitch. Continue this pattern and decrease according to diagram A.7. When A.7 has been worked 1 time in height there are 20-23-26-23-26-32 treble crochets on the last row. Work 1 treble crochet in each treble crochet until the piece measures 54-56-58-60-62-64 cm. Cut and fasten strand.

SLEEVE:
The piece is worked back and forth.
Work 44-47-49-51-54-54 chain stitches with hook size 4.5 mm and Merino Extra Fine. Work 1 treble crochet in 4th chain stitch from the hook (= 2 treble crochets), 1 treble crochet in each of the next 4-1-3-5-2-2 chain stitches, * skip 1 chain stitch, work 1 treble crochet in each of the next 5 chain stitches *, work from *-* to end of row = 36-38-40-42-44-44 treble crochets.
Work A.8 over the first treble crochet, repeat A.9 until there is 1 treble crochet left, finish with A.10 over the last treble crochet. Repeat the last 2 rows in A.8/A.9/A.10 in height to finished length. When the piece measures 7-7-8-10-10-8 cm increase 1 treble crochet in each side of the piece by working 2 treble crochets in the first and last treble crochet on the row (= 2 treble crochets increased). Increase like this every 4-4-3½-3-3-2 ½ cm a total of 11-11-12-13-13-15 times = 58-60-64-68-70-74 stitches. The increased stitches are worked into A.9 as you go. NOTE: A.8/A.10 are always worked outermost in each side of the piece. When the piece measures 48-48-47-43-43-40 cm, insert 1 marker at beginning of row; the sleeve seam will later be sewn as far as this marker and the remaining rows will be sewn to the 6-6-6-12-12-12 treble crochets on back/front piece which were skipped for the armholes in each side (= mid under sleeve). Continue back and forth until the piece measures 52-52-51-51-51-48 cm (shorter measurements in larger sizes due to wider shoulders). Cut and fasten strand. Work the other sleeve in the same way.

ASSEMBLY:
Sew shoulder seams in outermost loop of outermost stitch. Sew in the sleeves; the marker on the sleeve marks the side seam on front and back pieces and the rows after the marker are sewn to the 6-6-6-12-12-12 stitches skipped for armholes on front and back pieces. Start at bottom of sleeve and sew seams in outermost loop then sew side seams on front and back pieces. Cut and fasten all strands.

NECK:
Work an edge around the neck as follows from mid top of shoulder: Work 1 double crochet, * 3 chain stitches, skip approx. 1 cm, 1 double crochet *, work from *-* around the whole neck and adjust so that you finish with 3 chain stitches and 1 slip stitch in first double crochet on round. Make sure the edge is not tight. Cut and fasten strand.

POCKET:
When working pockets, work according to diagram A.1 for sizes M-XL in all sizes! Work 32 chain stitches with hook size 4.5 mm and Merino Extra Fine. Work 1 treble crochet in 4th chain stitch from the hook (= equivalent to 2 treble crochets), 1 treble crochet in each of the next 4 chain stitches, * skip 1 chain stitch, work 1 treble crochet in each of the next 5 chain stitches *, work from *-* to end of row = 26 treble crochets. Then work as follows from the right side: Work A.1, A.3 (= 6 stitches) a total of 4 times in width and finish with A.5 over the last treble crochet. Work A.1/A.3/A.5 a total of 3 times in height. Cut and fasten strand. Work another pocket in the same way.

ASSEMBLY:
Sew the pockets onto the bottom of the jumper – sew them so that they lie on top of the pattern on the jumper and on each side of the middle 6-6-6-7-9-9 repeats on the front piece.

This pattern has been corrected.

Updated online: 11.09.2018
2 instances of Cotton Merino has been corrected to Merino Extra Fine

Diagram

symbols = this row has already been worked; it just shows how the next row is worked in the stitches - Start on next row!
symbols = chain stitch
symbols = double crochet in stitch
symbols = double crochet around chain-space
symbols = treble crochet in stitch
symbols = WORK 2 DOUBLE TREBLE CROCHETS TOGETHER: * Make 2 yarn overs, insert hook under chain-space, pick up strand, make 1 yarn over and pull it through the first 2 loops on hook, make 1 yarn over and pull it through the next 2 loops on hook *, work from *-* 1 more time, make 1 yarn over and pull it through all 3 loops on hook
symbols = 1 treble crochet around the space between 2 stitches
symbols = 1 treble crochet around chain-space
symbols = double treble crochet in stitch
symbols = triple treble crochet in stitch
diagram
diagram
diagram
diagram
diagram
diagram
Do you have a question? See a list of frequently asked questions (FAQ)

Knitting tension is what determines the final measurements of your work, and is usually measured per 10 x 10 cm. It is provided like so: number of stitches in width x number of rows in height - eg: 19 stitches x 26 rows = 10 x 10 cm.

The knitting tension is very individual; some people knit/crochet loosely while others work tightly. You adjust the knitting tension with the needle size, which is why the suggested needle size is only meant as a guide! You need to adjust this (up or down) to ensure that YOUR knitting tension matches the knitting tension provided in the pattern. If you work with a different knitting tension than provided you will have a different yarn consumption, and your work will have different measurements than what the pattern suggests.

The knitting tension also determines which yarns can replace each other. As long as you achieve the same knitting tension you can replace one yarn with another.

See DROPS lesson: How to measure your tension/gauge

See DROPS video: How to make a gauge tension swatch

The required amount of yarn is provided in grams, eg: 450 g. To calculate how many balls you’ll need you first need to know how many grams are in 1 ball (25g, 50g or 100g). This information is available if you click on the individual yarn quality on our pages. Divide the amount required with the amount of each ball. For example, if each ball is 50g (the most common amount), the calculation will be as follows: 450 / 50 = 9 balls.

The important thing when changing from one yarn to another is that the knitting/crochet tension remains the same. This is so that the measurements of the finished piece will be the same as on the sketch provided. It is easier to achieve the same knitting tension using yarns from the same yarn group. It is also possible to work with multiple strands of a thinner yarn to achieve the knitting tension of a thicker one. Please try our yarn converter. We recommend you to always work a test swatch.

Please NOTE: when changing yarn the garment might have a different look and feel to the garment in the photo, due to individual properties and qualities of each yarn.

See DROPS lesson: Can I use a different yarn than the one mentioned in the pattern?

All our yarns are categorised into yarn groups (from A to F) according to thickness and knitting tension – group A contains the thinnest yarns and group F the thickest. This makes it easier for you to find alternative yarns to our patterns, should you wish to switch yarn. All yarns within the same group have a similar knitting tension and can easily replace each other. However, different yarn qualities have different structures and properties which will give the finished work a unique look and feel.

Click here for an overview of the yarns in each yarn group

At the top of all our patterns you’ll find a link to our yarn calculator, which is a helpful tool should you wish to use a different yarn than suggested. By filling in the yarn quality you wish to replace, the amount (in your size) and number of strands, the calculator will present good alternative yarns with the same knitting tension. Additionally it will tell you how much you’ll require in the new qualities and whether you’ll need to work with multiple strands. Most skeins are 50g (some are 25g or 100g).

If the pattern is worked with multiple colours, every colour will have to be calculated separately. Similarly, if the pattern is worked with several strands of different yarns (for example 1 strand Alpaca and 1 strand Kid-Silk) you will have to find alternatives for each, individually.

Click here to see our yarn calculator

Since different yarns have different qualities and textures we have chosen to keep the original yarn in our patterns. However, you can easily find options among our available qualities by using our yarn calculator, or simply pick a yarn from the same yarn group.

It is possible that some retailers still have discontinued yarns in stock, or that someone has a few skeins at home that they would like to find patterns for.

The yarn calculator will provide both alternative yarn as well as required amount in the new quality.

If you think it's hard to decide what size to make, it can be a good idea to measure a garment you own already and like the size of. Then you can pick the size by comparing those measures with the ones available in the pattern's size chart.

You'll find the size chart at the bottom of the pattern.

See DROPS lesson: How to read size chart

The needle size provided in the pattern serves only as a guide, the important thing is to follow the knitting tension. And since knitting tension is very individual, you will have to adjust the needle size to ensure that YOUR tension is the same as in the pattern – maybe you’ll have to adjust 1, or even 2 needle sizes, up or down to achieve the correct tension. For this, we recommend that you work test swatches.

Should you work with a different knitting tension than the one provided, the measurements of the finished garment might deviate from the measurement sketch.

See DROPS lesson: How to measure your tension/gauge

See DROPS video: How to make a tension/gauge swatch

Working a garment top-down provides more flexibility and room for personal adjustment. For example it is easier to try the garment on while working, as well as making adjustments to length of yoke and shoulder caps.

The instructions are carefully explaining every step, in the correct order. Diagrams are adjusted to the knitting direction and are worked as usual.

The diagram depicts all rows/rounds, and every stitch seen from the right side. It is read from bottom to top, from right to left. 1 square = 1 stitch.

When working back and forth, every other row is worked from the right side and every other row is worked from the wrong side. When working from the wrong side, the diagram will have to be worked reversed: from left to right, knit stitches are purled, purl stitches are knit etc.

When working in the round every round is worked from the right side and the diagram are worked from right to left on all rounds.

See DROPS lesson: How to read knitting diagrams

The diagram depicts all rows/rounds, and every stitch seen from the right side. It is worked from bottom to top, from right to left.

When working back and forth every other row is worked from the right side: from right to left and every other row is worked from the wrong side: from left to right.

When working in the round, every row in the diagram are worked from the right side, from right to left.

When working a circular diagram you start in the middle and work your way outwards, counter clockwise, row by row.

The rows usually start with a given number of chain stitches (equivalent to the height of the following stitch), this will either be depicted in the diagram or explained in the pattern.

See DROPS lesson: How to read crochet diagrams

Instructions for working several diagrams after each other on the same row/round, will often be written like so: “work A.1, A.2, A.3 a total of 0-0-2-3-4 times". This means you work A.1 once, then A.2 is worked once, and A.3 is repeated (in width) the number of times provided for your size – in this case like so: S = 0 times, M = 0 times, L=2 times, XL= 3 times and XXL = 4 times.

The diagrams are worked as usual: begin with the first row in A.1, then work the first row in A.2 etc.

See DROPS lesson: How to read knitting diagrams

See DROPS lesson: How to read crochet diagrams

The total width of the garment (from wrist-to-wrist) will be larger in the larger sizes, despite the actual sleeves being shorter. The larger sizes have longer sleeve caps and wider shoulders, so there will be a good fit in all sizes.

The measurement sketch/schematic drawing provides information regarding the full length of the garment. If it’s a jumper or a jacket the length is measured from the highest point on the shoulder closest to the neckline, and straight down to the bottom of the garment. It is NOT measured from the tip of shoulder. Similarly, the length of yoke is measured from the highest point on the shoulder and down to where yoke is split into body and sleeves.

On a jacket measures are never taken along bands, unless specifically stated. Always measure inside band stitches when measuring the length.

See DROPS lesson: How to read a schematic drawing

Diagrams are often repeated on the round or in height. 1 repeat is the diagram the way it appears in the pattern. If it says to work 5 repeats of A.1 in the round, then you work A.1 a total of 5 times after/next to each other in the round. If it says to work 2 repeats of A.1 vertically/in height you work the entire diagram once, then begin again at the start and work the entire diagram one more time.

Chain stitches are slightly narrower than other stitches and to avoid working the cast-on edge too tight, we simply chain more stitches to begin with. The stitch count will be adjusted on the following row to fit the pattern and measurement sketch.

The rib edge is more elastic and will contract slightly compared to, for example, stocking stitch. By increasing before the rib edge, you avoid a visible difference in width between the rib edge and the rest of the body.

It’s very easy to cast off too tightly, and by making yarn overs while casting off (and simultaneously casting these off) you avoid a too tight cast off edge.

See DROPS video: How to bind off with yarn overs (yo)

To achieve an even increase (or decrease) you can increase on, for example: every 3rd and 4th row alternately, like so: work 2 rows and increase on the 3rd row, work 3 rows and increase on the 4th. Repeat this until the increase is complete.

See DROPS lesson: Increase or decrease 1 st on every 3rd and 4th row alternately

Should you prefer to work in the round instead of back and forth, you may of course adjust the pattern. You’ll need to add steeks mid-front (usually 5 stitches), and follow the instructions. When you would normally turn and work from the wrong side, simply work across the steek and continue in the round. At the end you’ll cut the piece open, pick up stitches to work bands, and cover the cut edges.

See DROPS video: How to knit steeks and cut open

Should you prefer to work back and forth instead of in the round, you may of course adjust the pattern so you work the pieces separately and then assemble them at the end. Divide the stitches for the body in 2, add 1 edge stitch in each side (for sewing) and work the front and back pieces separately.

See DROPS lesson: Can I adapt a pattern for circular needles into straight needles?

Pattern repeats can vary slightly in the different sizes, in order to get the correct proportions. If you’re not working the exact same size as the garment in the photo, yours might deviate slightly. This has been carefully developed and adjusted so that the complete impression of the garment is the same in all sizes.

Make sure to follow instructions and diagrams for your size!

If you have found a pattern you like which is available in women’s size it’s not very difficult to convert it to men’s size. The biggest difference will be the length of sleeves and body. Start working on the women size that you think would fit across the chest. The additional length will be worked right before you cast off for the armhole/sleeve cap. If the pattern is worked top-down you can add the length right after the armhole or before the first decrease on sleeve.

Regarding additional yarn amount, this will depend on how much length you add, but it is better with a skein too many than too few.

All yarns will have excess fibres (from production) that might come off as lint or shedding. Brushed yarns (ie hairier yarns) have more of these loose, excess fibres, causing more shedding.

Shedding also depends on what is worn under or over the garment, and whether this pulls at the yarn fibres. It’s therefore not possible to guarantee that there will be no shedding

Below are some tips on how to get the best result when working with hairier yarns:

1. When the garment is finished (before you wash it) shake it vigorously so the looser hairs come off. NOTE: do NOT use a lint roller, brush or any method that pulls at the yarn.

2. Place the garment in a plastic bag and put it in your freezer - the temperature will cause the fibres to become less attached to each other, and excess fibres will come off easier.

3. Leave in the freezer for a few hours before taking it out and shaking it again.

4. Wash the garment according to the instructions on the yarn label.

Pilling is a natural process that happens to even the most exclusive of fibers. It's a natural sign of wear and tear that is hard to avoid, and that is most visible in high friction areas of your garment like a sweater's arms and cuffs.

You can make your garment look as new by removing the pilling, using a fabric comb or a pill/lint remover.

Still can't find the answer you need? Then scroll down and leave your question so one of our experts can try to help you. This will be done normally within 5 to 10 working days.
In the meantime, you can read the questions and answers that others have left to this pattern or join the DROPS Workshop on Facebook to get help from fellow knitters/crocheters!

You might also like...

Post a comment to pattern DROPS 196-24

We would love to hear what you have to say about this pattern!

If you want to leave a question, please make sure you select the correct category in the form below, to speed up the answering process. Required fields are marked *.

Comments / Questions (25)

country flag Jeannette Hiddes wrote:

Trui na wassen een jurk geworden De trui kwam uit de was zo lang als een jurk Dus vertel mij maar wat ik verkeerd heb gedaan!

13.03.2023 - 23:52

country flag Jeannette Hiddes wrote:

De trui kwam uit de was als een jurk

12.03.2023 - 14:14

country flag Jeannette Hiddes wrote:

Ik heb de trui gewassen op 30graden wolwas Zonder wasverzachter. Ik heb nu een jurk ipv. een trui Hoe kan dat?

09.03.2023 - 22:01

DROPS Design answered:

Dag Jeannette,

Het behandelen van breiwerk met merinogaren komt vrij precies, want het rekt heel makkelijk uit. Heb je het plat laten drogen op een ondergrond? (Dus bijvoorbeeld op een tafel met een handdoek eronder.)

12.03.2023 - 11:59

country flag Kelly Anne wrote:

Hello, I have just learned to crochet and do not understand how to read the diagrams despite watching several videos :( I am also using US terms so TRB for me is DC I think. Does this pattern exist without the diagrams where I can just read row by row instructions? For example Row 3: 3 DC, CH 2, ETC" I have posted and asked for help on my crochet groups but no responses so far.I would really appreciate some help if possible. Thank you so much! Oops- I am also left handed.

05.03.2022 - 17:31

DROPS Design answered:

Dear Kelly Anne, unfortunately, we only publish our patterns in a single format, most of the time in a mixture of written and chart format. Take into account that, as you are left-handed, you would need to read the chart mirrored to the one published, which has been designed for right-handed crocheting. You can check the following lesson, which may help you understand better how to read crochet diagrams: https://www.garnstudio.com/lesson.php?id=69&cid=19 Happy crocheting!

06.03.2022 - 13:20

country flag Chris wrote:

Bonjour, je ne comprends pas vos explications. Après avoir monté une chainette de 108 mailles, vous dites de faire un rang avec 1 br dans 6 m, puis de sauter 1 maille et ainsi de suite. Ca veut dire qu'on rétréci l'ouvrage dès le 1er rang ? En plus on arrive pas juste au bout du rang ! Et le schéma n'est pas plus explicite. Une grille du début du motif aurait été la bienvenue !

04.07.2021 - 21:28

DROPS Design answered:

Bonjour Chris, effectivement, en crochet, la chaînette de base a souvent tendance à être plus serrée que le reste de l'ouvrage, raison pour laquelle on va monter davantage de mailles en l'air (par ex 94 en S) que l'on aura de brides au 1er rang (= 80 brides seulement en S pour la largeur souhaitée). Vous crochetez ensuite A.1 (= début du rang sur l'endroit), A.3 5 ou bien A.2 et A.4 (cf taille) et terminez par A.5 (= fin de rang sur l'endroit). Cette leçon explique comment lire un diagramme et vous aidera sûrement. Bon crochet!

05.07.2021 - 08:18

country flag Virginie wrote:

Je pense qu’il y a une erreur sur le diagramme A3 : au 3ème rang je me retrouve à chaque fois avec un arceau en trop quand je le termine... ça ne tombe pas juste... et pourtant je le suis très bien et suis partie avec le bon nombre de brides au départ pour une taille M : 86 brides. C’est la quatrième fois que je te démonte tout et pourtant c’est le même problème qui se répète !! ??

07.11.2020 - 00:15

DROPS Design answered:

Bonjour Virginie, au 3ème rang, vous devez effectivement avoir un grand arceau (= de 5 mailles en l'air = 3 mailles en l'air à la fin de A.3 + 2 mailles en l'air au début du A.3 suivant). On retrouve cet arceau de 5 ml dans A.7 (vous voyez ainsi ce grand arceau entre les 2 groupes de brides et les 2 mailles serrées dans le même arceau). Bon crochet!

09.11.2020 - 12:15

country flag Aline wrote:

Ik kan geen telpatronen lezen helaas. Kan ik de trui ook haken aan de hand van de omschrijving ?

20.05.2020 - 14:56

country flag Catherine Whitear wrote:

What is the youtube name for drops 196-24 cannot find it i am finding very difficult to follow the diagram do you have a you tube showing how you do the stitch

11.04.2020 - 18:17

DROPS Design answered:

Dear Catherine, there are no youtube videos of our patterns. All the videos to help you make the jumper are below the diagram. Happy crocheting!

12.04.2020 - 18:24

country flag Donatella wrote:

Scusatemi, ho avuto una svista e non tenete conto del mio commento precedente. Grazie e un cordiale saluto.

27.09.2019 - 11:09

country flag DONATELLA wrote:

Buongiorno, Complimenti per il modello che sto realizzando ma notò che il diagramma A3 non è corretto, secondo me: nella seconda riga mancano le 5 catenelle tra i due punti bassi (a cavallo delle 5 catenelle del giro precedente) come invece presenti nei diagrammi A6 e A7. Potreste cortesemente verificare. Grazie e buona giornata😃

27.09.2019 - 10:52