
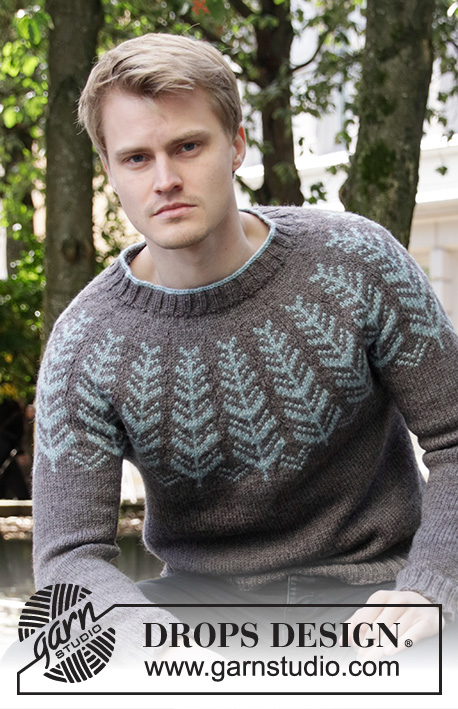
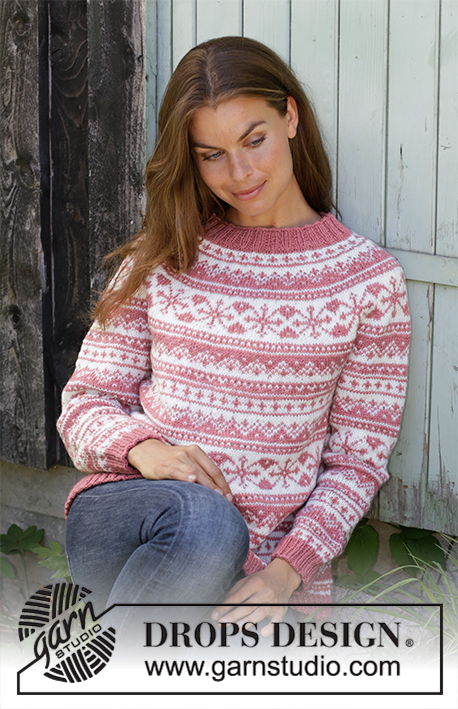
Popular categories
Looking for a yarn?


|
|||||||||||||
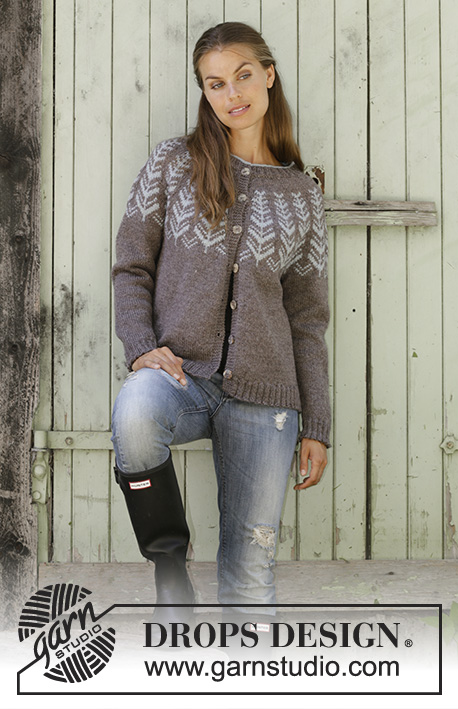
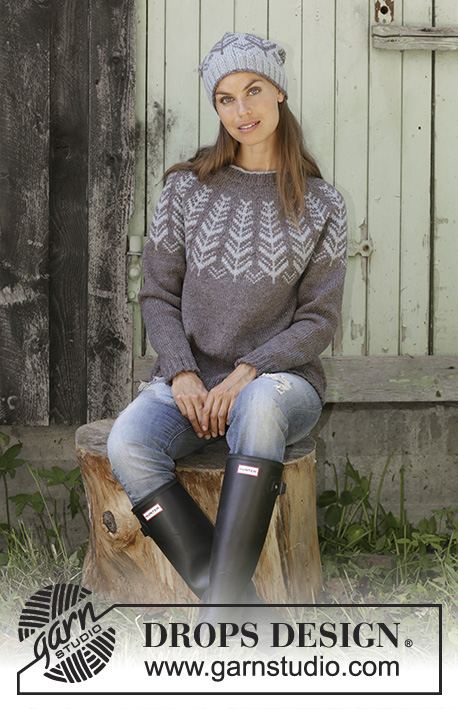
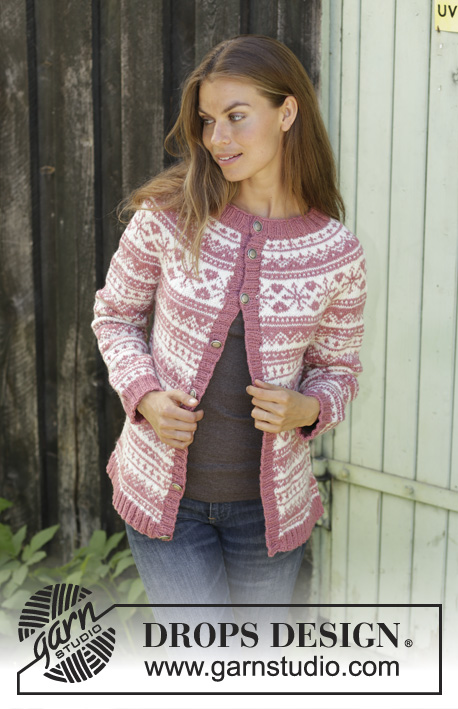
Selvik Jacket |
|||||||||||||
 |
 |
||||||||||||
Knitted jacket in DROPS Karisma or DROPS Merino Extra Fine. The piece is worked top down with round yoke and Nordic pattern. Sizes S - XXXL
DROPS 196-19 |
|||||||||||||
|
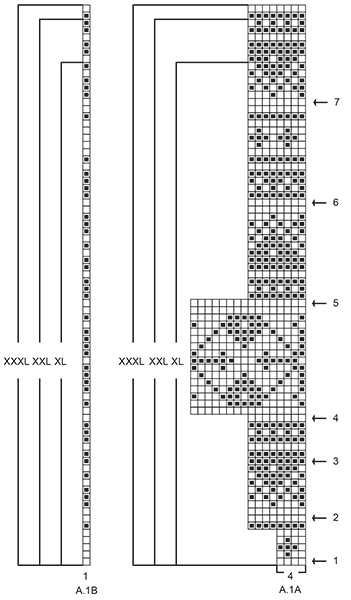
------------------------------------------------------- EXPLANATIONS FOR THE PATTERN: ------------------------------------------------------- RIDGE/GARTER STITCH (worked back and forth): 1 ridge = Knit 2 rows. KNITTING TIP-1: To avoid the tension becoming tighter when working pattern, it is important that the strands at the back are not tight. You can use a larger needle size when working pattern if this is a problem. KNITTING TIP-2: It is important that the knitting tension is also maintained in height or the yoke will be too short and the armholes too small! INCREASE/DECREASE TIP: All increases/decreases are worked from the right side! To work out how to increase/decrease evenly, count the total number of stitches on the needle (e.g. 104 stitches), minus the edge stitches (e.g. 2 stitches) and divide the remaining stitches by the number of increases/decreases to be made (e.g. 27) = 3.8. In this example increase by making 1 yarn over after approx. every 4th stitch. On the next row (wrong side) purl the yarn overs twisted to avoid holes. When decreasing knit approx. every 3rd and 4th stitch together. PATTERN: See diagrams A.1 to A.4. Choose right diagram for your size. The whole pattern is worked in stocking stitch. DECREASE TIP (for mid under sleeve): Start 2 stitches before the stitch with the marker thread, knit 2 together, knit 1 (= the stitch with the marker thread), slip 1 stitch as if to knit, knit 1, pass the slipped stitch over the knitted stitch (= 2 stitches decreased). BUTTONHOLE: Work buttonhole on right band from the right side. The bottom buttonhole should be placed approx. 2 cm from the bottom edge and the top one approx. 7-8-8-8-9-9 cm from the button hole in the neck. Adjust the placing of the buttonholes so that they are worked in purl sections (seen from the right side). 1 buttonhole = purl 2 together, 1 yarn over. On the next row (wrong side) knit the yarn over to leave a hole. ------------------------------------------------------- START THE PIECE HERE: ------------------------------------------------------- JACKET – QUICK SUMMARY OF THE WORK: Neck, yoke and body are worked back and forth with circular needle from mid front, top down. When the neck is finished, cast off the band stitches and continue working with 1 edge stitch in each side. The sleeves are worked in the round with short circular needle/double pointed needles, top down; change to double pointed needles when necessary. To finish, knit up stitches along mid front for the bands. NECK: Cast on 116-120-124-132-136-144 stitches (including 6 band stitches in each side towards mid front) with circular needle size 3 mm and pink. Purl 1 row (= wrong side). The next row is worked as follows from the right side: 1 edge stitch in GARTER STITCH – see description above, * knit 2, purl 2 *, work from *-* until there are 3 stitches left on the row, knit 2 and finish with 1 edge stitch in garter stitch. Continue the rib like this. When the neck measures approx. 1½ cm work 1 buttonhole at the end of a row from the right side as follows: Work until you have 5 stitches left on the row, purl 2 together, make 1 yarn over, knit 2 and finish with 1 edge stitch in garter stitch. On the next row (wrong side) knit the yarn over to leave a hole. Continue with rib until the neck measures approx. 3 cm. Change to circular needle size 4 mm. The next row is worked as follows from the right side: Cast off the first 6 stitches (= the band), knit to end of row, turn piece, cast off the first 6 stitches (= the band) and purl to end of row = 104-108-112-120-124-132 stitches on needle including 1 edge stitch in each side. Work the yoke as described below. YOKE: Read KNITTING TIP-1 and KNITTING TIP-2! The first row is worked as follows from the right side: Work 1 edge stitch in garter stitch, work A.1A until there are 2 stitches left on the row and at the same time increase 27-31-35-35-39-47 stitches evenly spaced over these stitches – read INCREASE/DECREASE TIP, work A.1B (= 1 stitch) and finish with 1 edge stitch in garter stitch = 131-139-147-155-163-179 stitches on the needle. Continue with A.1 and 1 edge stitch in garter stitch in each side – there is now room for 32-34-36-38-40-44 repeats of A.1A of 4 stitches). REMEMBER THE KNITTING TENSION! AT THE SAME TIME on each row marked with an arrow in A.1A increase evenly spaced as described below – remember INCREASE/DECREASE TIP (you have already increased by arrow-1). On row with arrow-2 increase 32-32-32-32-40-40 stitches evenly spaced = 163-171-179-187-203-219 stitches (there is now room for 20-21-22-23-25-27 repeats of A.1A of 8 stitches). On row with arrow-3 increase 32-40-40-40-40-48 stitches evenly spaced = 195-211-219-227-243-267 stitches (there is now room for 24-26-27-28-30-33 repeats of A.1A of 8 stitches). On row with arrow-4 increase 32-32-40-48-48-40 stitches evenly spaced = 227-243-259-275-291-307 stitches (there is now room for 14-15-16-17-18-19 repeats of A.1A of 16 stitches). On row with arrow-5 increase 32-32-32-32-40-48 stitches evenly spaced (there is now room for 32-34-36-38-41-44 repeats of A.1A of 8 stitches) = 259-275-291-307-331-355 stitches. On row with arrow-6 increase 32-32-32-24-32-32 stitches evenly spaced (there is now room for 36-38-40-41-45-48 repeats of A.1A of 8 stitches) = 291-307-323-331-363-387 stitches. The increases are now finished in sizes S, M and L. On row with arrow-7 (just sizes XL, XXL and XXXL) increase 24-24-32 stitches evenly spaced = 291-307-323-355-387-419 stitches on needle. The increases are now finished in sizes XL, XXL and XXXL. Continue until the last row in A.1 remains. The piece now measures 22-24-26-28-30-31 cm from cast on edge in mid front. The next row is worked as follows from the right side: Work 1 edge stitch in garter stitch, purl 40-44-46-50-56-64 stitches as shown on the last row of the diagram (= front piece), place the next 64-64-68-76-80-80 stitches on 1 thread for sleeve, cast on 8-8-12-12-16-16 new stitches on the needle (= in side under sleeve), purl 81-89-93-101-113-129 stitches (= back piece), place the next 64-64-68-76-80-80 stitches on 1 thread for sleeve, cast on 8-8-12-12-16-16 new stitches on the needle (= in side under sleeve), purl 40-44-46-50-56-64 stitches and finish with 1 edge stitch in garter stitch (= front piece). Body and sleeves are finished separately. THE PIECE IS NOW MEASURED FROM HERE! BODY: = 179-195-211-227-259-291 stitches. The first row is worked as follows from the right side: SIZES S, M, XL and XXL: Work 1 edge stitch in garter stitch, work A.2A until there are 3 stitches left on the row (= 22-24-28-32 repeats of 8 stitches), work A.2B (= 1 stitch) and finish with 1 edge stitch in garter stitch. Continue this pattern. When A.2 has been completed work the next row as follows from the right side: 1 edge stitch in garter stitch, work A.3A until there are 2 stitches left on the row (= 11-12-14-16 repeats of 16 stitches), work A.3B (= 1 stitch) and finish with 1 edge stitch in garter stitch. Continue as described under ALL SIZES. SIZES L and XXXL: Work 1 edge stitch in garter stitch, work A.3A until there are 2 stitches left on the row (= 13-18 repeats of 16 stitches), work A.3B (= 1 stitch) and finish with 1 edge stitch in garter stitch. Continue as described under ALL SIZES. ALL SIZES: Continue A.3 as described above. A.3 is repeated in height as far as to where the rib begins. AT THE SAME TIME on the row marked with an arrow in A.3A increase 16 stitches evenly spaced in all sizes = 195-211-227-243-275-307 stitches (this increase is just on the first repeat of A.3 in height). Continue this pattern (there is now room for 1 more repeat of A.3A in width). Work until the piece measures approx. 29-29-29-29-29-30 cm from the division for the sleeves – finish neatly after a whole pattern section. Knit 1 row from the right side with rose where you increase 41-41-45-49-57-61 stitches evenly spaced = 236-252-272-292-332-368 stitches. Change to circular needle size 3 mm and work rib as follows from the wrong side: 1 edge stitch in garter stitch, * purl 2, knit 2 *, work from *-* until there are 3 stitches left on the row, purl 2 and finish with 1 edge stitch in garter stitch. Continue like this, with garter stitch over garter stitch, knit over knit and purl over purl for 4 cm. Cast off with garter stitch over garter stitch, knit over knit and purl over purl, but make sure that the cast-off edge is not tight (if it does tighten you can make 1 yarn over after every 8th stitch at the same time as casting off - the yarn overs are cast off as normal stitches). The jacket measures approx. 58-60-62-64-66-68 cm from the shoulder down. SLEEVE: Place the 64-64-68-76-80-80 stitches from the thread on one side of the piece on short circular needle size 4 mm. In addition knit up 1 stitch in each of the 8-8-12-12-16-16 stitches cast on under the sleeve = 72-72-80-88-96-96 stitches on needle. Insert 1 marker thread in the middle of the 8-8-12-12-16-16 stitches under the sleeve, i.e. insert the marker thread in the first stitch after the middle, count 35-35-39-43-47-47 stitches, insert 1 marker thread in the next stitch (= middle stitch). There are now 35-35-39-43-47-47 stitches left on the round after the last marker thread. Allow the marker thread to follow your work onwards. The marker thread under the sleeve will be used a little later when decreasing and the marker thread on top of sleeve will be used to count to where the pattern starts. READ THE REST OF SLEEVE BEFORE CONTINUING! Work the last row of A.1A so that A.1 finishes in the same way as on the body. PATTERN: In sizes S, M, XL, XXL work A.2A in the round (= 9-9-11-12 repeats of 8 stitches), but count out from the middle - middle stitch in A.2A should match the marker thread mid top of sleeve. When A.2 has been finished, work A.3A in the same way. In sizes L and XXXL work A.3A as soon as the last row in A.1A has been worked and you count out from the middle stitch in the same way as the other sizes. A.3 is repeated in height until the piece measures approx. 29-28-26-23-22-21 cm from the division – finish neatly after a complete repeat of the pattern. Continue by working A.4A in the round in the same way. DECREASE: AT THE SAME TIME when the piece measures 3-3-3-3-2-2 cm decrease 2 stitches mid under sleeve – read DECREASE TIP. Decrease like this every 2½-3-2-1½-1½-1½ cm a total of 14-12-16-18-20-20 times = 44-48-48-52-56-56 stitches. When the sleeve measures approx. 39-38-36-34-33-32 cm from the division (shorter measurements in larger sizes due to longer yoke) knit 1 round with rose where you increase 4 stitches evenly spaced in all sizes = 48-52-52-56-60-60 stitches. Change to double pointed needles size 3 mm. Work rib in the round (= knit 2 / purl 2) for 4 cm. Cast off with knit over knit and purl over purl, but make sure that the cast-off edge is not tight (if it is tight, you can make 1 yarn over after every 8th stitch at the same time as you cast off - the yarn overs are cast off as normal stitches). The sleeve measures approx. 43-42-40-38-37-36 cm from the division down. Work the other sleeve in the same way. LEFT BAND: Knit up stitches along the left front piece with circular needle size 3 mm and rose, i.e. start just under the neckline and knit up from the right side inside the 1 edge stitch in garter stitch as follows: Knit up approx. 120-124-128-136-140-144 stitches (this is equivalent to approx. 25 stitches per 10 cm along the edge – the number of stitches must be divisible by 4). The next row is worked as follows from the wrong side: 1 edge stitch in garter stitch, * purl 2, knit 2 *, work from *-* until there are 3 stitches left on the row, purl 2 and finish with 1 edge stitch in garter stitch. Continue the rib like this for 2½-3 cm, cast off with knit over knit and purl over purl. RIGHT BAND: Work the band in the same way along the right front piece, but start at the bottom of the front piece and work up to the neck. When the band measures approx. 1-1½ cm work 7 BUTTONHOLES evenly spaced - read description above. Then continue the band until it measures the same as the left band. Cast off with knit over knit and purl over purl. ASSEMBLY: Sew the bands to the neck edge at top with the seam in towards the wrong side. Sew the buttons onto the left band. |
|||||||||||||
Diagram explanations |
|||||||||||||
|
|||||||||||||

|
|||||||||||||
|
|||||||||||||

|
|||||||||||||

|
|||||||||||||

|
|||||||||||||
|
Have you made this or any other of our designs? Tag your pictures in social media with #dropsdesign so we can see them! Do you need help with this pattern?You'll find tutorial videos, a Comments/Questions area and more by visiting the pattern on garnstudio.com. © 1982-2024 DROPS Design A/S. We reserve all rights. This document, including all its sub-sections, has copyrights. Read more about what you can do with our patterns at the bottom of each pattern on our site. |
|||||||||||||


With over 40 years in knitting and crochet design, DROPS Design offers one of the most extensive collections of free patterns on the internet - translated to 17 languages. As of today we count 304 catalogues and 11422 patterns - 11422 of which are translated into English (UK/cm).
We work hard to bring you the best knitting and crochet have to offer, inspiration and advice as well as great quality yarns at incredible prices! Would you like to use our patterns for other than personal use? You can read what you are allowed to do in the Copyright text at the bottom of all our patterns. Happy crafting!
Comments / Questions (31)
Is there a video for this cardigan please
13.08.2021 - 14:15Hei. Jeg ønsker å strikke jakken rundt og klippe opp. Holder det å legge til 4 masker til dette? Tenker gjøre det etter avfelt halskant og sy stolpen fast til halskanten ved montering. Skal jeg droppe den ene masken med rille og heller legge den til klippemaskene i rettstrikk?
19.12.2020 - 13:18DROPS Design answered:
Hei Irene, Det er helt mulig å strikke jakken rundt og klippe opp etterpå. Ta vekk kant maskene og legge til 4 masker til å klippe opp med høres fornuftig ut. God fornøyelse!
21.12.2020 - 06:59Er det mulig å få mønsteret der man strikker nedenfra og opp
29.12.2019 - 10:20DROPS Design answered:
Hei Jorun. Vi har ikke en beskrivelse på denne modellen hvordan den strikkes nedenfra og opp. Men man kan fint strikke den motsatte veien, bare husk fellinger istedenfor økning, diagrammet på snus osv. God Fornøyelse!
20.01.2020 - 11:25Hva er overvidde mål på jakka?
07.10.2019 - 13:33DROPS Design answered:
Hei Else. Alle mål til jakken finner du på jakkens målskisse, nederst på siden. God Fornøyelse!
07.10.2019 - 13:35I am making the jacket in XXXL size. I have completed the yolk. I am confused about which diagram I should use for the body after dividing the stitches. On A.3A I do not see any marking for XXXL size. Please guide. Thanks
22.04.2019 - 03:37DROPS Design answered:
Dear Mrs Bhagwat, in size XXXL you have to follow diagram currently called L - XL - XXL (it will be edited soon). Thank you. Happy knitting!
26.04.2019 - 10:47I AM MAKING THIS CARDIGAN AND I AM JUST FINISHING YOKE. IT SAYS GO TO A2.1 THAT IS JUST ONE LINE ONE COLOR AND ONE LINE THE CONTRAST? REALLY
24.02.2019 - 04:03DROPS Design answered:
Dear Mrs Long, depending on your size the diagrams A.2 will be different, in size S, M, XL and XXL repeat A.2A (= 8 sts) a total of 22-24-28-32 times in width, and work A.2B over the next stitch. From WS work A.2B then repeat A.2A. The number of rows are different in each size, since the pattern worked in the smaller sizes in A.2 has been worked in A.1 in the larger sizes. Happy knitting!
25.02.2019 - 10:05Hej. Hur gör jag när jag stickar nerifrån och upp? Skriv gärna ut det på alla uppifrån och ner mönster
07.01.2019 - 11:33Bonjour, Dans la manche, après avoir tricoté A3, pendant 26 cm pour la taille, il faut faire A4. Mais A4 ne mesure pas 10 cm, faut-il tricoter plusieurs fois A4? \\r\\nMerci de votre réponse
04.12.2018 - 18:12DROPS Design answered:
Bonjour Mme Perrier, tout à fait, vous répétez A.4 en hauteur jusqu'à la hauteur indiquée (soit 36 cm depuis la séparation dans votre taille). Bon tricot!
05.12.2018 - 08:57Bonjour, merci pour votre réponse. Bien cordialement.
26.11.2018 - 23:25Bonjour, dites moi, comment commencer les manches avec le diagramme A3A? Car j'ai du mal à comprendre et avec les diminutions le motif va être perturbé on dirait. C'est mon 1er jacquard sur manche du coup c'est difficile. Merci d'avance. Bonne journée. Cordialement.
20.11.2018 - 08:17DROPS Design answered:
Bonjour Mme Colin, vous allez centrer A.3A au niveau du dessus de la manche (pour que la maille centrale = triangle) soit celle avec le marqueur au-dessus de la manche; Vous trouverez ici comment centrer un diagramme. Bon tricot!
20.11.2018 - 08:43