
Popular categories
Looking for a yarn?


|
|||||||||||||||||||||||||||||||||||||||||||||||||||||||
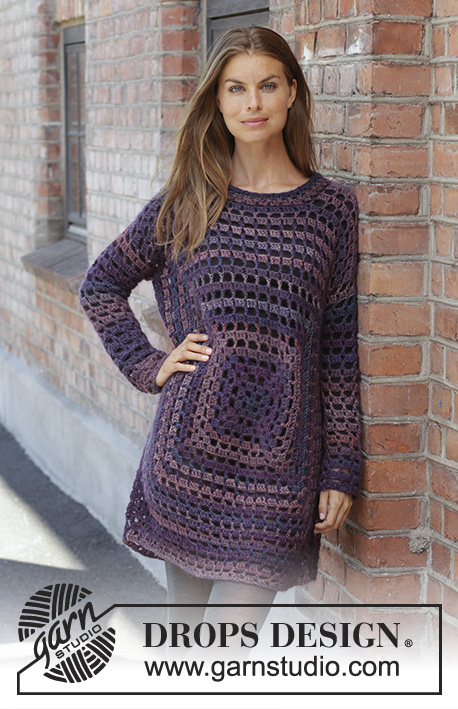
Alberta Autumn |
|||||||||||||||||||||||||||||||||||||||||||||||||||||||
 |
 |
||||||||||||||||||||||||||||||||||||||||||||||||||||||
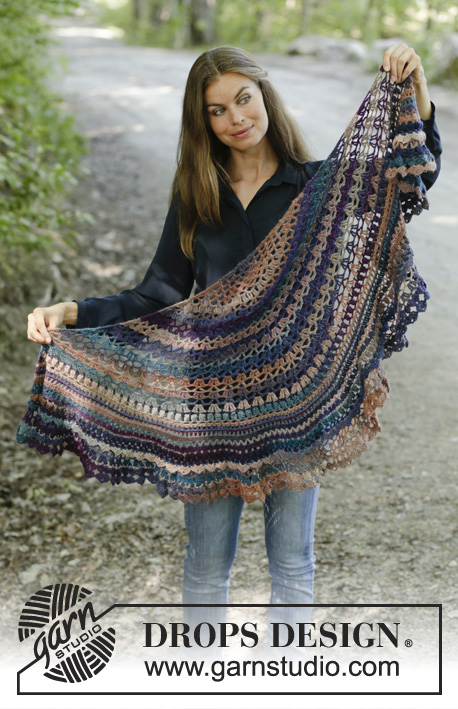
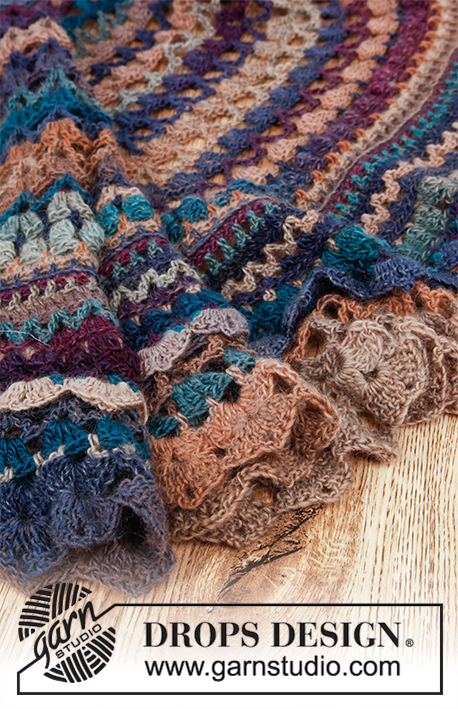
Crocheted shawl in DROPS Delight. Piece is crocheted top down with lace pattern and fans.
DROPS 197-30 |
|||||||||||||||||||||||||||||||||||||||||||||||||||||||
|
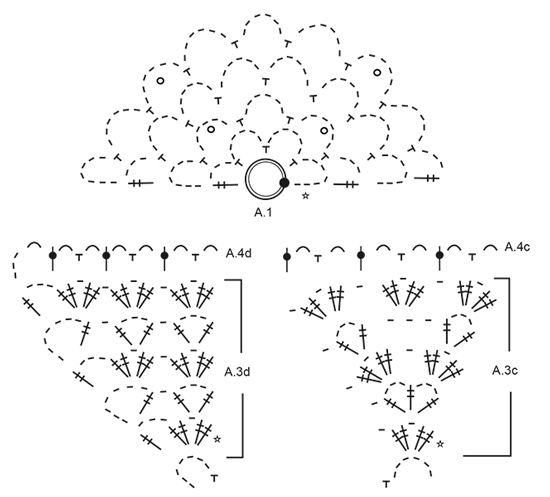
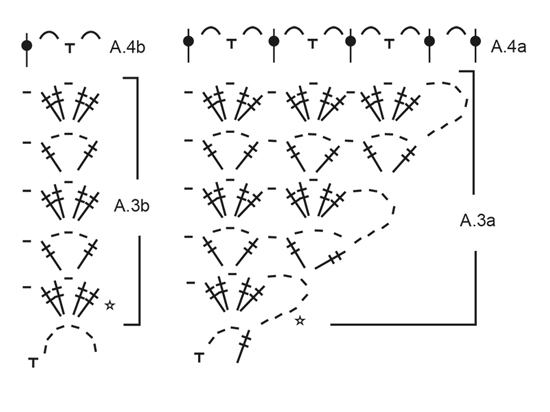
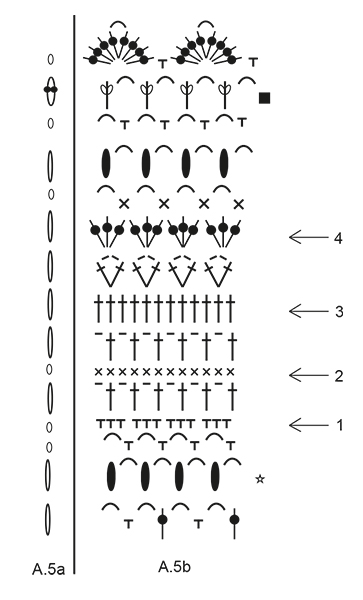
---------------------------------------------------------- EXPLANATION FOR THE PATTERN: ---------------------------------------------------------- PATTERN: See diagrams A.1 to A.6. A.5a and A.6a show how row begins. NOTE: Begin on rows drawn over each other in the same diagram even though they are worked alternately in right and left side of shawl and not over each other. ---------------------------------------------------------- START THE PIECE HERE: ---------------------------------------------------------- SHAWL - SHORT OVERVIEW OF THE PIECE: Piece is worked back and forth, top down. Work 5 chain stitches on hook size 3.5 mm with Delight and form a ring with 1 slip stitch in first chain stitch made. Start on row with star and work pattern according to diagram A.1 back and forth. When diagram has been worked, continue as follows: A.2a, A.2b and A.2c. When diagrams have been worked vertically, there are 17 chain spaces on row. Piece measures approx. 8 cm from the first chain stitch ring and down the middle of shawl. REMEMBER THE CROCHET TENSION! Now work pattern from right side as follows: Work A.3a around first chain space, A.3b around each of the next 7 chain spaces, A.3c around next chain space (= the middle chain space on shawl), A.3b around each of the next 7 chain spaces, A.3d around the last chain space. When A.3a to A.3d have been worked vertically, repeat the last 4 rows in diagrams 3 more times vertically. Piece measures approx. 37 cm from beginning and down the middle of shawl. Now work a row with chain spaces from wrong side as follows: Work A.4a over A.3a, A.4b over A.3b, A.4c over A.3c, A.4d over A.3d. There are now 84 chain spaces on row. Now insert 12 marker threads in the piece. This is done to make it easier to increase stitches evenly. Insert the markers in the piece as follows: Insert first marker thread in treble crochet after 4 chain spaces, * skip 7 chain spaces and insert next marker thread in next treble crochet *, repeat from *-* 11 times in total, 3 chain spaces remain on row. Then work pattern A.5b (A.5a shows how every row begins and is worked in addition to stitches in A.5b), AT THE SAME TIME on rows with arrow increase stitches evenly as follows: ARROW-1: Increase 2 double crochets on each side of marker threads by working 1 extra double crochet around each of the 2 chain spaces before and after marker threads (= 48 stitches increased) = 300 double crochets. ARROW-2: Increase 1 double crochet on each side of marker threads by working 2 double crochets in a stitch (= 24 stitches increased) = 324 double crochets. ARROW-3: Increase 1 treble crochet on each side of marker threads by working 2 treble crochets in a stitch (= 24 stitches increased) = 348 treble crochets. ARROW-4: Increase 2 treble crochets on each side of marker threads by working 1 extra treble crochet around each of the 2 chain spaces before and after marker threads (= 48 stitches increased) = 396 treble crochets. Work the remaining rows in diagrams. Piece measures approx. 51 cm from beginning and down the middle of shawl. There are now 66 fans (= 33 repetitions of A.5b) on row. Fold last row in A.5a/A.5b down so that right side is against right side and work from wrong side around row with black square in A.5b (= row with: 1 half treble crochet, 3 chain stitches, etc.) as follows: Work first row in A.6b as follows (A.6a shows how row begins and is worked in addition to A.6b): 4 chain stitches, 1 double crochet around first half treble crochet, work (3 chain stitches, 1 double crochet around next half treble crochet), work like this along the entire shawl AT THE SAME TIME increase 2 chain spaces on each side of marker threads by working 1 extra chain space in each of the 2 chain spaces before and after every marker thread (= 48 chain spaces increased) = 180 chain spaces. Continue back and forth with A.6a and A.6b until entire diagram has been worked vertically and finish with 1 treble crochet in edge stitch on previous row. When entire A.6a and A.6b have been worked vertically, there are 90 fans on row. Shawl measures approx. 60 cm from beginning and down the middle of shawl. Fasten off. |
|||||||||||||||||||||||||||||||||||||||||||||||||||||||
Diagram explanations |
|||||||||||||||||||||||||||||||||||||||||||||||||||||||
|
|||||||||||||||||||||||||||||||||||||||||||||||||||||||

|
|||||||||||||||||||||||||||||||||||||||||||||||||||||||
|
|||||||||||||||||||||||||||||||||||||||||||||||||||||||
|
|||||||||||||||||||||||||||||||||||||||||||||||||||||||
|
|||||||||||||||||||||||||||||||||||||||||||||||||||||||

|
|||||||||||||||||||||||||||||||||||||||||||||||||||||||
|
Have you made this or any other of our designs? Tag your pictures in social media with #dropsdesign so we can see them! Do you need help with this pattern?You'll find tutorial videos, a Comments/Questions area and more by visiting the pattern on garnstudio.com. © 1982-2024 DROPS Design A/S. We reserve all rights. This document, including all its sub-sections, has copyrights. Read more about what you can do with our patterns at the bottom of each pattern on our site. |
|||||||||||||||||||||||||||||||||||||||||||||||||||||||


With over 40 years in knitting and crochet design, DROPS Design offers one of the most extensive collections of free patterns on the internet - translated to 17 languages. As of today we count 304 catalogues and 11422 patterns - 11422 of which are translated into English (UK/cm).
We work hard to bring you the best knitting and crochet have to offer, inspiration and advice as well as great quality yarns at incredible prices! Would you like to use our patterns for other than personal use? You can read what you are allowed to do in the Copyright text at the bottom of all our patterns. Happy crafting!
Comments / Questions (42)
Jeg lærte at hækle for 50 års siden. Jeg har hæklet efter både opskrift og diagrammer, men jeg har aldrig haft så store problemer med at forstå en opskrift som jeg har haft med denne. diagrammerne er ikke særlig tydelige, og er slet ikke forklaret.
05.08.2020 - 09:49Hvorfor tages der ud ved pil 4, når næste række går mellem grupperne. Det bliver der jo ikke flere masker af i næste række??
01.08.2020 - 11:36Witam. Mam pytanie takie samo jak Beena. Otoz, mam 84 łuki, a ściślej: pół-łuki, mam markery umieszczone zgodnie z instrukcją, czyli pierwszy w za 4tym łukiem w pierwszy słupek. Dalej, w każdy słupek po kazdym 7-mym łuku. I mam 10 markerów a nie 12. Przy czym, po ostatnim markerze mam 7 łuków. Proszę o pomoc. Pozdrawiam serdecznie
15.05.2020 - 19:27DROPS Design answered:
Witaj Ulu, wzór musi być skorygowany, ponieważ jak będziemy umieszczać markery co 7 łuków, to marker raz trafi w słupek, a raz w oczko ścisłe. Omiń 4 łuki i umieść marker w oś, dalej odliczaj po 7 łuków i umieszczaj markery raz w słupek (2-gi marker), a raz w oś (3-ci marker) itd. Na końcu zostanie 3 łuki za ostatnim 12-tym markerem. Dziękujemy z twoją wiadomość i pozdrawiamy!
19.05.2020 - 09:01Hi, In row 4 there r total of 84 chain spaces. After skipping 7 chain spaces and placing marker in next double chrochet I'm able to place only 11 markers (I notice stitches are being 'missed' in order to place after next double chrochet) Kindly assist, Thank you
08.04.2020 - 16:59DROPS Design answered:
Dear Beena, you should insert the markers as explained in the text below: Insert first marker thread in double crochet after 4 chain spaces, * skip 7 chain spaces and insert next marker thread in next double crochet *, repeat from *-* 11 times in total, 3 chain spaces remain on row. there are then: 4 chain spaces, 1 marker, (7 ch-spaces, 1 marker) x 11 (= 77 ch-sp in total, 3 ch-spaces = 84 ch-spaces. Happy crocheting!
09.04.2020 - 16:57Hvordan er kvaliteten på garnet? Er det blødt og lækkert? Fnugger det eller sætter der sig fibre på feks sort tøj.
31.12.2019 - 10:39DROPS Design answered:
Hei Mette. Vi syns garnet er både bløtt og lekkert, men alle har sin personlig mening. Det vil alltid være litt overskuddsfirbre på garn, så da kan sette seg igjen hos f.eks sort tøy. Men har ikke fått noen klager på dette garnet. God Fornøyelse!
20.01.2020 - 11:45I’m unclear about the row just after the 4th increase arrow row in A.5b. Is the front-loop double crochet (“x”) in the first treble of 3 (or 4 - increase set), then 3 chains, then where does the next double crochet “x” go? How are the subsequent sets worked regarding which treble stitches gets the double crochets? It looks in the diagram as if the double crochet is in the space between the trebles below, but then you can’t put the double crochet in the front look. Thanks!
16.12.2019 - 03:40DROPS Design answered:
Dear Sandy, on row after arrow-4 in A.5b work the dc as shown in diagram so that there are (1 dc, 3 chains)x 4 (= 4 dc and 4 ch-spaces) over a set of 12 trebles. Happy crocheting!
16.12.2019 - 09:21Buenas tardes, no entiendo dónde tengo que aplicar el diagrama A.6a y A.6b. Gracias
25.11.2019 - 20:29DROPS Design answered:
Hola Blanca. Los diagramas A.6a y A.6b se trabajan alrededor de la anteúltima fila de A.5 (por el lado revés). De modo que la última fila de A.5 estará sobre la primera fila de A.6.
30.11.2019 - 19:55Buonasera. Modello stupendo, ma non mi è chiara una cosa. Nella prima riga di A. 5b si finisce facendo tre catenelle prima dell'ultima maglia alta? Grazie
10.11.2019 - 18:46DROPS Design answered:
Buongiorno Adelaide. Inizia a lavorare il diagramma A.5b dalla riga con la stella sulla destra, quindi dalla seconda riga che trova nel diagramma. La prima riga del diagramma indica come si presentano le maglie della riga precedente ed è già stata lavorata. Buon lavoro!
11.11.2019 - 09:51Bonjour,\r\nJ’arrive à la fin du diagramme où je suis sensée avoir 84 arceaux, seul hic, je crois que j’en ai beaucoup plus. Ou alors je compte mal les arceaux, à quoi correspond un arceau pour ce modèle s’il vous plaît ?\r\nCombien y aurait-il d’arceau après avoir crocheter les 4 derniers rangs deux fois ? (J’ai défait les 4 derniers rangs de la troisième répétition et j’aimerais vérifier que je ne me suis pas trompée jusque là). Merci pour votre reponse
05.11.2019 - 10:32DROPS Design answered:
Bonjour Claire, dans A.4, 1 arceau = 3 mailles en l'air dans le diagramme, on doit avoir un total de 84 fois ces 3 mailles en l'air (avec soit 1 maille serrée, soit 1 bride), soit 7 dans A.4d, 2 dans chaque A.4b, 6 dans chaque A.4c et 7 dan,s A.4a. Bon crochet!
05.11.2019 - 15:02Je me suis mal exprimée, je ne comprends pas comment faire le premier rang de a6 : crocheter 1 arceau supplémentaire dans chacun des 2 arceaux avant et après tous chaque fil marqueur (= on augmente 48 arceaux) = 180 arceaux. Or on ne pique pas dans des arceaux mais on entoure la demi bride. Je ne vois donc pas comment faire des arceaux complémentaires. Merci
07.10.2019 - 14:31DROPS Design answered:
Bonjour Laurence, vous augmentez dans A.6b comme vous avez fait auparavant dans A.5b aux flèches: crochetez 3 ml, 1 ms autour de la demi-bride, 3 ml, 1 ms autour de la même demi-bride pour augmenter 1 arceau. Bon crochet!
07.10.2019 - 15:04