DROPS Karisma
DROPS Karisma
100% Wool
from 2.30 £ /50g
Get the yarn to make this pattern from 27.60£.

The yarn cost is calculated from the pattern’s smallest size and the yarn’s cheapest product type. Looking for an even better price? You might find it on the DROPS Deals!

DROPS SS24

Night Shades

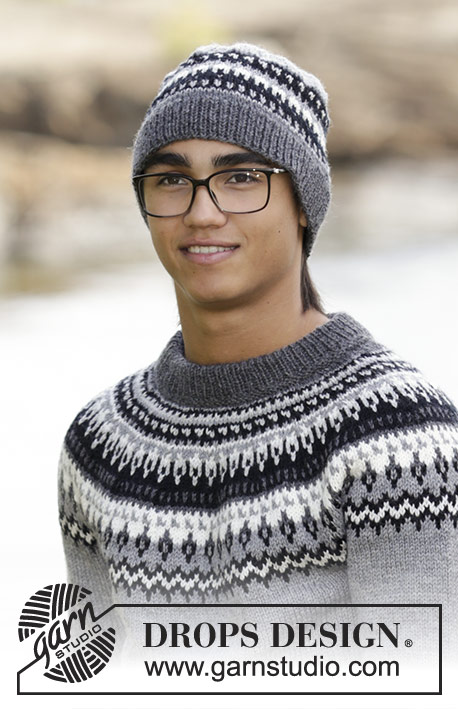
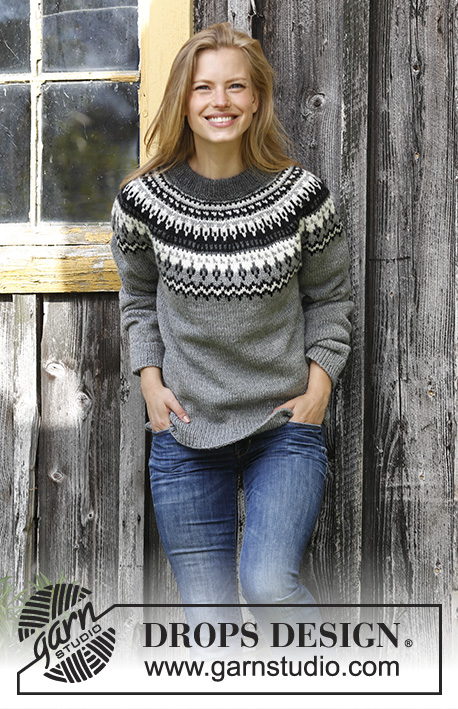
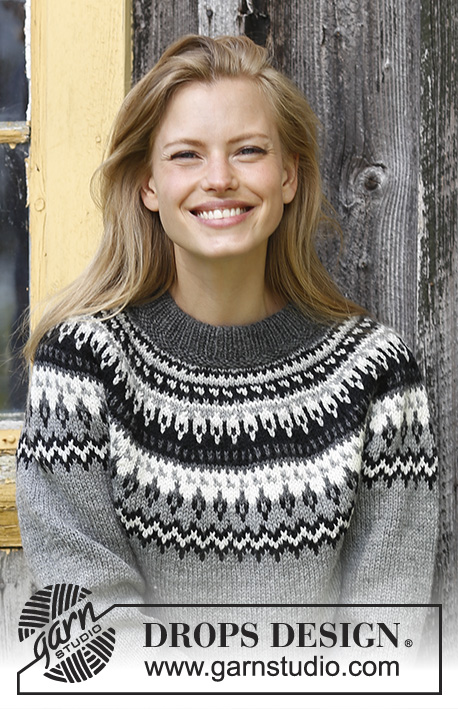
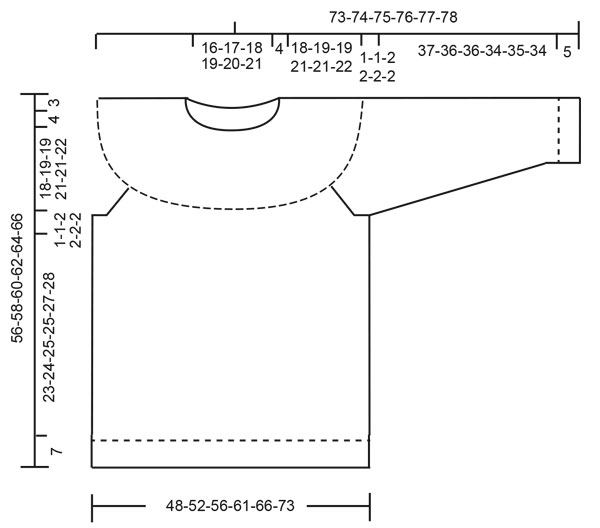
Knitted jumper round yoke in DROPS Karisma. Piece is knitted bottom up with Nordic pattern. Size: S - XXXL

DROPS 195-19
DROPS design: Pattern u-874
Yarn group B
----------------------------------------------------------

Size: S - M - L - XL - XXL - XXXL
Materials: 
DROPS KARISMA from Garnstudio (belongs to yarn group B)
400-450-500-550-600-650 g colour 21, medium grey
50-100-100-100-100-100 g colour 16, dark grey
50-100-100-100-100-100 g colour 05, black
50-50-50-50-50-50 g colour 01, off white
50-50-50-50-50-50 g colour 72, light pearl grey

----------------------------------------------------------
Color combinations:
A) DROPS Karisma 69, 50, 56, 01, 55.
B) DROPS Karisma 55, 52, 56, 01, 77.
----------------------------------------------------------

ACCESSORIES FOR THE PIECE:

KNITTING TENSION:
21 stitches in width and 28 rows vertically in stocking stitch = 10 x 10 cm.

NEEDLES:
DROPS DOUBLE POINTED NEEDLES AND CIRCULAR NEEDLE SIZE 4 mm, length 40 and 80 cm for the garment in stocking stitch.
DROPS DOUBLE POINTED NEEDLES AND CIRCULAR NEEDLE SIZE 3 mm, length 40 and 80 cm for rib.
Needle size is only a suggestion! If you have too many stitches on 10 cm switch to larger needles. If you have too few stitches on 10 cm switch to smaller needles.

----------------------------------------------------------

-------------------------------------------------------

Alternative Yarn – See how to change yarns here
Yarn Groups A to F – Use the same pattern and change the yarn here
Yarn usage using an alternative yarn – Use our yarn converter here

-------------------------------------------------------

DROPS Karisma
DROPS Karisma
100% Wool
from 2.30 £ /50g
Get the yarn to make this pattern from 27.60£.

The yarn cost is calculated from the pattern’s smallest size and the yarn’s cheapest product type. Looking for an even better price? You might find it on the DROPS Deals!

Pattern instructions

NOTE: This pattern is written in British English. All measurements in charts are in cm. For conversion from cm to inches - click here. There are different terms for crocheting in British and American English. If this pattern includes crochet, click for "crochet terms" here. For this pattern in American English, please click here.
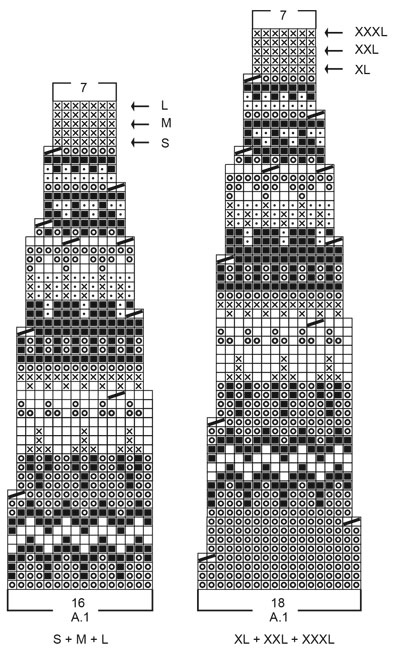
EXPLANATION FOR THE PATTERN:

----------------------------------------------------------

GARTER STITCH (worked in the round):
1 ridge = 2 rounds. Knit 1 round and purl 1 round. 

PATTERN: 
Jumper: See diagram A.1. Choose diagram for your size. Work the entire pattern in stocking stitch.

KNITTING TIP:
To avoid the knitting tension to tighten when working pattern with several colours, it is important not to tighten the strands on back side of piece. Switch to a higher needle number when working pattern if the pattern is somewhat tight.

INCREASE TIP (applies to under sleeves):
Work until 1 stitch remains before marker, make 1 yarn over, knit 2 (marker is in the middle of these 2 stitches), make 1 yarn over (= 2 stitches increased). On next round knit yarn overs twisted to avoid holes. 

DECREASE/INCREASE TIP (evenly):
To calculate how to decrease/increase evenly, use the total number of stitches on row (e.g. 240 stitches) and divide stitches by number of decreased/increases to be done (e.g. 40) = 6. In this example knit approx. every 5th and 6th stitch together. When increasing make 1 yarn over after every 6th stitch. On next round knit yarn over twisted to avoid holes.

RAGLAN:
Decrease for raglan on each side of marker in every transition between sleeves and body. Begin 2 stitches before marker, knit 2 together, marker is here, slip 1 stitch knitwise, knit 1, pass slipped stitch over stitch worked (= 2 stitches decreased).

ELEVATION IN BACK OF NECK:
For better shape work an elevation in the back of neck with dark grey. Insert 1 marker mid back of neck. Knit until 14-15-16-15-16-18 stitches past marker have been worked, turn, tighten yarn and purl 28-30-32-30-32-36 stitches. Turn and knit 42-45-48-45-48-54 stitches, turn, tighten yarn and purl 56-60-64-60-64-72 stitches back. Turn and knit 70-75-80-75-80-90 stitches, turn, tighten yarn and purl 84-90-96-90-96-108 stitches back. Turn piece, tighten yarn and knit until mid back. 

----------------------------------------------------------

START THE PIECE HERE:

----------------------------------------------------------

JUMPER - SHORT OVERVIEW OF THE PIECE:
Work piece in the round on circular needle, bottom up. Work sleeves in the round on double pointed needles.

BODY:
Cast on 240-262-282-306-334-366 stitches on circular needle size 3 mm with medium grey. Work rib (knit 1/purl 1) for 7 cm. Knit 1 round while decreasing 40-44-46-50-56-60 stitches evenly - read DECREASE/INCREASE TIP = 200-218-236-256-278-306 stitches. Switch to circular needle size 4 mm. Continue in stocking stitch. Insert 1 marker at the beginning of round and 1 marker after 100-109-118-128-139-153 stitches (= in the sides). REMEMBER THE KNITTING TENSION! When piece measures 30-31-32-32-34-35 cm, cast off 8-8-10-10-12-14 stitches in each side for armholes (i.e. cast off 4-4-5-5-6-7 stitches on each side of both markers) = 92-101-108-118-127-139 stitches remain on front and back piece. Put piece aside and work the sleeves.

SLEEVE:
Cast on 58-58-64-64-64-72 stitches on double pointed needles size 3 mm with medium grey. Work rib (= knit 1/purl 1) for 5 cm. Knit 1 round while decreasing 10-10-10-10-10-12 stitches evenly = 48-48-54-54-54-60 stitches. Insert 1 marker at beginning of round (= mid under sleeve). Switch to double pointed needles size 4 mm and work in stocking stitch in the round. When piece measures 9-9-9-7-9-8 cm, increase 2 stitches mid under sleeve - read INCREASE TIP. Increase like this every 7th-6th-7th-6th-5th-5th round 12-14-12-14-16-16 times in total = 72-76-78-82-86-92 stitches. When piece measures 42-41-41-39-40-39 cm (NOTE: Shorter measurements in the larger sizes because of wider shoulders), cast off the middle 8-8-10-10-12-14 stitches under sleeve = 64-68-68-72-74-78 stitches remain on needle. Put piece aside and knit another sleeve.

YOKE
Slip sleeves on to same circular needle as body where armholes were cast off = 312-338-352-380-402-434 stitches on needle. Insert 1 marker in every transition between sleeves and body = 4 markers. Work stocking stitch with medium grey. AT THE SAME TIME on next round decrease for RAGLAN – see explanation above (= 8 stitches decreased). Decrease like this every other round 2-2-3-3-3-3 times in total = 296-322-328-356-378-410 stitches. After last round with decrease knit 1 round while decreasing 24-34-24-32-36-32 stitches evenly = 272-288-304-324-342-378 stitches remain on needle. Then work pattern according to diagram A.1 (choose diagram for correct size = 17-18-19-18-19-21 repetitions on round). Read KNITTING TIP! Continue pattern like this and decrease as shown in diagram. When A.1 has been worked (finish after a round marked with arrow in diagram for correct size), there are 119-126-133-126-133-147 stitches on needle and piece measures approx. 56-58-60-62-64-66 cm from shoulder and down. For better fit work an elevation at the back of neck so that yoke is somewhat higher on back piece. This elevation can be skipped, to make the neck the same at the front and back - read ELEVATION. 

NECK EDGE:
Knit 1 round with dark grey while decreasing 25-30-35-26-29-39 stitches evenly = 94-96-98-100-104-108 stitches around the neck edge. Switch to a short circular needle size 3 mm. Work 2 ridges in GARTER STITCH - see explanation above, AT THE SAME TIME on last round increase 22-22-24-26-26-26 stitches evenly = 116-118-122-126-130-134 stitches. Then work rib = knit 1/purl 1. When rib measures 8 cm, work 1 ridge in garter stitch. Loosely cast off - make sure that the cast-off edge is not too tight. Fold neck edge double and sew on the inside, ridge against ridge.

ASSEMBLY:
Sew the openings under the sleeves.

This pattern has been corrected.

Updated online: 11.09.2018
Correction to BODY: Knit 1 round while decreasing 40-44-46-50-56-60 stitches evenly
Updated online: 22.10.2018
Correction: Switch to circular needle size 4 mm. Continue in stocking stitch. Insert 1 marker at the beginning of round and 1 marker after 100-109-118-128-139-153 stitches (= in the sides).
Updated online: 08.03.2022
New diagram A.1

Diagram

symbols = off white
symbols = light pearl grey
symbols = medium grey
symbols = dark grey
symbols = black
symbols = knit 2 together
diagram
diagram

Each of our patterns has specific tutorial videos to help you.

Do you have a question? See a list of frequently asked questions (FAQ)

Knitting tension is what determines the final measurements of your work, and is usually measured per 10 x 10 cm. It is provided like so: number of stitches in width x number of rows in height - eg: 19 stitches x 26 rows = 10 x 10 cm.

The knitting tension is very individual; some people knit/crochet loosely while others work tightly. You adjust the knitting tension with the needle size, which is why the suggested needle size is only meant as a guide! You need to adjust this (up or down) to ensure that YOUR knitting tension matches the knitting tension provided in the pattern. If you work with a different knitting tension than provided you will have a different yarn consumption, and your work will have different measurements than what the pattern suggests.

The knitting tension also determines which yarns can replace each other. As long as you achieve the same knitting tension you can replace one yarn with another.

See DROPS lesson: How to measure your tension/gauge

See DROPS video: How to make a gauge tension swatch

The required amount of yarn is provided in grams, eg: 450 g. To calculate how many balls you’ll need you first need to know how many grams are in 1 ball (25g, 50g or 100g). This information is available if you click on the individual yarn quality on our pages. Divide the amount required with the amount of each ball. For example, if each ball is 50g (the most common amount), the calculation will be as follows: 450 / 50 = 9 balls.

The important thing when changing from one yarn to another is that the knitting/crochet tension remains the same. This is so that the measurements of the finished piece will be the same as on the sketch provided. It is easier to achieve the same knitting tension using yarns from the same yarn group. It is also possible to work with multiple strands of a thinner yarn to achieve the knitting tension of a thicker one. Please try our yarn converter. We recommend you to always work a test swatch.

Please NOTE: when changing yarn the garment might have a different look and feel to the garment in the photo, due to individual properties and qualities of each yarn.

See DROPS lesson: Can I use a different yarn than the one mentioned in the pattern?

All our yarns are categorised into yarn groups (from A to F) according to thickness and knitting tension – group A contains the thinnest yarns and group F the thickest. This makes it easier for you to find alternative yarns to our patterns, should you wish to switch yarn. All yarns within the same group have a similar knitting tension and can easily replace each other. However, different yarn qualities have different structures and properties which will give the finished work a unique look and feel.

Click here for an overview of the yarns in each yarn group

At the top of all our patterns you’ll find a link to our yarn calculator, which is a helpful tool should you wish to use a different yarn than suggested. By filling in the yarn quality you wish to replace, the amount (in your size) and number of strands, the calculator will present good alternative yarns with the same knitting tension. Additionally it will tell you how much you’ll require in the new qualities and whether you’ll need to work with multiple strands. Most skeins are 50g (some are 25g or 100g).

If the pattern is worked with multiple colours, every colour will have to be calculated separately. Similarly, if the pattern is worked with several strands of different yarns (for example 1 strand Alpaca and 1 strand Kid-Silk) you will have to find alternatives for each, individually.

Click here to see our yarn calculator

Since different yarns have different qualities and textures we have chosen to keep the original yarn in our patterns. However, you can easily find options among our available qualities by using our yarn calculator, or simply pick a yarn from the same yarn group.

It is possible that some retailers still have discontinued yarns in stock, or that someone has a few skeins at home that they would like to find patterns for.

The yarn calculator will provide both alternative yarn as well as required amount in the new quality.

If you think it's hard to decide what size to make, it can be a good idea to measure a garment you own already and like the size of. Then you can pick the size by comparing those measures with the ones available in the pattern's size chart.

You'll find the size chart at the bottom of the pattern.

See DROPS lesson: How to read size chart

The needle size provided in the pattern serves only as a guide, the important thing is to follow the knitting tension. And since knitting tension is very individual, you will have to adjust the needle size to ensure that YOUR tension is the same as in the pattern – maybe you’ll have to adjust 1, or even 2 needle sizes, up or down to achieve the correct tension. For this, we recommend that you work test swatches.

Should you work with a different knitting tension than the one provided, the measurements of the finished garment might deviate from the measurement sketch.

See DROPS lesson: How to measure your tension/gauge

See DROPS video: How to make a tension/gauge swatch

Working a garment top-down provides more flexibility and room for personal adjustment. For example it is easier to try the garment on while working, as well as making adjustments to length of yoke and shoulder caps.

The instructions are carefully explaining every step, in the correct order. Diagrams are adjusted to the knitting direction and are worked as usual.

The diagram depicts all rows/rounds, and every stitch seen from the right side. It is read from bottom to top, from right to left. 1 square = 1 stitch.

When working back and forth, every other row is worked from the right side and every other row is worked from the wrong side. When working from the wrong side, the diagram will have to be worked reversed: from left to right, knit stitches are purled, purl stitches are knit etc.

When working in the round every round is worked from the right side and the diagram are worked from right to left on all rounds.

See DROPS lesson: How to read knitting diagrams

The diagram depicts all rows/rounds, and every stitch seen from the right side. It is worked from bottom to top, from right to left.

When working back and forth every other row is worked from the right side: from right to left and every other row is worked from the wrong side: from left to right.

When working in the round, every row in the diagram are worked from the right side, from right to left.

When working a circular diagram you start in the middle and work your way outwards, counter clockwise, row by row.

The rows usually start with a given number of chain stitches (equivalent to the height of the following stitch), this will either be depicted in the diagram or explained in the pattern.

See DROPS lesson: How to read crochet diagrams

Instructions for working several diagrams after each other on the same row/round, will often be written like so: “work A.1, A.2, A.3 a total of 0-0-2-3-4 times". This means you work A.1 once, then A.2 is worked once, and A.3 is repeated (in width) the number of times provided for your size – in this case like so: S = 0 times, M = 0 times, L=2 times, XL= 3 times and XXL = 4 times.

The diagrams are worked as usual: begin with the first row in A.1, then work the first row in A.2 etc.

See DROPS lesson: How to read knitting diagrams

See DROPS lesson: How to read crochet diagrams

The total width of the garment (from wrist-to-wrist) will be larger in the larger sizes, despite the actual sleeves being shorter. The larger sizes have longer sleeve caps and wider shoulders, so there will be a good fit in all sizes.

The measurement sketch/schematic drawing provides information regarding the full length of the garment. If it’s a jumper or a jacket the length is measured from the highest point on the shoulder closest to the neckline, and straight down to the bottom of the garment. It is NOT measured from the tip of shoulder. Similarly, the length of yoke is measured from the highest point on the shoulder and down to where yoke is split into body and sleeves.

On a jacket measures are never taken along bands, unless specifically stated. Always measure inside band stitches when measuring the length.

See DROPS lesson: How to read a schematic drawing

Diagrams are often repeated on the round or in height. 1 repeat is the diagram the way it appears in the pattern. If it says to work 5 repeats of A.1 in the round, then you work A.1 a total of 5 times after/next to each other in the round. If it says to work 2 repeats of A.1 vertically/in height you work the entire diagram once, then begin again at the start and work the entire diagram one more time.

Chain stitches are slightly narrower than other stitches and to avoid working the cast-on edge too tight, we simply chain more stitches to begin with. The stitch count will be adjusted on the following row to fit the pattern and measurement sketch.

The rib edge is more elastic and will contract slightly compared to, for example, stocking stitch. By increasing before the rib edge, you avoid a visible difference in width between the rib edge and the rest of the body.

It’s very easy to cast off too tightly, and by making yarn overs while casting off (and simultaneously casting these off) you avoid a too tight cast off edge.

See DROPS video: How to bind off with yarn overs (yo)

To achieve an even increase (or decrease) you can increase on, for example: every 3rd and 4th row alternately, like so: work 2 rows and increase on the 3rd row, work 3 rows and increase on the 4th. Repeat this until the increase is complete.

See DROPS lesson: Increase or decrease 1 st on every 3rd and 4th row alternately

Should you prefer to work in the round instead of back and forth, you may of course adjust the pattern. You’ll need to add steeks mid-front (usually 5 stitches), and follow the instructions. When you would normally turn and work from the wrong side, simply work across the steek and continue in the round. At the end you’ll cut the piece open, pick up stitches to work bands, and cover the cut edges.

See DROPS video: How to knit steeks and cut open

Should you prefer to work back and forth instead of in the round, you may of course adjust the pattern so you work the pieces separately and then assemble them at the end. Divide the stitches for the body in 2, add 1 edge stitch in each side (for sewing) and work the front and back pieces separately.

See DROPS lesson: Can I adapt a pattern for circular needles into straight needles?

Pattern repeats can vary slightly in the different sizes, in order to get the correct proportions. If you’re not working the exact same size as the garment in the photo, yours might deviate slightly. This has been carefully developed and adjusted so that the complete impression of the garment is the same in all sizes.

Make sure to follow instructions and diagrams for your size!

If you have found a pattern you like which is available in women’s size it’s not very difficult to convert it to men’s size. The biggest difference will be the length of sleeves and body. Start working on the women size that you think would fit across the chest. The additional length will be worked right before you cast off for the armhole/sleeve cap. If the pattern is worked top-down you can add the length right after the armhole or before the first decrease on sleeve.

Regarding additional yarn amount, this will depend on how much length you add, but it is better with a skein too many than too few.

All yarns will have excess fibres (from production) that might come off as lint or shedding. Brushed yarns (ie hairier yarns) have more of these loose, excess fibres, causing more shedding.

Shedding also depends on what is worn under or over the garment, and whether this pulls at the yarn fibres. It’s therefore not possible to guarantee that there will be no shedding

Below are some tips on how to get the best result when working with hairier yarns:

1. When the garment is finished (before you wash it) shake it vigorously so the looser hairs come off. NOTE: do NOT use a lint roller, brush or any method that pulls at the yarn.

2. Place the garment in a plastic bag and put it in your freezer - the temperature will cause the fibres to become less attached to each other, and excess fibres will come off easier.

3. Leave in the freezer for a few hours before taking it out and shaking it again.

4. Wash the garment according to the instructions on the yarn label.

Pilling is a natural process that happens to even the most exclusive of fibers. It's a natural sign of wear and tear that is hard to avoid, and that is most visible in high friction areas of your garment like a sweater's arms and cuffs.

You can make your garment look as new by removing the pilling, using a fabric comb or a pill/lint remover.

Still can't find the answer you need? Then scroll down and leave your question so one of our experts can try to help you. This will be done normally within 5 to 10 working days.
In the meantime, you can read the questions and answers that others have left to this pattern or join the DROPS Workshop on Facebook to get help from fellow knitters/crocheters!

You might also like...

Night Shades

Becky, United States

Night Shades

Ingrid, Belgium

Night Shades

Heike, Sweden

Night Shades

Jette, Denmark

Night Shades

Bettina Sundman, Finland

195-19 Night Shades

Jette, Denmark

Night Shades

Krista, Finland

Night Shades

Veerle, Belgium

Post a comment to pattern DROPS 195-19

We would love to hear what you have to say about this pattern!

If you want to leave a question, please make sure you select the correct category in the form below, to speed up the answering process. Required fields are marked *.

Comments / Questions (152)

country flag Pia Noren wrote:

Hej igen Er det læst korrekt at mønsteret først beynder når ærmerne er sat på bærestykket, synes ikke det tydeligt fremgår af opskrift Hilsen Pie

05.11.2020 - 22:00

country flag Chantal wrote:

Bonjour, Je n'ai pas compris comment diminuer les manches dans le modèle 195-19 où placer le marqueur ? (placer un marqueur au début du tour (=milieu sous la manche) augmenter 2 mailles au milieu du tour sous la manche ... les augmentations se font sur un seul côté ou sur les 2 côtés de la manche ? Merci beaucoup Chantal

28.10.2020 - 13:41

DROPS Design answered:

Bonjour Chantal, le marqueur est placée au début du tour (= entre la dernière maille montée et la première maille montée); après les côtes, on diminue à intervalles réguliers (= cf cette leçon) puis on augmente comme expliqué sous AUGMENTATIONS (sous les manches) - autrement dit ces augmentations vont se trouver au milieu sous le bras/sous la manche, 1 à la fin du tour et 1 au début du tour. En espérant que ces explications complémentaires à celles d'hier vont vous aider. Bon tricot!

28.10.2020 - 15:36

country flag Chantal wrote:

Bonjour, Je ne comprends pas les explications Manches du modèle DROPS 195-19 On tricote sur deux aiguilles n°4 et on place un marqueur en début de tour ? à quoi cela sert-il ? Ensuite on explique qu'il faut diminuer 2 mailles sous la manche ? on augmente 1 maille à chaque début de tour ? il est clair qu'on travaille pas en circulaire n'est-ce pas ? Je suis perdue : faire un jeté = on augmente 2 mailles ? Bref ... merci pour votre aide Chantal

27.10.2020 - 14:02

DROPS Design answered:

Bonjour Chantal, les manches se tricotent en rond, d'abord sur les aiguilles doubles pointes, puis sur l'aiguille circulaire (quand on n'a plus suffisamment de place sur les aiguilles doubles pointes). On place un marqueur au début du tour, c'est le changement des tours et en même temps le milieu sous la manche, c'est ainsi de chaque côté de ce marqueur que l'on va d'abord augmenter puis rabattre les mailles pour l'emmanchure. Après les côtes, on va effectivement diminuer pour que la largeur de la manche avec les aiguilles 4 soit la bonne (on a besoin de davantage de mailles avec les aiguilles 3 en côtes qu'avec les 4 en jersey pour la même circonférence). Bon tricot!

27.10.2020 - 16:01

country flag Chantal wrote:

Bonjour, Je commence les manches du modèle 195-19 , pouvez-vous m'indiquer avec combien d'aiguilles ? pour 58 mailles deux aiguilles à embouts me semblent très petites ... Merci beaucoup

26.10.2020 - 14:42

DROPS Design answered:

Bonjour Chantal, vous pouvez tricoter avec les mailes réparties sur 4 aiguilles (14 m sur 2 aiguilles et 15 m sur 2 aiguilles) et tricoter avec la 5ème aiguille, et changer pour l'aiguille circulaire de 40 cm dès que vous serez un peu à l'étroit sur les double-pointes, mais vous pouvez également tricoter la manche sur une longue circulaire en magic loop. Bon tricot!

27.10.2020 - 11:36

country flag Margot wrote:

Hi, I have casted off the neck very loosely and am now trying to sew the neck edge double. Do you have a tutorial video showing how to do this or could you explain how to do it so that it doesn't twist? Every time I try to sew the casted off edge to the inside, the ribbing of the collar becomes skewed either to the left or right.

25.10.2020 - 22:43

DROPS Design answered:

Dear Margot, could this video help you to manage to sew the neck edge? Do not hesitate to contact your DROPS store, they might have more tips for you. Happy knitting!

26.10.2020 - 09:07

country flag Marianne Verduin wrote:

Ik het lijf en de 2 mouwen af en heb ze nu gezamenlijk op de rondbreipen gezet. Maar nu kan ik de steken van de mouwen nauwelijks breien, want die zijn "in de rondte" gebreid. Hoe los ik dat op?

08.10.2020 - 13:43

DROPS Design answered:

Dag Marianne,

Ja, dat is in het begin even een lastig stukje, maar na een aantal naalden gaat het vaak al een stuk beter. Je kunt bij de overgang van het pand naar de mouw of op de lastige stukjes steeds de rondbreinaald eruit trekken volgens de 'magic loop' methode, zoals uitgelegd in deze video

10.10.2020 - 10:33

country flag Pauline Upton wrote:

I am knitting this in the large size. I think the length should be adjusted for the body of the sweater as to follow the directions and make the body 12-1/2 inches up to the armhole is way too short. This would only reach the waist. I am making it at least 17", if not 18", and will have to hope I can purchase more wool in the same colour.

05.10.2020 - 21:30

country flag Nancy Vranken wrote:

Wordt de trui niet te kort met 32 CM voor het lijf , en dan de mouwen ?

04.10.2020 - 21:53

DROPS Design answered:

Dag Nancy

Nee hoor, de afmetingen kloppen. Ook de afmetingen in de tekening. Natuurlijk kun je de trui wat langer maken als je dat lievert hebt. Onderaan in de tekening kun je de totale lengte vinden, vanaf de opzetrand tot de hals. Als je de trui langer wilt hebben, kun je er een paar cm bij breien, voordat je afkant voor de armsgaten.

05.10.2020 - 11:07

country flag Susan Pickering wrote:

Hi. Are the measurements actual size or is there an easement of 2inches/4cm. Thank you

16.09.2020 - 11:41

DROPS Design answered:

Dear Mrs Pickering, all measurements in chart are finished measurements in each size, taken flat, in cm - measure a similar garment you like to compare the measurements and choose the correct size - read more here. Happy knitting!

16.09.2020 - 13:09

country flag Simone Kraaipoel wrote:

In dit patroon worden na het breien van de boorden heel veel steken geminderd. Klopt dat wel? Wordt het dan niet een veel te losse boord? ik hoor het heel graag.. want op het plaatje van het patroon is het niet goed tezien hoe de trui dan valt.

05.09.2020 - 17:38

DROPS Design answered:

Dag Simone,

Ja hoor dat klopt. Vaak wordt er inderdaad juist gemeerderd, maar in dit patroon is dat niet de bedoeling. Het meerderen wordt gedaan om het samentrekken van de boord a.h.w. te compenseren, waardoor de boordsteek doorloopt ipv samentrekt.

11.09.2020 - 13:41